Authentication in React Native with Firebase

This article was peer reviewed by Adrian Sandu. Thanks to all of SitePoint’s peer reviewers for making SitePoint content the best it can be!
React Native is one of the most popular choices for creating cross-platform mobile apps with JavaScript and React.
Essential for many apps is registering and authenticating users, and in this tutorial I’m going to use Firebase to implement authentication in a React Native app.
I’m testing on Android but the code in this tutorial should work on iOS as well. I am assuming that you’ve worked with React Native before, so I’m not going to go into details of all React Native code. If you’re new to React Native I recommend you read my previous tutorial on how to Build an Android App with React Native.
Here’s how the final app will look:

The final code is on GitHub.
Creating a Firebase App
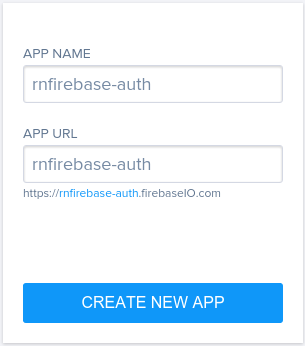
To work with Firebase, you first have to create an app on Firebase. Login to your dashboard and create a new app. You will need to change the name to something unique.
Once created, click the manage app button, then login & auth and update the session length to your liking. This setting allows you to change the amount of time each user session will remain valid. I usually stick with 5 weeks, this means that the user will have to login every 5 weeks.
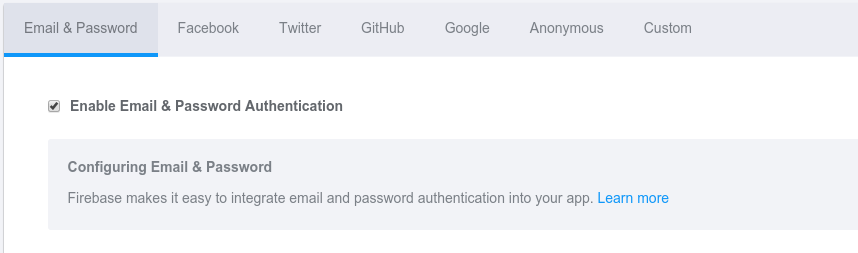
Next, enable email & password authentication which allows users to create or login to an account with an email and password combination.
Building the App
The app will be a bare-bones login system with a login page, signup page and account page. The user will login with an email and password. If the account is valid, the user will be redirected to an account page where user info and a logout button displayed. Clicking the logout button destroys the Firebase session, clears the local storage and returns the user to the login page.
Set Up
Create the project by executing the following command:
react-native init rnfirebaseauth
Next, install React native gifted spinner and Firebase:
npm install react-native-gifted-spinner firebase --save
As the name suggests, ‘React native gifted spinner’ allows you to create spinners for indicating that the app is loading something. This app will use a spinner whilst communicating with Firebase.
Directory Structure
Create a src folder inside your project directory and inside create a components, pages, and styles folder.
Your directory structure should now look like this:
rnfirebaseauth
    android
    ios
    node_modules
    package.json
    index.android.js
    index.ios.js
    src
        components
        pages
        styles
Here’s what each folder in the src directory will be for:
- components: Contains custom components used by the app. Mainly for convenience so you don’t have to write a lot of code when using different UI components such as buttons and headers.
- pages: Contains individual pages of the app.
- styles: Contains common styles used throughout the app.
Components
Button
The button component allows you to create buttons. It uses props to specify the button text, styles and the function to execute when the button is pressed. Create components/button.js and add the following code:
'use strict';
import React, {
  AppRegistry,
  Component,
  Text,
  View,
  TouchableHighlight
} from 'react-native';

export default class button extends Component {

  render(){
    return (
      <View>
        <TouchableHighlight underlayColor={"#E8E8E8"} onPress={this.props.onpress} style={this.props.button_styles}>
          <View>
              <Text style={this.props.button_text_styles}>{this.props.text}</Text>
          </View>
        </TouchableHighlight>
      </View>
    );
  }
}

AppRegistry.registerComponent('button', () => button);
Header
The header component allows you to create headers. A header has a title and a spinner which shows when the loaded props is false. The spinner uses the React native gifted spinner installed earlier. Create components/header.js and add the following code:
'use strict';
import React, {
  AppRegistry,
  Component,
  StyleSheet,
  Text,
  TextInput,
  View
} from 'react-native';

import GiftedSpinner from 'react-native-gifted-spinner';

export default class header extends Component {

  render(){
    return (
      <View style={styles.header}>
        <View style={styles.header_item}>
          <Text style={styles.header_text}>{this.props.text}</Text>
        </View>
        <View style={styles.header_item}>
        {  !this.props.loaded &&
            <GiftedSpinner />
        }
        </View>
      </View>
    );
  }


}

const styles = StyleSheet.create({
  header: {
    padding: 10,
    flexDirection: 'row',
    alignItems: 'center',
    marginBottom: 20,
    flex: 1
  },
  header_item: {
    paddingLeft: 10,
    paddingRight: 10
  },
  header_text: {
    color: '#000',
    fontSize: 18
  }
});

AppRegistry.registerComponent('header', () => header);
Pages
Signup Page
The signup page is the default page of the app and allows the user to create an account. Create pages/signup.js and add the following:
'use strict';
import React, {
  AppRegistry,
  Component,
  Text,
  TextInput,
  View
} from 'react-native';

import Button from '../components/button';
import Header from '../components/header';

import Login from './login';

import Firebase from 'firebase';

let app = new Firebase("YOUR-FIREBASE-APP-URL");

import styles from '../styles/common-styles.js';

export default class signup extends Component {

  constructor(props){
    super(props);

    this.state = {
      loaded: true,
      email: '',
      password: ''
    };
  }

  signup(){

    this.setState({
      loaded: false
    });

    app.createUser({
      'email': this.state.email,
      'password': this.state.password
    }, (error, userData) => {

      if(error){
        switch(error.code){

          case "EMAIL_TAKEN":
            alert("The new user account cannot be created because the email is already in use.");
          break;

          case "INVALID_EMAIL":
            alert("The specified email is not a valid email.");
          break;

          default:
            alert("Error creating user:");
        }

      }else{
        alert('Your account was created!');
      }

      this.setState({
        email: '',
        password: '',
        loaded: true
      });

    });

  }

  goToLogin(){
    this.props.navigator.push({
      component: Login
    });
  }

  render() {
    return (
      <View style={styles.container}>
        <Header text="Signup" loaded={this.state.loaded} />
        <View style={styles.body}>

            <TextInput
                style={styles.textinput}
                onChangeText={(text) => this.setState({email: text})}
                value={this.state.email}
            placeholder={"Email Address"}
            />
          <TextInput
            style={styles.textinput}
            onChangeText={(text) => this.setState({password: text})}
            value={this.state.password}
            secureTextEntry={true}
            placeholder={"Password"}
          />
          <Button
            text="Signup"
            onpress={this.signup.bind(this)}
            button_styles={styles.primary_button}
            button_text_styles={styles.primary_button_text} />

          <Button
            text="Got an Account?"
            onpress={this.goToLogin.bind(this)}
            button_styles={styles.transparent_button}
            button_text_styles={styles.transparent_button_text} />
        </View>
      </View>
    );
  }
}

AppRegistry.registerComponent('signup', () => signup);
Breaking down the code above. First import react native and extract every thing needed from the React class.
import React, {
  AppRegistry,
  Component,
  Text,
  TextInput,
  View
} from 'react-native';
Import the button and header components:
import Button from '../components/button';
import Header from '../components/header';
Import the login page:
import Login from './login';
Import the Firebase library and create a reference to the Firebase app that you created earlier by specifying the URL given to the app.
Note: Instead of specifying the whole URL such as http://your-app-name.firebasio.com it should be your-app-name.firebaseio.com. You will also need to replace YOUR-FIREBASE-APP-URL in every file.
import Firebase from 'firebase';

let app = new Firebase("YOUR-FIREBASE-APP-URL");
Import the common styles:
import styles from '../styles/common-styles.js';
Create a new component and export it to be importable in other files.
export default class signup extends Component {
    ...
}
In the constructor, set the default state. loaded sets whether to show the spinner. If loaded is true then the spinner is hidden, otherwise the spinner is visible. The email and password are the default values for the email and password text fields.
constructor(props){
  super(props);

  this.state = {
    loaded: true,
    email: '',
    password: ''
  };
}
The signup method executes when the user taps the signup button. First setting loaded to false to show the spinner. Then call the createUser method in the firebase app. This method accepts an object containing the users email and password as its first argument, and a callback function as its second. If the error is not empty, alert the user based on the code property of the error. Otherwise assume that the account was created. Lastly set the email and password to an empty string to reset the value of the text fields.
signup(){

  this.setState({
    loaded: false
  });

  app.createUser({
    'email': this.state.email,
    'password': this.state.password
  }, (error, userData) => {

    if(error){
      switch(error.code){

        case "EMAIL_TAKEN":
          alert("The new user account cannot be created because the email is already in use.");
        break;

        case "INVALID_EMAIL":
          alert("The specified email is not a valid email.");
        break;

        default:
          alert("Error creating user:");
      }

    }else{
      alert('Your account was created!');
    }

    this.setState({
      email: '',
      password: '',
      loaded: true
    });

  });

}
The goToLogin function navigates to the login page. This works by using the Navigator component’s push method. The push method accepts an object containing the component that you want to display.
goToLogin(){
  this.props.navigator.push({
    component: Login
  });
}
The render method displays the UI of the component. It has a header, a text field for entering the email and password, a button for signing up and a button for navigating to the login page.
render() {
  return (
    <View style={styles.container}>
      <Header text="Signup" loaded={this.state.loaded} />
      <View style={styles.body}>

        <TextInput
          style={styles.textinput}
          onChangeText={(text) => this.setState({email: text})}
          value={this.state.email}
          placeholder={"Email Address"}
        />
        <TextInput
          style={styles.textinput}
          onChangeText={(text) => this.setState({password: text})}
          value={this.state.password}
          secureTextEntry={true}
          placeholder={"Password"}
        />
        <Button
          text="Signup"
          onpress={this.signup.bind(this)}
          button_styles={styles.primary_button}
          button_text_styles={styles.primary_button_text} />

        <Button
          text="Got an Account?"
          onpress={this.goToLogin.bind(this)}
          button_styles={styles.transparent_button}
          button_text_styles={styles.transparent_button_text} />
      </View>
    </View>
  );
}
Note the value of loaded in the state as the value for the loaded attribute in the header. This allows control over showing the spinner from the parent component.
<Header text="Signup" loaded={this.state.loaded} />
For the text fields specify the onChangeText attribute and pass in an arrow function that will update the value of that specific field in the state.
onChangeText={(text) => this.setState({password: text})}
For the password field, there is another attribute called secureTextEntry set to true to specify that the characters typed should be hidden.
secureTextEntry={true}
For the buttons, notice the use of bind for the signup function instead of executing it directly when the button is pressed. This is because methods in es6 aren’t automatically bound to the current class.
<Button
  text="Signup"
  onpress={this.signup.bind(this)}
  button_styles={styles.primary_button}
  button_text_styles={styles.primary_button_text} />
Login Page
The login page is for logging in users. Create pages/login.js and add the following code:
'use strict';
import React, {
  AppRegistry,
  Component,
  StyleSheet,
  Text,
  TextInput,
  View,
  AsyncStorage
} from 'react-native';

import Button from '../components/button';
import Header from '../components/header';

import Signup from './signup';
import Account from './account';

import Firebase from 'firebase';

let app = new Firebase("YOUR-FIREBASE-APP-URL");

import styles from '../styles/common-styles.js';

export default class login extends Component {

  constructor(props){
    super(props);

    this.state = {
      email: '',
      password: '',
      loaded: true
    }
  }

  render(){
    return (
      <View style={styles.container}>
        <Header text="Login" loaded={this.state.loaded} />
        <View style={styles.body}>
          <TextInput
            style={styles.textinput}
            onChangeText={(text) => this.setState({email: text})}
            value={this.state.email}
            placeholder={"Email Address"}
          />
          <TextInput
            style={styles.textinput}
            onChangeText={(text) => this.setState({password: text})}
            value={this.state.password}
            secureTextEntry={true}
            placeholder={"Password"}
          />

          <Button
            text="Login"
            onpress={this.login.bind(this)}
            button_styles={styles.primary_button}
            button_text_styles={styles.primary_button_text} />

          <Button
            text="New here?"
            onpress={this.goToSignup.bind(this)}
            button_styles={styles.transparent_button}
            button_text_styles={styles.transparent_button_text} />
        </View>
      </View>
    );
  }

  login(){

    this.setState({
      loaded: false
    });

    app.authWithPassword({
      "email": this.state.email,
      "password": this.state.password
    }, (error, user_data) => {

      this.setState({
        loaded: true
      });

      if(error){
        alert('Login Failed. Please try again');
      }else{
        AsyncStorage.setItem('user_data', JSON.stringify(user_data));
        this.props.navigator.push({
          component: Account
        });
      }
    });


  }

  goToSignup(){
    this.props.navigator.push({
      component: Signup
    });
  }

}

AppRegistry.registerComponent('login', () => login);
Nothing new here except for the login function. The login function calls the authWithPassword method from the Firebase app, passing an object containing the users’ email and password and a callback function to execute once a response is returned. If there are no errors in the response, use AsyncStorage to store the user data in local storage by calling the setItem method in the AsyncStorage object. This method accepts the name of the item and its value.
Note: You can only store strings, so we use the JSON.stringify method to convert the user_data object to a string. After that, navigate to the account page or alert the user that the login has failed.
login(){

  this.setState({
    loaded: false
  });

  app.authWithPassword({
    "email": this.state.email,
    "password": this.state.password
  }, (error, user_data) => {

    this.setState({
      loaded: true
    });

    if(error){
      alert('Login Failed. Please try again');
    }else{
      AsyncStorage.setItem('user_data', JSON.stringify(user_data));
      this.props.navigator.push({
        component: Account
      });
    }
  });


}
Account Page
The account page displays the basic info of the current user. Create pages/account.js and add the following:
'use strict';
import React, {
  AppRegistry,
  Component,
  StyleSheet,
  Text,
  View,
  Image,
  AsyncStorage
} from 'react-native';

import Button from '../components/button';
import Header from '../components/header';

import Login from './login';

import styles from '../styles/common-styles.js';

import Firebase from 'firebase';

let app = new Firebase("YOUR-FIREBASE-APP-URL");

export default class account extends Component {

  constructor(props){

    super(props);
    this.state = {
      loaded: false,
    }

  }

  componentWillMount(){

    AsyncStorage.getItem('user_data').then((user_data_json) => {
      let user_data = JSON.parse(user_data_json);
      this.setState({
        user: user_data,
        loaded: true
      });
    });

  }

  render(){

    return (
      <View style={styles.container}>
        <Header text="Account" loaded={this.state.loaded} />
        <View style={styles.body}>
        {
          this.state.user &&
            <View style={styles.body}>
              <View style={page_styles.email_container}>
                <Text style={page_styles.email_text}>{this.state.user.password.email}</Text>
              </View>
              <Image
                style={styles.image}
                source={{uri: this.state.user.password.profileImageURL}}
              />
              <Button
                  text="Logout"
                  onpress={this.logout.bind(this)}
                  button_styles={styles.primary_button}
                  button_text_styles={styles.primary_button_text} />
            </View>
        }
        </View>
      </View>
    );
  }

  logout(){

    AsyncStorage.removeItem('user_data').then(() => {
      app.unauth();
      this.props.navigator.push({
        component: Login
      });
    });

  }

}

const page_styles = StyleSheet.create({
  email_container: {
    padding: 20
  },
  email_text: {
    fontSize: 18
  }
});
Unlike the other pages created so far, this page has a componentWillMount method. This method executes before the component gets mounted so is the perfect place to get the user data from local storage. This time it uses the getItem method from the AsyncStorage object, which accepts the name of the item as its argument. To get the stored value, use the then method and pass in a function. This function will then have the value passed into it as an argument. Convert the value back to an object using JSON.parse then set it into the current state. This way you can use this.state.user to extract any information from the user object.
componentWillMount(){

  AsyncStorage.getItem('user_data').then((user_data_json) => {
    let user_data = JSON.parse(user_data_json);
    this.setState({
      user: user_data,
      loaded: true
    });
  });

}
Inside the render method is a new component called Image. This allows you to display an image much like the img element in HTML, but specifying a source attribute with an object containing a uri property. This uri property refers to the URL of the image you want to display.
<Image
  style={styles.image}
  source={{uri: this.state.user.password.profileImageURL}} />
Styles
Each of the components included src/styles/common-styles.js but this hasn’t been created yet. The file serves as the global stylesheet for the whole app. Create the file and add the following code:
'use strict';
import React, {
  StyleSheet
} from 'react-native';

module.exports = StyleSheet.create({
  container: {
    flex: 1,
  },
  body: {
    flex: 9,
    alignItems: 'center',
    backgroundColor: '#F5FCFF',
  },
  textinput: {
    height: 40,
    borderColor: 'red',
    borderWidth: 1
  },
  transparent_button: {
    marginTop: 10,
    padding: 15
  },
  transparent_button_text: {
    color: '#0485A9',
    fontSize: 16
  },
  primary_button: {
    margin: 10,
    padding: 15,
    backgroundColor: '#529ecc'
  },
  primary_button_text: {
    color: '#FFF',
    fontSize: 18
  },
  image: {
    width: 100,
    height: 100
  }
});
Bringing Everything Together
Now bring everything together by replacing the code in index.android.js with the below, or index.ios.js if you want to deploy to iOS.
'use strict';
import React, {
  AppRegistry,
  Component,
  Text,
  View,
  Navigator,
  AsyncStorage
} from 'react-native';

import Signup from './src/pages/signup';
import Account from './src/pages/account';

import Header from './src/components/header';

import Firebase from 'firebase';

let app = new Firebase("YOUR-FIREBASE-APP-URL");

import styles from './src/styles/common-styles.js';

class rnfirebaseauth extends Component {

  constructor(props){
    super(props);
    this.state = {
      component: null,
      loaded: false
    };
  }

  componentWillMount(){

    AsyncStorage.getItem('user_data').then((user_data_json) => {

      let user_data = JSON.parse(user_data_json);
      let component = {component: Signup};
      if(user_data != null){
        app.authWithCustomToken(user_data.token, (error, authData) => {
          if(error){
            this.setState(component);
          }else{
            this.setState({component: Account});
          }
        });
      }else{
        this.setState(component);
      }
    });

  }

  render(){

    if(this.state.component){
      return (
        <Navigator
          initialRoute={{component: this.state.component}}
          configureScene={() => {
            return Navigator.SceneConfigs.FloatFromRight;
          }}
          renderScene={(route, navigator) => {
            if(route.component){
              return React.createElement(route.component, { navigator });
            }
          }}
        />
      );
    }else{
      return (
        <View style={styles.container}>
          <Header text="React Native Firebase Auth" loaded={this.state.loaded} />
          <View style={styles.body}></View>
        </View>
      );
    }

  }

}

AppRegistry.registerComponent('rnfirebaseauth', () => rnfirebaseauth);
The componentWillMount method checks if there is user_data stored in local storage. As with the account page earlier, use AsyncStorage.getItem to get the data from local storage and then parse it. If it returns null, then assume that there is nothing in the local storage and update the state to set the signup page as the current page. Otherwise, try to authenticate the user with the token from the last time they tried to login with their email and password by calling app.authWithCustomToken and passing the user token. If this succeeds, set the current page to the account page, or set it to the signup page.
componentWillMount(){

  AsyncStorage.getItem('user_data').then((user_data_json) => {

    let user_data = JSON.parse(user_data_json);
    let component = {component: Signup};
    if(user_data != null){
      app.authWithCustomToken(user_data.token, (error, authData) => {
        if(error){
          this.setState(component);
        }else{
          this.setState({component: Account});
        }
      });
    }else{
      this.setState(component);
    }
  });

}
Inside the render method, check if a component is set in the state. As you saw earlier from the constructor method, this is null so the else statement will execute by default. Inside the else statement is the default UI that shows when opening the app. Once the state is updated, the render method is called again, this time executing the code inside the if condition.
if(this.state.component){
  return (
    <Navigator
      initialRoute={{component: this.state.component}}
      configureScene={() => {
        return Navigator.SceneConfigs.FloatFromRight;
      }}
      renderScene={(route, navigator) => {
        if(route.component){
          return React.createElement(route.component, { navigator });
        }
      }}
    />
  );
}else{
  return (
    <View style={styles.container}>
      <Header text="React Native Firebase Auth" loaded={this.state.loaded} />
      <View style={styles.body}></View>
    </View>
  );
}
Inside the if condition, the Navigator component handles navigation between pages. This accepts the initialRoute and renderScene attributes and an optional configureScene attribute to customize the animation when navigating between pages. The initialRoute allows you to specify an object containing information about the default component to render using the navigator. The renderScene method accepts the function that will render the component with route and navigator passed as an argument to this function. The route is the object passed in the initialRoute attribute.
With route.component you get the actual reference to the component and render it using React.createElement. The second argument is an object containing the props you want to pass to the rendered component. In this case, the navigator object is passed, which contains all the methods needed for navigating between different pages.
If you look at the code for each of the pages (login, signup, account) you’ll see that the navigator object is used as this.props.navigator since it was passed as props.
<Navigator
      initialRoute={{component: this.state.component}}
      configureScene={() => {
        return Navigator.SceneConfigs.FloatFromRight;
      }}
      renderScene={(route, navigator) => {
        if(route.component){
          return React.createElement(route.component, { navigator });
        }
      }} />
What Next?
In this tutorial you created an app that authenticates users using Firebase with an email and password combination. Firebase offers a lot more features when it comes to authentication. You might have noticed earlier when you created the app that Firebase allows you to use Facebook, Twitter, Github, Google, Anonymous and Custom logins as well. If you’re looking into other ways for authenticating your users, I recommend you check those options out.
You also learned how to use AsyncStorage for persisting user data locally. This allows the app to persist login state across subsequent app launches.
Firebase provides you with functionality essential for mobile apps, I hope you found this tutorial useful and welcome your comments and questions.