How to Publish Responsive Websites with Sketch and Launchpad

Anima have built two super-useful Sketch Plugins. Auto Layout helps designers create responsive layouts in Sketch, and Launchpad exports the responsive design as a near-finished HTML/CSS website with decent code quality. TL;DR — watch the video…
"Wait…another site builder? Really?"
Well, Launchpad is more of an HTML/CSS exporter with some impressive features. It's not your typical WYSIWYG editor, since you're actually doing the design work in Sketch, a top-notch user interface design tool. You still need a developer who can take the 4-star code output and turn it into a 5-star website, but it will nonetheless save you huge amounts of time. Here's what Launchpad can actually do:
- Responsive design (if combined with Auto Layout)
- Videos, links and forms
- Font-family fallbacks
- Publishing, hosting and domains
- SEO (title, meta description, etc)
- Social media meta tags (Open Graph, etc)
- Version control
- Google Analytics (or similar) integration
- Keyboard-centric workflow (very Sketch-like!)
Here's what you need to do manually, with code, afterward:
- Insert custom meta tags, if any
- Insert any Schema markup, if needed
- Refine the adaptive/responsive qualities, if required
- Code any JavaScript needed
- Code any backend functionality
- Minification and other web perf tricks
Launchpad offers you the tools to build a static website, a foundation that you can build upon. It'll save you countless hours of your valuable time, but it won't take you to the finish line. This is a good thing because little code optimisations have a big impact on SEO and conversions, so these are the things you'll want to do manually.
Let's learn how to use it!
Make sure you've downloaded Launchpad first. Don't worry about Auto Layout, because it's automatically bundled into Launchpad now. We have Lots to cover, but I'll keep it brief!
Responsive Design with Sketch and Auto Layout
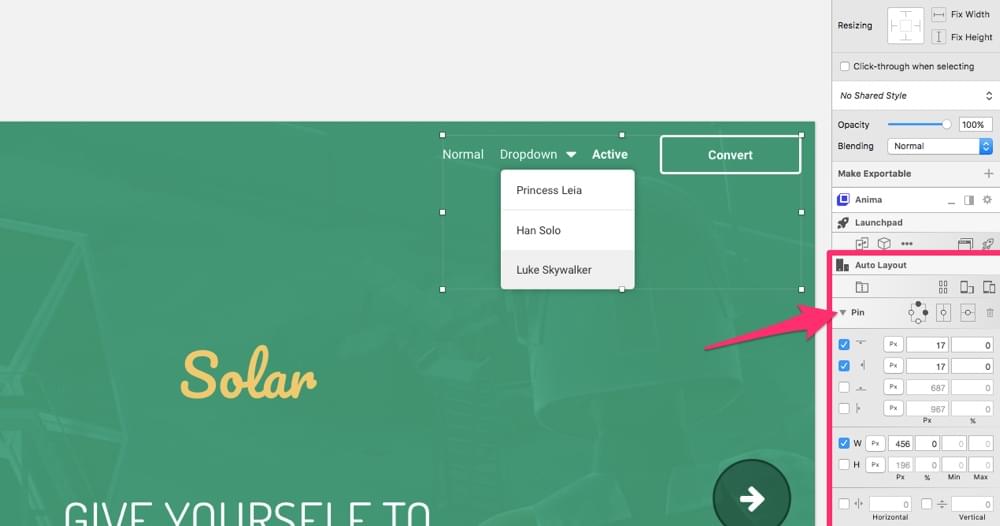
First, let's float a Group of layers/objects to the top-right corner of the parent container (which in this case is the Artboard itself). Open the "Pin" dropdown in the Auto Layout tab in the Inspector, and check both the top and right checkboxes (or click on the dots on the visual representation).
Also, ensure that the offset (from the Artboard) is "17px" on both sides (top and right), and hit the "W" checkbox to declare the Group as having a fixed-width (otherwise, when the container/Artboard is resized, the responsive object will be squashed up as if declared as being a % of the container).
For the HTML/CSS developer guys out there, "pinning" can mimic floated elements (
float:leftorfloat:right) or positioned elements (position:fixedorposition:absolute) combined withtop:right:bottom:orleft:.
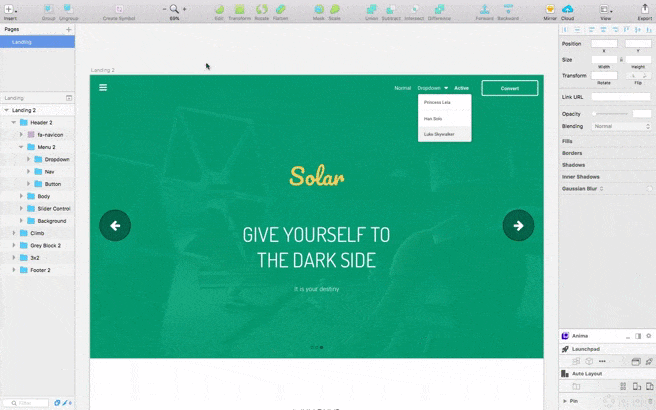
Here's how it looks when resized (notice how the other elements are getting squashed up, but our pinned elements are remaining fixed to the top-right corner of the Artboard):
What else can Auto Layout do?
Pinning is the tip of the iceberg. Auto Layout also helps you:
- Align objects vertically/horizontally
- Declare an objects' width (and min/max-width) in % or px
- Define an offset in % or px
- Rapidly switch between "Portrait" and "Landscape" for testing
- Switch to another Artboard Preset for testing in other devices
- Navigate using a visual diagram or traditional checkbox UI
- Create "Stacks", the Sketch equivalent of flexbox
As mentioned above, these layout options translate to CSS when exported with Launchpad (yes, even the flexbox/Stack settings). Have a play around with it. It's super-straightforward, so you won't have any trouble learning how to align objects or switch between the different device Artboards and orientations.
Links
Each Artboard is basically a webpage, so linking up screens is easy.
Let's set the homepage first.
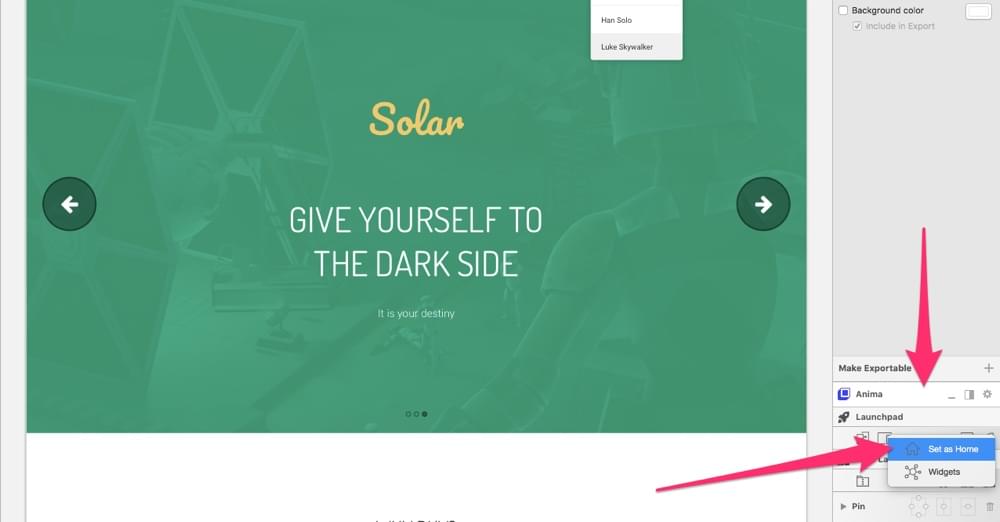
Set Homepage
Just underneath the Launchpad heading in the Inspector, click the … icon and select the "Set as Home" option. Pretty simple stuff so far—we’ll work up to the complex stuff.
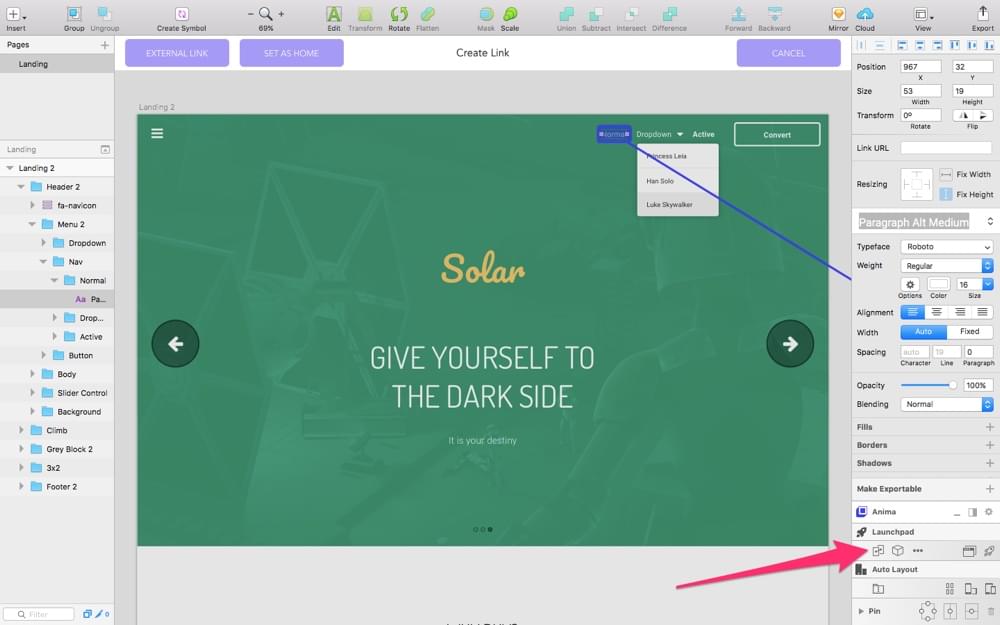
Create Link
Now select a layer on the canvas (which is to be a link to another Artboard/webpage), and click the Create Link icon (which resembles two Artboards that are linked by a line).
Next, click on the desired destination Artboard to establish the link (you may have to zoom out if the Artboard isn't visible, like in the screenshot below). Alternatively, you can choose the "EXTERNAL LINK" or "SET AS HOME" options, which link to external websites and whatever the homepage Artboard is, respectively.
Videos
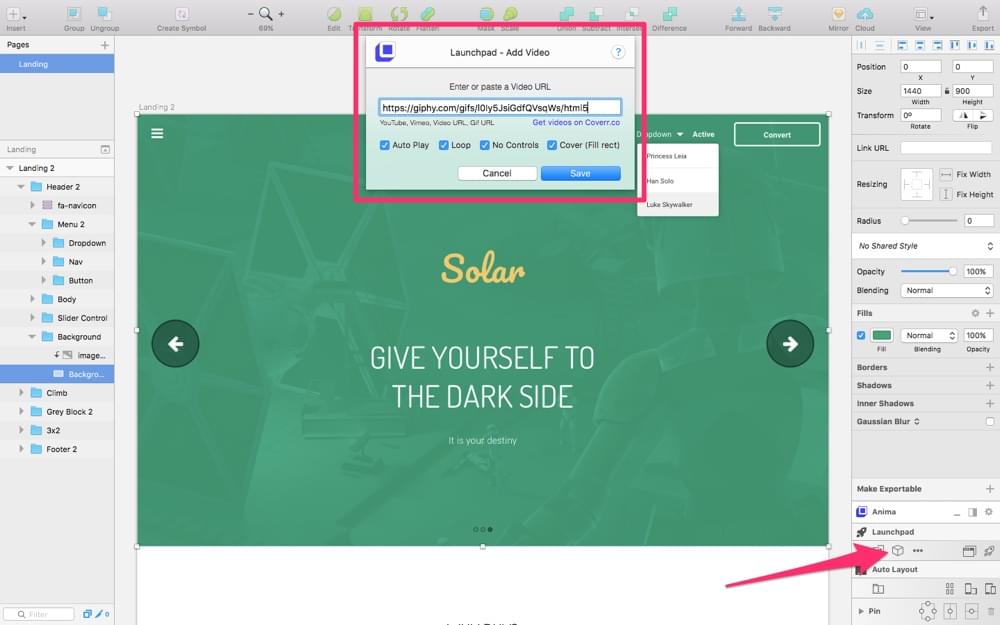
Video has various uses, but since they're not something we'd typically include on all websites (because they do take a while to load), it's easy to forget their HTML markup.
Besides, some videos use the <video> tag, whereas others, like YouTube videos, are embeddable using an <iframe>. Depending on where you're embedding the video from, there are additional options like "Auto Play", "Loop", "No Controls" and "Cover". YouTube videos are quite restrictive, so Loop is the only customisable option; however, if you used a service like Giphy, you could convert and embed YouTube videos (or upload your own) as GIFs and HTML5 videos, depending on the sort of functionality you need to offer (HTML5 video, for example, would be embeddable as a background).
Embed videos by select on a shape on the canvas, then by clicking on the box icon in the Inspector, choosing "Video Player", then pasting the video URL into the field.
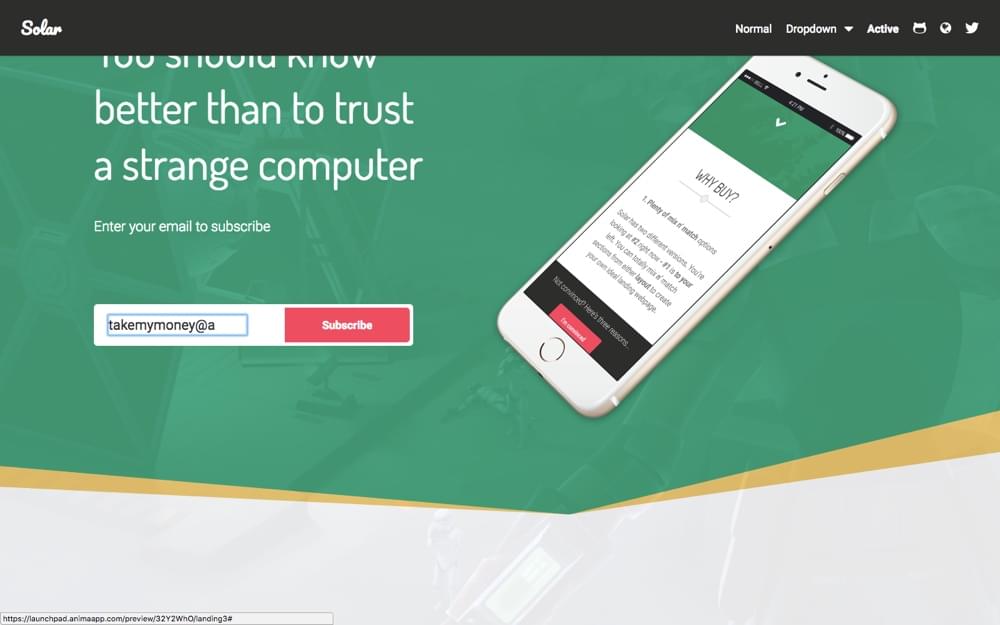
Forms
Forms are broken down into two sections: the various input fields and the submit buttons. We'll start with input fields.
Hit the box icon once more, then "Forms", then "Text Input".
Done, simple! When converted to a static website, this element will be an input field (<input type="text" value="value">).

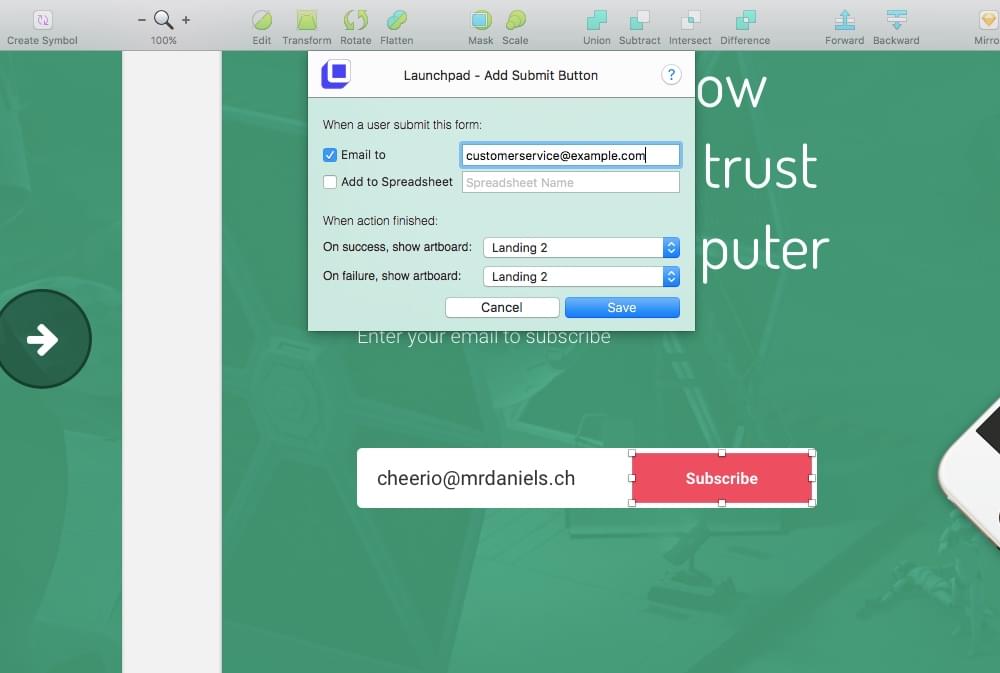
Next, submit buttons—repeat the steps, but select "Submit Button" this time. Now it's important to bare in mind that Launchpad does not create dynamic websites (as mentioned earlier), so JavaScript functionality is disabled. Form functionality is catered towards contact forms, hence the first customisable option is "Email to"—this is where the form data (as specified in the text layer/input field) will be sent to.
You can also specify two Artboards where the user may be sent to upon making a mistake in the form, or successfully completing it. Naturally, you'll be responsible for coding up the form validation after Launchpad has exported the website; as discussed, Launchpad delivers the barebones HTML/CSS, so it's up to you (or a developer) to take this to the finish line.
Hover Effects
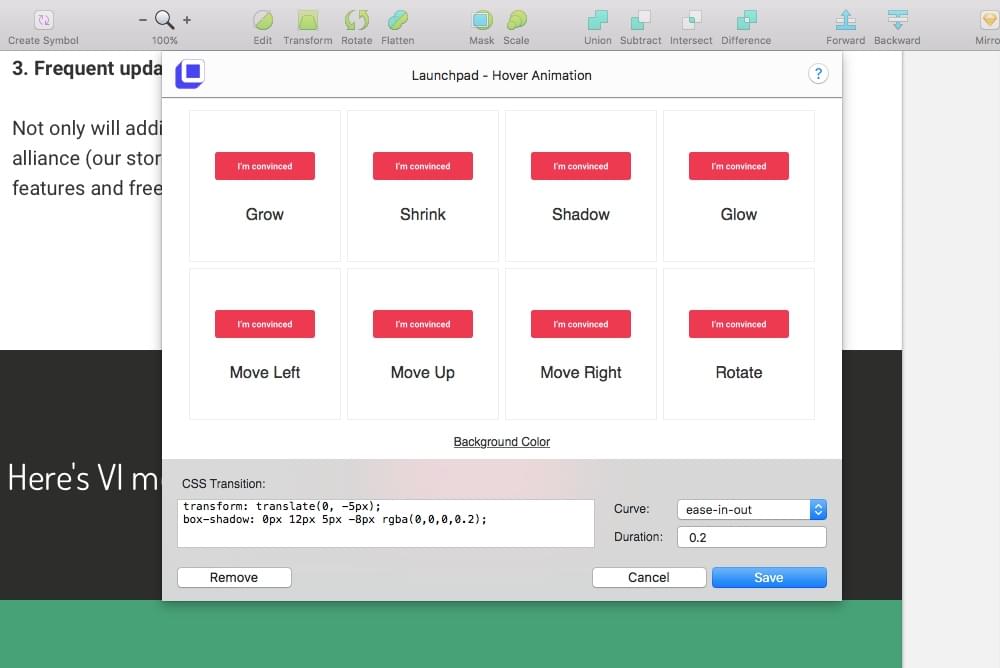
… icon → "Hover Effects".
So this feature is pretty much about CSS transitions. What I like about this feature is that there are a range of transitions that you can click-and-apply (move left, move right, …, rotate, grow, shrink, shadow, …), and the code output will automatically display in the edit-field for you to customise to your liking.
For basic transitions like background-color animations, you can write your own CSS in this field. Either way, you'll end this step by choosing the easing animation (ease-in-out, ease-in, ease-out, ease and linear) and animation duration.
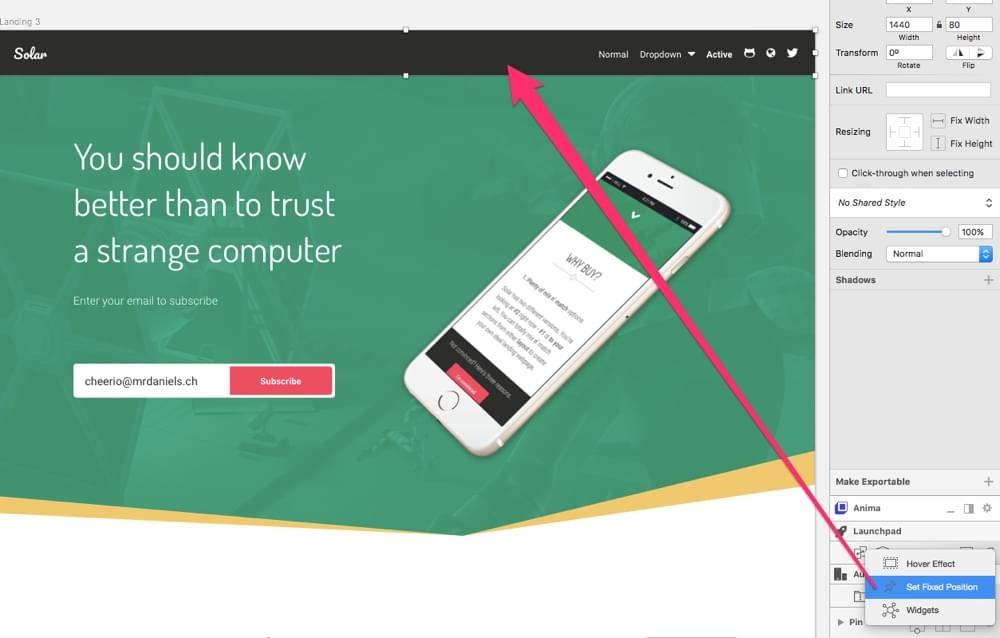
Fixed Positioning
… icon → "Fixed Position" does exactly what you'd assume it does. It defines fixed components (position:fixed in CSS) such as fixed headers, fixed footers, scroll-to-top buttons, live chat widgets, and other types of always-visible elements.
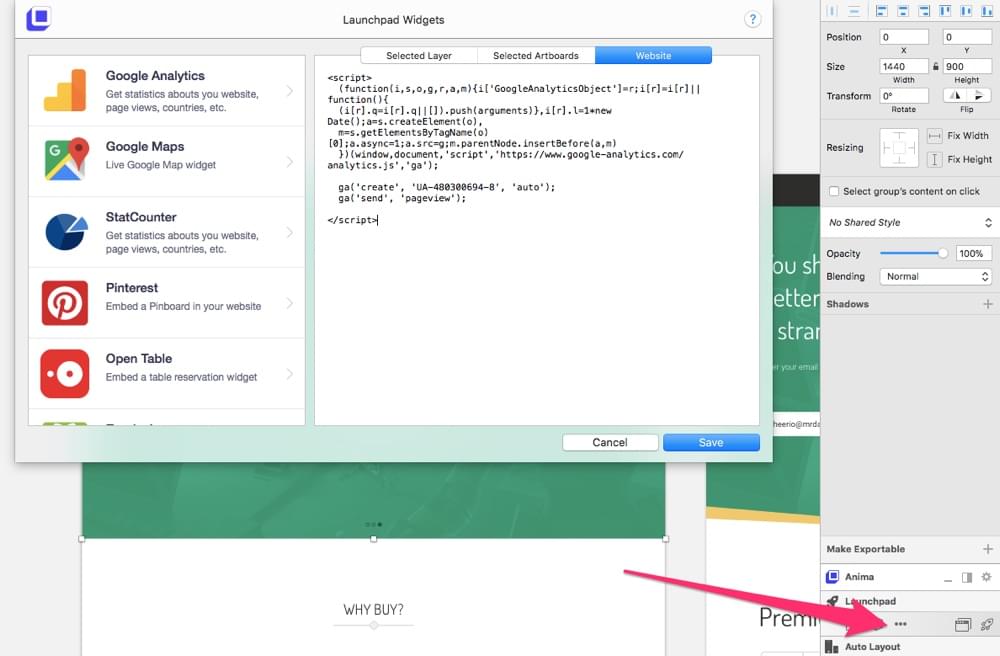
Widgets
Widgets are where things become a little more interesting (… icon → "Widgets"). Straight away you'll notice that the following widgets are available to embed into your site:
- Crisp.im (live chat)
- Usersnap (collect user feedback)
- Juicer.io (social media feeds)
- Gumroad (embeddable buy buttons)
- HubSpot (inbound marketing)
- Marketo (marketing automation)
- Mailchimp (for collecting subscribers)
- Google Analytics (website analytics)
- Google Maps (embeddable maps)
- Statcounter (alternative to Google Analytics)
- Pinterest (embed Pinboards)
- Open Table (table reservation widget)
- Zendesk (customer support)
- More coming soon!
As you can see, some of these widgets (like Google Analytics) work behind the scenes on every webpage, and some are visible to the user (but not only on every webpage—some may only appear only once on a specific screen). That's is why this modal has three tabs to insert your embed codes: Selected Layer, Selected Artboards and Website. Click on a widget to receive full instructions as to how to obtain the embed code.
Font Fallbacks
Basically a comma-separated list of font fallbacks, for those cases where the user doesn't have that font installed, or when the custom font cannot be loaded. Font fallbacks are standard in web design, so this feature was always going to be included.
You'll have to locate this feature from the Sketch menu bar (Plugins → Launchpad by Anima → CSS – Font-family fallbacks).

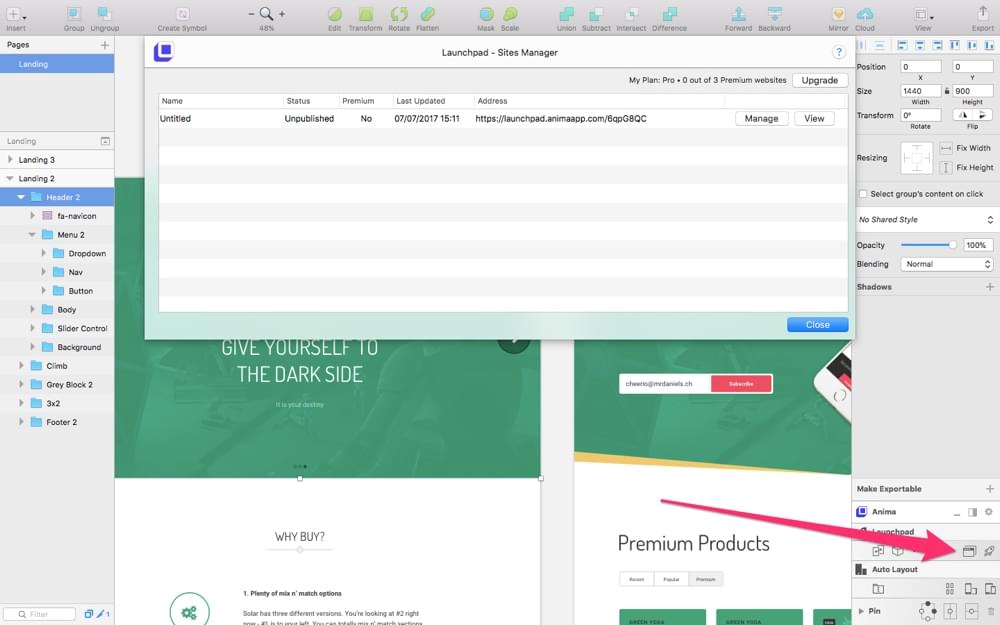
Sites Manager
Hit the browser tabs icon to open Sites Manager, and then click "Manage" to open the site manager modal.
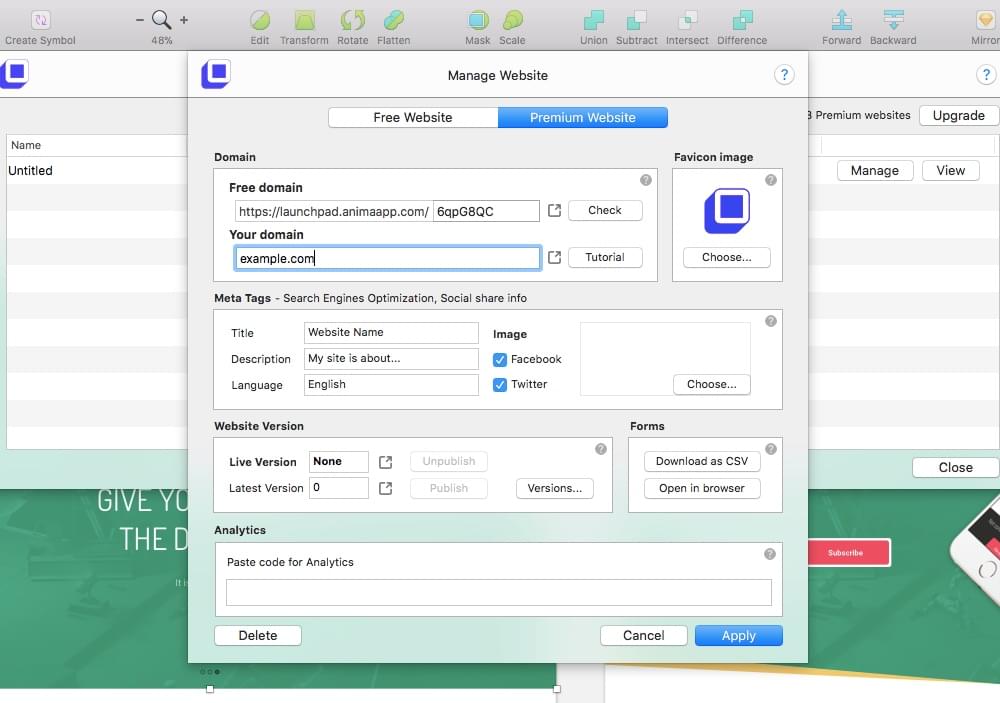
First, title and meta tags.
While there’s hundreds of meta tags, some required, some important, and others with special use-cases, Launchpad focuses on the two most important ones: the <title> tag, which contributes heavily to SEO, and the <meta name="description" content="description"> tag, which affects organic conversions.
You can also optionally specify the language of the website, which translates to, for example: <html lang="en">.
And of course, there's the option to upload an image to be used with Facebook/Twitter Open Graph (sharing on social media), and an input field to define the domain name of the website (with a quick tutorial on how to change CNAME and A records).
Version control can also be accessed from here, where it's fairly easy to click through older versions of the website that are both numbered and timestamped, and see, visually, what those versioned looked like and then roll back to an earlier version.
Publishing and Code Output Review
Now for the most important question: what is the quality of the code output like? Utterly unusable or crispy clean? Let's find out. Hit the rocket icon (in the Launchpad interface, as usual) to allow Launchpad to begin uploading your design to the web, and after that click "Open" in the following dialog to see it in action.
Pretty okay, right? A couple of snags to watch out for:
- Default browser styles will always override yours
- If you have two font styles in the same text layer, only one of them will take affect
- Occasionally something may be slightly "off", but can usually be fixed by simplifying or reorganizing the layer list/document structure
- Sometimes image masks didn't work as expected, but I could overcome this by inserting the image as a layer fill instead (to be fair, I should have done that anyway)
- Stacked/tiled components displayed very unexpected behaviour, although it wasn't too hard to figure out that Launchpad had used
display:inline-blockwhendisplay:blockwas desired—when this happens use Auto Layout Stacks, which mimics the behaviour of CSS Flexbox (which worked splendidly)
Mostly, the code output was fine and the image assets were optimised. It wasn't horrendously bloated, but there were a couple instances where <div> is used instead of a more semantic HTML element. Not a huge deal, since I'd always want to spend an hour cleaning up the code anyway (and an hour is much quicker than a few hours spent coding it from scratch).
Although…
- CSS code was internal, which is not ideal
- @import was used for font embeds (which is notoriously slow)
- If you have a lot of Groups, you'll end up a lot of
<div>‘s
I only hit a couple of minor snags and I was able to fix them with ease as soon as I figured out what I was doing wrong, for this reason, my rating is a solid 9/10!
Bonus: Keyboard Shortcuts
Launchpad doesn't come with any shortcuts, but if you navigate to Plugins → Launchpad by Anima → Keyboard Shortcuts you'll be able to record your own custom ones.
Conclusion
All-in-all, I'd totally recommend Launchpad for designing websites and exporting them as static HTML/CSS. WYSIWYG editors have never sat well with serious designers, but when you combine a serious design tool with a Sketch Plugin that outputs production-ready code, we have something that's truly changing the way that designers design, even if we do need to tweak the code output once the HTML/CSS has been exported.
So, what are your thoughts on Auto Layout and Launchpad?
- Was the code output clean?
- How much more coding did you need to do?
- Was the design truly responsive?
- Was it easy to link up your domain?