Automating Amazon EC2 Instance Backup and Recovery, Part Two

Part Two: Recovering an EC2 Instance from a Snapshot.
Skill Level: Intermediate.
Operating System(s): Linux.
Last Time in Part One…
We left off at the end of part one with a scheduled snapshot running from cron once every day. In part two, we will learn how to recover a failed AWS EBS-backed EC2 instance from a snapshot with just a few commands.
Disaster Scenarios
What are some of the situations which would force us to do a full instance recovery? Here are just a few:
- Filesystem corruption
- Malicious intrusion
- Hardware failure
- Extended Amazon general outage affecting your instance but not others
- Human error
Recovery Scenarios
You have another EC2 instance
This is my preferred approach. Since I maintain multiple instances, they all have the cron backups running, and so therefore all have the ability to perform recovery tasks as well. If you have another instance, but it does not yet have the EC2 API tools installed and working, please review Part One for instructions on how to set this up.
You do not have another instance
Below are some possible options to consider:
- Create an new T1.micro “admin-only” instance. They are quite inexpensive on a monthly basis and still give you full functionality. They are cheap enough to keep running full time so you don’t have to fuss during a crisis.
- Use these instructions to clone your existing single instance. This could potentially be costly if you are running a large instance and make an exact RUNNING copy of it. A less costly way would be to clone the instance and keep it powered off until needed.
- Use your home system to provide the functionality. Please see John Degner’s excellent tutorial for instructions. Detailed instructions for this solution are beyond the scope of this tutorial, but these examples can easily be used in this situation.
Choose a Method – AWS Console or Command-Line
Included in this tutorial are both methods – GUI and CLI. Each has advantages, and I leave it up to you to pick the one you prefer…
Prerequisites:
- Successful completion of Part One, specifically
/opt/bin/instanceid, and/opt/bin/ec2do. - GUI method: access to the AWS Management Console Web GUI
- CLI method: root access to a running AWS EC2 EBS-backed Linux instance – for example:
ssh -i AWSKeyPair.pem ec2-user@{yourInstance_FQDN_or_IP}
% sudo su
root@yourInstance#
The AWS Management Console GUI Plan
- Gather information about your instance(s).
- Gather information about your available snapshots.
- Create an Amazon Machine Image (AMI) from a chosen snapshot.
- Launch a new instance from the AMI just created.
GUI Method: Information About the Instance
It is easy to customize the columns in the Instance view to display just what you need:
- Click on Instances in the left navigation menu
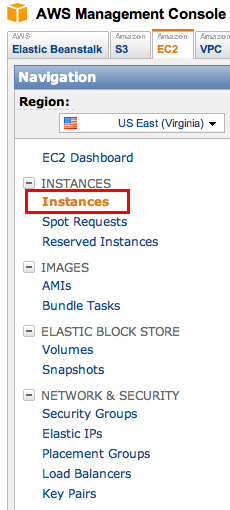
- Click the Show/Hide button to the right

- Select the needed columns and click Apply

- Locate and record the following information:
AMI ID, Root Device Name, Type, Security Groups, Key Pair Name, and Kernel ID
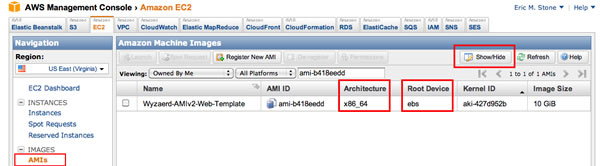
- Click on AMIs in the left navigation menu, then enter the AMI ID from the previous step into the indicated box. That AMI will appear below. Click the Show/Hide button so that the Architecture and Root device are checked, then click Apply. Verify that the root device is EBS, and record the Architecture:
GUI Method: Create an AMI from Snapshot
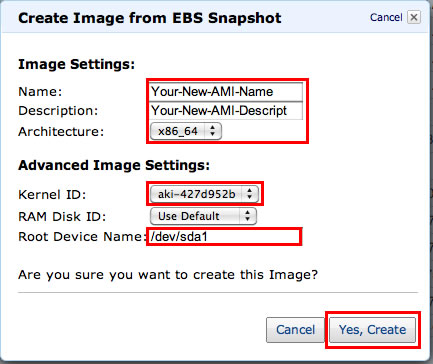
- Click on Snapshots in the left navigation menu, then click on the “Started” column title until the latest snapshots are at the top. Read through the descriptions until you find one that is a snapshot of a ROOT (/), BOOTABLE filesystem. Once located, click on it once and make sure the checkbox in the first column is checked. Also record the Capacity. Finally, click on the “Create Image” button.

- Fill out the form with the information you have recorded along the way and click “Yes, Create”.
GUI Method: Launch Instance from AMI
- Click on AMIs in the left navigation menu, then type in the name of your new AMI in the search box. Click once on the line and verify that the checkbox is checked at the beginning of the line.

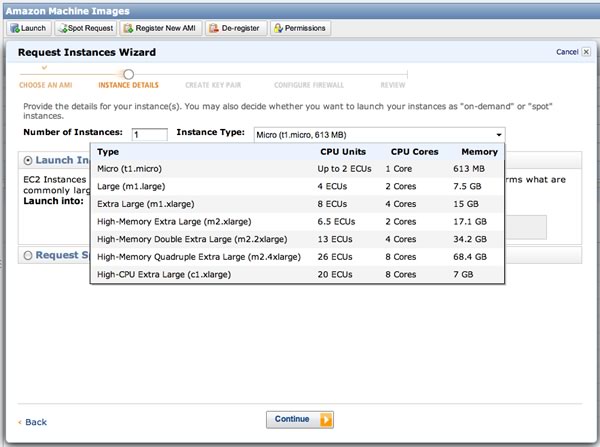
- At this point, the Launch button should be come enabled. Click it and the Request Instances Wizard appears. Select the instance type you desire, then click Continue:
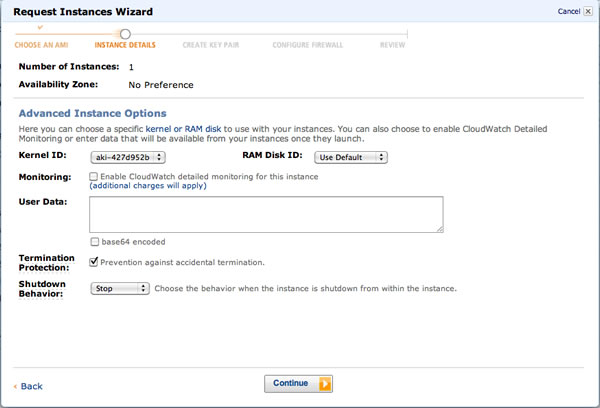
- Next, specify the kernel ID and check the Accidental Termination Prevention box, then click Continue:
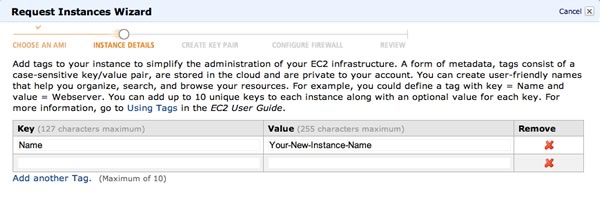
- Type in the name for your new AMI, then click Continue:
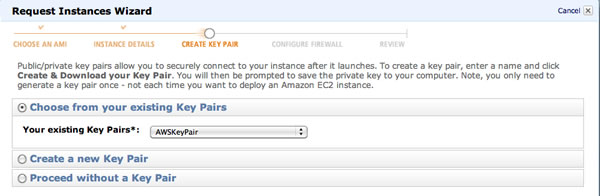
- Choose a key pair, then click Continue:
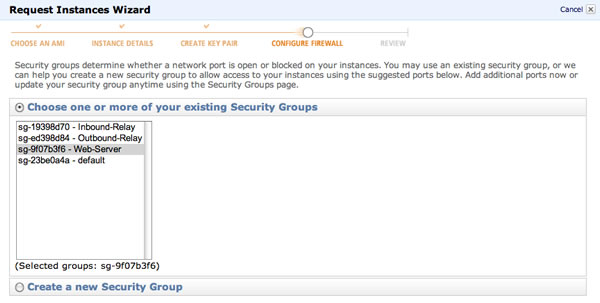
- Choose or create a security group, then click Continue:
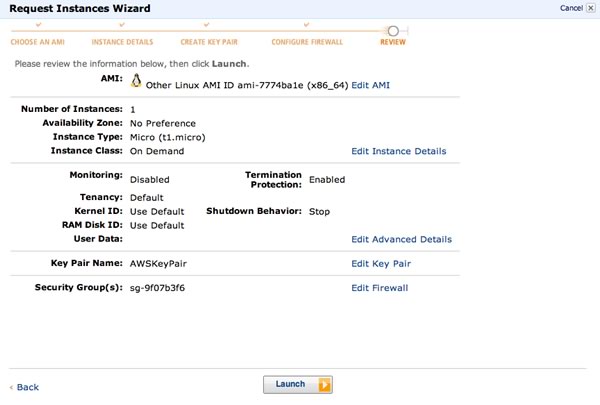
- Finally, verify all information, then click Launch:
If you have gotten this far, then you have successfully cloned an instance using the GUI Console method. Congratulations!
The Command-Line Plan
- Install the example scripts found below.
- Gather information about your instance(s).
- Gather information about your available snapshots.
- Create the instance clone and launch it.
CLI Method: Script Installation
The scripts found at the bottom of this tutorial help automate each step of the process, providing key bits of the workflow that allow us to quickly get the job done.
IMPORTANT: Please create each of these scripts in the /opt/bin directory, making sure to insert your specific values wherever you see curly brackets {}.
Also, please be sure to set execute permissions properly on all of the new scripts:
root@yourInstance# chmod 750 /opt/bin/*CLI Method: Information About the Instance
We need to gather a bit of data before we can proceed. Best practice is to keep a record of the instance configuration PRINTED out and EASILY accessible. The ‘-l’ (ell) option tells the script to operate in LOCAL mode, which only outputs information for the current instance, and also tells you the OS architecture. The non-local invocation of this script does NOT provide the OS arch.
# /opt/bin/instanceinfo -l
ami=ami-31509058
arch=i686
device=/dev/sda1
group=Web-Server
instanceid=i-29765a07
kernel=aki-407d9529
keypair=AWSKeyPair
privatedns=ip-10-100-100-100.ec2.internal
privateip=10.100.100.100
publicdns=ec2-100-200-200-200.compute-1.amazonaws.com
publicip=100.200.200.200
region=us-east-1a
type=c1.medium
volume=vol-723ebc42
CLI Method: Information About Available Snapshots
Find available snapshots for the desired volume:
# /opt/bin/ec2do describe-snapshots | grep {VOLUME_FROM_LAST_STEP}Choose the snapshot you wish to use as the source for the clone and proceed to the create clone step!
CLI Method: Create and Launch the Clone
# /opt/bin/clone -a x86_64 -n "MY-AMI-FROM-SNAPSHOT" -d "AMI-FROM-SNAP-20110818" -r "/dev/sda1" -s "snap-248adc04" -kern aki-427d952b -z 10 -g "My-Security-Group" -t "t1.micro" -k "KeyPairNameHere"Options for /opt/bin/clone
-a OS architecture (/bin/arch)
-n New AMI Name
-d New AMI description
-r Root device
-s Snapshot ID
-kern Kernel ID
-z Size of the new volume
-g Security group to use for the new instance
-t Type of instance to launch
-k Key pair to use for the new instance
If you have gotten this far, then you have successfully cloned an instance using the Command Line method. Congratulations!
CLI Method: Scripts
IMPORTANT: Please create each of these scripts in the /opt/bin directory, making sure to insert your specific values wherever you see curly brackets {}.
Also, please be sure to set execute permissions properly on all of the new scripts:
root@yourInstance# chmod 750 /opt/bin/*/opt/bin/instanceinfo
Here is a simple Perl script to output the list of the items to find for each instance you have:
#!/usr/bin/perl
#
## instanceinfo
#
use strict;
$|  = 1;

my $args		= {};
$args->{'local'}	= 0;
$args->{'instanceid'}	= '';
while ($ARGV[0] =~ /^-/) {
	$_ = shift;
	$args->{'local'}	= 1,	next if /^-l$/;
}

if ($args->{'local'}) {
	$_	= `/opt/aws/bin/ec2-metadata -i`;
	$args->{'instanceid'}	= (split)[1];
}

open(IN,"/opt/bin/ec2do describe-instances $args->{instanceid} |") or die;

my $settings			= {};
chomp($settings->{1}->{'arch'}	= `/bin/arch`) if $args->{'local'};

my $counter	= 0;
while (<IN>) {
	if (/^RESERVATION/) {
		$counter ++;
		$settings->{$counter}->{'group'} = (split)[3];
	}
	if (/^INSTANCE/) {
		next unless /running/;
		my @line	= split;
		$settings->{$counter}->{'ami'} = $line[2];
		$settings->{$counter}->{'publicdns'} = $line[3];
		$settings->{$counter}->{'privatedns'} = $line[4];
		$settings->{$counter}->{'keypair'} = $line[6];
		$settings->{$counter}->{'type'} = $line[8];
		$settings->{$counter}->{'region'} = $line[10];
		$settings->{$counter}->{'kernel'} = $line[11];
		$settings->{$counter}->{'publicip'} = $line[13];
		$settings->{$counter}->{'privateip'} = $line[14];
	}
	if (/^BLOCKDEVICE/) {
		my @line	= split;
		$settings->{$counter}->{'device'} = $line[1];
		$settings->{$counter}->{'volume'} = $line[2];
	}
	if (/^TAG/ and /name/i) {
		$settings->{$counter}->{'name'} = (split)[4];
	}
}

foreach my $counter (sort keys %$settings) {
	print '='x60,"n$settings->{$counter}->{name}n",'='x60,"n";
	foreach my $key (sort keys %{$settings->{$counter}}) {
		print "$key=$settings->{$counter}->{$key}n";
	}
}
/opt/bin/ec2run
This script wrapper simply allows us to launch a new instance when we need to, with a proper environment at all times.
Please be sure to modify the example below to include your specific information.
#!/bin/bash
#
## ec2run Wrapper
#
export EC2_HOME='/opt/aws/apitools/ec2'  # Make sure you use the API tools, not the AMI tools
export EC2_BIN=$EC2_HOME/bin
export EC2_PRIVATE_KEY=/root/.ec2/pk-{your_32_char_rand}.pem
export EC2_CERT=/root/.ec2/cert-{your_32_char_rand}.pem
export PATH=$PATH:$EC2_BIN
export JAVA_HOME=/usr/java/latest
/opt/aws/bin/ec2run $*
/opt/bin/clone
The main shell script for this tutorial is clone, which allows us to create an exact copy of a snapshot as a running instance.
Please be sure to modify the example below to include your specific information.
#!/usr/bin/perl
#
## clone
#
use strict;
$|	= 1; # unbuffered output

#######################################################################################################
## some defaults - change these to match your environment, or override from the command line

my $settings	= {};
$settings->{'snap'}	= '';
$settings->{'name'}	= '';
$settings->{'desc'}	= '';
$settings->{'key'}	= 'AWSKeyPair';
$settings->{'type'}	= 't1.micro';
$settings->{'kern'}	= 'aki-427d952b';
$settings->{'arch'}	= 'x86_64';
$settings->{'size'}	= 10;
$settings->{'group'}	= 'Production';
$settings->{'root'}	= '/dev/sda1';

#######################################################################################################
## Process the command line
while ($ARGV[0] =~ /^-/) {
	$_ = shift;
	$settings->{'arch'}	= shift,	next if /^-a$/;
	$settings->{'desc'}	= shift,	next if /^-d$/;
	$settings->{'key'}	= shift,	next if /^-k$/;
	$settings->{'kern'}	= shift,	next if /^-kern$/;
	$settings->{'name'}	= shift,	next if /^-n$/;
	$settings->{'snap'}	= shift,	next if /^-s$/;
	$settings->{'type'}	= shift,	next if /^-t$/;
	$settings->{'size'}	= shift,	next if /^-z$/;
	$settings->{'group'}	= shift,	next if /^-g$/;
	$settings->{'root'}	= shift,	next if /^-r$/;
}

#######################################################################################################
## more defaults...
chomp($settings->{'desc'}	= 'AMI-FROM-SNAPSHOT-' . `/bin/date '+%Y%m%d'`) unless $settings->{'desc'};

#######################################################################################################
## CREATE AN AMI LINKED TO THE SNAPSHOT
my $cmd	= qq|/opt/bin/ec2do register -n $settings->{name} -d $settings->{desc} --root-device-name $settings->{root} -b "$settings->{root}=$settings->{snap}" -a $settings->{arch} --kernel $settings->{kern}|;
print "Executing: $cmdn";
chomp($_ = `$cmd`);
my $ami	= (split)[1];
print "New AMI ID: $amin";

#######################################################################################################
## LAUNCH THE NEW AMI
$cmd	= qq|/opt/bin/ec2run $ami -b "$settings->{root}=snap-$settings->{snap}:$settings->{size}:true" -g $settings->{group} -t $settings->{type} -k $settings->{key}|;
print "Executing: $cmdn";
system($cmd);

print "Done.n";
Summary
Congratulations! Great job – you have automated your recovery.
Resource Links
http://aws.amazon.com/ec2/faqs/
http://docs.amazonwebservices.com/AWSEC2/latest/CommandLineReference/
From Zero to Cloud: Setting up an EC2 Sandbox, Part 2
AlexGul Images on Shutterstock