How to Use Varnish and Cloudflare for Maximum Caching

This article is part of a series on building a sample application — a multi-image gallery blog — for performance benchmarking and optimizations. (View the repo here.)
As we can see in this report, our site’s landing page loads very quickly and generally scores well, but it could use another layer of caching and even a CDN to really do well.
To learn more about GTMetrix and other tools you can use to measure and debug performance, see Improving Page Load Performance: Pingdom, YSlow and GTmetrix.
Let’s use what we’ve learned in our previous Varnish post, along with the knowledge gained in the Intro to CDN and Cloudflare posts to really tune up our server’s content delivery now.
Varnish
Varnish was created solely for the purpose of being a type of super-cache in front of a regular server.
Note: Given that Nginx itself is a pretty good server already, people usually opt for one or the other, not both. There’s no harm in having both, but one does have to be wary of cache-busting problems which can occur. It’s important to set them both up properly so that the cache of one of them doesn’t remain stale while the other’s is fresh. This can lead to different content being shown to different visitors at different times. Setting this up is a bit outside the context of this post, and will be covered in a future guide.
We can install Varnish by executing the following:
curl -L https://packagecloud.io/varnishcache/varnish5/gpgkey | sudo apt-key add -
sudo apt-get update
sudo apt-get install -y apt-transport-https
The current list of repos for Ubuntu does not have Varnish 5+ available, so additional repositories are required. If the file /etc/apt/sources.list.d/varnishcache_varnish5.list doesn’t exist, create it. Add to it the following:
deb https://packagecloud.io/varnishcache/varnish5/ubuntu/ xenial main
deb-src https://packagecloud.io/varnishcache/varnish5/ubuntu/ xenial main
Then, run:
sudo apt-get update
sudo apt-get install varnish
varnishd -V
The result should be something like:
$ varnishd -V
varnishd (varnish-5.2.1 revision 67e562482)
Copyright (c) 2006 Verdens Gang AS
Copyright (c) 2006-2015 Varnish Software AS
We then change the server’s default port to 8080. We’re doing this because Varnish will be sitting on port 80 instead, and forwarding requests to 8080 as needed. If you’re developing locally on Homestead Improved as instructed at the beginning of this series, the file you need to edit will be in /etc/nginx/sites-available/homestead.app. Otherwise, it’ll probably be in /etc/nginx/sites-available/default.
server {
    listen 8080 default_server;
    listen [::]:8080 default_server ipv6only=on;
Next up, we’ll configure Varnish itself by editing /etc/default/varnish and replacing the default port on the first line (6081) with 80:
DAEMON_OPTS="-a :80 \
   -T localhost:6082 \
   -f /etc/varnish/default.vcl \
   -S /etc/varnish/secret \
   -s malloc,256m"
The same needs to be done in /lib/systemd/system/varnish.service:
ExecStart=/usr/sbin/varnishd -j unix,user=vcache -F -a :80 -T localhost:6082 -f /etc/varnish/default.vcl -S /etc/varnish/secret -s malloc,256m
Finally, we can restart both Varnish and Nginx for the changes to take effect:
sudo service nginx restart
sudo /etc/init.d/varnish stop
sudo /etc/init.d/varnish start
systemctl daemon-reload
The last command is there so that the previously edited varnish.service daemon settings also reload, otherwise it’ll only take into account the /etc/default/varnish file’s changes. The start + stop procedure is necessary for Varnish because of a current bug which doesn’t release ports properly unless done this way.
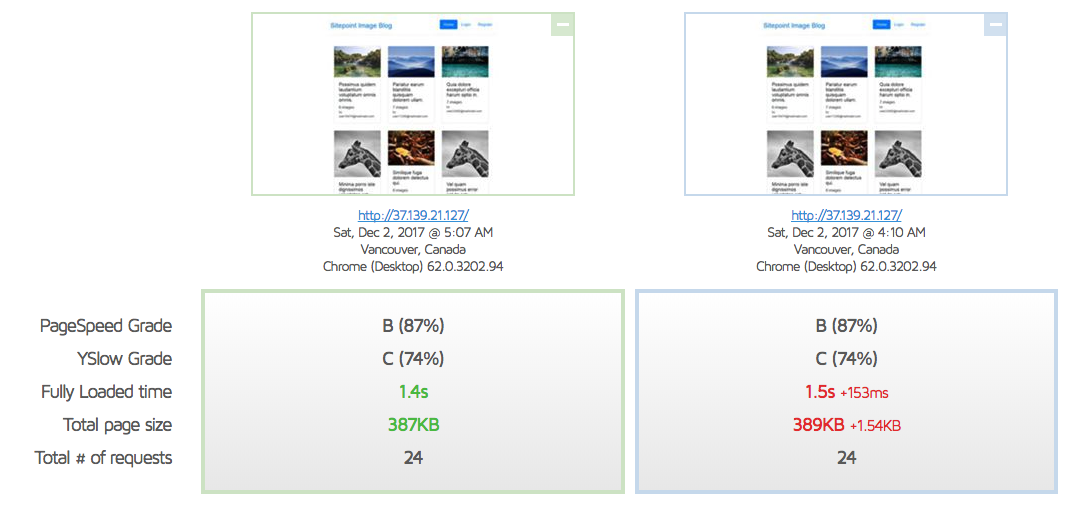
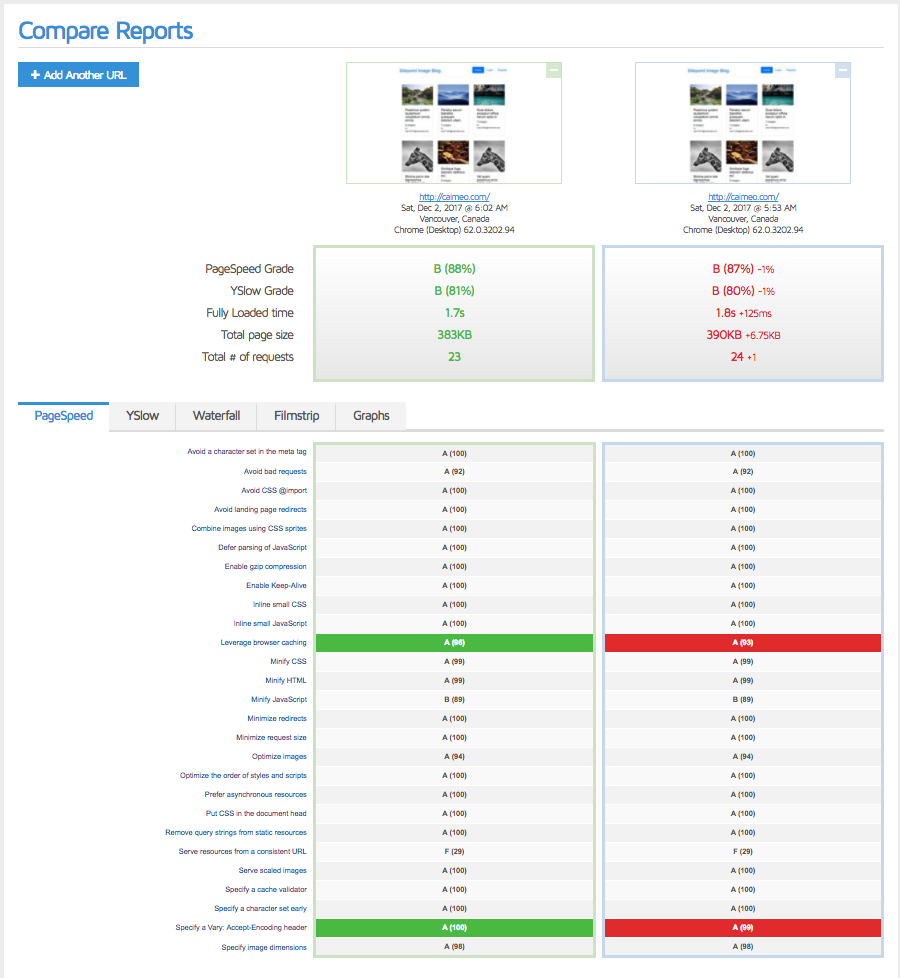
Comparing the result with the previous one, we can see that the difference is minimal due to the landing page already being extremely optimized.
Sidenote
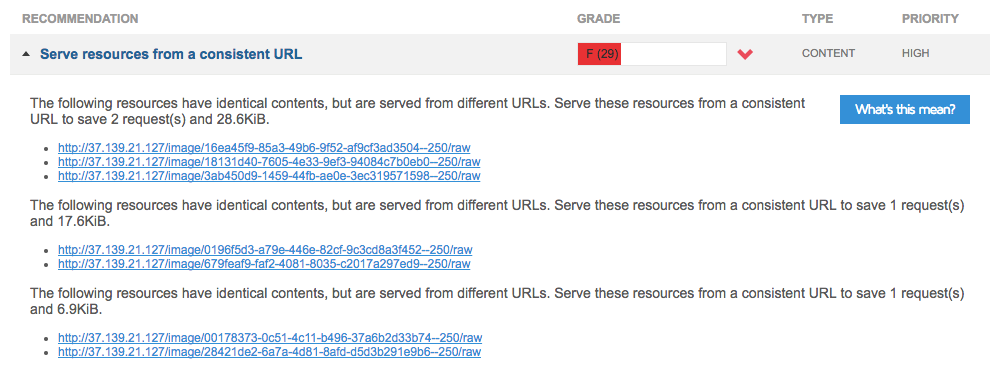
Both of the low grades are mainly the result of us “not serving from a consistent URL”, as GTMetrix would put it:
This happens because we used random images to populate our galleries, and the sample of randomness was small, so some of them are repeated. This is fine and won’t be an issue when the site is in production. In fact, this is one of the very rare cases where a site will by default score better in production than it does in development.
Cloudflare
Let’s set up Cloudflare next. First, we register for an account:
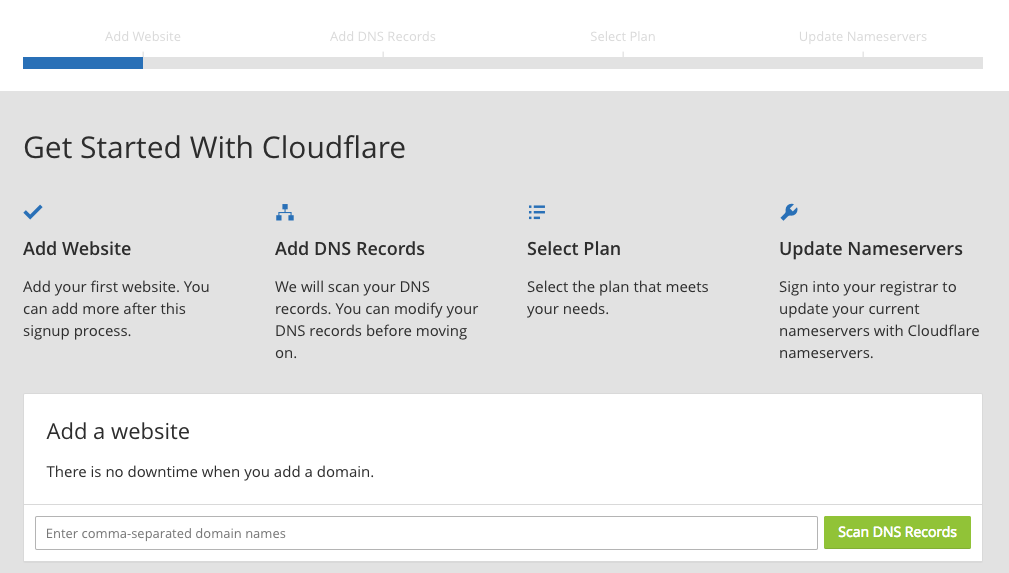
Because Cloudflare needs some DNS settings applied and thus requires there to be a domain attached to an IP address (i.e. there’s no way to use just an IP address of the destination server, like we’re doing in the tests so far), we should register a demo domain for this purpose. I have an old domain caimeo.com which I can use for this at this time, but first, the domain needs to be connected to the IP address of the DigitalOcean droplet with an A record:

Cloudflare will then scan and copy these existing records, allowing you to also add any missing ones if their system failed to identify them all.
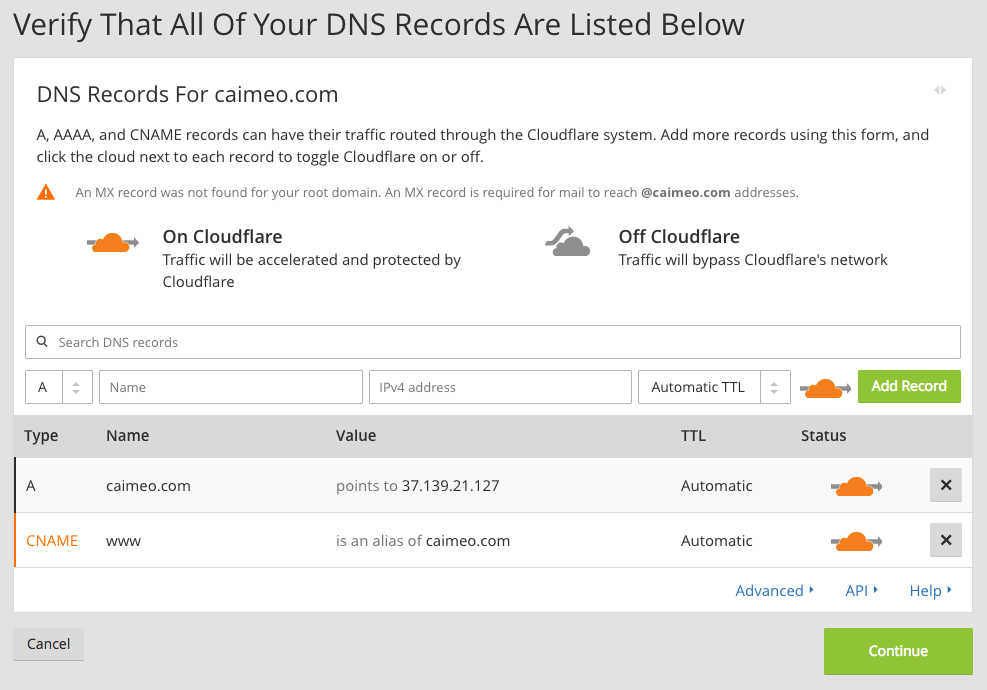
At the end of the process, the domain’s nameservers over at the original registrar need to be updated so that they point to Cloudflare’s. At this point, Cloudflare is fully controlling your domain for you (though it may take up to 24 hours to propagate to all possible visitors).
You can use the Cloudflare dashboard to see the account level and the settings applied to the given domain.

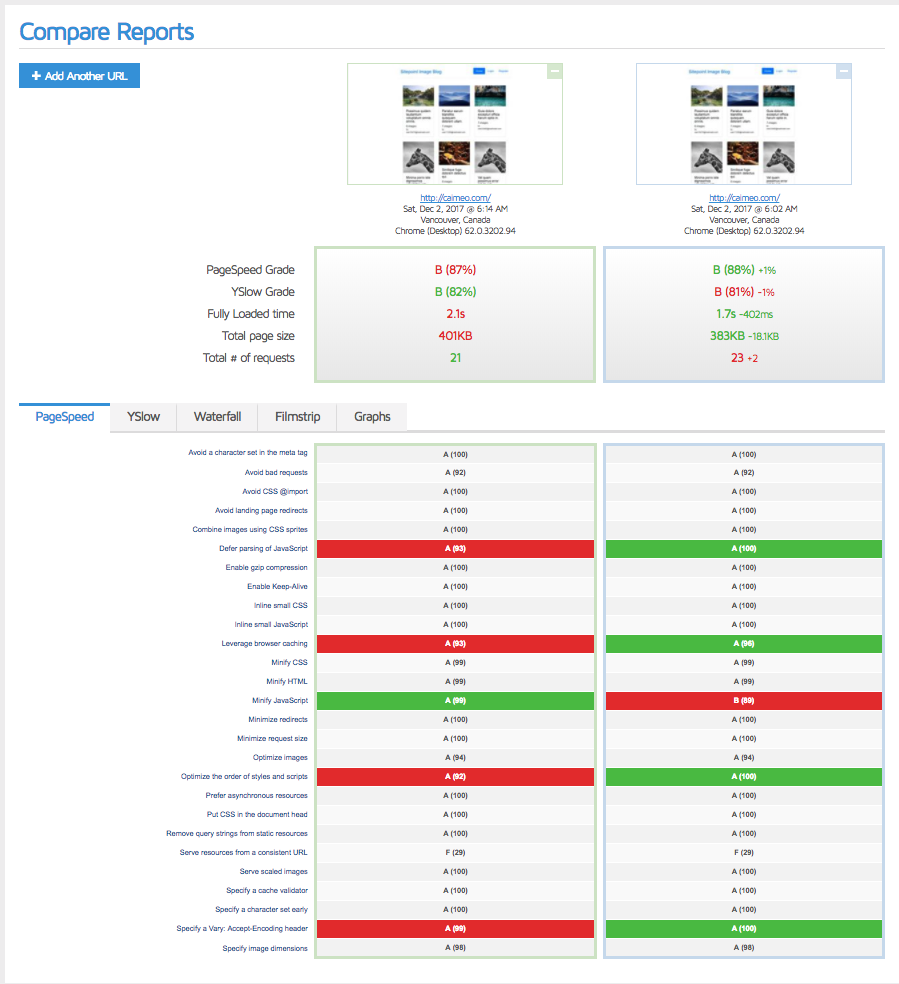
Once the service is active, we can compare the new GTMetrix result to the old one.

While YSlow does like us 6% more now, it seems like there’s more we could do since Cloudflare integration apparently slowed our site down by a whopping 23%.
First, let’s try turning on auto-minification (under Speed in the Cloudflare Dashboard) and fully purging the cache (under Caching). Then, we’ll run the test a few times before comparing, so the cache properly warms up.
That’s better! A few more test runs would likely get that even closer to the original 1.4s of load time, but let’s also take a look at CloudFlare’s Rocket Loader tool. It’s in beta and works by bundling together all the JavaScript it can find — even external files — and asynchronously loading these files. It then caches these resources locally, in the browser, rather than re-fetch them from a remote server. Comparison here.
Sadly, this leaves something to be desired. YSlow does like us more because we minify better and have fewer requests, but the tools seem to be misconfiguring some settings that worked much better previously. Let’s turn it back off and purge cache, the previous setting was better.
Other Possible Tweaks
Don’t forget the favicon!
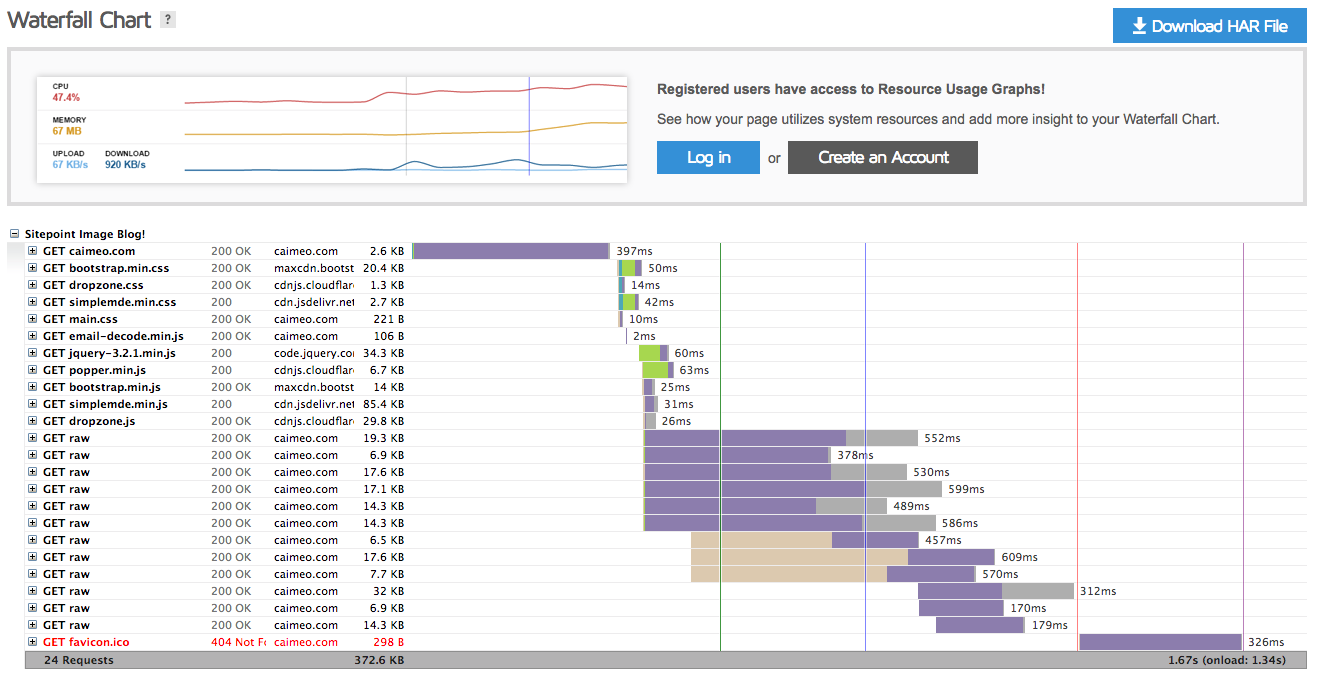
Adding a favicon is always a good idea — fewer 404 requests and it’ll look better in the browser. Besides, the waterfall screen clearly tells us that of those 1.6s around 330ms is spent waiting for the favicon!
Boom! With our favicon in place, we shaved off another 300ms.
Nginx tweaks
You may have come to this post after skipping the Nginx optimization one. It’s recommended you apply the tips from that one as well. The tweaks executed in this post have actually been applied on a live version of the site, so on a server different than one from that post. Varnish and Nginx tweaked in tandem here produce even better results:
location ~* \.(?:ico|css|js|gif|jpe?g|png|/raw)$ {
    expires 14d;
}

HTTP/2
Consider activating HTTP/2 with Varnish. See these blocking lines in the waterfall chart?
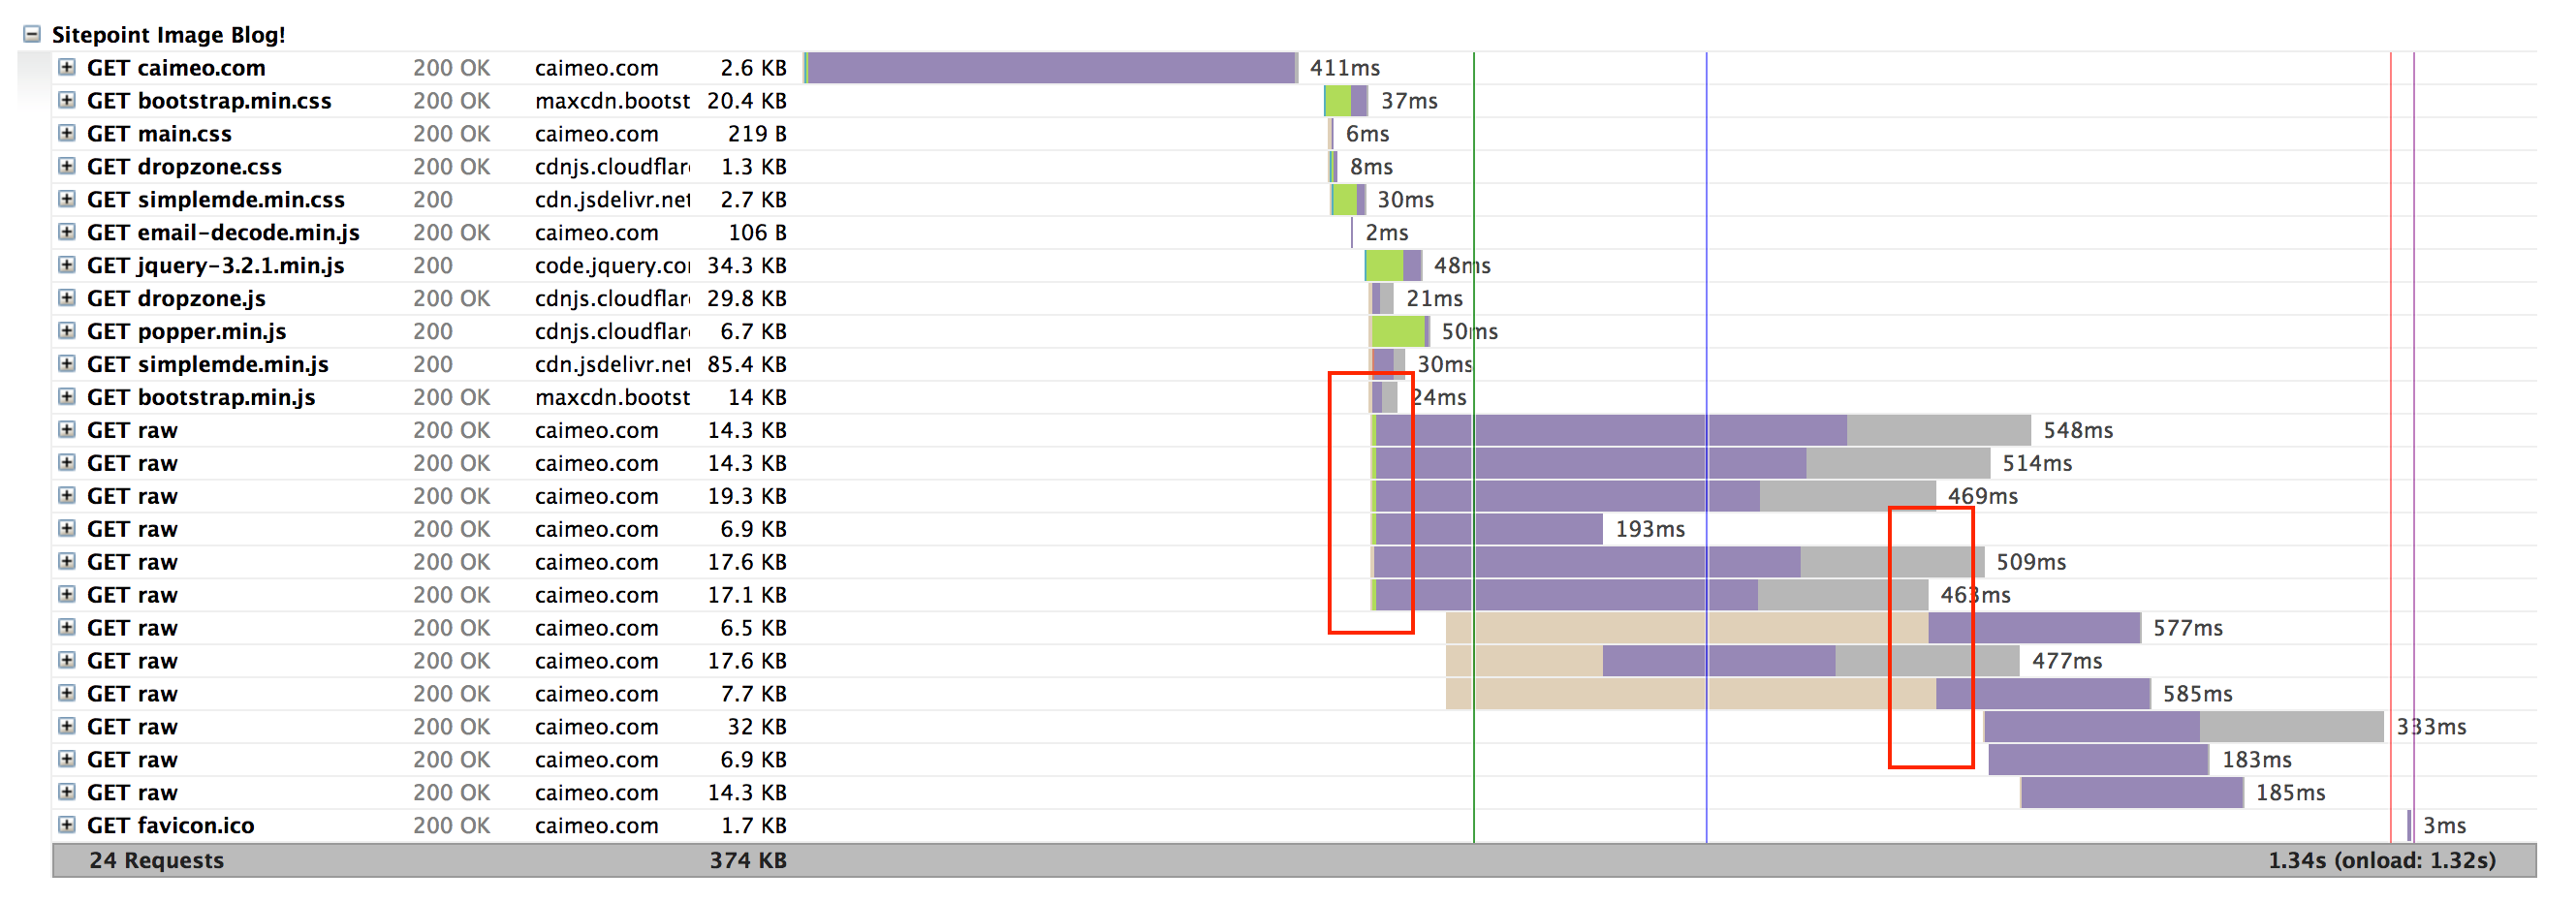
That’s because they’re being loaded a few at a time and the others wait for the previous ones to finish loading. With HTTP/2 that problem disappears, and the whole site loads much faster downloading several files over the same connection. One caveat is that the site requires a certificate. With Let’s Encrypt, that’s very simple to implement these days. Another caveat is that you need to rebuild Nginx with the HTTP/2 module included, so some fiddling around on the server is needed. The final caveat is that HTTP/2 is still in beta support on Varnish, and probably shouldn’t be too relied on.
To see how to configure Varnish and HTTP/2, see this tutorial.
Conclusion
We implemented Varnish as an additional caching layer, and Cloudflare’s free plan as our CDN, thereby increasing our GTMetrix score dramatically. While our optimization process may have been slight overkill for an app this simple, it’s very reassuring to know from day one that our app is capable of handling hundreds of thousands of users per second without breaking — and all that on a single $10 server.
If we’ve missed any steps and you recognize additional performance tricks we could do, please let us know!