Build a Desktop Application with Electron and Angular

In this tutorial we’ll build a cross-platform desktop application with Electron and web technologies such as TypeScript and Angular.
Electron.js is a popular platform for building cross-platform desktop apps for Windows, Linux and macOS with JavaScript, HTML, and CSS. It’s created and maintained by GitHub and it’s available under the MIT permissive license. It was initially created for GitHub’s Atom editor, but has since been used to create applications by companies like Microsoft (Visual Studio Code), Facebook, Slack, and Docker.
Electron makes use of powerful platforms like Google Chromium and Node.js, but also provides its own set of rich APIs for interacting with the underlying operating system.
Electron provides a native container that wraps web apps so they look and feel like desktop apps with access to operating system features (similar to Cordova for mobile apps). This means we can use any JavaScript library or framework to build our application. In this tutorial, we’ll be using Angular.
Prerequisites
For this tutorial, you will need to have these prerequisites covered:
- Familiarity with TypeScript and Angular.
- Node.js and npm installed on your development machine.
Installing Angular CLI
Let’s get started by installing Angular CLI, which is the official tool for creating and working with Angular projects. Open a new terminal and run the following command:
npm install -g @angular/cli
We’ll install the Angular CLI globally on our system. If the command fails with the EACCESS error, add sudo before your command in Linux or macOS, or run the command prompt as an administrator in Windows.
If the CLI is installed successfully, navigate to your working directory and create a new Angular project using the following commands:
cd ~
ng new electron-angular-demo
Wait for your project’s files to be generated and dependencies to be installed from npm. Next, navigate to the root of your project and run the following command to install the latest version of Electron from npm as a development dependency:
npm install --save-dev electron@latest
As of this writing, this command will install Electron v4.1.4.
Next, create a main.js file and add the following code:
    const {app, BrowserWindow} = require('electron')
    const url = require("url");
    const path = require("path");

    let mainWindow

    function createWindow () {
      mainWindow = new BrowserWindow({
        width: 800,
        height: 600,
        webPreferences: {
          nodeIntegration: true
        }
      })

      mainWindow.loadURL(
        url.format({
          pathname: path.join(__dirname, `/dist/index.html`),
          protocol: "file:",
          slashes: true
        })
      );
      // Open the DevTools.
      mainWindow.webContents.openDevTools()

      mainWindow.on('closed', function () {
        mainWindow = null
      })
    }

    app.on('ready', createWindow)

    app.on('window-all-closed', function () {
      if (process.platform !== 'darwin') app.quit()
    })

    app.on('activate', function () {
      if (mainWindow === null) createWindow()
    })
This code simply creates a GUI window and loads the index.html file that should be available under the dist folder after we build our Angular application. This example code is adapted from the official starter repository.
Next, open the package.json file of your project and add the main key to set the main.js file as the main entry point:
    {
      "name": "electron-angular-demo",
      "version": "0.0.0",
      "main": "main.js",
      // [...]
    }
Next, we need to add a script to easily start the Electron app after building the Angular project:
    {
      "name": "electron-angular-demo",
      "version": "0.0.0",
      "main": "main.js",
      "scripts": {
        "ng": "ng",
        "start": "ng serve",
        "build": "ng build",
        "test": "ng test",
        "lint": "ng lint",
        "e2e": "ng e2e",
        "start:electron": "ng build --base-href ./ && electron ."
      },
      // [...]
    }
We added the start:electron script which runs the ng build --base-href ./ && electron . command:
- The
ng build --base-href ./part of the command builds the Angular app and sets the base href to./. - The
electron .part of the command starts our Electron app from the current directory.
Now, in your terminal, run the following command:
npm run start:electron
An Electron GUI window will be opened, but will be blank. In the console, you’ll see the Not allowed to load local resource: /electron-angular-demo/dist/index.html error.
Electron is unable to load the file from the dist folder because it simply doesn’t exist. If you look in your project’s folder, you’ll see that Angular CLI builds your app in the dist/electron-angular-demo folder instead of just the dist folder.
In our main.js file, we are telling Electron to look for the index.html file in the dist folder without a subfolder:
       mainWindow.loadURL(
        url.format({
          pathname: path.join(__dirname, `/dist/index.html`),
          protocol: "file:",
          slashes: true
        })
      );
__dirname refers to the current folder from which we’re running Electron.
We use the path.join() method to join the path of the current folder with the /dist/index.html path.
You can either change the second part of the path to /dist/electron-angular-demo/index.html or, better yet, change the Angular configuration to output the files in the dist folder without using a subfolder.
Open the angular.json file, locate the projects → architect → build → options → outputPath key and change its value from dist/electron-angular-demo to just dist:
      "projects": {
        "electron-angular-demo": {
          "root": "",
          "sourceRoot": "src",
          "projectType": "application",
          "prefix": "app",
          "schematics": {},
          "architect": {
            "build": {
              "builder": "@angular-devkit/build-angular:browser",
              "options": {
                "outputPath": "dist",
Head back to your terminal and again run the following command:
npm run start:electron
The script will call the ng build command to build the Angular app in the dist folder, and call electron from the current folder to start the Electron window with the Angular app loaded.
This is a screenshot of our desktop app running Angular:

Calling Electron APIs from Angular
Let’s now see how we can call Electron APIs from Angular.
Electron apps make use of a main process running Node.js and a renderer process running the Chromium browser. We can’t directly access all of Electron’s APIs from the Angular app.
We need to make use of IPC or Inter-Process Communication, which is a mechanism provided by operating systems to allow communication between different processes.
Not all Electron APIs need to be accessed from the main process. Some APIs can be accessed from the renderer process, and some APIs can be accessed from both the main and renderer processes.
BrowserWindow, which is used to create and control browser windows, is only available in the main process. The desktopCapturer API (used for capturing audio and video from the desktop using the navigator.mediaDevices.getUserMedia API) is only available in the renderer process. Meanwhile the clipboard API (for performing copy and paste operations on the system clipboard) is available on both the main and renderer processes.
You can see the complete list of APIs from the official docs.
Let’s see an example of calling the BrowserWindow API, available only in the main process, from the Angular app.
Open the main.js file and import ipcMain:
const {app, BrowserWindow, ipcMain} = require('electron')
Next, define the openModal() function:
    function openModal(){
      const { BrowserWindow } = require('electron');
      let modal = new BrowserWindow({ parent: mainWindow, modal: true, show: false })
      modal.loadURL('https://www.sitepoint.com')
      modal.once('ready-to-show', () => {
        modal.show()
      })
    }
This method will create a child modal window, load the https://www.sitepoint.com URL inside it, and display it when it’s ready.
Next, listen for an openModal message that will be sent from the renderer process and call the openModal() function when the message is received:
    ipcMain.on('openModal', (event, arg) => {
      openModal()
    })
Now, open the src/app/app.component.ts file and add the following import:
import { IpcRenderer } from 'electron';
Next, define an ipc variable and call require('electron').ipcRenderer to import ipcRenderer in your Angular component:
      private ipc: IpcRenderer
      constructor(){
        if ((<any>window).require) {
          try {
            this.ipc = (<any>window).require('electron').ipcRenderer;
          } catch (e) {
            throw e;
          }
        } else {
          console.warn('App not running inside Electron!');
        }
      }
The require() method is injected at runtime in the renderer process by Electron and as such, it will only be available when running your web application in Electron.
Finally, add the following openModal() method:
      openModal(){
        console.log("Open a modal");
        this.ipc.send("openModal");
      }
We use the send() method of ipcRenderer to send an openModal message to the main process.
Open the src/app/app.component.html file and add a button, then bind it to the openModal() method:
    <button (click)="openModal()">
      Open Modal
    </button>
Now, run your desktop app using the following command:
npm run start:electron
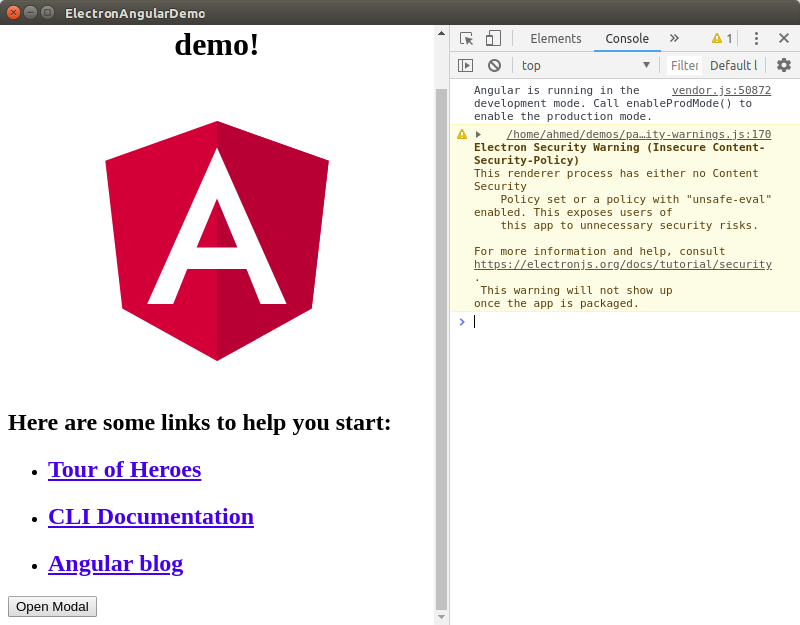
This is a screenshot of the main window with a button:
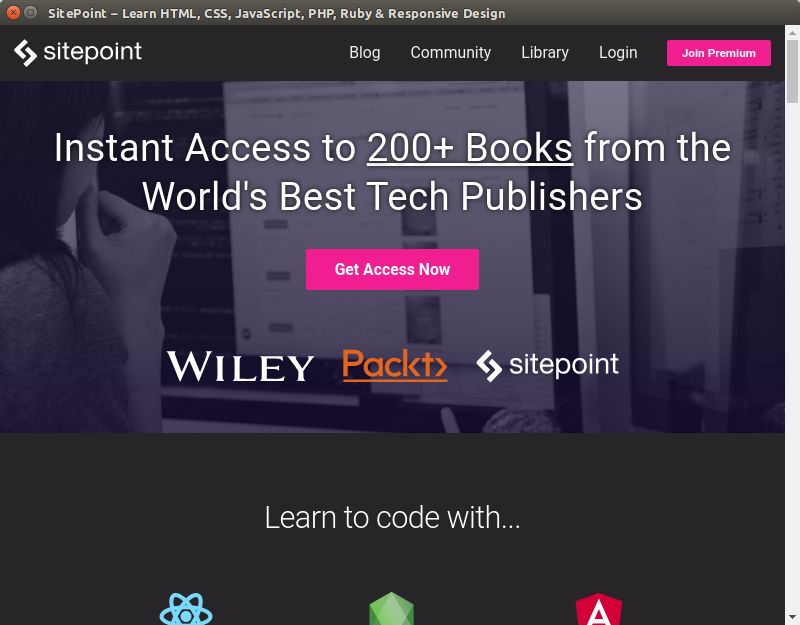
If you click on the Open Modal button, a modal window should be opened with the SitePoint website:
You can find the source code of this demo from this GitHub repository.
Conclusion
In this tutorial, we’ve looked at how to run a web application built with Angular as a desktop application using Electron. We hope you’ve learned how easy it can be to get started building desktop apps with your web development toolkit!


