Boosting Your Workflow with Angular 5 Snippets and VS Code

In this article, we’ll focus on how to use Angular 5 snippets in Visual Studio Code to improve our workflow. We’ll first start with the basics of using and creating snippets. We’ll look at how we can use Angular snippets for VS Code in an Angular project. Then we’ll later look at how we can create our own snippets and share them with others.
For anyone who’s become proficient in a programming language, you know how boring it is to type the same code over and over again. You eventually start copying and pasting pieces of your code to spare your fingers the agony of writing another for loop.
What if your editor could help you insert this common code for you automatically as you type? That would be awesome, right?
Well, you probably know them as snippets. It’s a feature that’s common in every modern IDE currently available. Even Notepad++ supports them (though not enabled by default).
Prerequisites
Before you start, you’ll need to have the latest version of Visual Studio Code installed on your machine. We’ll also be looking at Angular 5 snippets. So having at least a basic knowledge of Angular will be helpful, but not necessary.
You’ll need to use an existing or new Angular 5 project in order to experiment with snippets. I assume you have the latest version of Node.js, or at least a version that’s not older than Node.js 6. Here’s the command for installing the Angular CLI tool if you haven’t:
npm install -g @angular/cli

# or
yarn global add @angular/cli
Snippets Explained
Snippets are templates that allow you to easily insert repetitive code. When you first install VS Code, it comes with snippets for JavaScript pre-installed. To check them out, just open an existing JavaScript file or create a new one in your workspace and try out typing these prefixes:
logififelseforofsettimeout
As you type, a popup list will appear giving you options to autocomplete your code. As soon as the right snippet is highlighted, just press enter to insert the snippet. In some cases, such as log and for, you may need to press the down key to select the right snippet.
You’re probably wondering where these JavaScript snippets are coming from exactly. Well, you can find the exact definitions in these locations:
- Windows –
C:\Program Files\Microsoft VS Code\resources\app\extensions\javascript\snippets\javascript.json - Linux –
/usr/share/code/resources/app/extensions/javascript/snippets/javascript.json
We’ll look into how we can create our own snippets, but first let’s explore some third-party snippets.
How to Use Snippets
At the time of writing, the Visual Studio Marketplace listed 934 extensions in the snippet category. You’ll find snippets for every programming language created, including Pascal! This means you probably should check out the marketplace before creating your own snippets. As mentioned earlier, we’ll be looking at Angular 5 snippets. Locate an existing Angular 5 project in your workspace or just create a new one:
ng new snippets-demo
Once the project is set up, open it in VS Code. Next, click the extension icon on the activity bar to open the Extensions panel. Search for Angular 5. The search results should list several Angular extensions. Install the one that has the author ‘John Papa’. After installation is done, click the reload button to restart VS Code. This Angular 5 snippets extension comes with over 50 snippets. About 70% of the snippets are written for TypeScript, and the rest are mostly for HTML. There are some Docker snippets in there too.
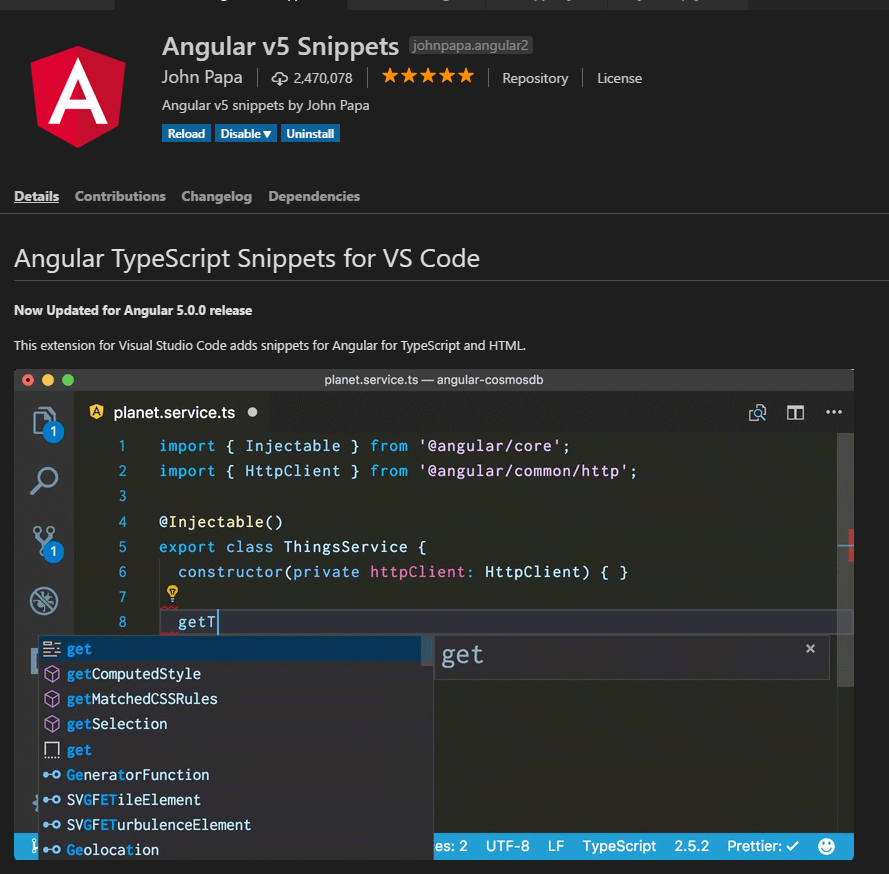
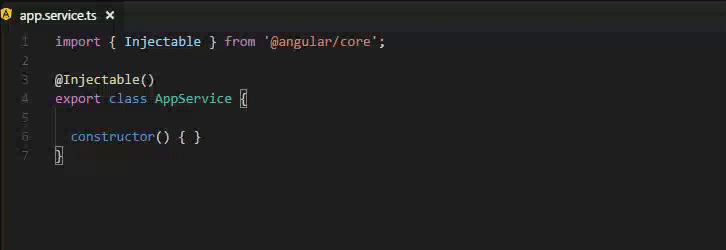
Let’s try a few of these Angular 5 snippets. Create a new file called app.service.ts inside the app folder. Open the file and start typing “a-service”. A pop-up list will appear as you type. Even before you finish typing, you should have the correct option highlighted. Press enter to insert the template. Once the snippet is entered, take note that the generated class name is highlighted for you to change.
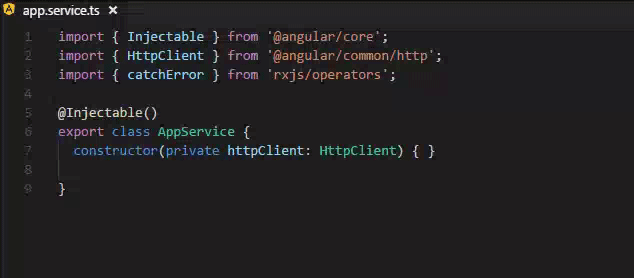
Just type “App” and the entire class name will read “AppService”. Pretty convenient, right? Let’s try something different. Delete the entire code in app-service.ts and type this prefix:
a-service-httpclient
You should get a service class definition, including imports and HttpClient injection in the class constructor. Just like before, rename the class name to AppService.
Next, let’s use another snippet to define an HTTP GET request. Let’s define an empty GET method. For this piece of code, you have to type; don’t copy-paste:
getPosts(): Observable<any[]> {

}
As you start to type “Observable”, a snippet option for it will appear. Just press enter and the Observable class will be imported for you automatically.
Next, let’s use another snippet to complete the function. Start typing this prefix: “a-httpclient-get”. Pressing enter will insert this snippet for you:
return this.httpClient.get('url');
Change the URL to an imaginary path — let’s say /posts. Obviously our code won’t run, as we haven’t set up any APIs. Fix it by adding <any> after get. The complete method now looks like this.
getPosts(): Observable<any[]> {
  return this.httpClient.get<any[]>('/posts');
}
Now that we know a little bit about how to use Angular 5 snippets, let’s see how they’re created.
How to Create Angular 5 Snippets
The syntax used in Visual Studio Code is the same syntax defined in TextMate. In fact, you can copy a snippet from TextMate and it will work in VS Code. However, keep in mind that the “interpolated shell code” feature isn’t supported in VS Code.
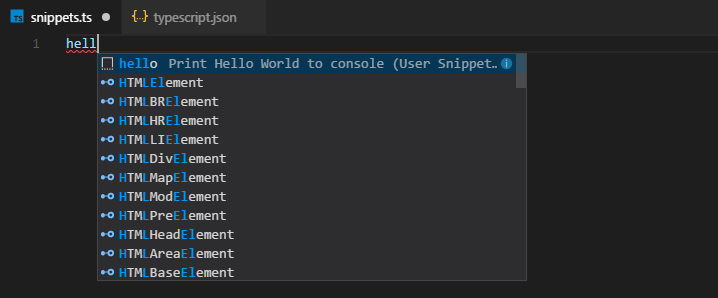
The easiest way to create a snippet is by opening Preferences:Configure User Snippet via the command palette (ctrl + shift + p). Select it, then choose a language you’d like to create a syntax for. Let’s create one now for TypeScript. Once you open typescript.json, place this snippet template right within the opening and closing braces:
"Print Hello World": {
  "prefix" : "hello",
  "body": [
    "console.log('Hello World!');"
  ],
  "description": "Print Hello World to console"
}
Let me go over the template structure:
- “Print Hello World” — title of the snippet template. You can put any title you want.
- prefix — trigger keyword for the snippet.
- body — the code the snippet will insert.
- description — no need to explain this one.
This is basically the simplest snippet template you can write. After you’ve saved the file, create a blank typescript and test the prefix hello. A pop list should appear as you type.
Just hit enter once your snippet is highlighted. You should have this code inserted for you:
console.log('Hello World');
Awesome, right? Let’s now make our snippet template interactive by inserting some Tab Stops.
"Print Hello World": {
  "prefix" : "hello",
  "body": [
    "console.log('Hello $1!');",
    "$2"
  ],
  "description": "Print Hello World to console"
}
Now try your prefix again. This version allows you to insert your name. Once you finish typing, just press tab and your cursor will come to rest at a new line. $0 indicates the final tab stop. You can use $1 and greater to create multiple tabs stops. But what if we wanted to insert a default value? We can use a placeholder that looks like this: ${1:World}. Here’s the full template:
"Print Hello World": {
  "prefix" : "hello",
  "body": [
    "console.log('Hello ${1:World}!');",
    "$0"
  ],
  "description": "Print Hello World to console"
}
Now try the snippet again. You can either change the default value, or tab out to leave it as is. Let’s now give developers a choice list to pick from:
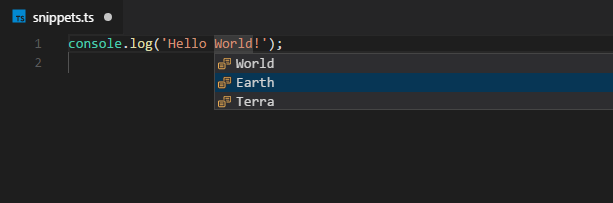
To implement the choice list, just replace the console.log line like this:
...
"console.log('Hello ${1|World,Earth,Terra|}!');",
...
That’s enough examples for now. I haven’t covered variable names and transformations. To learn more, check out John Papa’s Angular snippets on GitHub. Here’s a sneak preview:
"Angular HttpClient Service": {
    "prefix": "a-service-httpclient",
    "description": "Angular service with HttpClient",
    "body": [
      "import { Injectable } from '@angular/core';",
      "import { HttpClient } from '@angular/common/http';",
      "import { catchError } from 'rxjs/operators';",
      "",
      "@Injectable()",
      "export class ${1:ServiceName}Service {",
      "\tconstructor(private httpClient: HttpClient) { }",
      "\t$0",
      "}"
    ]
  }
This is the template we used earlier to create the HttpClient service. I recommend you go through the project, as it contains quite a number of highly useful templates you can learn from.
Summary
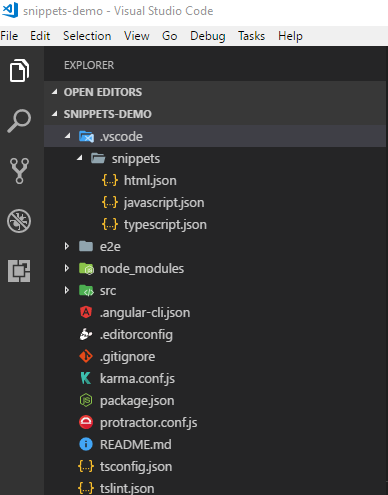
Now that you’ve learned how to create snippets, you probably want to share them with their team members, friends or the public. The easiest way to share the snippets with your teammates is to create a .vscode folder at your project root. Create a subfolder called snippets and place all your templates there, like this:
Make sure to commit this folder such that everyone can find it in the repository. To share with your friends and public, you have a number of options available to you:
- you can upload your snippets to a public server such as Google Drive, Dropbox or even Pastebin.
- you can publish your snippets as an extension on the VS Code Marketplace.
I hope this brief introduction to working with snippets will help make your programming life a bit easier!


