Change Detection in Angular: Everything You Need to Know

This article on change detection in Angular was originally published on the Angular In Depth blog, and is republished here with permission.
If you’re like me and looking to gain a comprehensive understanding of the change detection mechanism in Angular, you basically have to explore the sources, since there’s not much information available on the web.
Most articles mention that each component has its own change detector which is responsible for checking the component, but they don’t go beyond that and mostly focus on use cases for immutables and change detection strategy.
This article provides you with the information required to understand why use cases with immutables work and how change detection strategy affects the check. Also, what you’ll learn from this article will enable you to come up with various scenarios for performance optimization on your own.
The first part of this article is pretty technical and contains a lot of links to the sources. It explains in detail how the change detection mechanism works under the hood. Its content is based on the newest Angular version (4.0.1 at time of writing). The way the change detection mechanism is implemented under the hood in this version is different from the earlier 2.4.1. If interested, you can read a little about how it worked in this Stack Overflow answer.
The second half of the article shows how change detection can be used in the application, and its content is applicable for both earlier 2.4.1 and the newest 4.0.1 versions of Angular, since the public API hasn’t changed.
View as a Core Concept
An Angular application is a tree of components. However, under the hood, Angular uses a low-level abstraction called view. There’s a direct relationship between a view and a component: one view is associated with one component and vice versa. A view holds a reference to the associated component class instance in the component property. All operations — like property checks and DOM updates — are performed on views. Hence, it’s more technically correct to state that Angular is a tree of views, while a component can be described as a higher-level concept of a view. Here’s what you can read about the view in the sources:
A View is a fundamental building block of the application UI. It is the smallest grouping of Elements which are created and destroyed together.
Properties of elements in a View can change, but the structure (number and order) of elements in a View cannot. Changing the structure of Elements can only be done by inserting, moving or removing nested Views via a ViewContainerRef. Each View can contain many View Containers.
In this article, I’ll be using notions of component view and component interchangeably.
It’s important to note here that all articles on the web and answers on Stack Overflow regarding change detection refer to the View I’m describing here as Change Detector Object or ChangeDetectorRef. In reality, there’s no separate object for change detection and View is what change detection runs on.
Each view has a link to its child views through the nodes property, and hence can perform actions on child views.
View State
Each view has a state, which plays a very important role because, based on its value, Angular decides whether to run change detection for the view and all its children, or skip it. There are many possible states, but the following ones are relevant in the context of this article:
- FirstCheck
- ChecksEnabled
- Errored
- Destroyed
Change detection is skipped for the view and its child views if ChecksEnabled is false or view is in the Errored or Destroyed state. By default, all views are initialized with ChecksEnabled unless ChangeDetectionStrategy.OnPush is used. More on that later. The states can be combined: for example, a view can have both the FirstCheck and ChecksEnabled flags set.
Angular has a bunch of high-level concepts to manipulate the views. I’ve written about some of them here. One such concept is ViewRef. It encapsulates the underlying component view and has an aptly named method detectChanges. When an asynchronous event takes place, Angular triggers change detection on its top-most ViewRef, which after running change detection for itself runs change detection for its child views.
This viewRef is what you can inject into a component constructor using the ChangeDetectorRef token:
export class AppComponent {
    constructor(cd: ChangeDetectorRef) { ... }
This can be seen from the class’s definition:
export declare abstract class ChangeDetectorRef {
    abstract checkNoChanges(): void;
    abstract detach(): void;
    abstract detectChanges(): void;
    abstract markForCheck(): void;
    abstract reattach(): void;
}

export abstract class ViewRef extends ChangeDetectorRef {
   ...
}
Change Detection Operations
The main logic responsible for running change detection for a view resides in the checkAndUpdateView function. Most of its functionality performs operations on child component views. This function is called recursively for each component, starting from the host component. It means that a child component becomes a parent component on the next call as a recursive tree unfolds.
When this function is triggered for a particular view, it does the following operations in the specified order:
- sets
ViewState.firstChecktotrueif a view is checked for the first time and tofalseif it was already checked before - checks and updates input properties on a child component/directive instance
- updates child view change detection state (part of change detection strategy implementation)
- runs change detection for the embedded views (repeats the steps in the list)
- calls
OnChangeslifecycle hook on a child component if bindings changed - calls
OnInitandngDoCheckon a child component (OnInitis called only during first check) - updates
ContentChildrenquery list on a child view component instance - calls
AfterContentInitandAfterContentCheckedlifecycle hooks on child component instance (AfterContentInitis called only during first check) - updates DOM interpolations for the current view if properties on current view component instance changed
- runs change detection for a child view (repeats the steps in this list)
- updates
ViewChildrenquery list on the current view component instance - calls
AfterViewInitandAfterViewCheckedlifecycle hooks on child component instance (AfterViewInitis called only during first check) - disables checks for the current view (part of change detection strategy implementation)
There are few things to highlight based on the operations listed above.
The first thing is that the onChanges lifecycle hook is triggered on a child component before the child view is checked, and it will be triggered even if changed detection for the child view will be skipped. This is important information, and we’ll see how we can leverage this knowledge in the second part of the article.
The second thing is that the DOM for a view is updated as part of a change detection mechanism while the view is being checked. This means that if a component is not checked, the DOM is not updated even if component properties used in a template change. The templates are rendered before the first check. What I refer to as DOM update is actually interpolation update. So if you have <span>some {{name}}</span>, the DOM element span will be rendered before the first check. During the check only the {{name}} part will be rendered.
Another interesting observation is that the state of a child component view can be changed during change detection. I mentioned earlier that all component views are initialized with ChecksEnabled by default, but for all components that use the OnPush strategy, change detection is disabled after the first check (operation 9 in the list):
if (view.def.flags & ViewFlags._OnPush_) {
  view.state &= ~ViewState._ChecksEnabled_;
}
It means that during the following change detection run the check will be skipped for this component view and all its children. The documentation about the OnPush strategy states that a component will be checked only if its bindings have changed. So to do that, the checks have to be enabled by setting the ChecksEnabled bit. And this is what the following code does (operation 2):
if (compView.def.flags & ViewFlags._OnPush_) {
  compView.state |= ViewState._ChecksEnabled_;
}
The state is updated only if the parent view bindings changed and child component view was initialized with ChangeDetectionStrategy.OnPush.
Finally, change detection for the current view is responsible for starting change detection for child views (operation 8). This is the place where the state of the child component view is checked and if it’s ChecksEnabled, then for this view the change detection is performed. Here is the relevant code:
viewState = view.state;
...
case ViewAction._CheckAndUpdate_:
  if ((viewState & ViewState._ChecksEnabled_) &&
    (viewState & (ViewState._Errored_ | ViewState._Destroyed_)) === 0) {
    checkAndUpdateView(view);
  }
}
Now you know that the view state controls whether change detection is performed for this view and its children or not. So the question begs: can we control that state? It turns out we can, and this is what the second part of this article is about.
Some lifecycle hooks are called before the DOM update (3,4,5) and some after (9). So if you have the components hierarchy A -> B -> C, here is the order of hooks calls and bindings updates:
A: AfterContentInit
A: AfterContentChecked
A: Update bindings
    B: AfterContentInit
    B: AfterContentChecked
    B: Update bindings
        C: AfterContentInit
        C: AfterContentChecked
        C: Update bindings
        C: AfterViewInit
        C: AfterViewChecked
    B: AfterViewInit
    B: AfterViewChecked
A: AfterViewInit
A: AfterViewChecked
Exploring the Implications
Let’s assume that we have the following components tree:

As we learned above, each component is associated with a component view. Each view is initialized with the ViewState.ChecksEnabled, which means when Angular runs change detection, every component in the tree will be checked.
Suppose we want to disable change detection for the AComponent and its children. That’s easy to do — we just need to set ViewState.ChecksEnabled to false. Changing state is a low-level operation, so Angular provides us with a bunch of public methods available on the view. Every component can get a hold of its associated view through the ChangeDetectorRef token. For this class, the Angular docs define the following public interface:
class ChangeDetectorRef {
  markForCheck() : void
  detach() : void
  reattach() : void

  detectChanges() : void
  checkNoChanges() : void
}
Let’s see how we can wrangle it to our benefit.
detach
The first method that allows us to manipulate the state is detach, which simply disables checks for the current view:
detach(): void { this._view.state &= ~ViewState._ChecksEnabled_; }
Let’s see how it can be used in the code:
export class AComponent {
  constructor(public cd: ChangeDetectorRef) {
    this.cd.detach();
  }
This ensures that, while the following change detection runs, the left branch starting with AComponent will be skipped (orange components will not be checked):
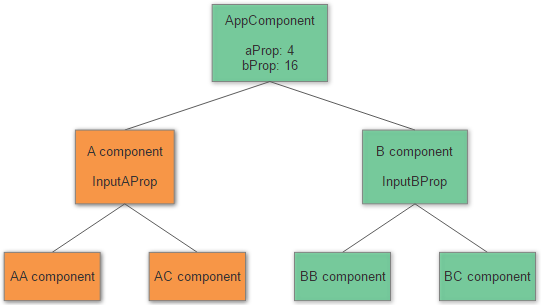
There are two things to note here. The first is that, even though we changed state for AComponent, all its child components will not be checked as well. Second is that, since no change detection will be performed for the left branch components, the DOM in their templates won’t be updated either. Here’s a small example to demonstrate it:
@Component({
  selector: 'a-comp',
  template: `<span>See if I change: {{changed}}</span>`})
export class AComponent {
  constructor(public cd: ChangeDetectorRef) {
    this.changed = 'false';

    setTimeout(() => {
      this.cd.detach();
      this.changed = 'true';
    }, 2000);
  }
The first time the component is checked the span will be rendered with the text See if I change: false. And within two seconds, when the changed property is updated to true, the text in the span won’t be changed. However, if we remove the line this.cd.detach(), everything will work as expected.
reattach
As shown in the first part of the article, the OnChanges lifecycle hook will still be triggered for AComponent if input binding aProp changes on the AppComponent. This means that, once we’re notified that input properties change, we can activate the change detector for the current component to run change detection and detach it on the next tick. Here’s the snippet demonstrating that:
export class AComponent {
  @Input() inputAProp;

  constructor(public cd: ChangeDetectorRef) {
    this.cd.detach();
  }

  ngOnChanges(values) {
    this.cd.reattach();
    setTimeout(() => {
      this.cd.detach();
    })
  }
This is because reattach simply sets ViewState.ChecksEnabled bit:
reattach(): void { this._view.state |= ViewState.ChecksEnabled; }
This is almost equivalent to what’s done when ChangeDetectionStrategy is set to OnPush: it disables the check after the first change detection run, and enables it when the parent component bound property changes, and disables after the run.
Please note that the OnChanges hook is only triggered for the top-most component in the disabled branch, not for every component in the disabled branch.
markForCheck
The reattach method enables checks for the current component only, but if change detection is not enabled for its parent component, it will have no effect. It means that the reattach method is only useful for the top-most component in the disabled branch.
We need a way to enable check for all parent components up to the root component. And there is a method for it — markForCheck:
let currView: ViewData|null = view;
while (currView) {
  if (currView.def.flags & ViewFlags._OnPush_) {
    currView.state |= ViewState._ChecksEnabled_;
  }
  currView = currView.viewContainerParent || currView.parent;
}
As you can see from the implementation, it simply iterates upwards and enables checks for every parent component up to the root.
When is this useful? Just as with ngOnChanges, the ngDoCheck lifecycle hook is triggered even if the component uses the OnPush strategy. Again, it’s only triggered for the top-most component in the disabled branch, not for every component in the disabled branch. But we can use this hook to perform custom logic and mark our component eligible for one change detection cycle run. Since Angular only checks object references, we may implement the dirty checking of some object property:
Component({
  ...,
  changeDetection: ChangeDetectionStrategy.OnPush
})
MyComponent {
  @Input() items;
  prevLength;
  constructor(cd: ChangeDetectorRef) {}

  ngOnInit() {
    this.prevLength = this.items.length;
  }

  ngDoCheck() {
    if (this.items.length !== this.prevLength) {
      this.cd.markForCheck();
      this.prevLenght = this.items.length;
    }
  }
detectChanges
There’s a way to run change detection once for the current component and all its children. This is done using detectChanges method. This method runs change detection for the current component view regardless of its state, which means that checks may remain disabled for the current view and the component won’t be checked during following regular change detection runs. Here’s an example:
export class AComponent {
  @Input() inputAProp;

  constructor(public cd: ChangeDetectorRef) {
    this.cd.detach();
  }

  ngOnChanges(values) {
    this.cd.detectChanges();
  }
The DOM is updated when the input property changes, even though the change detector reference remains detached.
checkNoChanges
This last method available on the change detector ensures there’ll be no changes done on the current run of change detection. Basically, it performs operations 1,7 and 8 from the list above and throws an exception if it finds a changed binding or determines that DOM should be updated.


