Hubot is an open source CoffeeScript bot, that can monitor and respond to commands through a variety of chat room applications. As GitHub proudly claims, “it can help to dramatically improve and reduce employee efficiency” (depending how you use it). In this article we’ll get Hubot set up, integrate it with Slack, and show off both the improved and reduced efficiency we can enjoy from the fruits of our labor.
What Can Hubot Do?
The only limit to Hubot is your own imagination. However, it is important to realize that although you can do just about anything with Hubot, the bigger question becomes, should you? From posting images, translating languages, sending reminders of upcoming birthdays, to building a report of your team’s latest activity. Hubot has a plethora of abilities through a very robust message system and well placed hooks.
Up and Running
So let’s get Hubot up and running. For this, we’ll need Node.js installed, as well as npm (Node’s package manager). If you’re unsure how to do this, then check out our tutorial: A Beginner’s Guide to npm.
generator-hubot — a Yeoman generator for creating your own chatbot using the Hubot framework
You can do this with the following command:
npm install -g hubot coffee-script yo generator-hubot
Then, we’ll need to create a directory to house our new friend and run the aforementioned Yeoman generator.
mkdir test-bot && cd test-bot
yo hubot
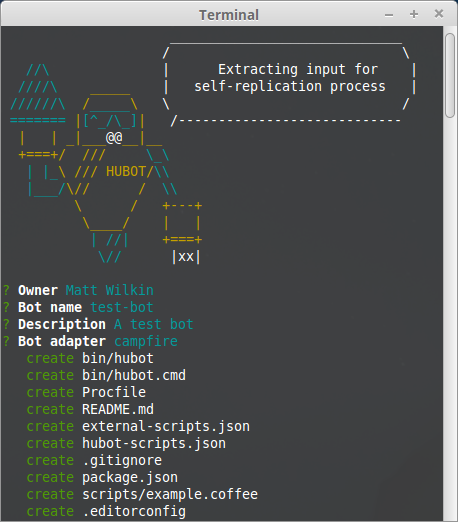
If all has gone well, Hubot will pop up and ask you some questions. Enter your name, the new bot’s name and description. You can leave the adapter as campfire. Before exiting it’ll create a bunch of files.
Now run bin/hubot to initiate your new bot.
A Test Run
To see what your new bot can do, run:
<bot_name> help
test-bot> ship it - Display a motivation squirrel
test-bot adapter - Reply with the adapter
test-bot animate me  - The same thing as `image me`, except adds a few parameters to try to return an animated GIF instead.
test-bot echo  - Reply back with
test-bot help - Displays all of the help commands that test-bot knows about.
test-bot help  - Displays all help commands that match .
test-bot image me  - The Original. Queries Google Images for  and returns a random top result.
test-bot map me  - Returns a map view of the area returned by `query`.
test-bot mustache me  - Searches Google Images for the specified query and mustaches it.
test-bot mustache me  - Adds a mustache to the specified URL.
test-bot ping - Reply with pong
test-bot pug bomb N - get N pugs
test-bot pug me - Receive a pug
test-bot the rules - Make sure test-bot still knows the rules.
test-bot time - Reply with current time
test-bot translate me  - Searches for a translation for the  and then prints that bad boy out.
test-bot translate me from  into   - Translates  from  into . Both  and  are optional
Wow! Ok, let’s try one of those out:
test-bot translate me from German into English Rindfleischetikettierungsüberwachungsaufgabenübertragungsgesetz
Produces:
test-bot> The German "Rindfleischetikettierungsüberwachungsaufgabenübertragungsgesetz" translates as "Beef labeling monitoring delegation law" in English
Awesome!
So Hubot works. Feel free to play around some more before moving on to the next step.
Integrating Hubot with Slack
Slack is a team collaboration tool which offers persistent chat rooms, as well as private groups and direct messaging. Slack is also SitePoint’s tool of choice to facilitate collaboration between its contributors, who are based all over the world. Let’s integrate our bot with Slack.
The first thing we need to do is install the Slack adapter in our project:
npm install hubot-slack --save
Once that is done, open your Slack Team page and go to the “Configure Integrations” area. Find the Hubot integration and click “Add”. Slack will ask you to designate a username for your bot. I choose Jarvis and Tars for the two bots I created for the Sitepoint Forum Staff.
Once the username is provided, Slack will create an account on your team with that username and assign it an API token. It is very important that you keep this API token a secret, so do not check it into your git repository. You’ll also have the option to customize your bot’s icon, first and last name, what it does, and so forth.
With the API token in hand, we can now start our bot locally using the following command:
This will log your bot into Slack so that you are able to talk to it there. Try it out by running the above command, visiting the #general channel (Hubot uses this by default) and issuing a command such as:
<bot_name> pug me
Note: Once you’re done experimenting locally, it is a good idea to move your bot somewhere more permanent (such as Heroku). There are plenty of good guides on how to do this and I won’t be covering it here.
Where to Find Pre-built Scripts
You can find a variety of scripts to pair with your Hubot at the npm website using the keyword “hubot-scripts”. All of these scripts can be added to your bot using the npm command with its --save parameter.
Start the bot locally (as above), then visit #general and enter:
<bot_name> cat me with funny
If all goes well, your bot should pull a random, yet amusing, cat picture from the Internet.
Building a Script to Reduce Employee Efficiency
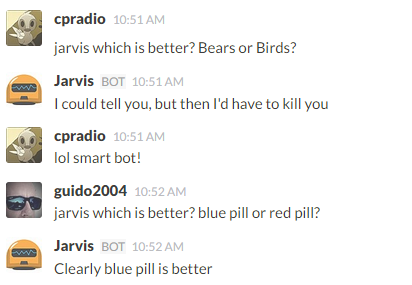
There are a lot of ways to reduce your efficiency with Hubot, from using pug bombs to building a script that randomly chooses a response (sometimes comical) when given a command. The latter, is the one that we’ll focus on in this article which is part of Jarvis’s programming.
I’ll illustrate this using the following script, named which-is-better.coffee. Place this file inside your scripts directory.
# Description:
# Which is Better?
#
# Dependencies:
# None
#
# Configuration:
# None
#
# Commands:
# hubot which is better[?]<text> or <text>?
# hubot who is better[?]<text> or <text>?
# hubot which is worse[?]<text> or <text>?
# hubot who is worse[?]<text> or <text>?
#
# Author:
# cpradio
uhh_what =["I could tell you, but then I'd have to kill you","Answering that would be a matter of national security","You can't possibly compare them!","Both hold a special place in my heart"]
module.exports=(robot)->
robot.respond/(which|who)is(better|worse)\?*(.*)or(.*?)\??$/i,(msg)->
choosen_response = msg.random[1..5]if choosen_response >=3
msg.send msg.random uhh_what
else
msg.send"Clearly #{msg.match[choosen_response + 2]} is #{msg.match[2]}"
At the top of the script is our base template of comments. Here you can specify a description of what the script is intended to do, which dependencies it has and how it can be configured. It’s also important to include the commands that people can use to interact with your script.
A little further down, we find a line with module.exports = (robots) -> which is where your Hubot instructions will live.
The next part uses the .respond method to listen for a specific command directed at your bot. All of the hearing and responding methods take a regular expression as their input. When that regular expression finds an applicable match, the logic associated to the .hear and .respond commands is invoked.
In this case, I choose .respond, because I want Hubot to respond to a direct command. If I wanted it to respond even when the command isn’t directed at him, I would use .hear
In this instance, the regular expression is matching on the phrase ‘which is better’, ‘who is better’, ‘which is worse’, and ‘who is worse’ followed by two options.
The next statement chooses a random number 1 through 5. If the number chosen is greater than or equal to 3, it will use one of the responses stored in the uhh_what array to send to the user, otherwise, it will select the appropriate first or second option the user provided as part of its response.
You’ll then be able to test out your script inside Slack using:
<bot_name> who is better? Bill Gates or Steve Jobs?
Or you can get a bit more creative as shown below.
Building a Script to Improve Employee Efficiency
The main reason I implemented Hubot wasn’t necessarily to detract from valuable conversations, in fact, that is why Jarvis, our fun loving bot is restricted to our #random channel, but rather, I wanted to automate some tasks we staff use on a regular basis. With that goal in mind, Tars was born and he lives in the Team Leader private group to help us look up forum statistics.
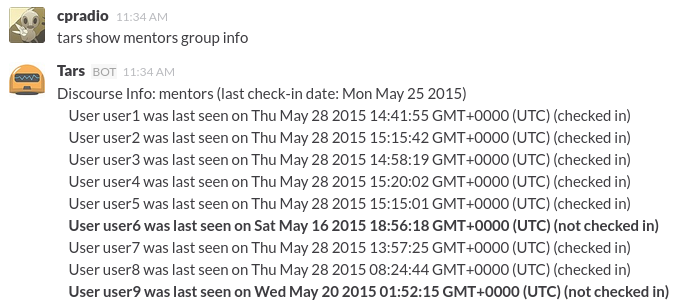
One statistic every Team Leader needs to know is, who has been present recently and who hasn’t. Tars’ discourse.group.info.coffee script provides this insight.
# Description:
# QueryDiscourseforGroupInformation
#
# Dependencies:
# None
#
# Configuration:
# HUBOT_DISCOURSE_URL
#
# Commands:
# hubot show <group> group info [from discourse]
#
# Author:
# cpradio
last_checkin_date =newDate();
last_checkin_date.setHours(0,0,0,0);
dif =(last_checkin_date.getDay()+6)%7;
last_checkin_date =newDate(last_checkin_date - dif *24*60*60*1000);
module.exports=(robot)->
robot.respond/show(.+) group info(from discourse)?/i,(res)->
groupname = res.match[1]
user_url = process.env.HUBOT_DISCOURSE_URL+"/groups/#{encodeURIComponent(groupname)}/members.json"
res.http(user_url).get()(err, _, body)->return res.send"Sorry, the tubes are broken."if err
try
data =JSON.parse(body.toString("utf8"))
checkin_date_str = last_checkin_date.toDateString()
output ="Discourse Info: #{groupname} (last check-in date: #{checkin_date_str})\r\n"for own key, user of data.members
username = user.username
last_seen =newDate(user.last_seen_at)
last_seen_as_date =newDate(last_seen)
checked_in = last_seen_as_date > last_checkin_date
checked_in_str =if checked_in then "(checked in)"else"(not checked in)"
prefix_suffix =if checked_in then ""else"*"
output +=" #{prefix_suffix}User #{username} was last seen on #{last_seen} #{checked_in_str}#{prefix_suffix}\r\n"
res.send output
catch e
res.send"Discourse data for #{groupname} group is unavailable."
Similar to the previous example, this one also has the comments filled out. This command is to be used by various members and knowing how to run the command is important. Secondly, there needs to be an environment variable configured for this command to function, so that is listed as well.
In this example, I simply need Tars to respond to a direct command of tars show {group_name} group info where {group_name} matches a group established in the Discourse forum (note: it must have a public page listing its group members for this to work).
groupname = res.match[1]
user_url = process.env.HUBOT_DISCOURSE_URL+"/groups/#{encodeURIComponent(groupname)}/members.json"
res.http(user_url).get()(err, _, body)->return res.send"Sorry, the tubes are broken."if err
try
data =JSON.parse(body.toString("utf8"))...
The command then builds the URL to get the json feed from Discourse and loops over its dataset to produce an output similar to below.
Now any Team Leader can request a group’s information and see who hasn’t been active for a while and follow up with those members. Just like the prior script, you will need to start Hubot, however, we’ll need to add a new environment variable to the start script that contains the Discourse URL we plan to run our script against. For the sake of this article, let’s use Sitepoint’s Discourse instance.
Well that is Hubot in a nutshell. You’ve got the ability to integrate it with a multitude of adapters, a multitude of scripts, and you can even create your own using its API and a bit of CoffeeScript! So what are you going to create with it? Let me know in the comments below.