A Beginner’s Guide to Handlebars

Nowadays the majority of the Web consists of dynamic applications in which the data keep changing frequently. As a result, there is a continuous need to update the data rendered on the browser. This is where JavaScript templating engines come to the rescue and become so useful. They simplify the process of manually updating the view and at the same time they improve the structure of the application by allowing developers to separate the business logic from the rest of the code. Some of the most well-known JavaScript templating engines are Mustache, Underscore, EJS, and Handlebars. In this article we’ll focus our attention on Handlebars by discussing its main features.
Handlebars: What it is and Why to Use it
Handlebars is a logic-less templating engine that dynamically generates your HTML page. It’s an extension of Mustache with a few additional features. Mustache is fully logic-less but Handlebars adds minimal logic thanks to the use of some helpers (such as if, with, unless, each and more) that we’ll discuss further in this article. As a matter of fact, we can say that Handlebars is a superset of Mustache.
Handlebars can be loaded into the browser just like any other JavaScript file:
<script src="/path/to/handlebars.min.js"></script>If you’re asking why you should employ this templating engine rather than another one, you should take a look at its pros. Here is a short list:
- It keeps your HTML page clean and separates the logic-less templates from the business logic in your JavaScript files, thus improving the structure of the application (and also its maintainability and scalability)
- It simplifies the task of manually updating the data on the view
- It’s used in popular frameworks and platforms such as Ember.js, Meteor.js, Derby.js and Ghost
I hope that this short recap helps you in deciding if it’s worth using Handlebars or not.
How Does it Work ?
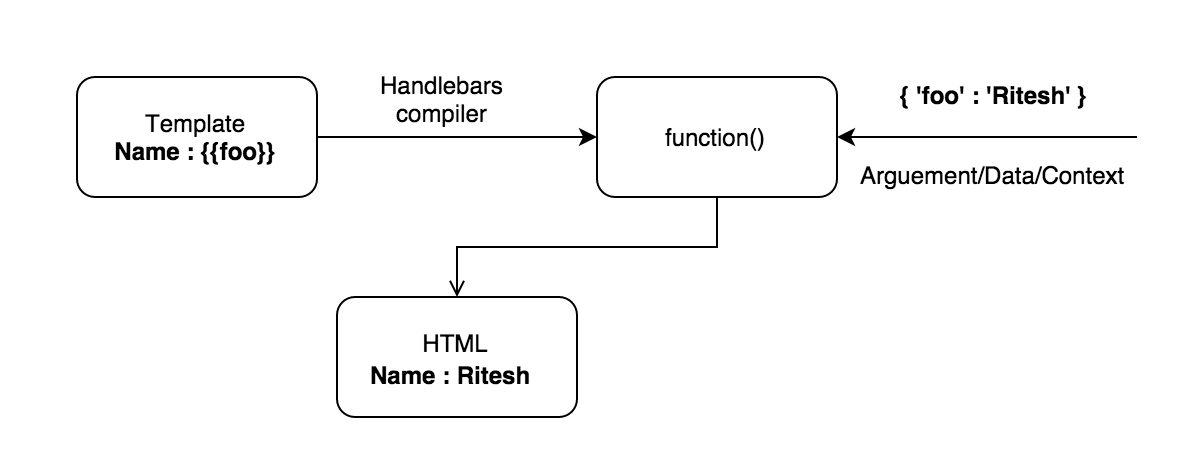
As shown in the above diagram, the way Handlebars works can be summarised as follows:
- Handlebars takes a template with the variables and compiles it into a function
- This function is then executed by passing a JSON object as an argument. This JSON object is known as context and it contains the values of the variables used in the template
- On its execution, the function returns the required HTML after replacing the variables of the template with their corresponding values
To understand the above process, let’s start with a demo that explains in detail all the above mentioned steps.
Templates
Templates can be written both in the HTML file or separately. In the first case, they appear inside the <script> tag with a type="text/x-handlebars-template" attribute and an ID. The variables are written in double curly braces {{}} and are known as expressions. Here is an example:
<script id="handlebars-demo" type="text/x-handlebars-template">
   <div>
      My name is {{name}}. I am a {{occupation}}.
   </div>
</script>
With this markup in place, we can see what we have to do use it. In your JavaScript file we firstly need to retrieve the template from the HTML document. In the following example, we’ll use the ID of the template for this purpose. After the template has been retrieved, we can compile it by using the Handlebars.compile() method which returns a function. This function is then executed by passing the context as an argument. When the execution is complete, the function returns the desired HTML with all the variables replaced by their corresponding values. At this point we can inject the HTML into our web page.
Turning this description into code results in the following snippet:
// Retrieve the template data from the HTML (jQuery is used here).
var template = $('#handlebars-demo').html();

// Compile the template data into a function
var templateScript = Handlebars.compile(template);

var context = { "name" : "Ritesh Kumar", "occupation" : "developer" };

// html = 'My name is Ritesh Kumar. I am a developer.'
var html = templateScript(context);

// Insert the HTML code into the page
$(document.body).append(html);
A live demo of this code can be found in this Codepen demo
Syntaxes
Now it’s time to dive a bit deeper into Handlebars. We’ll go through a few important terms and syntaxes that form the core of Handlebars.
Expressions
We already saw expressions in the above section. The variables used inside the templates are surrounded by double curly braces {{}} and are known as expressions:
My name is {{name}}HTML Escaping
Handlebars can escape the value returned by the expression. For example the character < is converted into <. If you don’t want Handlebars to escape a value, you have to surround the variable using triple curly braces {{{variableName}}}. For example, when the following template:
I am learning {{language}}. It is {{{adjective}}}.is used with the context variable reported below:
var context = {
  "language" : "<h3>Handlebars</h3>",
  "adjective": "<h3>awesome</h3>"
}
the resulting HTML will be:
I am learning <h3>Handlebars</h3>. It is <h3>awesome</h3>A live demo that shows this feature can be found in this Codepen demo
Comments
We can also write comments inside Handlebars templates. The syntax for Handlebars comments is {{!TypeYourCommentHere}}. However, every comment that has }} in it or any other symbol that has a special meaning in Handlebars should be written in the form {{!--TypeYourCommentHere--}}. Handlebars comments are not visible in the HTML but if you want to show them, you can use the standard HTML comment: <!--comments-->.
If we apply all these concepts to the template we’re using, we can come up with the code shown below:
<!-- I am learning {{language}} -->
I am learning {{language}}. It is {{!--adjective--}}
If we use the previous template with the context variable reported below:
var context = {
  "language" : "Handlebars",
  "adjective": "awesome"
}
the HTML output will be:
<!-- I am learning Handlebars -->
I am learning Handlebars. It is
which will result in the browser not showing the content inside the standard HTML comment. A demo of this example can be found here.
Blocks
In Handlebars, blocks are expressions that have a block opening ({{# }}) and closing ({{/}}). We’ll study in depth this topic later while focusing on helpers. For now, take a look at how an if block is written:
{{#if boolean}}
   Some Content here
{{/if}}
Paths
Handlebars supports both normal and nested path, making it possible to look up properties nested below the current context. Handlebars also supports the ../ path segment. This segment references to the parent template scope and not to one level up in the context.
For better understanding this topic, we’ll employ the example below in which we use the each helper (discussed in details later on). As you might expect, the latter iterates over the items of an array.
In this example, we’ll use the following template:
This article is available on {{website.name}}.<br/>

{{#each names}}
  I am a {{../occupation}}. My name is {{firstName}} {{lastName}}.<br/>
{{/each}}
By providing this context variable:
var context = {
  "occupation" : "developer",
  "website" : {
    "name" : "sitepoint"
  }
  "names" : [
    {"firstName" : "Ritesh", "lastName" : "Kumar"},
    {"firstName" : "John" , "lastName" : "Doe"}
  ]
}
we’ll obtain the output showed below:
This article is available on sitepoint.
I am a developer. My name is Ritesh Kumar.
I am a developer. My name is John Doe.
Like the other small snippets we’ve created so far, this example is available on Codepen
Helpers
Even though Handlebars is a logic-less templating engine, it can execute simple logics using helpers. A Handlebars helper is a simple identifier that may be followed by parameters (separated by a space), as shown below:
{{#helperName parameter1 parameter2 ...}}
  Content here
{{/helperName}}
Each parameter is a Handlebars expression. These helpers can be accessed from any context in a template.
The terms “block”, “helper”, and “block helper” are sometimes used interchangeably as most of the built-in helpers are blocks, although there are function helpers that are a bit different from block helpers. We’ll discuss them while covering custom helpers.
Some built-in helpers are if, each, unless, and with. Let’s learn more.
each Helper
The each helper is used to iterate over an array. The syntax of the helper is {{#each ArrayName}} YourContent {{/each}} . We can refer to the individual array items by using the keyword this inside the block. The index of the array’s element can be rendered by using {{@index}}. The example below illustrates the use of the each helper.
If we employ the following template:
{{#each countries}}
  {{@index}} : {{this}}<br>
{{/each}}

{{#each names}}
  Name : {{firstName}} {{lastName}}<br>
{{/each}}
in conjunction with this context variable:
var context = {
  "countries":["Russia","India","USA"],
  "names" : [
    {"firstName":"Ritesh","lastName":"Kumar"},
    {"firstName":"John","lastName":"Doe"}
  ]
}
then the output will be:
0 : Russia
1 : India
2 : USA
Name : Ritesh Kumar
Name : John Doe
A live demo of this example can be found on Codepen.
if Helper
The if helper is similar to an if statement. If the condition evaluates to a truthy value, Handlebars will render the block. We can also specify a template section known as “else section”, by using {{else}}. The unless helper is the inverse of the if helper. It renders the block when the condition evaluates to a falsy value.
To show how the if helper works, let’s consider the template below:
{{#if countries}}
  The countries are present.
{{else}}
  The countries are not present.
{{/if}}
If we provide the following context variable:
var context = {
  "countries": []
}
We’ll obtain the result reported below:
The countries are not present.This happens because an empty array is a falsy value.
In case you want to play with helpers, you can take a look at the live demo I created on Codepen.
Custom Helpers
You can create your own helpers to perform complex logics using the expression system that Handlebars provides. There are two kinds of helpers: function helpers and block helpers. The first definition is meant for a single expression, while the latter is used for block expressions. The arguments provided to the callback function are the parameters written after the helper’s name, separated by a space. The helpers are created using Handlebars.registerHelper() method:
Handlebars.registerHelper("HelperName", function(arguments){
  // This function is executed whenever this helper is used
})
Custom function helper
The syntax for a function helper is {{helperName parameter1 parameter2 ...}}. To better understand how to proceed with the implementation, let’s create a function helper called studyStatus which returns a string that will be “passed” if passingYear < 2015 and “not passed” if passingYear >= 2015:
Handlebars.registerHelper("studyStatus", function(passingYear) {
   if(passingYear < 2015) {
      return "passed";
   } else {
      return "not passed";
   }
})
In our example the parameter is only one. However, if we want to pass more parameters to the helper’s callback function we can write them in the template after the first parameter separated by a space.
Let’s develop an example with this template:
{{#each students}}
  {{name}} has {{studyStatus passingYear}}.<br>
{{/each}}
and with the following context variable:
var context = {
  "students":[
    {"name" : "John", "passingYear" : 2013},
    {"name" : "Doe" , "passingYear" : 2016}
  ]
}
In this case, the output will be:
John has passed.
Doe has not passed.
A live demo of this example is available here.
Custom block helper
Custom block helpers are used in the same way as function helpers, but the syntax is a bit different. The syntax of block helpers is:
{{#helperName parameter1 parameter2 ...}}
  Your content here
{{/helperName}}
When we register a custom block helper, Handlebars automatically adds an options object as the last parameter to the callback function. This options object has a fn() method that allows us to change the context of the object temporarily to access a certain property. Let’s change the example of the previous section by using a block helper named studyStatus but with the same context variable:
Handlebars.registerHelper("studyStatus", function(data, options){
  var len = data.length;
  var returnData="";
  for(var i=0;i<len;i++){
    // change the value of the passingYear to
    // passed/not passed based on the conditions.
    data[i].passingYear=(data[i].passingYear < 2015) ? "passed" : "not passed";

    // here options.fn(data[i]) temporarily changes the
    // scope of the whole studyStatus helper
    // block to data[i]. So {{name}}=data[i].name
    // in the template.
    returnData = returnData + options.fn(data[i]);

  }

  return returnData;
});

var context = {
  "students":[
    {"name" : "John", "passingYear" : 2013},
    {"name" : "Doe" , "passingYear" : 2016}
  ]
}
If this code is used in conjunction with the template defined below
{{#studyStatus students}}
  {{name}} has {{passingYear}}
{{/studyStatus}}
we’ll obtain the following result:
John has passed.
Doe has not passed.
And here is the Codepen demo.
Partial Templates
Handlebars partials are templates that can be shared among different templates. They are written as {{> partialName}}. Before using them in the HTML, we need to register the partial using Handlebars.registerPartial() method. The following example will help you in understanding how to register a partial named partialTemplate:
Handlebars.registerPartial(
  'partialTemplate',
  '{{language}} is {{adjective}}. You are reading this article on {{website}}.'
);

var context={
  "language" : "Handlebars",
  "adjective": "awesome"
}
When used with the template defined below
{{> partialTemplate website="sitepoint"}} <br>
{{> partialTemplate website="www.sitepoint.com"}}
It’ll give the following result:
Handlebars is awesome. You are reading this article on sitepoint
Handlebars is awesome. You are reading this article on www.sitepoint.com
A live demo of this code can be found in this Codepen demo.
Precompilation
As we have seen, the first thing Handlebars does is to compile the template into a function. This is one of the most expensive operations to perform on the client. We can improve the performance of the application if we precompile templateScript and then send the compiled version to the client. In that case, the only task needed to be performed on the client will be the execution of that function. Since the precompiled file is a script, we can load the script in HTML as a normal file. Let’s see how all this stuff can be done.
Firstly, you have to install Handlebars globally by using npm install handlebars -g. Please, be sure that different templates are written in separate files with different file names and with the .handlebars extensions (for example demo.handlebars). There is no need of using the <script> tag inside those files.
<div>
  My name is {{name}}. I am a {{occupation}}.
</div>
Now store all the template files in a single folder named templates. You can use any folder name you wish but if you do that, please don’t forget to change the following command accordingly. So, open the terminal and execute the command:
handlebars path/to/templates -f templatesCompiled.jsThis command will generate a file named templatesCompiled.js that contains all the compiled templates. The compiler will insert the templates in Handlebars.templates. If the input file is demo.handlebars, then it will be inserted at Handlebars.templates.demo
Now we have to include templatesCompiled.js in the HTML file as a normal script. It’s important to note that we don’t need to load the whole Handlebars library as the compiler itself is not needed anymore. We can use the smaller “runtime” build instead:
<script src="handlebars.runtime.js"></script>
<script src="path/to/templatesCompiled.js"></script>
Now we can employ the template that was originally present in demo.handlebars by using the following code:
var context = {
  "name" : "Ritesh Kumar",
  "occupation" : "developer"
}

var templateScript = Handlebars.templates.demo(context);

$(document.body).append(templateScript);
The final output will be the following:
My name is Ritesh Kumar. I am a developer.This method will significantly increase the performance of the application and the page loading time also decreases as we are using the runtime build of Handlebars that is lighter than the whole library.
The code of this whole precompilation demo is available on GitHub.
Conclusions
In this article we have discussed the basic concepts of Handlebars. We also examined its frequently used functions and syntaxes. I hope you enjoyed this tutorial and you’ll use the demos included to have a good grasp of this topic. I’ll look forward to reading your comments.
In case you don’t want to download the library but you still want to try it, you can play with Handlebars online at http://tryhandlebarsjs.com/.


