Build a Database with Eloquent, Faker and Flysystem

In this part, we will create the structure of the database. We will create the tables using migrations and seed the database using seeders. Also, you will learn how to grab some random images from LoremPixel and put them on the filesystem using Flysystem. You’ll also be adding some randomly generated data using the Faker library.
Much like with part 1, you can download this part’s code from github.
Install the libraries
The installation is very straightforward with Composer.
Require these projects:
"fzaninotto/faker": "1.5.*@dev",
    "league/flysystem": "dev-feature/eventable-filesystem",
    "dropbox/dropbox-sdk": "dev-master"
Execute composer update and everything will be installed and updated smoothly.
Build the structure of the database
Until now, we had just one migration file. We need two more for our application. One table that will keep the data for photos and another for categories. To find out more about Artisan and Migrations, see this post.
php artisan migrate:make create_photos_table
    php artisan migrate:make create_categories_table
These two commands create two migration files. Let’s start filling them with some schema. First, we start with the photos migration file. Stop for a moment and think what we need for this one. Earlier, we installed the flysystem library.
The flysystem library can handle files on different locations: the local filesystem, Dropbox, AWS3, Rackspace Cloud Files and more. We need it for the local filesystem on our development environment and we have to use Dropbox for production. Why is that? Heroku is a Paas (Platform as a Service) so we don’t have full control of the filesystem. There are only two directories that can be writable: ./temp and ./logs. You can write files only using git for deployment, and not in any other folder. Why don`t we just use those two directories? Because they are temporary. If something goes wrong and the Dyno restarts, all the files in those directories are deleted. It’s not safe to work with those two directories.
If you want to know more about flysystem read this article on sitepoint by Lukas White or their documentation .
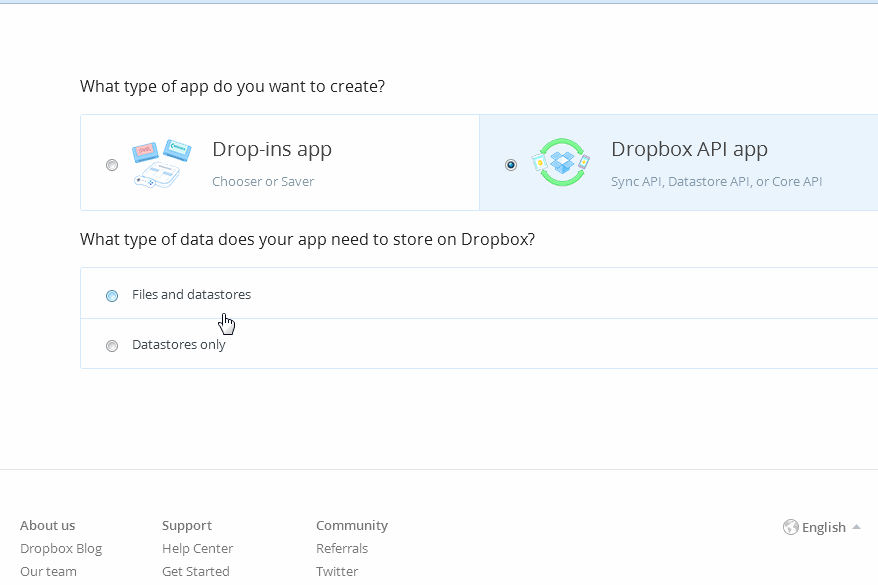
A Dropbox application
Before using flysystem and Dropbox for production, we have to create a Dropbox application which allows us to use their Api. Then, we need to do some configuring. If you don’t already have a Dropbox account, create one and then return for the rest of the article. If you use Rackspace, or AWS3 then you are free to use either of those. I’m using Dropbox here because it doesn’t require a credit card and it’s free to use. Follow the link and create a Dropbox App. Here is how to create one.
Next come the configurations. We are going to use it only on production. Its a good idea to separate the configuration from App logic. Create dropbox.php inside /app/config or in /app/config/production.
return array(
        'token'     =>  'token_here',
        'appName'   =>  'Your App Name'
    );
And for retrieving use:
Config::get('dropbox.appName');
    Config::get('dropbox.token');
We need flysystem to create the images folder (the folder that will hold images/photos) and delete it. In the up method, we will create the folder and in the down method we will delete it. In __construct we create a Filesystem object by passing in a Local adapter (or a Dropbox, Rackspace…). Inside that local adapter we specify a path.
Note that creating a folder and deleting it inside a migration is an anti pattern. It’s nothing critical, but it breaks the single responsibility principle. Don’t worry, this code is just for demonstration purposes and to show you how the library works – just keep that in mind and try to use it inside the controllers next time.
The public_path() function is a Laravel helper function that returns the full path of the public folder.
To define the schema, just specify what type of fields you want to use and put the name of the field as a parameter. For more info on schema read the Laravel docs.
/* /app/database/migrations/some_date_CreatePhotosTable.php */


    use Illuminate\Database\Schema\Blueprint;
    use Illuminate\Database\Migrations\Migration;
    use Dropbox\Client;
    use League\Flysystem\Filesystem;
    use League\Flysystem\Adapter\Local as Adapter;
    use League\Flysystem\Adapter\Dropbox;


    class CreatePhotosTable extends Migration {

        private $filesystem;

        public function __construct(){

            if(App::environment() === "local"){     // If its on local use the local filesystem

                $this->filesystem = new Filesystem(new Adapter( public_path() ));

            }else{                                  // Use dropbox on other cases,
                                                    // including testing here (not a good idea)

                $client = new Client(Config::get('dropbox.token'), Config::get('dropbox.appName'));
                $this->filesystem = new Filesystem(new Dropbox($client));

            }

        }

    	public function up()
    	{

            $this->filesystem->createDir('images');

            Schema::create('photos', function($table)
            {
                $table->increments('id');
                $table->integer('user_id');
                $table->string('title');
                $table->string('url')->unique();
                $table->text('description');
                $table->integer("category");
                $table->timestamps();
            });
    	}

    	public function down()
    	{

            Schema::dropIfExists('photos');

            try{
                $this->filesystem->deleteDir('images');
            }catch (\Dropbox\Exception_BadResponse $e){}

    	}

    }
For the up method we created an id, user_id, title, url, a category, and a description for the photo. We also used something that doesn’t look like the others. $table->timestamps() is a special function that adds two more fields automatically: created_at and updated_at.
In the down method, drop the table if it exists and delete the folder that we created in the up method. We will be using seeders to set some images there, so it’s a good idea to delete all the photos and seed with new photos.
This seed file works in production, too. For development, we have used the local filesystem and for production a Dropbox App. Upload all the changes to Heroku and make a migration + seeding and you will see that in your Dropbox App a folder was created.
After creating the photos migration file, we need the categories migration file. This is easier. In the schema, we create an id that increments every time a new record is added into the table. We also need a name for the category. By having a name and an id for the category, we can make things more dynamic. In the down method, drop the table if it exists.
/* /app/database/migrations/some_date_CreateCategoriesTable.php */

    use Illuminate\Database\Schema\Blueprint;
    use Illuminate\Database\Migrations\Migration;

    class CreateCategoriesTable extends Migration {

    	public function up()
    	{
            Schema::create('categories', function($table)
            {
                $table->increments('id');
                $table->string('name');
                $table->timestamps();
            });
    	}

    	public function down()
    	{
            Schema::dropIfExists('categories');
    	}

    }
After creating those two files let’s apply the migration by executing:
php artisan migrate:refresh
    php artisan db:seed
or
php artisan migrate:refresh --seedThis will revert the old migration (if you had applied one) and build the new schema. Afterwards, the seeders will be executed.
If you hadn’t already made a migration then an error will be shown. Use php artisan migrate and everything afterwards will be working just fine.
Create the Models
Before going further with the seeders, it’s better if we create the models first. When creating the models, migrations, and the seeders, you have to know what you are doing. Think clearly about what you really want. The relations between models are important and save time down the line.
Laravel’s models extend Eloquent’s ORM class. A nice feature of Eloquent is the Relations. As we are dealing with a REST Api in this series, this feature helps us a lot on the endpoints to put the data that is related with a given resource. EmberJs on the front end side has a similar logic about relations and this automates a large part of the code. This parity makes the code more maintainable and scalable.
For the User model, you don’t have to worry. It’s created by Laravel and ready to use. Edit that Model and add some relation with other models that we are going to create. The models are located in /app/models.
/* /app/models/User.php */

    use Illuminate\Auth\UserTrait;
    use Illuminate\Auth\UserInterface;

    class User extends Eloquent implements UserInterface{

    	use UserTrait;

    	protected $table = 'users';     // The table that this model uses

        public function photos()
        {
            return $this->hasMany('Photo');
        }

    }
The photos() method specifies a relation with the Photo model which doesn’t exist for now. Also, the protected variable $table is used for specifying the table name that this model is using. As an additional feature, this model implements the UserInterface for easier integration with authentication.
Let’s create the Photo model. Create a new file in /app/models and name it Photo.php. Remember that the class name should begin with uppercase letters and extend Eloquent.
/* /app/models/Photo.php */

    class Photo extends Eloquent {

        protected $table = 'photos';

        public function author(){
            return $this->belongsTo('User', 'user_id');
        }

    }
The $table variable does not have to be specified in this case. If a $table variable does not exist, Laravel uses the plural of the name in lowercase as the table name. We have specified another relation here: the belongsTo relation. The first parameter is for the Model that has a relation with it. The second one is for the field that is being used on this model to specify which user owns this photo. It can by used like this:
Photo::find($id)->author;This returns a User object with an id that is the same as the user_id on the Photo model.
For the categories, create another file in /app/models and name it Category.php.
class Category extends Eloquent {

        protected $table = 'categories';

    }
Seed the tables with some data
Now that we have a structure for the database, it is time to seed it with some data. This is where the Faker library comes in. For more info on Faker read the Faker docs or for more advanced features and use cases, read Simplifying Test Data Generation with Faker.
Currently, we have only a seeder file. Let’s edit it and use the Faker library to generate a fake username and password. Edit the UserTableSeeder.php file inside the /app/database/seeds folder.
We need to know one user for authentication. One user in the database should be created without Faker.
Init the Faker object:
$faker = Faker\Factory::create(); // Faker uses Factory design patternHow to create a username and a password:
$faker->userName;                           // returns a username
    Hash::make($faker->name . $faker->year);    // Creates a password
In the end, the UserTableSeeder should look something like this:
/* /app/database/seeds/UserTableSeeder.php */

    class UserTableSeeder extends Seeder {

        public function run()
        {

            Eloquent::unguard();

            DB::table('users')->delete();

            $faker = Faker\Factory::create();


            for($i = 0; $i < 2; $i++){
                User::create(array(
                    'username' => $faker->userName,
                    'password' => Hash::make($faker->name . $faker->year),
                    'name' => $faker->name,
                    'lastname' => $faker->lastName
                ));
            }

            User::create(array(
                'username' => 'foo',
                'password' => Hash::make('password'),
                'name' => $faker->name,
                'lastname' => $faker->lastName
            ));

        }

    }
By executing this seeder Class, we have created two fake users and a hardcoded one. Later, we will test this app by using basic authentication so we need to have a known user.
What’s left are the category and photo seed files. Create PhotoTableSeeder.php and CategoryTableSeeder.php inside /app/database/seeds.
/* /app/database/seeds/CategoryTableSeeder.php */

    class CategoryTableSeeder extends Seeder {

        public function run()
        {

            Eloquent::unguard();

            DB::table('categories')->delete();

            for($i = 1; $i < 5; $i++){
                Category::create(array(
                    'name' => 'category' . $i
                ));
            }

        }

    }
For the categories seed file, we don’t even need Faker. Just categorynumber would do for the name of the category. The id will auto increment each time a new category is inserted.
The photo seed class is a bit trickier. In this migration file we need to get some images from LoremPixel and put them into the /public/images folder. Also, we need the flysystem library with a local adapter or Dropbox Adapter.
This is how we create a random string. The length of the argument is the length of the random string. This will be the name of the image.
$faker->lexify($string = '???????????????????');Getting the images from lorempixel is simple: width and height are URL fragments. Such a link then returns an image with the given size. By requesting this url several times, different images are returned so no duplication occurs. file_get_contents($url); gets the content of that url. In this case that url would be https://lorempixel.com/400/200/ , and it’s an image
file_get_contents('https://lorempixel.com/640/400/');The sentence method of Faker returns a sentence with the specified number of words as an argument
$faker->sentence(40);In the end, PhotoTableSeeder.php should look something like this.
/* /app/database/seeds/PhotoTableSeeder.php */

    use Dropbox\Client;                     // DropBox Client
    use League\Flysystem\Filesystem;
    use League\Flysystem\Adapter\Local as Adapter;
    use League\Flysystem\Adapter\Dropbox;   // The DropBox Adapter


    class PhotoTableSeeder extends Seeder {

        private $filesystem;

        public function __construct(){
            if(App::environment() === "local"){
                $this->filesystem = new Filesystem(new Adapter( public_path() . '/images/'));
            }else{
                $client = new Client(Config::get('dropbox.token'), Config::get('dropbox.appName'));
                $this->filesystem = new Filesystem(new Dropbox($client, '/images'));
            }

        }

        public function run()
        {

            Eloquent::unguard();

            DB::table('photos')->delete();

            $faker = Faker\Factory::create();

            for($i = 0; $i < 10; $i++){

                $file = file_get_contents('https://lorempixel.com/640/400/');

                $url = $faker->lexify($string = '???????????????????');
                try{
                    $this->filesystem->write($url, $file);
                }catch (\Dropbox\Exception $e){
                    echo $e->getMessage();
                }


                Photo::create(array(
                    'url' => $url,
                    'user_id' => (int) rand(1, 4),
                    'title' => $faker->sentence(5),
                    'description' => $faker->sentence(40),
                    'category' => rand(1, 4)
                ));
            }

        }

    }
Don’t forget to call these migration files into DatabaseSeeder.php . Add these lines into /app/database/seeds/DatabaseSeeder.php:
$this->call('PhotoTableSeeder');
    $this->call('CategoryTableSeeder');
This way, DatabaseSeeder will call the two new seeder files. Let’s apply the migration and seeding on Heroku. First push the project
git add .
    git commit -m "a message here"
    git push heroku master
And then run the migration and the seed
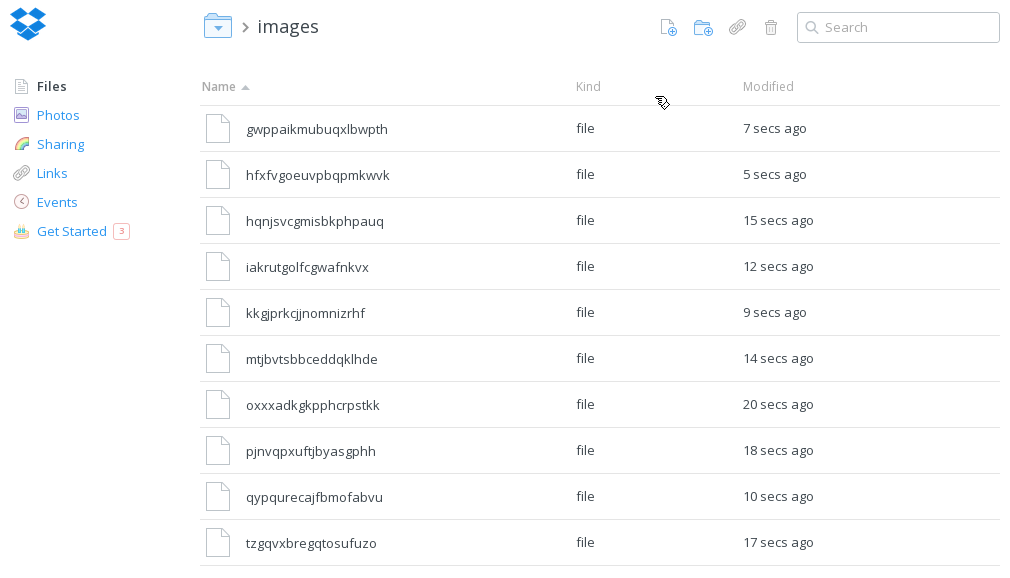
heroku run php artisan migrate:refresh --seedAfter executing the migration and seeding on the server, this is the screenshoot on my dropbox apps folder.
Conclusion
In this part, we saw how to create the database using migrations and how to seed that database using seeders with some fake data. We used the Faker library and Flysystem to work with the filesystem. Eloquent is an easy to use ORM, yet very powerful – understanding how Eloquent works simplifies your workflow. Don’t forget that everything starts from the database architecture and defining a smart one in the beginning will spare you many headaches later on. Stay tuned for part 3!


