Revealing the Magic of JavaScript

We use tons of tools every day. Different libraries and frameworks are a part of our daily job. We use them because we don’t want to reinvent the wheel for every project, even if we don’t understand what’s going on under the hood. In this article, we will reveal some of the magical processes happening in the most popular libraries. We’ll also see if we can replicate their behaviour.
Creating DOM Elements From a String
With the rise of single page applications, we are doing a lot of things with JavaScript. A big part of our application’s logic has been moved to the browser. It is a common task to generate or replace elements on the page. Code similar to what is shown below has become very common.
var text = $('<div>Simple text</div>');

$('body').append(text);
The result is a new <div> element added to the body of the document. This simple operation is done with only one line of jQuery. Without jQuery, the code is a little more complex, but not much:
var stringToDom = function(str) {
  var temp = document.createElement('div');

  temp.innerHTML = str;
  return temp.childNodes[0];
}
var text = stringToDom('<div>Simple text</div>');

document.querySelector('body').appendChild(text);
We defined our own utility method stringToDom that creates a temporary <div> element. We changed its innerHTML property and in the end we simply returned the first child which in practice is what we needed. It worked the same way. However, we will observe different results with the following code:
var tableRow = $('<tr><td>Simple text</td></tr>');
$('body').append(tableRow);

var tableRow = stringToDom('<tr><td>Simple text</td></tr>');
document.querySelector('body').appendChild(tableRow);
Visually, on the page, there are no differences. However, if we check the generated markup with Chrome’s developer tools we will get an interesting result:
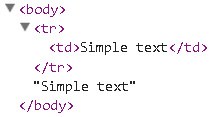
It looks like our stringToDom function created just a text node and not the actual <tr> tag. But at the same time, jQuery somehow managed to do it. The problem is that the string containing the HTML element is run through a parser in the browser. That parser ignores the tags that are not placed in the right context, and we get only a text node. A table row without a table is not valid for the browser.
jQuery successfully solves the problem by creating the right context and extracts only the needed part. If we dig a bit into the code of the library we will see a map like this one:
var wrapMap = {
  option: [1, '<select multiple="multiple">', '</select>'],
  legend: [1, '<fieldset>', '</fieldset>'],
  area: [1, '<map>', '</map>'],
  param: [1, '<object>', '</object>'],
  thead: [1, '<table>', '</table>'],
  tr: [2, '<table><tbody>', '</tbody></table>'],
  col: [2, '<table><tbody></tbody><colgroup>', '</colgroup></table>'],
  td: [3, '<table><tbody><tr>', '</tr></tbody></table>'],
  _default: [1, '<div>', '</div>']
};
wrapMap.optgroup = wrapMap.option;
wrapMap.tbody = wrapMap.tfoot = wrapMap.colgroup = wrapMap.caption = wrapMap.thead;
wrapMap.th = wrapMap.td;
Every element that requires special treatment has an array assigned. The idea is to construct the right DOM element and to depend on the level of nesting to fetch what we need. For example, for the <tr> element we need to create a table with a <tbody> child. So, we have two levels of nesting.
Having a map, we have to find out what kind of tag we want in the end. The following code extracts the tr from <tr><td>Simple text</td></tr>
var match = /<\s*\w.*?>/g.exec(str);
var tag = match[0].replace(/</g, '').replace(/>/g, '');
The rest is finding the proper context and returning the DOM element. Here is the final variant of the function stringToDom:
var stringToDom = function(str) {
  var wrapMap = {
    option: [1, '<select multiple="multiple">', '</select>'],
    legend: [1, '<fieldset>', '</fieldset>'],
    area: [1, '<map>', '</map>'],
    param: [1, '<object>', '</object>'],
    thead: [1, '<table>', '</table>'],
    tr: [2, '<table><tbody>', '</tbody></table>'],
    col: [2, '<table><tbody></tbody><colgroup>', '</colgroup></table>'],
    td: [3, '<table><tbody><tr>', '</tr></tbody></table>'],
    _default: [1, '<div>', '</div>']
  };
  wrapMap.optgroup = wrapMap.option;
  wrapMap.tbody = wrapMap.tfoot = wrapMap.colgroup = wrapMap.caption = wrapMap.thead;
  wrapMap.th = wrapMap.td;
  var element = document.createElement('div');
  var match = /<\s*\w.*?>/g.exec(str);

  if(match != null) {
    var tag = match[0].replace(/</g, '').replace(/>/g, '');
    var map = wrapMap[tag] || wrapMap._default, element;
    str = map[1] + str + map[2];
    element.innerHTML = str;
    // Descend through wrappers to the right content
    var j = map[0]+1;
    while(j--) {
      element = element.lastChild;
    }
  } else {
    // if only text is passed
    element.innerHTML = str;
    element = element.lastChild;
  }
  return element;
}
Notice that we are checking if there is a tag in the string – match != null. If not we simply return a text node. There is still usage of a temporary <div>, but this time we are passing the right tags so the browser can create a valid DOM tree. In the end by using a while loop we are going deeper and deeper till we reach the wanted tag.
Here is a CodePen showing our implementation:
See the Pen xlCgn by Krasimir Tsonev (@krasimir) on CodePen.
Let’s continue by exploring the wonderful AngularJS dependency injection.
Revealing AngularJS Dependency Injection
When we start using AngularJS it impresses with its two-way data binding. The second thing which we notice is its magical dependency injection. Here is a simple example:
function TodoCtrl($scope, $http) {
  $http.get('users/users.json').success(function(data) {
    $scope.users = data;
  });
}
That’s a typical AngularJS controller. It performs an HTTP request, fetches data from a JSON file, and passes it to the current scope. We don’t execute the TodoCtrl function – we don’t have a chance to pass any arguments. The framework does. So, where do these $scope and $http variables came from? It’s a super cool feature, that highly resembles black magic. Let’s see how it is done.
We have a JavaScript function that displays the users in our system. The same function needs access to a DOM element to put the generated HTML, and an Ajax wrapper to get the data. In order to simplify the example, we will mock-up the data and the HTTP requesting.
var dataMockup = ['John', 'Steve', 'David'];
var body = document.querySelector('body');
var ajaxWrapper = {
  get: function(path, cb) {
    console.log(path + ' requested');
    cb(dataMockup);
  }
}
We will use the <body> tag as a content holder. ajaxWrapper is the object simulating the request and dataMockup is an array containing our users. Here is the function that we will use:
var displayUsers = function(domEl, ajax) {
  ajax.get('/api/users', function(users) {
    var html = '';
    for(var i=0; i < users.length; i++) {
      html += '<p>' + users[i] + '</p>';
    }
    domEl.innerHTML = html;
  });
}
And of course, if we run displayUsers(body, ajaxWrapper) we will see the three names displayed on the page and /api/users requested in our console. We could say that our method has two dependencies – body and ajaxWrapper. So, now the idea is to make the function working without passing arguments, i.e. we have to get the same result by calling just displayUsers(). If we do that with the code so far the result will be:
Uncaught TypeError: Cannot read property 'get' of undefinedAnd that’s normal because ajax parameter is not defined.
Most of the frameworks that provide mechanisms for dependency injecting have a module, usually named injector. To use a dependency we need to register it there. Later, at some point, our resource is provided to the application’s logic by the same module.
Let’s create our injector:
var injector = {
  storage: {},
  register: function(name, resource) {
    this.storage[name] = resource;
  },
  resolve: function(target) {

  }
};
We need only two methods. The first one, register, accepts our resources (dependencies) and stores them internally. The second one accepts the target of our injection – the function that has dependencies and needs to receive them as parameters. The key moment here is that the injector should not call our function. That’s our job and we should be able to control that. What we can do in the resolve method is to return a closure that wraps the target and invokes it. For example:
resolve: function(target) {
  return function() {
    target();
  };
}
Using that approach we will have the chance to call the function with the needed dependencies. And at the same time we are not changing the workflow of the application. The injector is still something independent and doesn’t hold logic related functionalities.
Of course, passing the displayUsers function to the resolve method doesn’t help.
displayUsers = injector.resolve(displayUsers);
displayUsers();
We still get the same error. The next step is to find out what the passed target needs. What are its dependencies? And here is the tricky part that we can adopt from AngularJS. I, again, dug a bit into the code of the framework and found this:
var FN_ARGS = /^function\s*[^\(]*\(\s*([^\)]*)\)/m;
var STRIP_COMMENTS = /((\/\/.*$)|(\/\*[\s\S]*?\*\/))/mg;
...
function annotate(fn) {
  ...
  fnText = fn.toString().replace(STRIP_COMMENTS, '');
  argDecl = fnText.match(FN_ARGS);
  ...
}
We purposely skipped some parts, because they are more like implementation details. That’s the code which is interesting for us. The annotate function is something like our resolve method. It converts the passed target function to a string, removes the comments (if any), and extracts the arguments. Let’s use that and see the results:
resolve: function(target) {
  var FN_ARGS = /^function\s*[^\(]*\(\s*([^\)]*)\)/m;
  var STRIP_COMMENTS = /((\/\/.*$)|(\/\*[\s\S]*?\*\/))/mg;
  fnText = target.toString().replace(STRIP_COMMENTS, '');
  argDecl = fnText.match(FN_ARGS);
  console.log(argDecl);
  return function() {
    target();
  }
}
Here is the output in the console:

If we get the second element of argDecl array we will find the names of the needed dependencies. That’s exactly what we need, because having the names we will be able to deliver the resources from the storage of the injector. Here is the version that works and successfully covers our goals:
resolve: function(target) {
  var FN_ARGS = /^function\s*[^\(]*\(\s*([^\)]*)\)/m;
  var STRIP_COMMENTS = /((\/\/.*$)|(\/\*[\s\S]*?\*\/))/mg;
  fnText = target.toString().replace(STRIP_COMMENTS, '');
  argDecl = fnText.match(FN_ARGS)[1].split(/, ?/g);
  var args = [];
  for(var i=0; i<argDecl.length; i++) {
    if(this.storage[argDecl[i]]) {
      args.push(this.storage[argDecl[i]]);
    }
  }
  return function() {
    target.apply({}, args);
  }
}
Notice that we are using .split(/, ?/g) to convert the string domEl, ajax to an array. After that we are checking if the dependencies are registered and if yes we are passing them to the target function. The code outside the injector looks like that:
injector.register('domEl', body);
injector.register('ajax', ajaxWrapper);

displayUsers = injector.resolve(displayUsers);
displayUsers();
The benefit of such an implementation is that we can inject the DOM element and the Ajax wrapper in many functions. We could even distribute the configuration of our application like that. There is no need to pass objects from class to class. It’s just the register and resolve methods.
Of course our injector is not perfect. There is still some room for improvements, like for example the supporting of scope definition. The target function right now is invoked with a newly created scope, but normally we will want to pass our own. We should support also sending custom arguments along with the dependencies.
The injector becomes even more complicated if we want to keep our code working after minification. As we know the minifiers replace the names of the functions, variables and even the arguments of the methods. And because our logic relies on these names we need to think about workaround. One possible solution is again coming from AngularJS:
displayUsers = injector.resolve(['domEl', 'ajax', displayUsers]);Instead of only the displayUsers we are passing the actual dependencies’ names.
Our example in action:
See the Pen bxdar by Krasimir Tsonev (@krasimir) on CodePen.
Adopting Ember’s Computed Properties
Ember is one of the most popular frameworks nowadays. It has tons of useful features. There is one which is particularly interesting – computed properties. In summary, computed properties are functions that act as properties. Let’s see a simple example taken from the Ember’s documentation:
App.Person = Ember.Object.extend({
  firstName: null,
  lastName: null,
  fullName: function() {
    return this.get('firstName') + ' ' + this.get('lastName');
  }.property('firstName', 'lastName')
});
var ironMan = App.Person.create({
  firstName: "Tony",
  lastName:  "Stark"
});
ironMan.get('fullName') // "Tony Stark"
There is a class that has firstName and lastName properties. The computed property fullName returns the concatenated string containing the full name of the person. The strange thing is the part where we use .property method against the function applied to fullName. I personally didn’t see that anywhere else. And, again, quick look of the framework’s code reveals the magic:
Function.prototype.property = function() {
  var ret = Ember.computed(this);
  // ComputedProperty.prototype.property expands properties; no need for us to
  // do so here.
  return ret.property.apply(ret, arguments);
};
The library tweaks the prototype of the global Function object by adding a new property. It’s a nice approach to run some logic during the definition of a class.
Ember uses getters and setters to operate with the data of the object. That simplifies the implementation of the computed properties because we have one more layer before to reach the actual variables. However, it will be even more interesting if we are able to use computed properties with the plain JavaScript objects. Like for example:
var User = {
  firstName: 'Tony',
  lastName: 'Stark',
  name: function() {
    // getter + setter
  }
};

console.log(User.name); // Tony Stark
User.name = 'John Doe';
console.log(User.firstName); // John
console.log(User.lastName); // Doe
name is used as a regular property but in practice is a function that gets or sets firstName and lastName.
There is a build-in feature of JavaScript that could help us realize the idea. Have a look at the following snippet:
var User = {
  firstName: 'Tony',
  lastName: 'Stark'
};
Object.defineProperty(User, "name", {
  get: function() {
    return this.firstName + ' ' + this.lastName;
  },
  set: function(value) {
    var parts = value.toString().split(/ /);
    this.firstName = parts[0];
    this.lastName = parts[1] ? parts[1] : this.lastName;
  }
});
The Object.defineProperty method could accept a scope, name of a property, getter, and setter. All we have to do is to write the body of the two methods. And that’s it. We will be able to run the code above and we will get the expected results:
console.log(User.name); // Tony Stark
User.name = 'John Doe';
console.log(User.firstName); // John
console.log(User.lastName); // Doe
Object.defineProperty is exactly what we need, but we don’t want to force the developer to write it every time. We may need to provide a polyfill, run additional logic, or something like that. In the ideal case we want to provide an interface similar to Ember’s. Only one function is part of the class definition. In this section, we will write a utility function called Computize that will process our object and somehow will convert the name function to a property with the same name.
var Computize = function(obj) {
  return obj;
}
var User = Computize({
  firstName: 'Tony',
  lastName: 'Stark',
  name: function() {
    ...
  }
});
We want to use the name method as a setter, and at the same time as a getter. This is similar to Ember’s computed properties.
Now let’s add our own logic into the prototype of the Function object:
Function.prototype.computed = function() {
  return { computed: true, func: this };
};
Once we add the above lines, we will be able to add .computed() to the end of every function definition:
name: function() {
  ...
}.computed()
As a result, the name property doesn’t contain function anymore, but an object that has computed property equal to true and func property filled with the old function. The real magic happens in the implementation of the Computize helper. It goes through all the properties of the object and uses Object.defineProperty where we have computed properties:
var Computize = function(obj) {
  for(var prop in obj) {
    if(typeof obj[prop] == 'object' && obj[prop].computed === true) {
      var func = obj[prop].func;
      delete obj[prop];
      Object.defineProperty(obj, prop, {
        get: func,
        set: func
      });
    }
  }
  return obj;
}
Notice that we are deleting the original property name. In some browser Object.defineProperty works only on properties that are not defined yet.
Here is the final version of the User object that uses .computed() function.
var User = Computize({
  firstName: 'Tony',
  lastName: 'Stark',
  name: function() {
    if(arguments.length > 0) {
      var parts = arguments[0].toString().split(/ /);
      this.firstName = parts[0];
      this.lastName = parts[1] ? parts[1] : this.lastName;
    }
    return this.firstName + ' ' + this.lastName;
  }.computed()
});
A function that returns the full name is used for changing firstName and lastName. That is the idea behind the checking of passed arguments and processing the first one. If it exists we split it and apply the values to the normal properties.
We already mentioned the desired usage, but let’s see it one more time:
console.log(User.name); // Tony Stark
User.name = 'John Doe';
console.log(User.firstName); // John
console.log(User.lastName); // Doe
console.log(User.name); // John Doe
The following CodePen shows our work in practice:
See the Pen ahpqo by Krasimir Tsonev (@krasimir) on CodePen.
The Crazy React Templates
You’ve probably heard about Facebook’s framework React. It’s built around the idea that everything is a component. What is interesting is the definition of component. Let’s take a look at the following example:
<script type="text/jsx">;
  /** @jsx React.DOM */
  var HelloMessage = React.createClass({
    render: function() {
      return <div>Hello {this.props.name}</div>;
    }
  });
</script>;
The first thing that we start thinking about is that this is a JavaScript, but it is an invalid one. There is a render function, and it will probably throw an error. However, the trick is that this code is put in <script> tag with custom type attribute. The browser doesn’t process it which means that we are safe from errors. React has its own parser that translates the code written by us to a valid JavaScript. The developers at Facebook called the XML like language JSX. Their JSX transformer is 390K and contains roughly 12000 lines of code. So, it is a bit complex. In this section, we will create something way simple, but still quite powerful. A JavaScript class that parses HTML templates in the style of React.
The approach that Facebook took is to mix JavaScript code with HTML markup. So, lets say that we have the following template:
<script type="text/template" id="my-content">;
  <div class="content">;
    <h1>;<% title %>;</h1>;
  </div>;
</script>;
And a component that uses it:
var Component = {
  title: 'Awesome template',
  render: '#my-content'
}
The idea is that we point out the id of the template and define the data that should be applied. The last piece of our implementation is the actual engine that merges the two elements. Let’s call it Engine and start it like that:
var Engine = function(comp) {
  var parse = function(tplHTML) {
    // ... magic
  }
  var tpl = document.querySelector(comp.render);
  if(tpl) {
    var html = parse(tpl.innerHTML);
    return stringToDom(html);
  }
}
var el = Engine(Component);
We are getting the content of the <script type="text/template" id="my-content"> tag. Parse it and generate HTML string. Just after that convert that HTML to a valid DOM element and return it as a result of the whole process. Notice that we are using the stringToDom function. The one that we wrote in the first section of this article.
Now, let’s write our parse function. Our first task is to distinguish the HTML from the expressions. By expressions, we mean strings put between <% and %>. We will use a RegEx to find them and a simple while loop to go through all the matches:
var parse = function(tplHTML) {
  var re = /<%([^%>]+)?%>/g;
  while(match = re.exec(tplHTML)) {
    console.log(match);
  }
}
The result of the above code is as follows:
[
    "<% title %>",
    "title",
    index: 55,
    input: "<div class="content"><h1><% title %></h1></div>"
]
There is only one expression and its content is title. The first intuitive approach that we can take is to use the JavaScript’s replace function and replace <% title %> with the data from the passed comp object. However, this will work only with the simple properties. What if we have nested objects or even if we want to use a function. Like for example:
var Component = {
  data: {
    title: 'Awesome template',
    subtitle: function() {
      return 'Second title';
    }
  },
  render: '#my-content'
}
Instead of creating a complex parser and almost invent a new language we may use pure JavaScript. The only one thing that we have to do is to use the new Function syntax.
var fn = new Function('arg', 'console.log(arg + 1);');
fn(2); // outputs 3
We are able to construct the body of a function that is later executed. So, we know the position of our expressions and what exactly stands behind them. If we use a temporary array and a cursor our while cycle will look like that:
var parse = function(tplHTML) {
  var re = /<%([^%>]+)?%>/g;
  var code = [], cursor = 0;
  while(match = re.exec(tplHTML)) {
    code.push(tplHTML.slice(cursor, match.index));
    code.push({code: match[1]}); // <-- expression
    cursor = match.index + match[0].length;
  }
  code.push(tplHTML.substr(cursor, tplHTML.length - cursor));
  console.log(code);
}
The output in the console shows that we are on the right track:
[
  "<div class="content"><h1>",
  { code: "title" },
  "</h1></div>"
]
The code array should be transformed to a string that will be a body of a function. For example:
return "<div class=\"content\"><h1>" + title + "</h1></div>";It’s quite easy to achieve this result. We may write a loop that goes through all the elements of code array and checks if the item is a string or object. However, this again covers only part of the cases. What if we have the following template:
// component
var Component = {
  title: 'Awesome template',
  colors: ['read', 'green', 'blue'],
  render: '#my-content'
}

// template
<script type="text/template" id="my-content">
    <div class="content">
        <h1><% title %></h1>
        <% while(c = colors.shift()) { %>
            <p><% c %></p>
        <% } %>
    </div>
</script>
We can’t just concatenate the expressions and expect to have the colors listed. So, instead of appending a string to string we will collect them in an array. Here is the updated version of the parse function:
var parse = function(tplHTML) {
  var re = /<%([^%>]+)?%>/g;
  var code = [], cursor = 0;
  while(match = re.exec(tplHTML)) {
    code.push(tplHTML.slice(cursor, match.index));
    code.push({code: match[1]}); // <-- expression
    cursor = match.index + match[0].length;
  }
  code.push(tplHTML.substr(cursor, tplHTML.length - cursor));
  var body = 'var r=[];\n';
  while(line = code.shift()) {
    if(typeof line === 'string') {
      // escaping quotes
      line = line.replace(/"/g, '\\"');
      // removing new lines
      line = line.replace(/[\r\t\n]/g, '');
      body += 'r.push("' + line+ '");\n'
    } else {
      if(line.code.match(/(^( )?(if|for|else|switch|case|break|while|{|}))(.*)?/g)) {
        body += line.code + '\n';
      } else {
        body += 'r.push(' + line.code + ');\n';
      }
    }
  }
  body += 'return r.join("");';
  console.log(body);
}
Once the code array is filled we start constructing the body of the function. Every line of the template will be stored in an array r. If the line is a string, we are clearing it a bit by escaping the quotes and removing the new lines and tabs. It’s added to the array via the push method. If we have a code snippet then we check if it is not a valid JavaScript operator. If yes then we are not adding it to the array but simply dropping it as a new line. The console.log at the end outputs:
var r=[];
r.push("<div class=\"content\"><h1>");
r.push(title);
r.push("</h1>");

while(c = colors.shift()) {
  r.push("<p>");
  r.push(c);
  r.push("</p>");
}

r.push("</div>");
return r.join("");
Nice, isn’t it? Properly formatted working JavaScript, which executed in the context of our Component will produce the desired HTML markup.
The last thing that is left is the actual running of our virtually created function:
body = 'with(component) {' + body + '}';
return new Function('component', body).apply(comp, [comp]);
We wrapped our code in a with statement in order to run it in the context of the component. Without that we need use this.title and this.colors instead of title and colors.
Here is a CodePen demonstrating the final result:
See the Pen gAhEj by Krasimir Tsonev (@krasimir) on CodePen.
Summary
Behind the big frameworks and libraries are smart developers. They found and use tricky solutions that are not trivial, and even kinda magical. In this article, we revealed some of that magic. It’s nice that in the JavaScript world we are able to learn from the best and use their code.
The code from this article is available for download from GitHub


