JavaScript Game Programming Using Phaser

Phaser is a HTML5 game framework for desktop and mobile. It’s fast, free, and open source. Phaser is currently in version 2.0.7. It supports both WebGL and Canvas. It has a bunch of features to help you in your game development. It is like the Flixel game framework for ActionScript 3. In this article we will build a game skeleton with Phaser, making use of Phaser.State. For simplicity we won’t use any Phaser game objects like sprites or groups. I will mention a little bit about tweens as well.
Installing Phaser
Phaser is available through bower using the following command:
bower install phaser-official --saveAlternatively, you can grab the files directly from GitHub. The full version of Phaser is in the build directory. There are also customized builds, such as Phaser without the physics engine, located in the build/custom directory.
There are many community tutorials and getting started guides. I suggest you check out some of them in order to get familiar with Phaser. One of my favorites is a four part series on Flappy Bird. An extensive collection of tutorials, examples, and documentation is available on the official Phaser website.
Scaffolding Phaser
A Grunt-based Yeoman generator for Phaser is available for scaffolding projects. You can install it using the following commands:
npm install -g generator-phaser-official
yo phaser-official
This generator is great for getting up and running quickly, however, for the purposes of this tutorial, we will start from scratch.
Phaser Directory Structure
Our Phaser project will use the directory structure shown below. main.js starts the game, while app.js defines our Phaser application. The prefabs directory is for your game objects, while the states directory is for your game states.
|-- app.js
|-- main.js
|-- prefabs
`-- states
    |-- boot.js
    |-- level_intro.js
    |-- level_master.js
    |-- level_round.js
    |-- main_intro.js
    |-- main_menu.js
    `-- preload.js
You have to pay attention to the order you include these files if you are including them with plain script tags. I prefer using RequireJS, another alternative is Browserify.
Phaser.State
This section will focus on the use of Phaser.State. Phaser state encapsulates the different states of your game. Examples of game states are preload, main menu, level 1, level 2, help, pause, etc. When a state starts, you create the game objects relevant to that state. Later, you can switch to a different state, and Phaser will clean up your old game objects so you can create new game objects and display them.
You define a state by defining an object with some hook methods. The important ones are:
init– A method called when a state starts. It is passed an argument to enable sharing data between states.preload– A method called when a state starts. It is used for loading assets before anything else.create– A method called afterpreload, used for creating game objects.update– A method called for every frame, which is used for user polling and collision detection.shutdown– A method called when a state is shutdown, which is used for cleaning up game objects.
Organizing State Flow
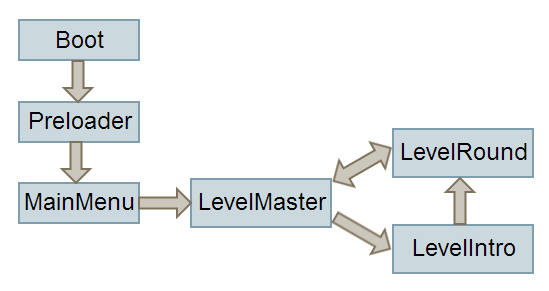
This is a state chart for our Phaser states. The Boot and Preload states are the defacto states for setting up configuration and loading the game assets. The MainMenu state is for displaying the main menu. Other level states are for actual game play and switching between different levels and rounds. The levels are split into rounds. Each level has some rounds, which once played, allow you to move to the next level.
Game States
The Boot state loads preloader assets in the preload hook method and sets up Phaser game settings like scaling and input pointers via the create method.
File: states/boot.js
function Boot() {};

Boot.prototype = {
  preload: function() {
    // load preloader assets
  },
  create: function() {
    // setup game environment
    // scale, input etc..

    this.game.state.start('preload');
  }
};
The Preload state loads all the game assets, then switches to the main-intro state.
File: states/preload.js
Preload.prototype = {
  preload: function() {
    // load all game assets
    // images, spritesheets, atlases, audio etc..
  },
  create: function() {
    this.game.state.start('main-intro');
  }
};
The MainIntro state displays the game intro, logos, credits, etc. It doesn’t need a preload method, as it tweens an object for two seconds then switches to the main-menu state. I added a tween here, just to give you an idea that, you can tween your objects using effects like fading, shrinking, and sliding for state transition effects.
File: states/main_intro.js
function MainIntroState() {};

MainIntroState.prototype = {
  create: function() {
    // add main intro assets into the world
    this.tweenFadeState();
  },

  tweenFadeState: function() {
    this.game.add.tween({})
      .to({alpha: 1}, 2000)
      .onComplete.add(function() {
        this.game.state.start('main-menu');
      }, this);
  }
};
The MainMenu state displays the main menu. The user can then interact with items from the menu. For simplicity, I added a single keyboard event that will trigger a chain of tweens, and at the end switches to the level-master state. Chaining tweens is useful for combined animations like shrinking the menu and then fading the display.
File: states/main_menu.js
MainMenuState.prototype = {
  create: function() {
    this.enterKey = this.game.input.keyboard
        .addKey(Phaser.Keyboard.ENTER);

    this.enterKey.onDown.add(this.tweenPlayState, this);
  },
  tweenPlayState: function() {
    var tweenMenuShrink = this.game.add.tween({})
          .to({x: 0, y: 0}, 200);

    var tweenFadeIn = this.game.add.tween({})
          .to({alpha: 1}, 2000);

    tweenFadeIn.onComplete.add(function() {
      this.game.state.start('level-master');
    }, this);

    tweenMenuShrink.chain(tweenFadeIn);
    tweenMenuShrink.start();
  }
};
Notice in the sample I don’t tween anything useful. For simplicity, you should insert your game objects there. Also, I don’t create any game objects, but you can do that in the create method. For more information check out the Phaser examples and docs.
The LevelMaster state is a headless state that decides which state to switch to. It doesn’t display anything on the game world. It’s sole purpose is to decide whether it should switch to a level-round state or level-intro state, and most important, it updates and passes game data (this.levelData) between states.
File: states/level_master.js
LevelMasterState.prototype = {
  init: function(levelData) {
    if (!levelData) {
      levelData = {
        level: 0,
        round: 1,
        players: [
          { score: 0, skill: 1 },
          { score: 0, skill: 1 }
        ]
      };
    }

    this.levelData = levelData;
    this.winScore = 2;
  },

  create: function() {
    this.decideLevelState();
  }
};
When a new level starts, the level-intro state starts. The level-intro state displays an intro to the new level, like showing which level you are on. After the level-intro, it switches to level-round, which is where actual game play happens.
After a round finishes, it is either a new level-round or a new level. This logic happens in our decideLevelState function. If it’s the first level, or we have a winner for a level, we switch to the next level, otherwise we switch to the next round.
this.levelData holds the game data, such as the game level, game round, and player scores. We update it in our logic and pass along the states.
File: states/level_master.js
LevelMasterState.prototype = {
  decideLevelState: function() {
    if (this.isFirstLevel() || this.getWinningPlayer() !== -1) {
      this.nextLevel();
    } else {
      this.nextRound();
    }
  },
  nextLevel: function() {
    this.levelData.level++;

    this.levelData.players.forEach(function(p) {
      p.score = 0;
    }, this);

    this.levelData.round = 1;

    this.game.state.start('level-intro', true, false, this.levelData);
  },
  nextRound: function() {
      this.levelData.round++;
      this.game.state.start('level-round', true, false, this.levelData);
  }
};
The LevelIntro state displays level introduction information, such as which level you are on, and some intro animation. We pass the levelData parameter, that holds the game data. In the create method, we use levelData by displaying a skill menu if it’s the first level of the game. By skill menu I mean a menu that player selects which skill they want to play, but it’s up to you. At the end it switches to level-round state.
File: states/level_intro.js
LevelIntroState.prototype = {
  init: function(levelData) {
    this.levelData = levelData;
  },
  create: function() {
    var tweenIntro = this.tweenIntro();

    if (this.levelData.level === 1) {
      var tweenSkillMenuPop = this.tweenSkillMenuPop();

      tweenIntro.chain(tweenSkillMenuPop);
      tweenSkillMenuPop.onComplete.add(this.levelStart, this);
    } else {
      tweenIntro.onComplete.add(this.levelStart, this);
    }
  },
  levelStart: function() {
    this.game.state.start('level-round', true, false, this.levelData);
  },
  tweenIntro: function() {
    var tween = this.game.add.tween({})
      .to({alpha: 0}, 1000, Phaser.Easing.Linear.None, true);

    return tween;
  },
  tweenSkillMenuPop: function() {
    var tween = this.game.add.tween({})
      .to({x: 1, y: 1}, 500, Phaser.Easing.Linear.None, true);

    return tween;
  }
};
Finally, the LevelRound state is where the actual game play happens. You can use its update method if you need. For simplicity, I added a simple key interaction that ends the state when Enter is pressed. The important note here is that, it switches back to level-master, passing along the levelData that it got from level-master in the first place.
File: states/level_round.js
LevelRoundState.prototype = {
  init: function(levelData) {
    this.levelData = levelData;
  },
  create: function() {
    this.enterKey = this.game.input.keyboard
      .addKey(Phaser.Keyboard.ENTER);

    this.enterKey.onDown.add(this.roundEnd, this);
  },
  roundEnd: function() {
    this.nextRound();
  },
  nextRound: function() {
    this.game.state.start('level-master', true, false, this.levelData);
  }
};
This completes our state flow. All this provides us a level state loop, that looks something like this:
Boot -> Preload ->
main-intro -> main-menu ->
level-master -> Level1 ->
level-master -> L1 Round1 ->
level-master -> L1 Round2 ->
level-master -> Level2 ->
level-master -> L2 Round1 ->
You can exit this loop in your level-round state by an action that switches to main-menu state.
Startup Phaser
Now, we will start the Phaser game. Place this div inside your page. Phaser will place it’s canvas there.
File index.html
<div id="game-area"></div>We have to create a Phaser.Game, add all our states to the StateManager, and start the boot state.
File: app.js
function Game() {}

Game.prototype = {
  start: function() {
    var game = new Phaser.Game(640, 480, Phaser.AUTO, 'game-area');

    game.state.add('boot', BootState);
    game.state.add('preload', PreloadState);
    game.state.add('main-intro', MainIntroState);
    game.state.add('main-menu', MainMenuState);
    game.state.add('level-master', LevelMasterState);
    game.state.add('level-intro', MainIntroState);
    game.state.add('level-round', LevelRoundState);
    game.state.start('boot');
  }
};
Finally, fire up the game using the following code.
File: main.js
var game = new Game();
game.start();
Conclusion
That concludes our Phaser.State article. This is just the skeleton of a Phaser game. There are lots of other things Phaser provides you, like sprites, animations, sounds, physics, scaling, and more. You can find the repo for our example on GitHub.


