Multilingual Preprocessing with Prepros

In today’s web development preprocessing plays a significant role. Preprocessing languages, also known as preprocessors, make writing HTML, CSS and JavaScript faster, easier and more flexible. But before we can use them we need to have them installed and configured on our machines.
This is not a big deal when we are using just one, for example CoffeeScript. But often our project requires several preprocessors to be combined, and then things can get a bit complicated. We need to install all needed languages and set them up correctly to compile our files. Of course, this means extra work. Fortunately there is a much simpler solution – the all-in-one solution.
Prepros, created by Subash Pathak, is a tool that can handle automatically all of our preprocessing needs. It is an open source GUI compiler, similar to CodeKit, for preprocessing languages like LESS, Sass, Compass, Stylus, Markdown, CoffeeScript, and so on. With Prepros, multilingual preprocessing is not a problem anymore. It works both on Win and Mac and since its initial release at May 1, 2013 it has been actively developed with new features added regularly.
Sounds good? OK. Let’s take a quick look at what Prepros can do for us.
Features and Benefits
Below you can find an outline of all the cool features and benefits which Prepros offers at the time of this writing:
- All-in-one multilingual solution. Prepros can compile today’s most popular preprocessing languages. These include: LESS, Sass, SCSS, Compass, CoffeeScript, LiveScript, Stylus, Jade, Slim, Markdown and Haml.
- No dependencies. Just install Prepros and you are good to go. There’s nothing else to install or configure. No messing around on the command line. Just run the app and start working. Easy enough.
- Sleek and simple, yet powerful GUI interface. Bye-bye command line :)
- Multiple customization levels. You can configure Prepros globally for all projects, specifically for every single project and individually for each file. And each file can be manually or automatically compiled depending on your needs.
- JavaScript minification and concatenation. Prepros can minify and concatenate your JavaScript files in real time whenever you change the file(s) in your editor.
- Image Optimization. Prepros can optimizes PNG, JPG, and GIF images with just one click in order to speed up the page load time and improve your overall site performance.
@importsdetection and watching. Prepros watches for your files to change and compiles them on the fly.- Built-in http server. Prepros has built-in one click static http server to test all your stuff without file URL restrictions.
- Live browser refresh. Prepros can live refresh your browser whenever a change is made to your file(s). This feature works in Firefox, Chrome, Opera and IE10 if you are using built-in http server, but to use a custom server or file URL you have to install a browser extension.
- Multi device live refresh. Prepros supports testing your web pages in multiple devices connected to your network. It live refreshes all browsers and devices whenever you make change to your file(s).
- Error and success notifications. Prepros notifies you every time your file is compiled successfully, and whenever compilation fails it pops up an error message and logs the error for easy debugging.
- It’s cross-platform (currently runs on Win and Mac).
- It’s absolutely FREE and open source.
How It Works
The first thing you need in order to use Prepros is to have a project. A project is just a folder containing all your preprocessing files placed in that same folder and/or subfolders. To add your project just drag and drop the project folder to the app window and Prepros will list all files it can compile.
When a file is imported by another file, the imported file is not shown in the files list, but the imported file is watched in the background and the parent file is compiled whenever a change is made to the imported file. Also you must bear in mind that after adding new file(s) to your project folder, or importing one file from another file, you must refresh the project to see the changes.
After the project is added, Prepros has lots of options that you can customize for your needs.
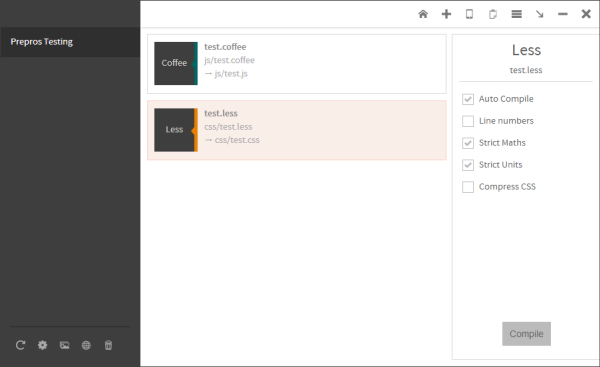
You can configure each file individually. Just select it and edit the settings at the panel which appears on the right side of the app window.
You can also use the toolbar at the bottom left corner of the app window to manage your projects. When a project is selected you can open Project Options window by clicking the cog-wheel icon on the project toolbar.
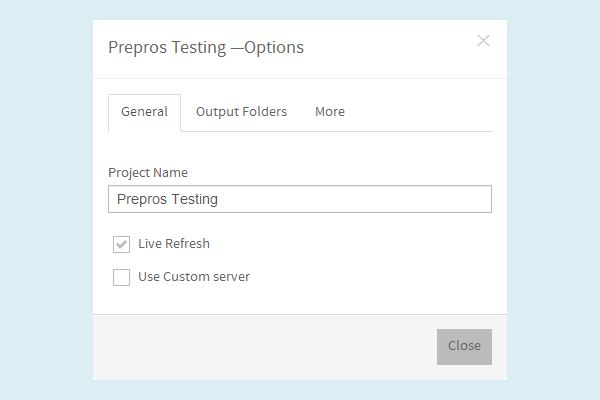
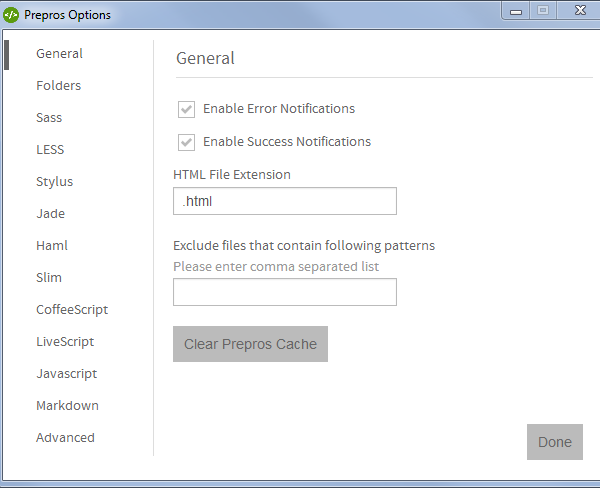
For global configuration, you need to open the Prepros Options window. Just click on the menu icon on the top right corner of the app window and then choose Prepros Options. Here you can set options that apply to all of your projects.
Try It Out
Now let’s make a quick test to see the app in action. To get started, download and install a version of Prepros for your operating system.
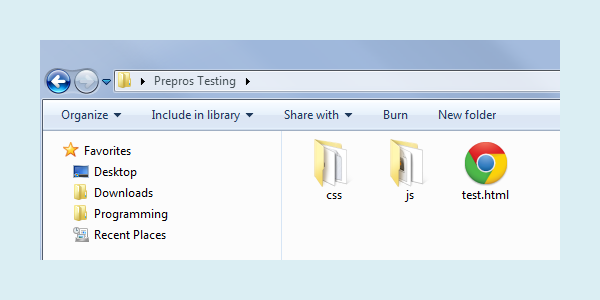
We will use LESS and CoffeeScript in our example to demonstrate how the app works. First you need to create a project folder named “Prepros Testing”. Also add “css” and “js” subfolders. Then create a test.html file with the following content:
<!DOCTYPE  HTML>
<html>
<head>
    <meta charset="utf-8" />
    <title>Prepros Test</title>
    <link href="css/test.css"  rel="stylesheet" type="text/css" />
    <script src="js/test.js"  type="text/javascript"></script>
</head>

<body>

<hr />

<div  class="round-rect"></div>

</body>
</html>
In the head section we will add references to the files to be compiled by Prepros. Then in the body section we add a div with class round-rect, which we will use for CSS demonstration.
Next, create test.less file and place it inside the “css” folder. The code is as follows:
.rounded-corners  (@radius: 5px) {
  -webkit-border-radius: @radius;
  -moz-border-radius: @radius;
  -ms-border-radius: @radius;
  -o-border-radius: @radius;
   border-radius: @radius;
}

.round-rect {
    width: 100px;
    height: 100px;
    background-color: orange;
    .rounded-corners(10px);
}
OK. Now create test.coffee file inside “js” folder. The code is as follow:
square = (x)  -> x * x
cube   = (x) -> square(x) * x
getCube =  ->
  document.write "The result is: " +  cube(4)

getCube()
Now we are ready for testing. First launch Prepros and add our test project.
Then right-click on the project name and choose Compile All Files. If you take a look at the “js” and “css” folders you will see that Prepros has created test.js and test.css automatically.
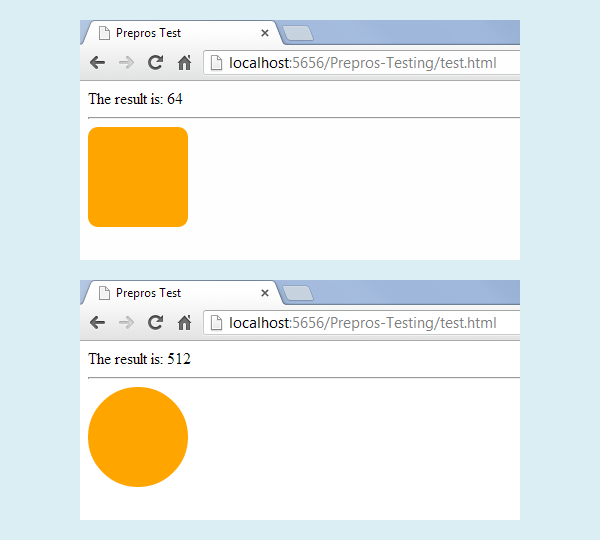
Now click Open project live url (the globe icon) in the project toolbar and choose test.html. You should see “The result is: 64” statement, and an orange, rounded rectangle below.
Open test.coffee and make sure you see both your browser and your editor. Now just change the argument in the cube() function from 4 to 8. As soon as you save the file you should see the changes reflected in your browser. Then open test.less, change the radius from 10px to 100px and save it. You should see an orange circle now.
OK. It works. Congratulations! Your new secret web development weapon is successfully tested and ready to go.
Conclusion
As you can see, Prepros can tremendously simplify your preprocessing workflow. It just takes the hard work and leaves the cool stuff for us. Preprocessing is a powerful technology and thanks to applications like Prepros we can utilize it easily and efficiently.
This article is only a quick introduction to this wonderful preprocessing tool. For more details, not mentioned here, please check the documentation at the Prepros website.


