Mastering Your Inbox with the Gmail JavaScript API

In this article, we’re going to build a basic Gmail inbox and message viewing app using the Gmail RESTful API. The purpose of this article is to give you a good starting point to create cool new JavaScript apps of your own using this API. We’re going to use jQuery and Bootstrap to take some weight out of the code base so we can focus on getting something working quickly without worrying about cross-browser JavaScript inconsistencies and basic styling.
As ever the complete code for this article can be found on our GitHub repo.
![]()
Enabling the Gmail API on Your Google Account
First off, we need to enable Gmail API access to get our API credentials. To do this, we need to visit Google’s Developer Console in our favourite web browser. From there, we need to create a project (or choose an existing one) and go to the APIs section. Choose “Gmail API” under the Google Apps APIs section and click the “Enable API” button.
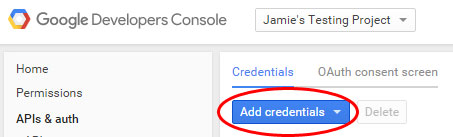
Now we need to create two sets of credentials, one for an OAuth 2.0 client ID for a web application and the other to create a browser API key. This can be done in the credentials section of the Google Developer Console by clicking the “Add Credentials” button.
For the browser API key we need to only fill in the “name” field. However, for production I’d recommend adding a HTTP referrer (this will prevent abuse of our API key from non-authorized domains). For the OAuth 2.0 client ID we must enter at least one authorized JavaScript origin. For a local development environment this will likely be http://localhost or similar. We do not need to enter an authorized redirect URI.
Once we’ve filled in the necessary fields we should be able to see our credentials back in the Credentials section. Keep this info open in a browser tab for later.
Connecting to the Gmail API
Even though the Gmail API is a standard REST API using OAuth 2.0 we recommend using Google’s own JavaScript libraries for connecting to and working with any Google-authored APIs. This is because Google has already packaged up authentication logic and the required dependencies into a single include file — less work for us!
So, first things first – let’s set up our HTML file which we’re going to use as the base of our app. For the purpose of this app we’re going to include all of our code in a single HTML file. In a production environment Id recommend splitting out HTML, CSS and JavaScript into separate files.
<!doctype html>
<html>
  <head>
    <title>Gmail API demo</title>
    <meta charset="UTF-8">

    <link rel="stylesheet" href="//maxcdn.bootstrapcdn.com/bootstrap/3.3.5/css/bootstrap.min.css">
    <link rel="stylesheet" href="//maxcdn.bootstrapcdn.com/bootstrap/3.3.5/css/bootstrap-theme.min.css">
    <style>
      .hidden{ display: none; }
    </style>
  </head>
  <body>
    <div class="container">
      <h1>Gmail API demo</h1>

      <button id="authorize-button" class="btn btn-primary hidden">Authorize</button>

      <table class="table table-striped table-inbox hidden">
        <thead>
          <tr>
            <th>From</th>
            <th>Subject</th>
            <th>Date/Time</th>
          </tr>
        </thead>
        <tbody></tbody>
      </table>
    </div>

    <script src="//code.jquery.com/jquery-1.11.3.min.js"></script>
    <script src="//maxcdn.bootstrapcdn.com/bootstrap/3.3.5/js/bootstrap.min.js"></script>

    <script type="text/javascript">
      var clientId = 'xxxxxxxxxxxx-xxxxxxxxxxxxxxxxxxxxxxx.apps.googleusercontent.com';
      var apiKey = 'xxxxxxxxxxxxxxxxxxxxxxxxxxxxxxxxxxxxxxx';
      var scopes = 'https://www.googleapis.com/auth/gmail.readonly';
    </script>

    <script src="https://apis.google.com/js/client.js?onload=handleClientLoad"></script>
  </body>
</html>
Right at the bottom (above the closing </body> tag) is where we include Google’s JavaScript client library. Notice the query string on the end, this contains the callback function which will be executed once the script has loaded — we’ll use that to initialize our app a little later. Just above that is where we are defining our API credentials, we need to paste these from the Google Developer Console Credentials section. We also define which permissions we’ll require from the user, these are known as scopes. For the purpose of this app we only require read-only Gmail access. It’s good practice to request as few permissions as possible from the user — this provides the user peace of mind that we’re not going to do something nefarious like send emails on their behalf without them knowing.
Other than that we’ve got a button which will allow the user to authorize us to access their Gmail account, and we’ve also stubbed out a table to hold our inbox data once we fetch it. And, as mentioned earlier, we’ve included the necessary files for jQuery and Bootstrap.
Authenticating the User
Now we’re going to provide a mechanism for the user to authenticate us to access their Gmail account. As mentioned above, we need to build out a function named handleClientLoad() which will automatically be called once Google’s JavaScript client library has loaded into the page. This function will then call a chain of other functions which will eventually lead us to fetching their inbox.
function handleClientLoad() {
  gapi.client.setApiKey(apiKey);
  window.setTimeout(checkAuth, 1);
}

function checkAuth() {
  gapi.auth.authorize({
    client_id: clientId,
    scope: scopes,
    immediate: true
  }, handleAuthResult);
}

function handleAuthClick() {
  gapi.auth.authorize({
    client_id: clientId,
    scope: scopes,
    immediate: false
  }, handleAuthResult);
  return false;
}

function handleAuthResult(authResult) {
  if(authResult && !authResult.error) {
    loadGmailApi();
    $('#authorize-button').remove();
    $('.table-inbox').removeClass("hidden");
  } else {
    $('#authorize-button').removeClass("hidden");
    $('#authorize-button').on('click', function(){
      handleAuthClick();
    });
  }
}

function loadGmailApi() {
  gapi.client.load('gmail', 'v1', displayInbox);
}
We should insert this code directly below where we set the API credentials, within the same SCRIPT block.
To summarise the process this chain of function calls goes through:
handleClientLoad()simply sets the API key and passes off tocheckAuth()after 1 millisecond.checkAuth()checks if the user has previously authenticated our app with Google. Setting theimmediateparameter totruehere means that we do not prompt the user with a login/permissions modal if they are not authenticated. We then pass the authentication result tohandleAuthResult().handleAuthResult()then does one of two things; if the user is already authenticated it’ll load the Gmail API usingloadGmailApi(), alternatively it’ll display the authorize button on the UI and attach a click event to it which will triggerhandleAuthClick()handleAuthClick()simply executes the same authentication function ascheckAuth()but will present the user with a login/permissions modal. Once the user authenticates the samehandleAuthResult()function from before is triggered.- Once those series of functions have been executed and the user has authenticated we should always find ourselves at the
loadGmailApi()function. This simply loads the Gmail API functionality from Google’s JavaScript client library and then calls ourdisplayInbox()function.
Tip: You can check (and revoke) which apps have access to your Gmail account on this page: https://security.google.com/settings/security/permissions. This could come in handy when testing.
Fetching and Displaying the User’s Inbox
Now that we’ve got the user authenticated we can proceed to displaying some of their data using our displayInbox() function. We need to build out that function with the following components;
First off we need to fetch a list of messages from Gmail. To do that we need to call the Users.messages: list endpoint. For the purpose of this app we’re going to request the last ten messages marked as INBOX:
function displayInbox() {
  var request = gapi.client.gmail.users.messages.list({
    'userId': 'me',
    'labelIds': 'INBOX',
    'maxResults': 10
  });

  request.execute(function(response) {
    $.each(response.messages, function() {
      var messageRequest = gapi.client.gmail.users.messages.get({
        'userId': 'me',
        'id': this.id
      });

      messageRequest.execute(appendMessageRow);
    });
  });
}
This will return a JSON object containing the ids of the last ten messages received by the authenticated user, along with some other peripheral data which we don’t need. Note that we can use the special userId of me to indicate the currently authenticated user. As with all API requests made using Google’s library, requests should be assigned to a variable and then the execute() function should be called to actually make the request. This function takes a callback function as it’s parameter, and allows you to specify a parameter to save the response to.
We’re actually making two API requests here as unfortunately, the list API endpoint returns only the message ids, but not the actual message data. So inside our callback function we need to loop through each message and request more data specific to that message. To do that we need to call the User.messages: get endpoint to fetch a single message by it’s id, and pass the response over to another function, appendMessageRow().
Now we’ve got the message data we’re finally ready to modify the DOM and show the user something!
function appendMessageRow(message) {
  $('.table-inbox tbody').append(
    '<tr>\
      <td>'+getHeader(message.payload.headers, 'From')+'</td>\
      <td>'+getHeader(message.payload.headers, 'Subject')+'</td>\
      <td>'+getHeader(message.payload.headers, 'Date')+'</td>\
    </tr>'
  );
}
We’re making use of jQuery’s append() function here to append rows containing the message data to the HTML table we stubbed out earlier. This should leave us with a working app which can show the user the last ten messages from their inbox! But it’s not much use if you can’t actually read the email, right?
Note: if you’re following along with this tutorial, you’ll also need the getHeader() utility function for the code to work at this point. You can read about the utility functions at the end of the article.
Displaying the Email Message Content
Since we’ve already got the message content from our Users.messages: get request there’s no need to make any more API requests to display this data. We simply need to build a mechanism into our existing code to facilitate displaying the existing data we have previously fetched.
To do this we need to start off by adding a method for launching the message content viewer. So we’re going to modify the appendMessageRow() code from above to add a link to the subject table cell.
function appendMessageRow(message) {
  $('.table-inbox tbody').append(
    '<tr>\
      <td>'+getHeader(message.payload.headers, 'From')+'</td>\
      <td>\
        <a href="#message-modal-' + message.id +
          '" data-toggle="modal" id="message-link-' + message.id+'">' +
          getHeader(message.payload.headers, 'Subject') +
        '</a>\
      </td>\
      <td>'+getHeader(message.payload.headers, 'Date')+'</td>\
    </tr>'
  );
}
This is making use of Bootstrap’s modal functionality to launch a pre-defined modal window when the link is clicked. So now we need to make another modification to the code to also build a modal window container in the DOM each time we insert the message summary into the table. So we simply add this snippet under our previous append() snippet.
$('body').append(
'<div class="modal fade" id="message-modal-' + message.id +
'" tabindex="-1" role="dialog" aria-labelledby="myModalLabel">\
<div class="modal-dialog modal-lg">\
<div class="modal-content">\
<div class="modal-header">\
<button type="button"\
class="close"\
data-dismiss="modal"\
aria-label="Close">\
<span aria-hidden="true">×</span></button>\
<h4 class="modal-title" id="myModalLabel">' +
getHeader(message.payload.headers, 'Subject') +
'</h4>\
</div>\
<div class="modal-body">\
<iframe id="message-iframe-'+message.id+'" srcdoc="<p>Loading...</p>">\
</iframe>\
</div>\
</div>\
</div>\
</div>'
);
Note that we are only stubbing out the message content panel here, and we are doing that in an iframe. The iframe is used because if we simply inserted the message content straight into the DOM it could break our own app in a multitude of ways. Anyone who has dipped their toes into the murky waters of HTML email building can tell you that broken, old HTML and inline, over-riding CSS is commonplace, so if we insert that code directly into the DOM it could wreak havoc with the aesthetics of our app.
We also don’t want to insert our HTML directly into the iframe when we build the modal for a few reasons. One being browser incompatibility and another being that if we fetch and render ten external HTML pages (complete with imagery) in the background on page load it could have an impact on our app’s initialization speed.
So now we’ve got a table of message details and a modal window with a blank content panel, so it’s time to implement the actual message content display mechanism. Inside that same function we need to attach an on click event to our subject cell links to render the contents of the iframe once the message modal is requested.
$('#message-link-'+message.id).on('click', function(){
  var ifrm = $('#message-iframe-'+message.id)[0].contentWindow.document;
  $('body', ifrm).html(getBody(message.payload));
});
This simply accesses the iframe (which is already present in the DOM) and injects our message HTML into its <body> element. A small workaround is required in order to achieve this functionality.
Utility Functions
Now, you may have been asking what those functions are that we’ve been using in the previous few code snippets; namely getBody(), getHeader() and getHTMLPart(). These are utility functions we’ve defined to abstract out some of the nuances from working with the Gmail API message resource which returns multi-part emails in an inconsistent format (nested parts), along with a message body which is base64 and UTF-8 encoded. (Full source code for these functions is available on our GitHub repo).
A Little Styling
To round our app off, add this CSS to the <head> section of out HTML page:
iframe {
  width: 100%;
  border: 0;
  min-height: 80%;
  height: 600px;
  display: flex;
}
Closing Remarks
We should now have a working app which can display a recent message summary list as well as display a complete HTML formatted email.

Clearly, there is a lot of room for improvement with this app, notably:
- Better date formatting using JavaScript’s Date object
- Mustache or Handlebars HTML templating (to keep HTML out of the JavaScript)
- Proper date ordering of messages (currently this is displayed out of order because the individual message data requests are asynchronous, so whichever one returns first goes into the table first)
- Ability to fetch more than 10 messages and paginate the results
- Ajax auto-updating of messages (with browser notifications for new messages)
I’d also like to look at adding more functionality to this app, obvious next steps could be:
- Adding more email functionality such as compose, reply, forward, etc. (would require a further permissions request)
- Differentiating the UI from what Gmail already offers
If you have any other improvements or suggestions, please feel free to add them in the comments.
Full source code is available via our GitHub repo.


