Meet Redwood, a Full-stack, Serverless Jamstack Framework

Imagine a React app, delivered by CDN, that sends GraphQL queries to a back end running AWS Lambdas around the world, all accessible via a git push. This is Redwood — an opinionated, full-stack framework that embraces the Jamstack.
Redwood fills a need that the JavaScript community has been missing for some time — no easy feat in an ecosystem where the rate at which new tooling appears has become a meme unto itself. This full-stack JavaScript solution has a fantastic developer experience designed to bring the opinionated, scaffold-driven development philosophy of Rails to the fast, secure experience offered by Jamstack sites.
Redwood wants to be the tool that breaks the Jamstack out of its largely static confines and makes that experience available to vastly more complex projects.
The ideas behind the Redwood framework are embodied in the name itself. Redwoods are a type of tree in Northern California. They’re large trees, the tallest in the world, some as big as 380 feet (c. 116 meters). The oldest living Redwoods sprouted off the ground some 3,200 years ago. Redwood pine cones are surprisingly small. The trees are resistant to fire, and appear complex from afar, but remain simple up close. This is what the framework attempts to achieve — to give developers a way to build beautiful apps that are dense, resilient, and easy to work with.
In this tutorial, I’ll take a good look at Redwood and what it brings to the table. I’ll assume some familiarity with React, GraphQL, and the Jamstack. If you want to follow along, you can find the entire demo sample code on GitHub. This tutorial will build a CRUD app (Create-Read-Update-Delete) and show how seamless this is in Redwood.
Initial Setup
For a successful Redwood installation, the tool checks for the following version requirements:
- Node: >=12
- Yarn: >=1.5
Assuming Node is available via NVM, for example, install Yarn via npm:
npm install -g yarn
All Redwood commands use Yarn, which is a requirement. To fire up your first app:
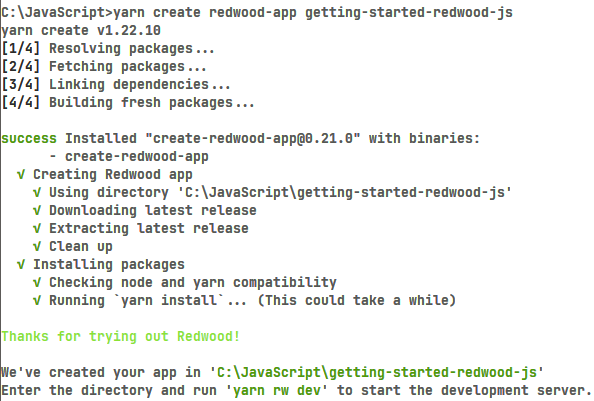
yarn create redwood-app getting-started-redwood-js
This is what the initial output in the terminal looks like:
Make sure the target directory is a new or empty folder, as otherwise this Yarn command fails. Change to this new directory and fire up the dev server:
cd getting-started-redwood-js
yarn redwood dev
Ta-da! This automatically opens a browser set to http://localhost:8910. Your new project should look like this:
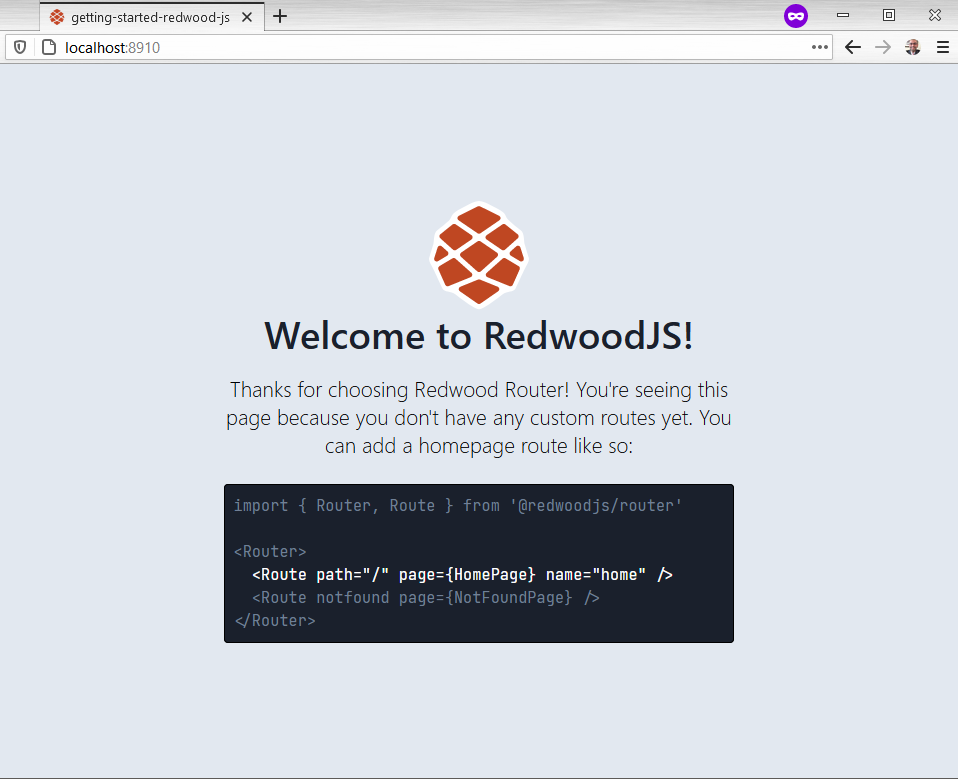
Go ahead and leave the dev server running. I’ll be sure to let you know when it needs a reboot. Next, with the initial Redwood project in place, it’s time to commit progress:
git init
git add .
git commit -m "First commit"
Feel free to poke around in the skeleton project. There should be a .gitignore file where you can append any files you want to ignore. For example, the initial skeleton project has the node_modules folder in this file. Anything not in this file gets committed to the repo.
Now, take a deep breath, and appreciate how the tool does most of the work in getting a skeleton project off the ground. There are two folders of interest — web and api — which seem to suggest both a back end and front end in this project. There’s a Babel and a GraphQL config file which suggests these are dependencies.
Go back and look at the console output after the initial project has run. There should be a message that says “Watching files in api/src/functions”. This suggests any back-end code changes get refreshed automatically via this webpack file watcher.
Redwood Folder Structure
Open the Redwood project in a file explorer, or your favorite code editor, and look at the folder structure. Ignoring non-essential files, it has the following hierarchy:
┳
┣━┓ api
┃ ┣━┓ db
┃ ┃ ┣━━ schema.prisma
┃ ┃ ┗━━ seed.js
┃ ┗━┓ src
┃   ┣━┓ functions
┃   ┃ ┗━━ graphql.js
┃   ┣━━ graphql
┃   ┣━┓ lib
┃   ┃ ┗━━ db.js
┃   ┗━━ services
┗━┓ web
  ┣━┓ public
  ┃ ┣━━ favicon.png
  ┃ ┣━━ README.md
  ┃ ┗━━ robots.txt
  ┗━┓ src
    ┣━━ components
    ┣━━ layouts
    ┣━┓ pages
    ┃ ┣━┓ FatalErrorPage
    ┃ ┃ ┗━━ FatalErrorPage.js
    ┃ ┗━┓ NotFoundPage
    ┃   ┗━━ NotFoundPage.js
    ┣━━ index.css
    ┣━━ index.html
    ┣━━ index.js
    ┗━━ Routes.js
At the root are the web and api folders which separate front-end and back-end code. Redwood calls these “sides”, and Yarn refers to them as “workspaces”.
The api folder has the following sub-directories:
db, which contains the database:schema.prismahas the database schema definition with tables and columns.seed.jsinitially populates the database with any zero-configuration data.
Database migrations are in SQLite and are part of the framework. After I add the database, there will be a dev.db file, and a folder named migrations. This is how Redwood keeps track of database schema changes in the project.
srchas all the back-end code:functions: these will have Lambda functions and thegraphql.jsfile generated by Redwood.graphql: this is the GraphQL schema written in Schema Definition Language (or SDL).libhas one filedb.jsthat sets up the Prisma database. This folder is for code that does not fit infunctionsorservices.services: this is for the business logic which works with data. Code that queries or mutates data goes here.
For the front end, look at the web directory:
publichas all static assets that are not in React. All files in this folder get copied over as-is:favicon.png: an icon that pops up in the browser’s tab when the page first opens.robots.txtcontrols web crawlers for search engine optimization.README.mdexplains how and when to use this public folder.srchas several sub-directories:componentshas traditional React components and Redwood Cells (more on this later).layouts: HTML/components that are shared across Pages. In a project, layouts are optional.pageshas components that might be wrapped inside Layouts and become the landing page for URLs. For example,/authorsmaps to one page and each page route has its own folder.NotFoundPage/NotFoundPage.js: the framework serves this page when no page exists (look atRoutes.jsbelow).FatalErrorPage/FatalErrorPage.jsrenders with an uncaught error exception in the app.
index.css: a generic place to put global CSS that does not belong anywhere else.index.html: React initial page.index.js: bootstrap code to get the app up and running.Routes.js: route definitions which map a URL to a Page.
In the Routes.js file, this is how the app routes to a NotFoundPage:
<Router>
  <Route notfound page={NotFoundPage} />
</Router>
Creating an Author Database
For this app, I’ll build a CRUD app that shows a list of authors on the page. Each author has info like name, a timestamp, and their favorite topic. The table has a surrogate primary key with a sequential integer to keep it simple. Imagine an author database with the following columns:
id: sequential unique identifier for this authornametopic: the author’s favorite topiccreatedAt: a timestamp for this record
Redwood uses the Prisma ClientJS to talk to the database via an ORM query builder. The Prisma client has another tool called Migrate that updates the database schema consistently. Each change to the schema is a migration, and Prisma Migrate creates one to mutate the database. Prisma supports most popular flavors of SQL, such as SQLite, MySQL, and PostgreSQL. For this tutorial, I’ll target SQLite to keep it simple.
Open api/db/schema.prisma and define an Author table. Be sure to nuke any sample code in this file because it will run in the migration.
For example:
datasource DS {
  provider = "sqlite"
  url      = env("DATABASE_URL")
}

generator client {
  provider      = "prisma-client-js"
  binaryTargets = "native"
}

model Author {
  id    Int     @id @default(autoincrement())
  name  String
  email String  @unique
  topic String?
  createdAt DateTime @default(now())
}
This defines a table with the following columns:
- an
id: Prisma uses the@idto build relationships with other tables and the@defaultvalue is a sequentialautoincrement()value - a
namedefined as aStringtype - a
@uniqueemail defined as aString - an optional
String?column named topic - a timestamp
createdAtcolumn set as aDateTimethat will@defaulttonow()
Go ahead and snapshot this as a migration. Be sure to run this Yarn command at the root of the project:
yarn redwood db save create authors
This creates a migration called “create authors”. Redwood doesn’t care what the name is because this is for other developers. When this completes, look for a new folder in api/db/migrations with a timestamp and name for this migration. The terminal’s output will have this name and what files it generated. A snapshot of the schema is in schema.prisma, and the directives to apply the migration are in steps.json.
Let’s now apply database changes:
yarn rw db up
Note the use of the shorthand rw instead of redwood.
With the database taking shape, it’s time to turn towards the UI. Redwood has scaffolding to get a basic CRUD app in no time:
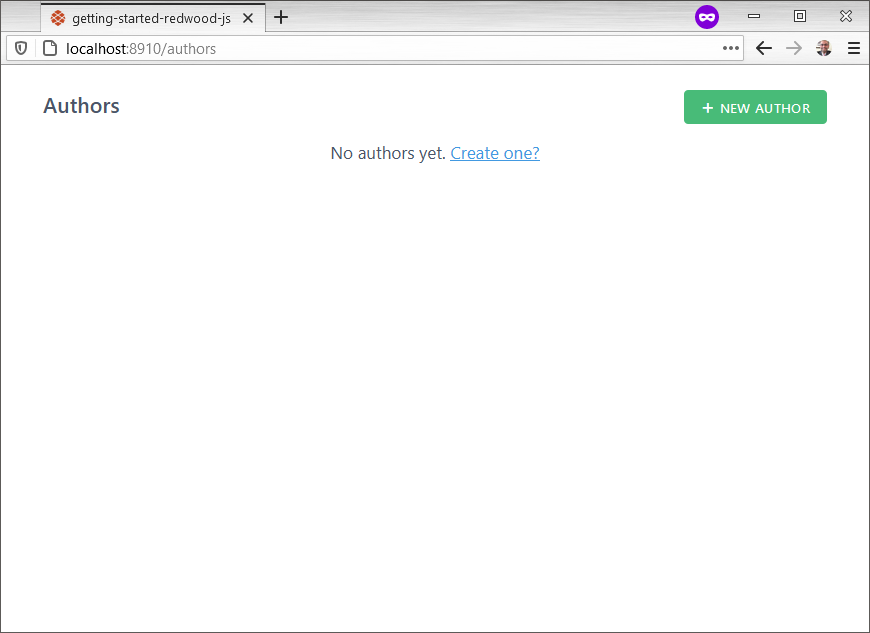
yarn rw g scaffold author
The terminal outputs the generated files for this app. If you left the dev server running, note the browser now points to a 404 Not Found. Point the browser to http://localhost:8910/authors to see what’s available:
This is what a skeleton UI looks like with the scaffold CSS. If styling in missing from the page, open index.js and add import './scaffold.css':
The scaffold makes all fields in the Author table required, although topic is an optional column. To fix this, open web/src/components/AuthorForm/AuthorForm.js and replace the topic TextField with this:
<TextField
  name="topic"
  defaultValue={props.author?.topic}
  className="rw-input"
/>
To see the Jamstack in action, open the developer tools in your browser and start poking around. I’ll create one author using my name without a favorite topic (it’s optional). Then, update the record with my favorite topic. The network traffic will show Ajax requests to the back end doing all the work without any full page refreshes. Be sure to Disable Cache to see all network traffic.
This is what the browser looks like:
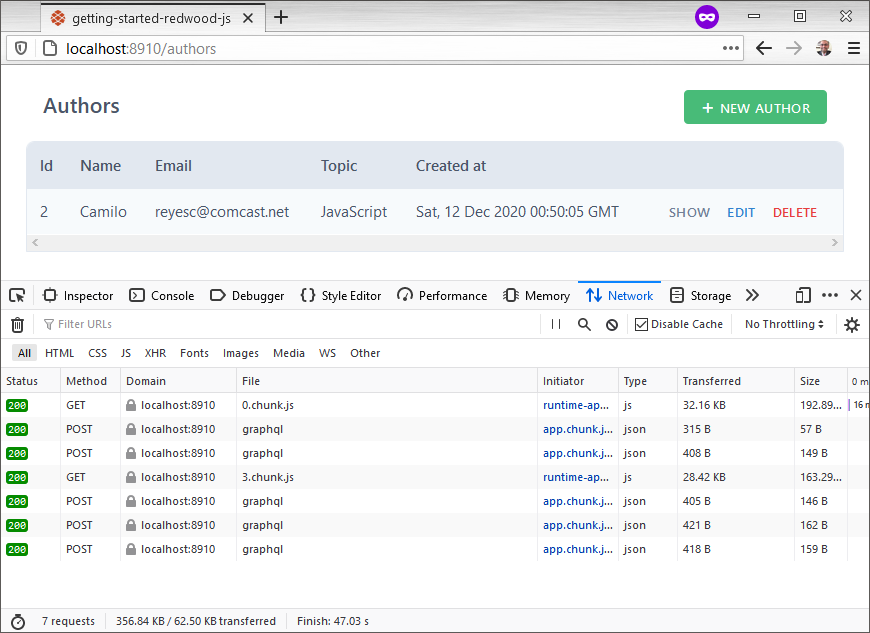
A couple of points to note. chunk.js requests are partial page loads that render parts of the app in the browser. This is React and webpack in action. The JSON network requests have the GraphQL payload via a POST that query or mutate the data in the back end.
Opening the network request payload reveals the GraphQL query. For example:
{
  "operationName": "AUTHORS",
  "variables": {},
  "query": "query AUTHORS {authors {id name email topic createdAt __typename}}"
}
Phew, so Redwood creates all the pages with little coding. No need to write a complex SQL or React component from scratch. This is what Redwood means by scaffolds.
This is what generated when I ran the yarn rw g scaffold author command:
- an SDL file that defines several GraphQL queries and mutations in
api/src/graphql/authors.sdl.js - a service file in
api/src/services/authors/authors.jsthat makes Prisma calls to work with the database - a Jest test file in
api/src/services/authors/authors.test.jsto write unit tests (more on this in a bit) - several pages in
web/src/pages EditAuthorPageto edit an authorAuthorPageto show details on one authorAuthorsPageto get all authorsNewAuthorPageto create an author- routes for those pages in
web/src/Routes.js - a Layout in
web/src/layouts/AuthorsLayout/AuthorsLayout.js - cells in
web/src/components AuthorCellgets one authorAuthorsCellgets a list of authorsEditAuthorCellgets the author to edit in the database- components also in
web/src/components Author: shows a single authorAuthorForm: the actual HTML form used to change data fieldsAuthorsshows the list of authorsNewAuthorrenders the form to create an author (edit uses a cell)
The scaffold was cool enough to create a test file for me because Jest comes built in with the initial project. Crack open services/authors/authors.test.js and drop a couple of unit tests:
import { createAuthor, deleteAuthor } from './authors'

let author

it('creates an author', () => {
  author = createAuthor({ input: { name: 'T', email: 'xyz@abc.xo' } })
})

it('deletes an author', () => {
  deleteAuthor(author)
})
Because this talks to an actual database, be sure to write tests that are idempotent. This means running tests repeatedly should have no side effects or leave behind any bad data in the database. Feel free to add more tests as you see fit.
To run tests from the root of the project:
node_modules/.bin/jest
How Redwood Works with Data
Redwood uses GraphQL to query and mutate data. This is what a GraphQL query does on the back end:

The front end uses Apollo Client to create a GraphQL payload sent to the serverless AWS Lambda function in the cloud. If you peek at the request URL in the developer tools, note all payloads go to the .redwood/functions/graphql endpoint. The graphql/authors.sdl.js and services/authors/authors.js files are the interface to the public API that gets exposed to the Internet.
Opening api/src/graphql/authors.sdl.js reveals the following GraphQL schema definition:
export const schema = gql`
  type Author {
    id: Int!
    name: String!
    email: String!
    topic: String
    createdAt: DateTime!
  }

  type Query {
    authors: [Author!]!
    author(id: Int!): Author
  }

  input CreateAuthorInput {
    name: String!
    email: String!
    topic: String
  }

  input UpdateAuthorInput {
    name: String
    email: String
    topic: String
  }

  type Mutation {
    createAuthor(input: CreateAuthorInput!): Author!
    updateAuthor(id: Int!, input: UpdateAuthorInput!): Author!
    deleteAuthor(id: Int!): Author!
  }
`
This translates into Redwood looking for the following five resolvers:
authors()author({id})createAuthor({input})updateAuthor({id, input})deleteAuthor({id})
Crack open api/src/services/authors/author.js, which has the following interface:
import { db } from 'src/lib/db'

export const authors = () => {
  return db.author.findMany()
}

export const author = ({ id }) => {
  return db.author.findOne({
    where: { id },
  })
}

export const createAuthor = ({ input }) => {
  return db.author.create({
    data: input,
  })
}

export const updateAuthor = ({ id, input }) => {
  return db.author.update({
    data: input,
    where: { id },
  })
}

export const deleteAuthor = ({ id }) => {
  return db.author.delete({
    where: { id },
  })
}
Go back and look at the unit tests I wrote, because that reuses this same code to access the database. Redwood allows you to reuse these services because they are abstractions above a single table. This means business logic can reuse as many services as possible to get the job done. Some of this functionally can be exposed to the client via GraphQL, or not. Think of the authors.sdl.js GraphQL schema definition as the public interface exposed to the browser, and this author.js file as the private interface. To prove this, edit the SDL file and nuke any line with a mutation — say updateAuthor(). The next time a GraphQL payload asks for this one change, it bombs in the browser. Pretty neat, huh?
Next, Redwood uses this concept of cells to tell the Success component when the data is available. I’ll now delve into cells to find out what this Success component is and what it does.
Cells
The good news is that the scaffolding already takes care of creating cells. Redwood uses cells as a decorative approach to data fetching. Use cells every time components need data from the database or for any async calls with a delay. Cells export several specially named components like Success, and Redwood does the rest of the work.
Redwood cells follow this lifecycle when working with data:
- perform the
QUERYand display theLoadingcomponent - if there’s an error, render the
Failurecomponent - if there’s no data (zero-configuration), render the
Emptycomponent - otherwise, render the
Successcomponent
There are lifecycle helpers like beforeQuery for massaging props before running the QUERY, and afterQuery for massaging the data returned from GraphQL. These helpers run before data gets sent to the Success component.
At a minimum, cells need QUERY and Success exports. Without an Empty component, results end up in Success. If there’s no Failure component, errors will go to the browser’s console.
To see a cell, open web/src/components/AuthorCell/AuthorCell.js:
export const QUERY = gql`
  query FIND_AUTHOR_BY_ID($id: Int!) {
    author: author(id: $id) {
      id
      name
      email
      topic
      createdAt
    }
  }
`

export const Loading = () => <div>Loading...</div>

export const Empty = () => <div>Author not found</div>

export const Success = ({ author }) => {
  return <Author author={author} />
}
Note this cell handles loading, empty, and success statuses when the page renders with a single author.
Final Thoughts
Overall, Redwood isn’t production ready, but it takes a lot of good concepts from the JavaScript community. Modern ideas like React and GraphQL set this framework on a good path. Cells solve a common React problem that I see happening all too often when fetching data. Putting GraphQL and Prisma as first-class citizens with private/public interfaces is fun to work with. As a bonus, I was pleasantly surprised to find how easy it is to write unit tests in the back end.