Creating a Note Taking App with React and Flux
React, by Facebook, is a very nice library for creating user interfaces. The only problem is that React doesn’t care how your application handles the data. Most people use React as the V in MV*. So, Facebook introduced a pattern called Flux which brings a functional approach to data handling inside an app. This tutorial gives a brief introduction on the Flux pattern and shows how to create a note taking app using React and Flux architecture.
A Primer on Flux
Flux relies on unidirectional data flow. We have two key components in the Flux pattern:
- Stores : A store component, as the name suggests, stores the application data.
- Actions : New data flows into the stores through actions. Stores listen to actions and do some tasks (e.g. modify data) when actions are invoked. This keeps the data flow unidirectional.
To reinforce the concept let’s take a real world example. For example, in a note making app you can have the following arrangement:
- A store called
NoteStorewhich stores a list of notes. - You can have an action called
createNote. The storeNoteStorelistens to the actioncreateNoteand updates its list with a new note whenever the action is invoked. Data flows into the store only through actions. - The
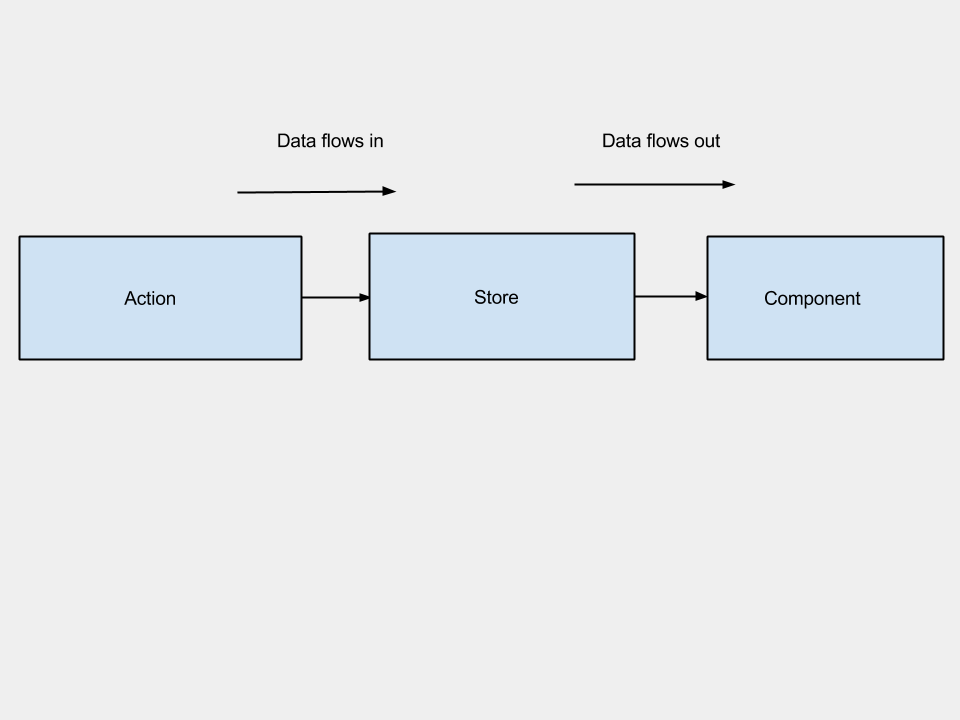
NoteStoretriggers an event whenever its data changes. Your React component, sayNoteListComponent, listens to this event and updates the list of notes presented on the view. This is how the data flows out of the store.
So, the data flow can be visualised as following :

The biggest advantage of the Flux pattern is that it keeps your application data flat. As mutation can be done only through actions, it’s easier to understand how the data change affects the whole application.
Note:
If you have gone through Facebook’s guide to Flux, you might have noticed the concept of a Dispatcher. A Dispatcher is a registry of callbacks into the stores. When an action is invoked, the Dispatcher responds to it and sends the associated data to all the registered stores. Stores then check the action type and perform tasks accordingly.
The above process has been greatly simplified by a library called Reflux . It removes the concept of Dispatchers by making the actions listenable. So, in Reflux stores can directly listen to actions and respond to their invocation.
To understand the Flux pattern fully let’s build a simple note taking app with Reflux, React, and Node.js.
Setting Up a Development Environment
We will use use React and Reflux as Node modules and use Browserify to make them available on the client side as well. So, here is how we set up the environment:
- We will use Browserify to bundle up our React components, Actions and Stores into a client side
.jspackage. - We will use
grunt watchto detect changes in the above components and re-run Browserify every time a change occurs. grunt nodemonis used to restart the server whenever any.jsxor.jsfile is changed so that you don’t have to do it manually.
You can download the code from GitHub and open up Gruntfile.js to read about the tasks. Once you have the repo on your machine you can just run npm install to install the required node modules. Run the following commands and start development:
grunt watch
grunt nodemon
The app is accessible at https://localhost:8000 and works as following:
Working on the App
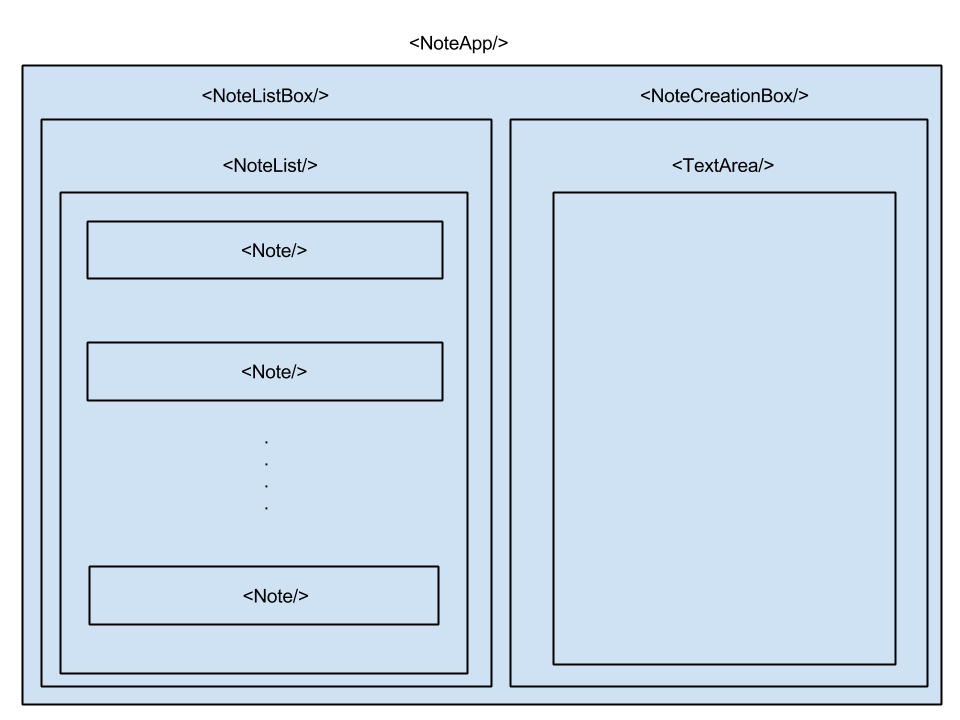
Let’s start with various components of the app. Here’s how we can divide our UI into various components:

Here is what each component does:
NoteApp: This is the root component that comprises of two child components:NoteListBoxandNoteCreationBox.NoteListBox: Has a single child componentNoteList. It retrieves a list of notes from Flux Store and passes them toNoteList.NoteList: Responsible for rendering eachNotecomponent. Passes a note object to eachNotecomponent.Note: Displays the details for a single note item. In this case we just displaytitle. You can easily go ahead and display other details likedate,subtitleetc.NoteCreationBox: This component renders aTextAreacomponent and passes currently-edited noteidto it, if any.TextArea: Provides atextareato accept user input. Passes the note text toNoteCreationBoxfor saving.
Creating Actions
Let’s use Reflux to create some actions. If you open up actions/NoteActions.js, you can see how actions are created. Here is the snippet:
var Reflux = require('reflux');

var NoteActions = Reflux.createActions([
  'createNote',
  'editNote'
]);

module.exports = NoteActions;
Reflux.createActions is used to create Actions. We export these Actions in order to use them in our components.
Creating Store
We have a single store called NoteStore which maintains an array of notes. The following code is used to create the store (stores/NoteStore.js) :
var Reflux = require('reflux');
var NoteActions = require('../actions/NoteActions');

var _notes = []; //This is private notes array

var NoteStore = Reflux.createStore({
  init: function() {
    // Here we listen to actions and register callbacks
    this.listenTo(NoteActions.createNote, this.onCreate);
    this.listenTo(NoteActions.editNote, this.onEdit);
  },
  onCreate: function(note) {
    _notes.push(note); //create a new note

    // Trigger an event once done so that our components can update. Also pass the modified list of notes.
    this.trigger(_notes);
  },
  onEdit: function(note) {
    // Update the particular note item with new text.
    for (var i = 0; i < _notes.length; i++) {
      if(_notes[i]._id === note._id) {
        _notes[i].text = note.text;
        this.trigger(_notes);
        break;
      }
    }
  },

  //getter for notes
  getNotes: function() {
    return _notes;
  },

  //getter for finding a single note by id
  getNote: function(id) {
    for (var i = 0; i < _notes.length; i++) {
      if(_notes[i]._id === id) {
        return _notes[i];
      }
    }
  }
});

module.exports = NoteStore; //Finally, export the Store
As you see we listen to two actions, createNote and editNote, inside the init method. We also register callbacks to execute when actions are invoked. The code for adding/updating a note is pretty straightforward. We also expose getters to retrieve list of notes. Finally, the store is exported so that it can be used in our component.
Creating Components
All our React components are located in the react/components directory. I have already shown the overall structure of the UI. You can check out the downloaded source code to know more about each component. Here I will show you the key thing (i.e. how our components invoke actions and interact with the store).
NoteListBox:
This component obtains a list of notes from NoteStore and feeds them to NoteList component which then renders the notes. Here is how the component looks like:
var React = require('react');
var NoteList = require('./NoteList.jsx');
var NoteStore = require('../../stores/NoteStore');

var NoteListBox = React.createClass({
  getInitialState: function() {
    return { notes: NoteStore.getNotes() };
  },
  onChange: function(notes) {
    this.setState({
      notes: notes
    });
  },
  componentDidMount: function() {
    this.unsubscribe = NoteStore.listen(this.onChange);
  },
  componentWillUnmount: function() {
    this.unsubscribe();
  },
  render: function() {
    return (
        <div className="col-md-4">
            <div className="centered"><a href="" onClick={this.onAdd}>Add New</a></div>
            <NoteList ref="noteList" notes={this.state.notes} onEdit={this.props.onEdit} />
        </div>
    );
  }
});

module.exports = NoteListBox;
When the component mounts we start listening to the NoteStore‘s change event. This is broadcast whenever there is a mutation in the notes list. Our component listens to this event so that it can re-render the notes in case of any change. The following line registers a listener:
this.unsubscribe = NoteStore.listen(this.onChange);So, whenever there is a change onChange method of the component is called. This method receives an updated note list and changes the state.
this.setState({
  notes: notes //state changes
});
As this.state.notes is passed as a prop to NoteList, whenever the state changes NoteList re-renders itself.
Finally, we write this.unsubscribe() inside componentWillUnmount to remove the listener.
So, this is how NoteList always stays up-to-date by listening to Store’s change event. Now let’s see how a note is created/edited.
NoteCreationBox:
Have a look at the following method of NoteCreationBox:
handleSave: function(noteText, id) {
  if (id) {
    NoteActions.editNote({ _id: id, text: noteText });
  } else {
    NoteActions.createNote({ _id: Date.now(), text: noteText });
  }
}
This method is called whenever the Save button is clicked. It accepts noteText as its first parameter. If an id is passed as the second parameter, we know this is an edit operation and invoke the action NoteActions.editNote(). Otherwise we generate an id for the new note and call NoteActions.createNote(). Remember our NoteStore listens to these actions. Depending on the action appropriate store callback is executed. Once the data is mutated the store triggers a change event and our component NoteList updates itself.
This is how the data flows into the system and subsequently goes out in a Flux based application.
Why Use React on the Server
You might be wondering why I used React and Reflux on the server. One of the cool features of React is that the components can be rendered on both the client and server. Using this technique, you can create isomorphic apps that render on server and also behave as Single Page Apps. While this may not be required for a note app, you can easily use this setup to build complex isomorphic apps in future.
I encourage you to go through the source code and improve it further as there is a lot of room for improvements. If you have any questions do let me know in comments.
Thanks for reading!


