Build a CRUD App with Yii in Minutes

Yii is a high performance framework that’s fast, secure, and well-suited for Web 2.0 applications. It favors convention over configuration, which means that if you follow its guidelines you’ll end up writing much less code than you would otherwise (and less code implies fewer bugs). Furthermore, it offers many convenient features out of the box, such as scaffolding, data access objects, theming, access control, caching, and more. In this article I’ll cover the basics using Yii to create a CRUD system.
Getting Started
I assume you already have Apache, PHP (5.1 or greater), and MySQL installed on your system, so the first step is downloading the framework files. Head over to the official Yii website and download the latest stable version, which at the time of this writing is 1.1.13.
Extract the ZIP file to get the folder yii-1.1.13.e9e4a0 (the version identifier may be different depending on the version you download) and rename it yii, then move the folder to your web-accessible root directory. For me, this is C:\wamp\www so the location to the framework files will be C:\wamp\www\yii. I’ll refer to this as <YiiRoot> throughout the article so you’ll be able to follow along easily even if your own setup is different.
Next, we should check which features of Yii will be supported by our system. Access http://localhost/yii/requirements/ in your browser to see the requirement details of the framework. Since we’ll be working with a MySQL database, you should have the MYSQL PDO extension enabled.
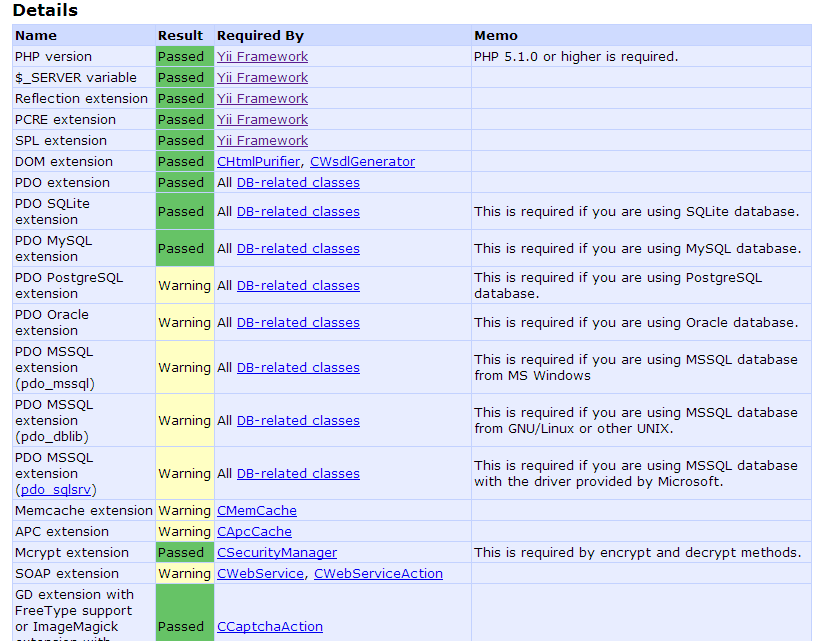
We wanted to quickly check the requirements of Yii, which is why we put the files in the accessible directory, but it’s recommended to keep Yii files outside of the web root. After the check, feel free to move it elsewhere.
Moving Forward
Every web app has a directory structure, and Yii apps also need to maintain a hierarchical structure inside the web root. To create a skeleton app with a a suitable directory structure we can use Yii’s command line tool yiic. Navigate to the web root and type the following:
<YiiRoot>frameworkyiic webapp yiitest
This will create the skeleton app called yiitest with the minimum required files. Inside you’ll find index.php which serves as an entry script; it accepts user requests and decides which controller should handle the request.
Yii is based on MVC and OOP principles so you should be well versed with these topics. If you’re not familiar with MVC, read the SitePoint series The MVC Pattern and PHP which offers a good introduction.
Yii URLs look like http://localhost/yiitest/index.php?r=controllerID/actionID. For example, in a blogging system the URL could be http://localhost/yiitest/index.php?r=post/create. post is the controller ID and create is the action ID. The entry script decides which controller and method to invoke based on the IDs.
The controller whose ID is post must be named PostController (the ID strips the suffix “Controller” from the class name and converts the first letter to lowercase). The action ID is the ID of a method present inside the controller in a similar way; inside PostController there would be a method named actionCreate().
There may be several views associated with a controller, so we keep the view files inside protected/views/controllerID folders. We can create a view file for our controller called create.php it in the above described directory, and then present this view to the users simply by writing the following code for actionCreate():
public function actionCreate()
{
    $this->render('create');
}
It’s also possible to pass additional data to the view when necessary. This is done as follows:
$this->render('create', array('data' => $data_item));Inside the view file we can access the data through the $data variable.
The view also has access to $this which points to the controller instance that rendered it.
Furthermore, if you’d like user friendly URLs you can uncomment the following in protected/config/main.php:
'urlManager'=>array(
    'urlFormat'=>'path',
    'rules'=>array(
        '<controller:w+>/<id:d+>'=>'<controller>/view',
        '<controller:w+>/<action:w+>/<id:d+>'=>'<controller>/<action>',
        '<controller:w+>/<action:w+>'=>'<controller>/<action>',
    )
The URLs will then look like http://localhost/yiitest/controllerID/actionID.
Developing a CRUD App
Now that you know the important Yii conventions, it’s time to get started with CRUD. In this section we will develop a simple system where a user can perform CRUD operations (create, retrieve, update, and delete) on a blog post.
Step 1
Create the MySQL database yiitest and inside that create a table named posts. The table will have just 3 columns for our purposes here: id, title, and content.
CREATE TABLE posts (
    id INTEGER NOT NULL PRIMARY KEY AUTO_INCREMENT,
    title VARCHAR(100),
    content TEXT
)
Open up your application’s config file (protected/config/main.php) and uncomment the following:
'db'=>array(
'connectionString' => 'mysql:host=localhost;dbname=testdrive,
'emulatePrepare' => true,
'username' => 'root',
'password' => '',
'charset' => 'utf8',
)
Replace testdrive with the name of our database, i.e. yiitest. And obviously you should provide the necessary credentials for Yii to connect as well.
Step 2
In Yii every database table should have a corresponding model class of type CActiveRecord. The benefit is that we don’t have to deal with database tables directly. Instead we can work with model objects that correspond to different rows of a table. For instance, the Post class is the model for the posts table. An object of this class represents a row from the table posts and has attributes that represent the column values.
To generate the model quickly, we’ll make use of Yii’s web-based tool gii. This tool can be used to generate models, controllers, and forms for CRUD operations. To use gii in your project, find the following in your application’s config file and uncomment it and add a password.
'gii'=>array(
'class'=>'system.gii.GiiModule',
'password'=>your password to access gii,
'ipFilters'=>array('127.0.0.1','::1'),
)
Then access gii with the following URL: http://localhost/yiitest/index.php?r=gii. If you’re using user friendly URLs, the URL is: http://localhost/yiitest/gii.
Click on Model Generator. gii will ask you for name of the table; enter “posts” for the table name and for model use the name “Post”. Then click Generate to create the model.
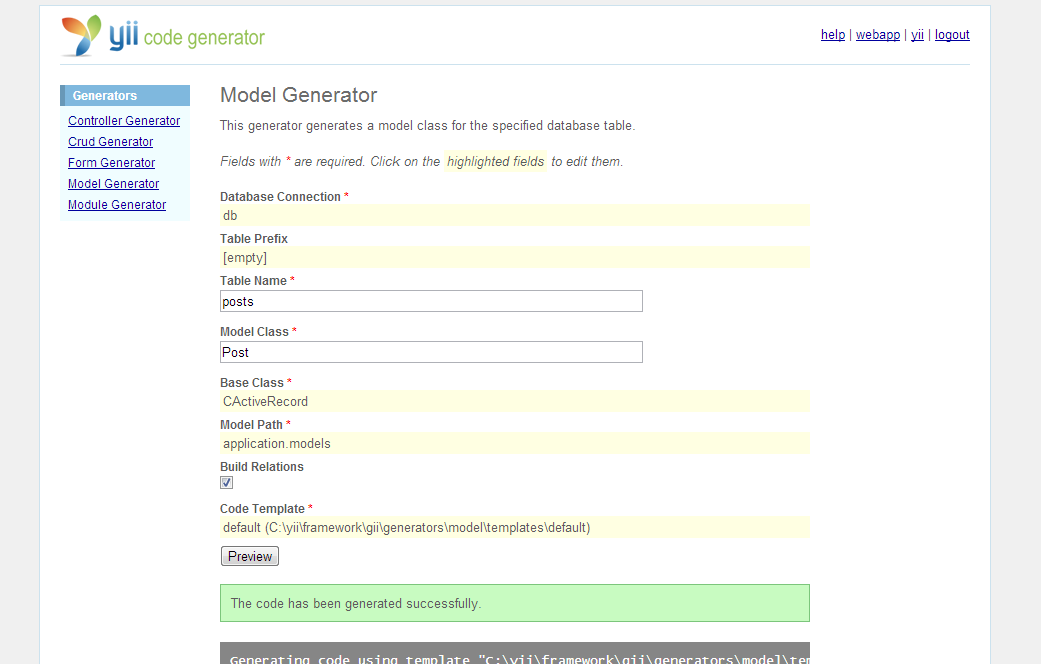
Check protected/models and you will find the file Post.php there.
Step 3
Now click on CRUD Generator. Enter the model name as “Post”. The controller ID will be auto populated as “post”. This means a new controller will be generated under the name of PostController.php.
Click on Generate. The process will generate the controller and also several view files with the forms necessary for the CRUD operations.
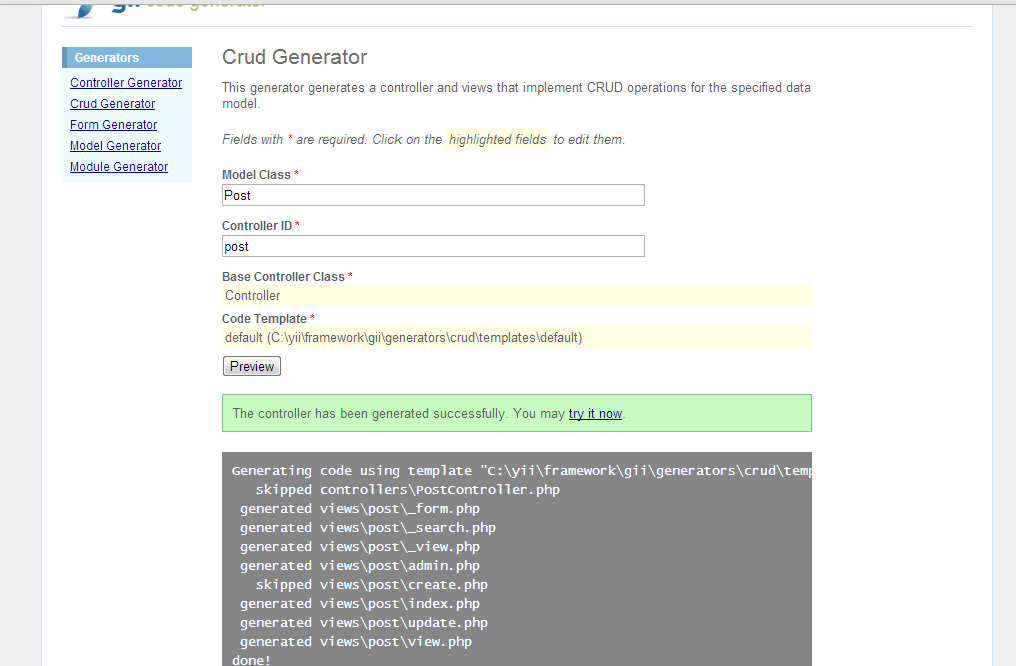
Now you have a brand new CRUD app! Click on the “try it now” link to test it out. To manage the posts you will need to be logged in as admin/admin.
To create a new post you will need to access http://localhost/yiitest/post/create and for updating a specific post just point your browser to http://localhost/yiitest/post/update/postID.
Similarly you can list all the posts and delete some or all of them.
Conclusion
Yii is very powerful when it comes to developing Web 2.0 projects. In fact, we just saw how easy it is to create a fully functional CRUD system in only a few minutes! Clearly Yii can save you a lot of hard work because you don’t have to start from scratch. Yii gives us the foundation and we can extend it as we see fit.