Extending Flarum: Adding a Web3 Address to a User’s Profile

In our first Flarum tutorial — “Writing a Flarum Extension: Building a Custom Field” — we covered how to add a new custom field to a user’s profile in a blazing fast and extremely extensible open-source forum software called Flarum. The field we added was web3address, the account of a user’s Web3 identity.
In this second tutorial, we take things a step further by allowing users to add a Web3 address to their profile.
Note ℹ: The Web3 ecosystem is a new internet of decentralized hosting, self-owned data, and censorship-resistant communication. For a primer on Web3, please see this 15 minute talk at FOSDEM.
Cryptographically Adding Web3
At this point, our custom field works, is settable by users, and is editable by administrators of the forum. Now let’s make sure users can add their address in a cryptographically sound way.
This means a user will only be able to add an address they have proven to own. You prove ownership of an address by signing a message with that address’ private key. Only the person who has the private key of a public–private keypair is considered to be the owner of that keypair. The public part of a public–private keypair is the base from which a Web3 address is mathematically derived.
To own some address(es), a user should install the Polkadot JS extension and create an account. The UI should be self-explanatory, but there’s a more detailed guide here if needed.
The field we added in the previous tutorial currently lets users manually set any value, but this means users can enter anyone’s address or even some gibberish. We want them to only add their own, so we’ll replace it with a button that will:
- ask for permission to access the browser extension containing the account(s)
- load the accounts and offer a dropdown to select one of them
- ask the user to sign a message with that address and verify that signature
- register that account as the user’s Web3 address
Let’s dive in.
Button
First we need to change our Web3 input field into a Dropdown. Let’s create components/Web3Dropdown.js:
import Component from "flarum/Component";
import Dropdown from "flarum/components/Dropdown";

export default class Web3Dropdown extends Component {
  view() {
    return (
      <Dropdown
        buttonClassName="Button"
        onclick={this.handleClick.bind(this)}
        label="Add Web3 Account"
      >
      </Dropdown>
    );
  }

  handleClick(e) {
    console.log("Pick something");
  }
}
We create a new component in the style of Web3Field.js we created earlier, but now we return an instance of the Dropdown component. The Dropdown component is one of several standard JS components in Flarum. You can find a full list here. We also give it the class “Button” to match its style with the rest of the forum. On click, we print a message.
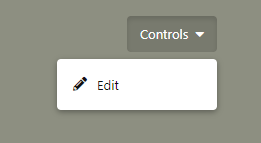
The component is a button with the ability to summon a dropdown from passed-in items, much like the “Controls” menu that an admin of the forum can see on a user’s profile:
Dependencies
In our extension’s JS folder, we’ll add two dependencies:
yarn add @polkadot/util-crypto @polkadot/util @polkadot/extension-dapp
Note ⚠: don’t forget to stop the process if you’re still running yarn dev and don’t forget to start it again after having installed these dependencies!
util-crypto contains some utility functions for cryptographic operations.util contains some basic utilities, like turning strings into bytes etc. (There are docs for both here.) extension-dapp is a helper layer that lets the JS we write interact with the Polkadot JS extension we’ve installed. (Visit the docs here.)
Asking Permission and Getting Accounts
Let’s modify our Dropdown now to ask the user for permission to access their Web3 accounts:
  import { web3Accounts, web3Enable } from "@polkadot/extension-dapp";

  // ...

  async handleClick(e) {
    await web3Enable("Flarum Web3 Address Extension");
    const accounts = await web3Accounts();
    console.log(accounts);
  }
Notice that we changed the handleClick function to be async! We need this to be able to await promises in the code. Otherwise, we’d get stuck with nesting then calls.
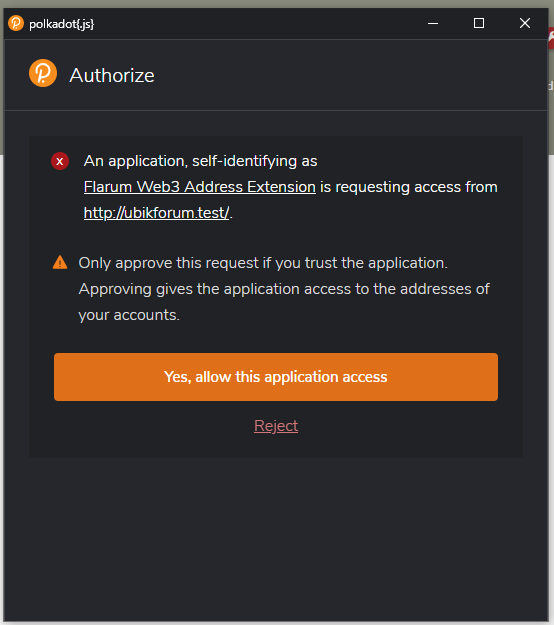
First we call web3Enable, which asks us for permission to access the extension. Then we grab all of a user’s accounts and output them in the console. If you have the Polkadot JS extension installed and some accounts loaded, feel free to try this out now.

But what if someone doesn’t have the extension installed? We could have an admin-level setting which lets us choose whether to hide the button if the extension isn’t around or to redirect the user to its URL, but for now, let’s choose the latter:
  import { web3Accounts, web3Enable, isWeb3Injected } from "@polkadot/extension-dapp";

  // ...

  async handleClick(e) {
    await web3Enable("Flarum Web3 Address Extension");
    if (isWeb3Injected) {
      const accounts = await web3Accounts();
      console.log(accounts);
    } else {
      window.location = "https://github.com/polkadot-js/extension";
    }
  }
Picking the Account
The next step is letting the user pick an account and at the same time asking them to sign a message with it. Once verified, that signature irrefutably proves ownership of the account.
The Dropdown component takes an items array of items to display. This is most commonly an array of Button elements, where Button is a common Flarum component. To give our component a component-wide data property that we can manipulate and base changes on, we define it in oninit:
  oninit() {
    this.web3accounts = [];
  }
Instead of just console.loging the accounts, we then set the accounts to this new attribute:
this.web3accounts = accounts;
m.redraw();
Note ⚠: we use redraw here to make mithril (m) re-render our component. If we don’t, the component will render an empty dropdown first (it doesn’t have accounts yet) and will need another close–open of the dropdown to show accounts (which triggers a redraw). We want the accounts in the dropdown as soon as they are loadedstrong>, even if the dropdown is already open and has no elements, so this will do the trick. Whenever you need to apply changes to your component dynamically without UI triggers, usually based on some remote data fetches or data processing, you’re okay to use m.redraw().
Finally, we make view, the function responsible for our rendering, react to this change:
  view() {
    const items = [];
    if (this.web3accounts.length) {
      for (let i = 0; i < this.web3accounts.length; i++) {
        items.push(
          <Button
            value={this.web3accounts[i].address}
            onclick={this.handleAccountSelect}
          >
            {this.web3accounts[i].address}
            {this.web3accounts[i].meta.name
              ? ` - ${this.web3accounts[i].meta.name}`
              : ""}
          </Button>
        );
      }
    }
    return (
      <Dropdown
        buttonClassName="Button"
        onclick={this.handleClick.bind(this)}
        label="Set Web3 Account"
      >
        {items}
      </Dropdown>
    );
  }
First we define an empty placeholder array. Then, if there are more than zero web3accounts stored in this component, we iterate through them to create a button for each account with the value set to the account’s address and the label set to a combination of address and in-extension-defined label. Finally, we pass those Buttons into the Dropdown component.
We also need to import the Button component:
import Button from "flarum/components/Button";
Note ℹ: notice that we’re not binding this to each Button’s onclick event handler. This is because this would change the button’s context to the parent Dropdown component, rather than the button being clicked, and would make fetching the button’s value less straightforward.
Next, we need to react to the user clicking on one of the addresses in the menu:
  handleAccountSelect() {
    console.log(this.value);
  }
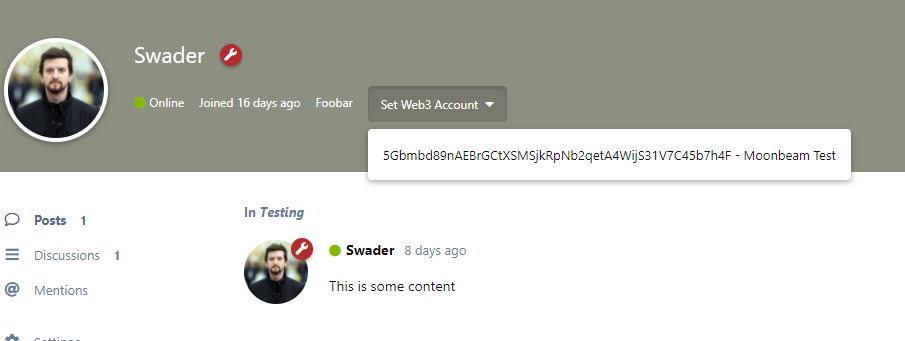
Testing this will reveal that we can indeed select a Web3 account from our extension, and that it gets logged in the console after selection.
![]()
Verifying the Account
Finally, we need to ask the user to sign a message. Let’s say the message is “Extreme ownership”. This will prompt them to submit a password in the extension popup and return a signed message.
First, some imports:
import {
  web3Accounts,
  web3Enable,
  isWeb3Injected,
  web3FromAddress,  // <-- this is new
} from "@polkadot/extension-dapp";
import { stringToHex } from "@polkadot/util"; // <-- this is new
web3FromAddress is a handy method to construct a Web3 object, the standard object for Web3 interactions, with the given address as the “protagonist”. stringToHex is used to turn a string into a hexadecimal representation, which is the data format a signer expects (bytes):
  async handleAccountSelect() {
    const address = this.value;
    const web3 = await web3FromAddress(address);
    const signer = web3.signer;
    const hexMessage = stringToHex("Extreme ownership");
    try {
      const signed = await signer.signRaw({
        type: "bytes",
        data: hexMessage,
        address: address,
      });
      console.log(signed);
    } catch (e) {
      console.log("Signing rejected");
      return;
    }
  }
We first turn the function into an async one so we can use await. Then we make a web3 instance from our address, as explained above, and extract the signer. The signer is a cryptographic tool which will automatically extract the public key from an address and sign a given message, provided in bytes. (This is what we need the hexMessage for — converting our string into bytes, represented hexadecimally.)
The only way to get signed is to sign; everything else causes an error to be thrown.
Saving the Account
Finally, we follow the same process as before with Web3Field.js — pass the address into save:
  async handleAccountSelect() {
    const address = this.value;
    const web3 = await web3FromAddress(address);
    const signer = web3.signer;
    const hexMessage = stringToHex("Extreme ownership");
    try {
      const signed = await signer.signRaw({
        type: "bytes",
        data: hexMessage,
        address: address,
      });
      console.log(signed);
      const user = app.session.user;
      user
        .save({
          web3address: address,
        })
        .then(() => m.redraw());
    } catch (e) {
      console.log("Signing rejected");
      return;
    }
  }
Note ℹ: we add m.redraw to refresh the value on-screen after save. The redraw will trigger a refresh of the extension’s JavaScript and read in data from the User instance returned by the save operation, showing our updated address if the save was successful.
Server-side Verification
This is reasonably secure. Even if someone hacks around our JS and inserts a Web3 address that doesn’t belong to them, they can’t really do much with it. They can merely present themselves as someone they’re not. Still, we can get around this as well by doing some server-side validation.
Because there’s currently no toolkit for PHP for the cryptographic functions we’re using, we’ll need to be creative. Specifically, we’ll write a command-line script in TypeScript which we’ll call from within PHP.
In js/src/forum, create the scripts folder and add the file verify.js:
let util_crypto = require("@polkadot/util-crypto");

util_crypto
  .cryptoWaitReady()
  .then(() => {
    const verification = util_crypto.signatureVerify(
      process.argv[2], // message
      process.argv[3], // signature
      process.argv[4] // address
    );
    if (verification.isValid === true) {
      console.log("OK");
      process.exitCode = 0;
    } else {
      console.error("Verification failed");
      process.exitCode = 1;
    }
  })
  .catch(function (e) {
    console.error(e.message);
    process.exit(1);
  });
The crypto utilities package contains helper methods for everything we need. cryptoWaitReady waits for crypto operations to init — in particular, sr25519, which we’re using here, needs a piece of WASM to warm up. Then, we verify the signature using the signatureVerify function by processing the arguments provided.
We can test this locally (get the values from the payload of a Save request after setting an address in the dropdown, or by manually signing the “Extreme ownership” message in Polkadot UI):
$ node src/forum/scripts/verify.js "Extreme ownership" 0x2cd37e33c18135889f4d4e079e69be6dd32688a6bf80dcf072b4c227a325e94a89de6a80e3b09bea976895b1898c5acb5d28bccd2f8742afaefa9bae43cfed8b 5EFfZ6f4KVutjK6KsvRziSNi1vEVDChzY5CFuCp1aU6jc2nB
> OK
$ node src/forum/scripts/verify.js "Wrong message" 0x2cd37e33c18135889f4d4e079e69be6dd32688a6bf80dcf072b4c227a325e94a89de6a80e3b09bea976895b1898c5acb5d28bccd2f8742afaefa9bae43cfed8b 5EFfZ6f4KVutjK6KsvRziSNi1vEVDChzY5CFuCp1aU6jc2nB
> Verification failed
Our verification script works.
Note ℹ: the same message signed by the same address will give a different hash every time. Don’t count on them being the same. For example, these three payloads are “Extreme ownership” signed by the same address 3 times:
// {"web3address":"5EFfZ6f4KVutjK6KsvRziSNi1vEVDChzY5CFuCp1aU6jc2nB","signedMessage":"0x0c837b9a5ba43e92159dc2ff31d38f0e52c27a9a5b30ff359e8f09dc33f75e04e403a1e461f3abb89060d25a7bdbda58a5ff03392acd1aa91f001feb44d92c85"}""
// {"web3address":"5EFfZ6f4KVutjK6KsvRziSNi1vEVDChzY5CFuCp1aU6jc2nB","signedMessage":"0x3857b37684ee7dfd67304568812db8d5a18a41b2344b15112266785da7741963bdd02bb3fd92ba78f9f6d5feae5a61cd7f9650f3de977de159902a52ef27d081"}""
// {"web3address":"5EFfZ6f4KVutjK6KsvRziSNi1vEVDChzY5CFuCp1aU6jc2nB","signedMessage":"0xa66438594adfbe72cca60de5c96255edcfd4210a8b5b306e28d7e5ac8fbad86849311333cdba49ab96de1955a69e28278fb9d71076a2007e770627a9664f4a86"}""
We also need to modify our app.session.user.save call in the Dropdown component so it actually sends the signed message to the back end:
  user
    .save({
      web3address: address,
      signedMessage: signed.signature,
    })
    .then(() => console.log("Saved"));
When our web3address value is being saved on a user, we need to intercept that operation, verify the signature only if it’s the user doing the save, not an admin, and save if okay, or reject (preferably with an error message) if not.
Let’s modify out handle function in SaveUserWeb3Address.php:
if (isset($attributes['web3address'])) {
    if (!$isSelf) {
        $actor->assertPermission($canEdit);
    }

    chdir(__DIR__ . "/../../js");
    $command = "node src/forum/scripts/verify.js \"Extreme ownership\" " . $attributes['signedMessage'] . " " . $attributes['web3address'] . " 2>&1";
    exec($command, $out, $err);

    if ($err) {
        return false;
    }
    $user->web3address = $attributes['web3address'];
    $user->save();
}
We added lines 6 to 12: we change the directory to the one containing our verification script. Then, we compose the command-line call to the script by passing in the required params, and finally if the error code $err is anything other than falsy (it will be 0 if all went well), we stop the saving process.
This doesn’t allow admins to change the value at will though, so let’s add that. As per the docs, an $actor has the isAdmin helper. The final version of our handle method is now:
public function handle(Saving $event)
{
    $user = $event->user;
    $data = $event->data;
    $actor = $event->actor;

    $isSelf = $actor->id === $user->id;
    $canEdit = $actor->can('edit', $user);
    $attributes = Arr::get($data, 'attributes', []);

    if (isset($attributes['web3address'])) {
        if (!$isSelf) {
            $actor->assertPermission($canEdit);
        }

        if (!$actor->isAdmin()) {
            chdir(__DIR__ . "/../../js");
            $command = "node src/forum/scripts/verify.js \"Extreme ownership\" " . $attributes['signedMessage'] . " " . $attributes['web3address'] . " 2>&1";
            exec($command, $out, $err);

            if ($err) {
                return false;
            }
        }
        $user->web3address = $attributes['web3address'];
        $user->save();
    }
}
Error Clarity
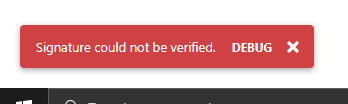
The last thing we should do is make an error more UX-friendly if the verification of the address fails. A return false isn’t very useful; the UI would simply do nothing. Since this is a validation error (we’ve failed to validate the user’s ownership of this address), we can throw a ValidationException:
if ($err) {
    throw new Flarum\Foundation\ValidationException(["Signature could not be verified."]);
}
Now if our verification fails, we’ll see this in a handy error message:
Pre-deploy caveat
Because we’re in development mode, our extension has access to Node and Yarn and could install the Polkadot dependencies needed to do the cryptography. However, in a production environment there’s no easy way to automatically run yarn install on a Composer-installed package, so our verify script would not work without significant user intervention. We need to bundle the verify.js script into a file that’s directly runnable by NodeJS without package managers. This still means our production server has to have NodeJS installed, but that’s all it needs — at least until the cryptographic functionality we use also appears in PHP flavor.
To bundle up our script, inside the extension’s JS folder we can run:
npx browserify src/forum/scripts/verify.js > dist/verify.js
This will run Browserify without installing it, bundle up all the dependencies and output a single JS blob that we save into dist/verify.js. Now we can commit this file into the extension’s repo and target it if it exists. In fact, we can make our extension detect whether or not the forum is in debug mode and target the source vs dist file based on that flag:
if (!$actor->isAdmin()) {
    chdir(__DIR__ . "/../../js");
    if (app(\Flarum\Foundation\Config::class)->inDebugMode()) {
        $command = "node src/forum/scripts/verify.js \"Extreme ownership\" " . $attributes['signedMessage'] . " " . $attributes['web3address'] . " 2>&1";
    } else {
        $command = "node dist/verify.js \"Extreme ownership\" " . $attributes['signedMessage'] . " " . $attributes['web3address'] . " 2>&1";
    }
    exec($command, $out, $err);

    if ($err) {
        throw new ValidationException(["Signature could not be verified."]);
    }
}
Our Listener will read the source version if the inDebugMode returns true, or dist/verify.js otherwise.
Conclusion
Our forum users can now add their Web3 addresses to their profile. You can find the published extension at swader/web3address.
Because some users might not be using Chrome or Firefox and won’t have the extension available, and because some might prefer alternative account generation methods as documented here, we allow administrators to manually input addresses for specific user accounts, provided those users prove ownership of their address. As that’s a manual process, however, the proving process is outside the scope of this tutorial.
This lays the foundation for future use of these addresses. They’ll be used to pay out participation points — crypto tokens — for user activity on the forum, encouraging lively discussions and quality engagement. We’ll see about doing that in a subsequent guide.
Got any feedback about this post? Need something clarified? Feel free to contact the author.


