Moving from All in One SEO to WordPress SEO by Yoast

When I began playing with blogging software over a decade ago, MoveableType was the ‘Bee’s Knees’ of the available options. AltaVista was the search engine of choice, and the majority of us had never heard the term SEO (Search Engine Optimization).
Today, WordPress is a CMS (Content Management System) that is used to run a significant proportion of the world’s websites. Google is the dominant search engine and there are hundreds of millions of websites, so the trick is to be found easily. Few people venture beyond the first page of the search results in Google, so you more or less need to be there if you want to be found.
Early on, all that was necessary to get noticed was to put some keywords into the meta tags in the <head></head> of your web page code. Alta-Vistas’ ‘spider’ would come along and ‘crawl’ your site and that would be more or less all you had to do to be found.
Since then, things have become substantially more difficult, and while major search engines like Google still crawl your site they look at a number of different characteristics and tags such as <h1> </h1> and <h2> </h2> in your code.
To further complicate matters, the search engines are continuously tweaking their algorithms. The ongoing migration to HTML5 and CSS3 has added a further layer of complexity with new tags such as <article> </article>.
So how do you keep up with all the changes and get your site on page one of Google and Bing? Fortunately, there are a number of tools that you can use, to almost automate the process, or at least keep it relatively simple. In particular, there are several plugins for WordPress that focus on improving your SEO. I have been using the ‘All in One SEO Pack’ plugin for the past few years. It has been a great tool and I haven’t had any issues with it. However, I was swayed to move to WordPress SEO by Yoast after attending a number of Melbourne SEO Meetups.
WordPress SEO by Yoast promises to control a wider range of parameters and offers a few more features than what I have with All in One SEO Pack. So I made the decision to change my SEO plugin on one of my less trafficked and more experimental sites. I tackled the conversion in two stages:
- Stage 1 – The setup process including backups and installation.
- Stage 2 – The swap, which involves configuring WordPress SEO by Yoast, updating additional fields and other minor tasks.
Now I’ll take you through the process I took to switch from All in One SEO Pack to WordPress SEO by Yoast.
Stage One: Setup
Step One – Backup
Backup the complete site including the main database files. While I have a regular backup regime, there are a lot of parameters and data that is associated with SEO. You can’t be too careful, so make sure the backups are not on your actual server.
Step Two – Deactivate
Deactivate your previous SEO plugin, but don’t delete it yet.
Step Three – Install
Install and activate the WordPress SEO by Yoast plugin (and optionally the separate Google Analytics plugin which is also handy).
Step Four – Import
On the WordPress dashboard, you should now see a new menu item ‘SEO’. Expand the menu and select Import & Export. Check the ‘Import from All-in-One SEO’ box.
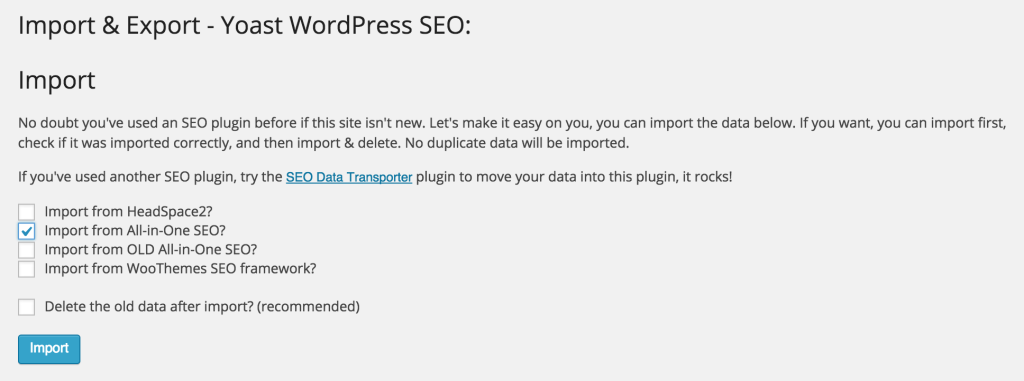
On the first site I converted I did not check the ‘Delete old data after import’ option. On subsequent sites I have done this, and it appears safe. However, I again recommend that you have your site backed up in the unlikely event that something goes wrong.
Depending on how large your site is, and the speed of your server, the import will take a few seconds. That’s about it for the set up process!
Stage Two: Swap
Step 1 – Connect Google Analytics (optional)
The first thing to check is that you have connected to your Google Analytics account. Yoast will remind you to do this until it is updated. You can find instructions on how to do this here. Although very straightforward, I found it a little confusing that the ‘Authenticate with your Google Account’ button appears greyed out. Once I had realised the button is actually active, the process took less than 30 seconds. You can also enter your UA code manually if the authentication fails.
Step 2 – Check Permalink Structure
You should also check the structure of your page and post settings. If you are starting fresh or have only a few pages and posts, then consider setting your permalink structure to either /%postname%/ or /%category%/%postname%/. However, I recommend reading this article from Yoast on permalinks and taking note of the comments. You may lose data and have to relink all your pages and posts if it goes wrong. As my WordPress sites were setup many years ago the permalinks are structured in the ‘Day’ and ‘Name’ format, and I am happy with that.
Note: If you do need to change your URL structure, make sure you use 301 redirects to redirect your old URLs. To do this, you can use a plugin such as Redirection or Simple 301 Redirects, or manually add entries to your .htaccess file.
Step 3 – Update Extra Fields in Pages and Posts
The WordPress SEO by Yoast plugin has a few extra fields compared to All in One SEO. This means that if you want your existing pages and posts to fully take advantage of the plugin, you are going to have go back over them all and do some updates.
You will need to go through each existing page and post and add the relevant data. Although this is a bit tedious, especially when you have hundreds of pages and posts, it does give you the opportunity to review and optimize your content.
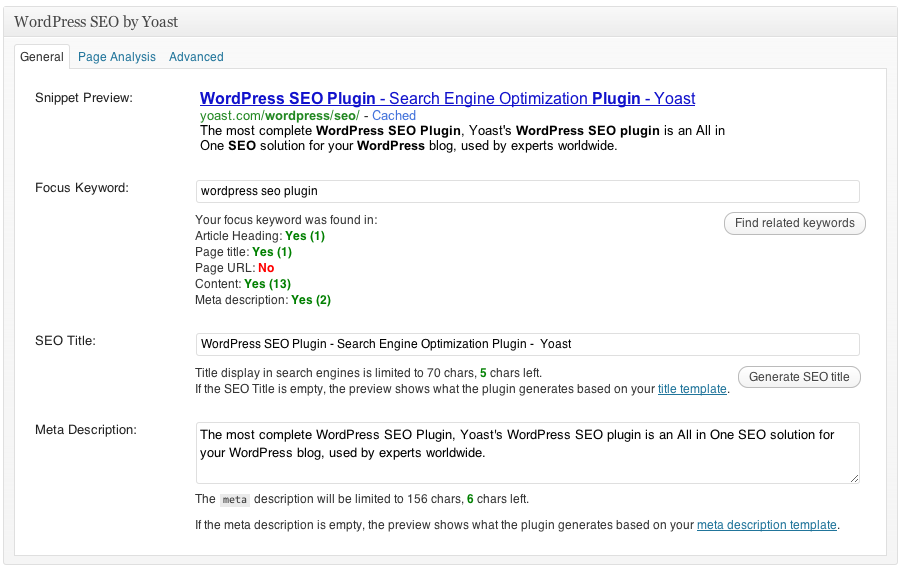
With one of my main sites, I have taken this opportunity to consolidate many of the pages deleted some of the out of date and irrelevant posts. The key field that you will need to add is the ‘Focus Keyword’.
For blog posts, you will usually aim for a long tail keyword (a short phrase containing multiple keywords). When you start to type in the phrase, you will see a drop down menu which offers suggestions. These suggestions are based on Google’s Suggest. This is exactly the same as what is suggested when you enter a search term into a Google search box.
You should aim to have a simple keyword/phrase that people would naturally type. Think of the words you might type if you were searching the topic yourself. When creating a phrase, WordPress SEO will warn you about the use of ‘Stop’ words. These are simply words that the search engines ignore such as ‘a’, ‘and’, ‘the’, etc.
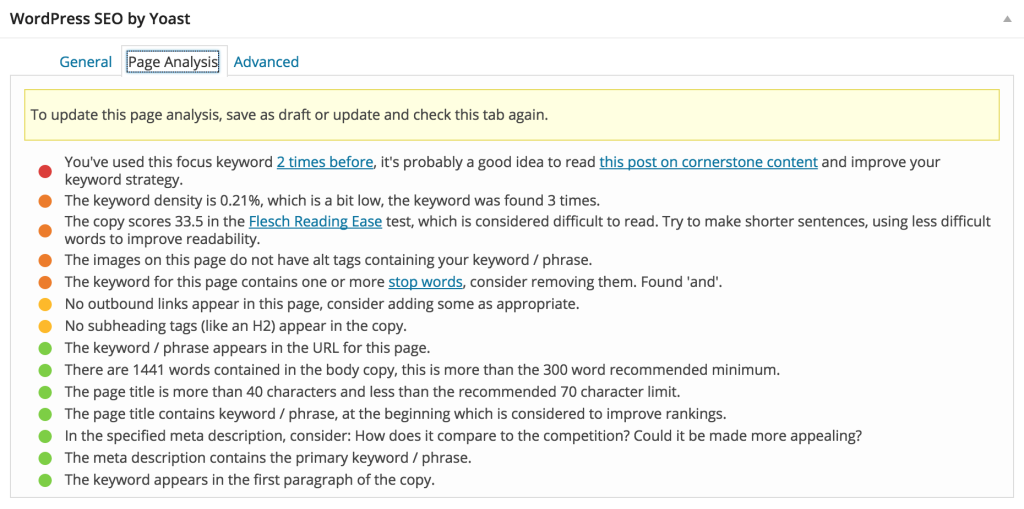
Once you have added the keyword/phrase, and updated the page/post and you will be able to see the page analysis. The ‘Page Analysis’ tab gives a good number of suggestions if you want to drill down into your content, it’s also useful for explaining why your content might not be opmtized. As you get better at SEO, there are some indicators you may want ignore for certain posts. In this example, it was an update about an event, so the 98 words was adequate for the purpose. Similarly, the warning about linking to a page with a similar keyword was ignored because the event spelling was unique.
If you don’t want to go through every page and post manually, there is a ‘Bulk Editor’. This allows you to update titles or descriptions in bulk.
Conclusion
Even if you’re not a Search Engine Optimization expert, the WordPress SEO by Yoast plugin allows you to easily control the key SEO aspects on your WordPress site. This plugin is great for writing meta descriptions and other SEO tasks.
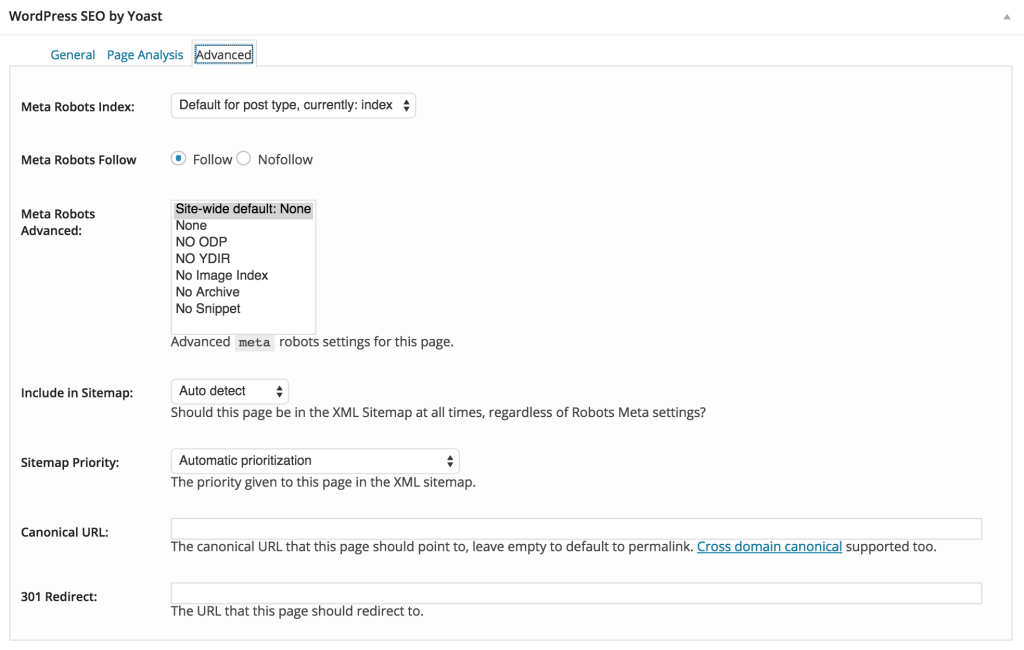
You can also control more advanced elements such as your robots.txt file, use to allow or disallow search engines to crawl certain areas of your site, and you can generate your XML sitemap for submission to the search engines. I would suggest that you use a program such as Screaming Frog to check for broken links and other errors before creating and submitting your sitemap.
Perhaps the thing I like the most about Yoast’s SEO plugin is the way that it analyzes your page and post content making suggestions based on what you’ve written. Yoast’s plugin also gives you an overall score – Good, OK, Fair – plus a corresponding traffic light, based on how many of the points you’ve correctly targeted. The traffic light system is good quick reference to let you know if you’ve forgotten something important, such as not using your keyword in a heading. This is also really easy for non-tech users to use without much training, which is important if your site has multiple authors.
The change from All in One SEO Pack to WordPress SEO by Yoast is quite straightforward, but keep in mind that this plugin demands more of you than the simpler options with All in One SEO. However, in return, with some practice, and keyword research your site should see better search engine rankings.