How to Build Your Backend with Hasura and PostgreSQL

Backend development often requires writing many lines of code that handle CRUD, authorization and business logic. All this code needs to be tested, debugged and maintained during the entire lifetime of the project. This takes a lot of time that developers can be using to develop new features. In this article, you’ll learn how Hasura and PostgreSQL can help you speed up app development and launch backends quickly with minimal effort.
Hasura is an open-source GraphQL engine that generates GraphQL and REST API endpoints using your database schema. It supports data modeling, real-time querying, event programming, role-based authorization and actions for running custom business logic over GraphQL.
PostgreSQL is a popular and powerful open-source, object-oriented relational database that offers enterprise-class features on a similar level with Oracle Database and Microsoft SQL Server. PostgreSQL is used by large international companies such as Netflix, Instagram, Uber and Spotify, according to StackShare.
In this article, we’ll go over the main features Hasura provides that makes it suitable for developing and launching scalable backends, for both web and mobile applications. We’ll also look at how you can leverage PostgreSQL’s features to perform various computation and analytical tasks using just SQL to deliver the right data to your frontend without writing custom code.
Do note that Hasura does support other databases as well, such as Microsoft SQL Server, Amazon Aurora and Google BigQuery. We’ll focus on PostgreSQL, since it’s free and accessible for the majority of businesses and organizations. Support for MySQL is coming soon, in case you’re interested.
If you’re new to GraphQL, please check out our tutorial to learn more. Let’s start with why PostgreSQL can be a perfect choice for your project.
Why PostgreSQL
Relational databases have many distinct advantages over other types of databases, in that you can model your data using strict schemas and table relationships. The ability to perform JOINs and execute ACID transactions is a major requirement for many applications in most industries. These features are essential to promoting integrity and consistency of business data at any given time.
PostgreSQL also has additional advantages over other relational databases such as MySQL, in that:
- you can model data using table inheritance
- it has better concurrency control for multi-user environments (you can write massive amounts of data more efficiently)
- it’s fault tolerant and is less prone to data corruption
- it supports a number unique data types such as JSON and Spatial, which is useful for finance and research-related applications
PostgreSQL isn’t just a data storage service. It’s also a server capable of running custom functions and triggers to perform various computation and analytical tasks. Running logic on PostgreSQL is more efficient, as it negates the need to write custom server code. You can define logic in PostgreSQL using:
- Views, a stored query that can help simplify complex queries
- Functions & Operators, such as date formatting, pattern matching, arithmetic operations
- Extensions, addons that extends PostgreSQL’s capabilities (such as PostGIS)
- Procedural Languages, programming languages for writing user-defined functions, stored procedures, triggers and extending the standard SQL (such as PL/pgSQL)
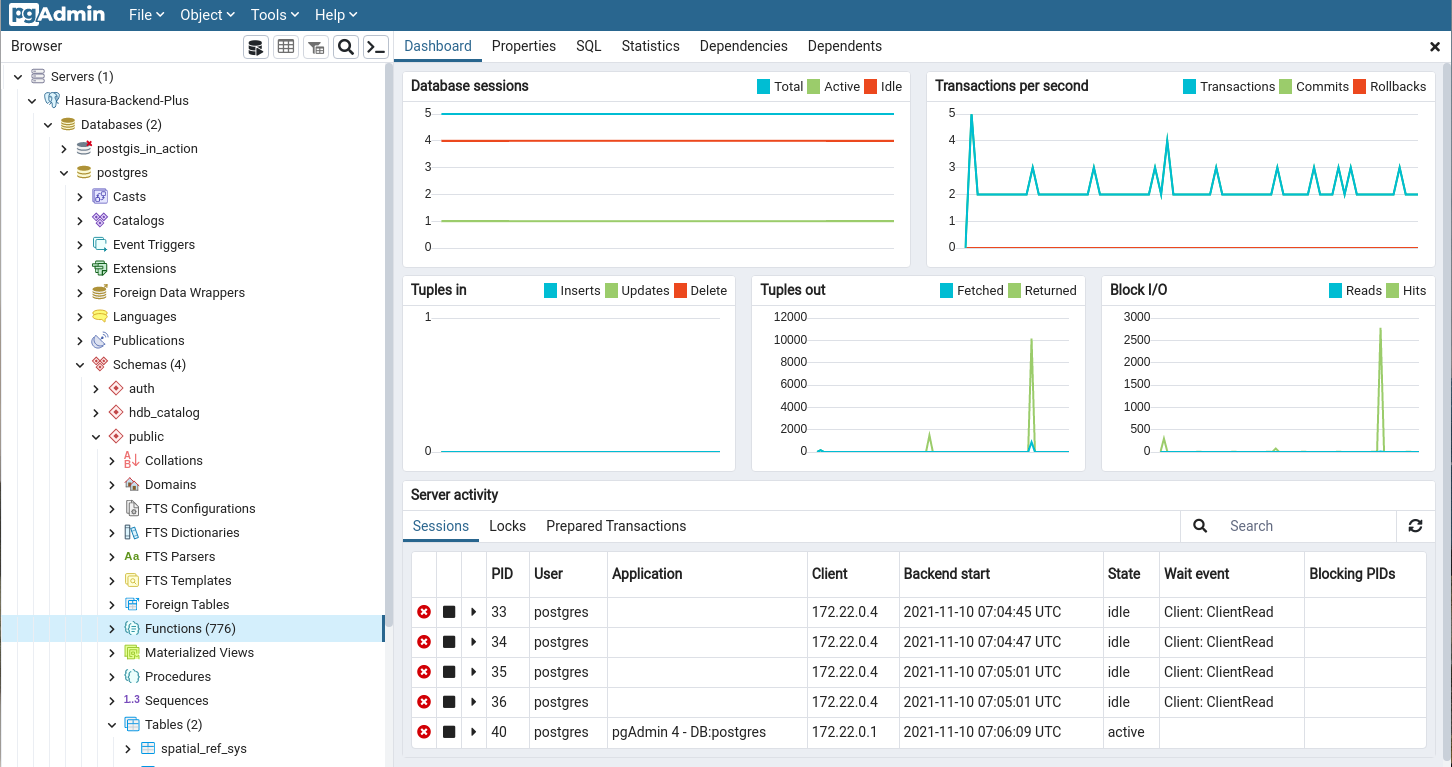
When you implement logic in PostgreSQL, Hasura is able to expose them to frontend applications via GraphQL queries and mutations. Here’s a top-level view of a PostgreSQL server, as seen via the pgAdmin interface:
Learning to take advantage of PostgreSQL features can help you solve complex problems easily without writing server code. Here are a few examples of what you can do with PostgreSQL:
EXAMPLE 1
You can retrieve a list of online users that are currently active using a view:
CREATE OR REPLACE VIEW "public"."online_users" AS
 SELECT users.id,
    users.last_seen
   FROM users
  WHERE (users.last_seen >= (now() - '00:00:30'::interval));
EXAMPLE 2
Using a PostGIS function, you can list all stores that are located within a 1,000 meter radius. See this geolocation tutorial for a detailed explanation:
SELECT id, name, address, geom
FROM Seattle_Starbucks
WHERE ST_DWithin(geom, ST_MakePoint(-122.325959,47.625138)::geography, 1000);
In the next section, we’ll focus on Hasura’s features.
What is Hasura?
Hasura is an open-source, real-time GraphQL engine that generates GraphQL and REST API endpoints for your database. It comes with a web console that allows you to:
- model your database schema
- view, insert, update and delete data
- implement role-based access control policies
- run GraphQL queries and mutations
- create REST endpoints
- run SQL code
- define actions and triggers
Hasura doesn’t support user authentication, so you’ll need to integrate Hasura and your frontend application with a provider such as:
There’s also no file storage service, you’ll need to integrate your app with a third-party storage provider. If you’d prefer a more out-of-the-box integrated experience with Hasura, you can check out NHost, which we’ll discuss later in the deployment section.
In the next section, we’ll look at how we can run Hasura locally and in the cloud.
Launching Hasura
There are a couple of ways you can quickly launch and run a Hasura instance:
1. Docker
Using Docker to run Hasura in your local machine is the recommended way for setting up a development environment. With this setup, there’s no rate limiting for API requests and there’s no internet connection throttling your experience when you interact with Hasura’s web console. Any work you do locally can easily be migrated to staging and production environments. We’ll discuss how this is done later in the “Migrations and Environments” section.
Assuming you already have Docker and Docker Compose already installed on your machine, you can follow the instructions provided by this guide to run Hasura on your machine:
# create new directory
mkdir my-hasura
cd my-hasura

# download docker-compose.yml
curl https://raw.githubusercontent.com/hasura/graphql-engine/stable/install-manifests/docker-compose/docker-compose.yaml -o docker-compose.yml

# start hasura and postgresql container instances
docker-compose up -d
You can confirm your Hasura and PostgreSQL container instances are running by executing the command docker ps. You should be able to access your local Hasura instance via your browser at http://localhost:8080/console. To complete the setup, you’ll need to connect to the PostgreSQL database, which is running as a container alongside Hasura’s.
With the database connected, you’ll be able to use the web console to create tables, define relationships and perform CRUD operations on your data. Do note that your data is public when using the default Docker setup. You can secure it by simply uncommenting the line that starts with HASURA_GRAPHQL_ADMIN_SECRET in your docker-compose.yml file and restarting your Hasura container.
2. Cloud
A much easier way of getting started is via Hasura Cloud. This is a re-engineered version of the open-source Hasura designed for scalability, availability, security
and global distribution.
Hasura Cloud comes with several new features not available in the open-source version, which include:
- Monitoring dashboard for errors, connections, subscriptions, slow queries and other operations
- GraphQL caching for improved server and client data fetching performance
- Rate limiting for preventing malicious users and DDoS attacks from compromising your API
- Regression testing for running test suites such as checking changes in your dev instance against your production instance
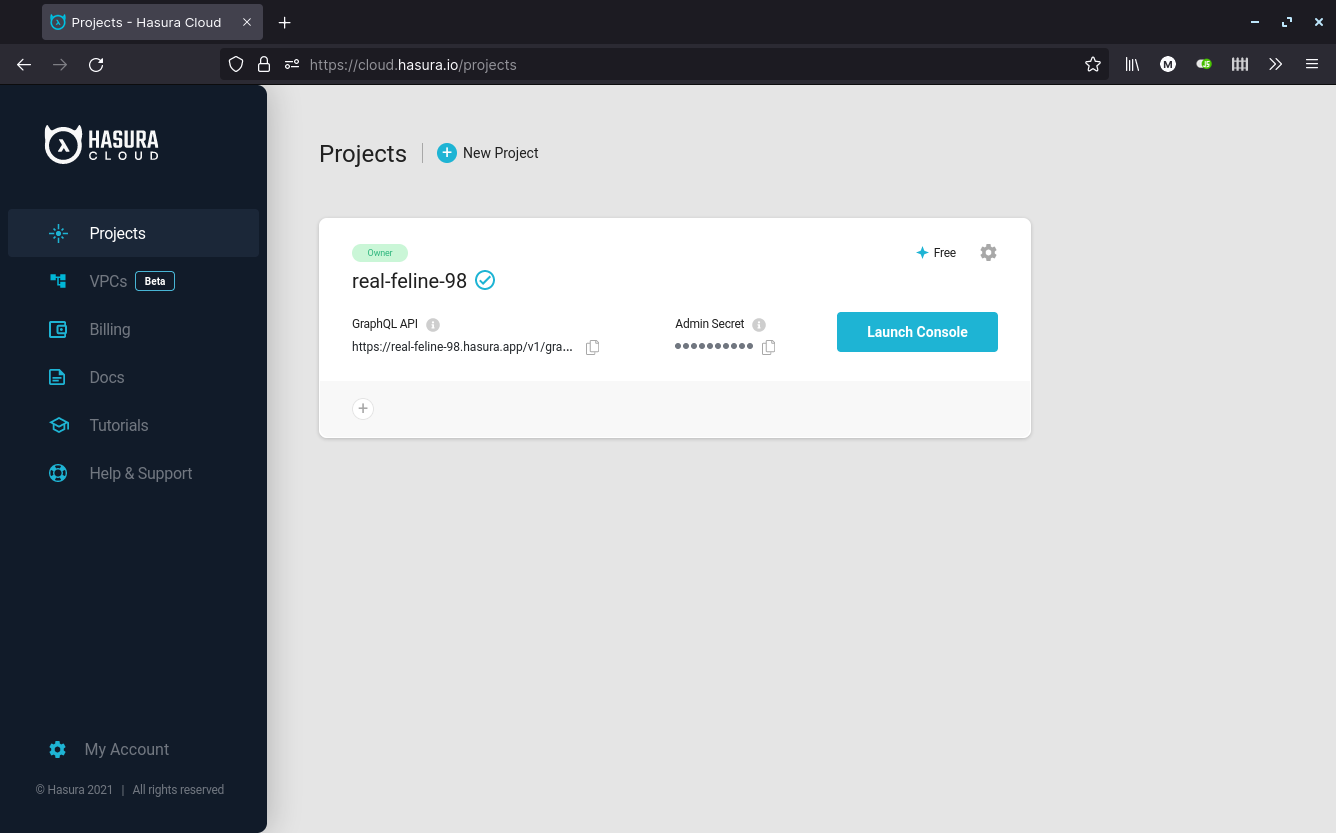
To get started with Hasura Cloud, you’ll need to sign up for a free account. Do note the free account has a rate limit of 60 requests per minute. After creating an account, you’ll need to:
- Create a project (a Hasura instance)
- Connect to a PostgreSQL database
For convenience, Hasura Cloud provides a one-click installation and connection to a free Heroku Cloud database instance. You can also connect to any other PostgreSQL database that’s accessible over the Internet. There are many PostgreSQL providers you can use. These include cloud services such as:
- AWS
- Azure
- Digital Ocean
- TimescaleDB Cloud
- YugabyteDB
You can follow this guide if you need more clarity with the steps above. By default, Hasura Cloud restricts data access from the public using the admin secret key. We’ll discuss more about this in the upcoming sections.
Hasura Features
In this section, I’ll give you a high-level overview of the features that Hasura offers for building a custom backend without writing code.
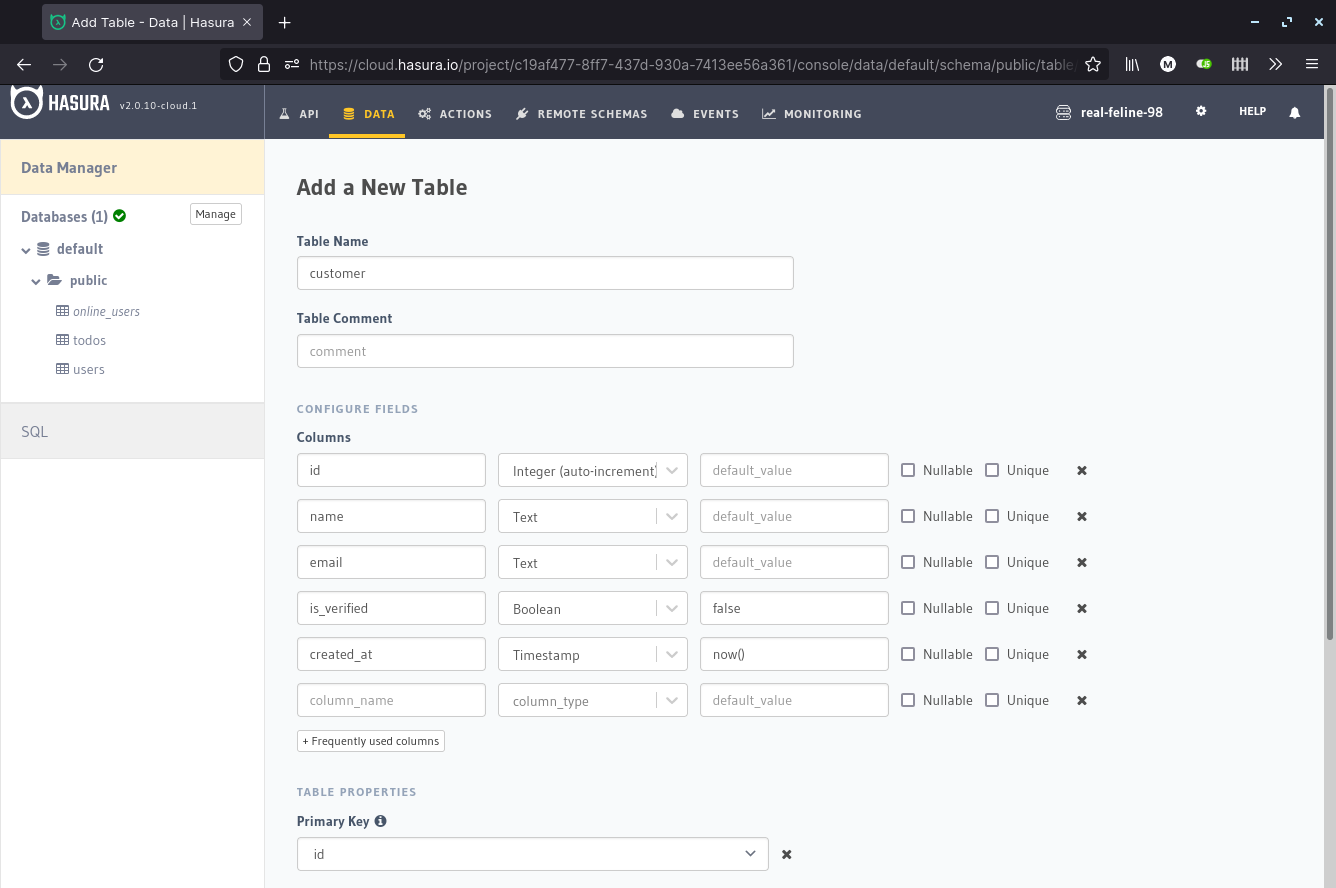
Data Manager
Hasura comes with a visual designer for modeling your data layer. This allows you to:
- create tables
- define relationships (one-to-one, one-to-many, many-to-many)
- perform CRUD operations
- create views
- run any SQL statement
- implement data validation using PostgreSQL’s DDL constraints
- define triggers
When it comes to columns, Hasura supports a rich set of data types which include:
- integers, numerics and floats
- serials and UUID
- characters and text
- date and time
- Boolean
- geometric — such as line, box, path, polygon and circle
- JSON
You can also add custom types using the CREATE TYPE SQL command. Next, we’ll look at how data is authorized in Hasura.
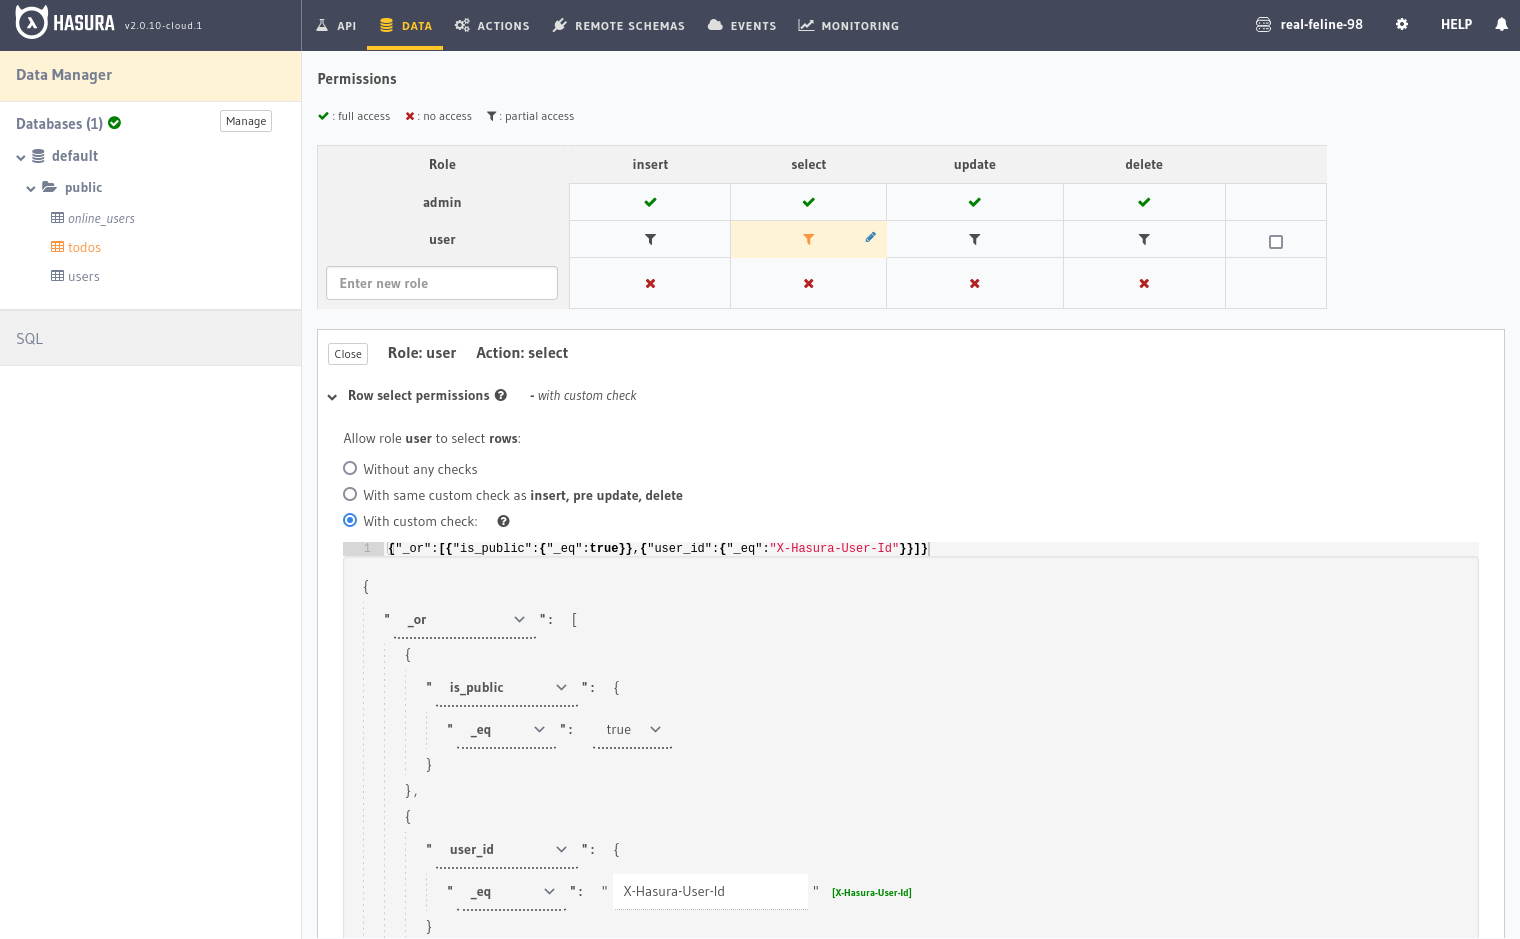
Authorization
Access control in Hasura is role based. By default, there’s a role called admin that has full CRUD access to your data. To restrict access to other users, you’ll need to create additional roles such as user, public or accountant.
For each role you create, you need to define an access policy for the following actions:
- insert
- select
- update
- delete
There are three types of policies you can define:
- Full access, with no restriction
- Partial access, with conditionally—based restrictions
- No access
The following example demonstrates a select authorization policy for the user role. The rules defined below are set to ensure that a user can only query either their own records or those marked as public:
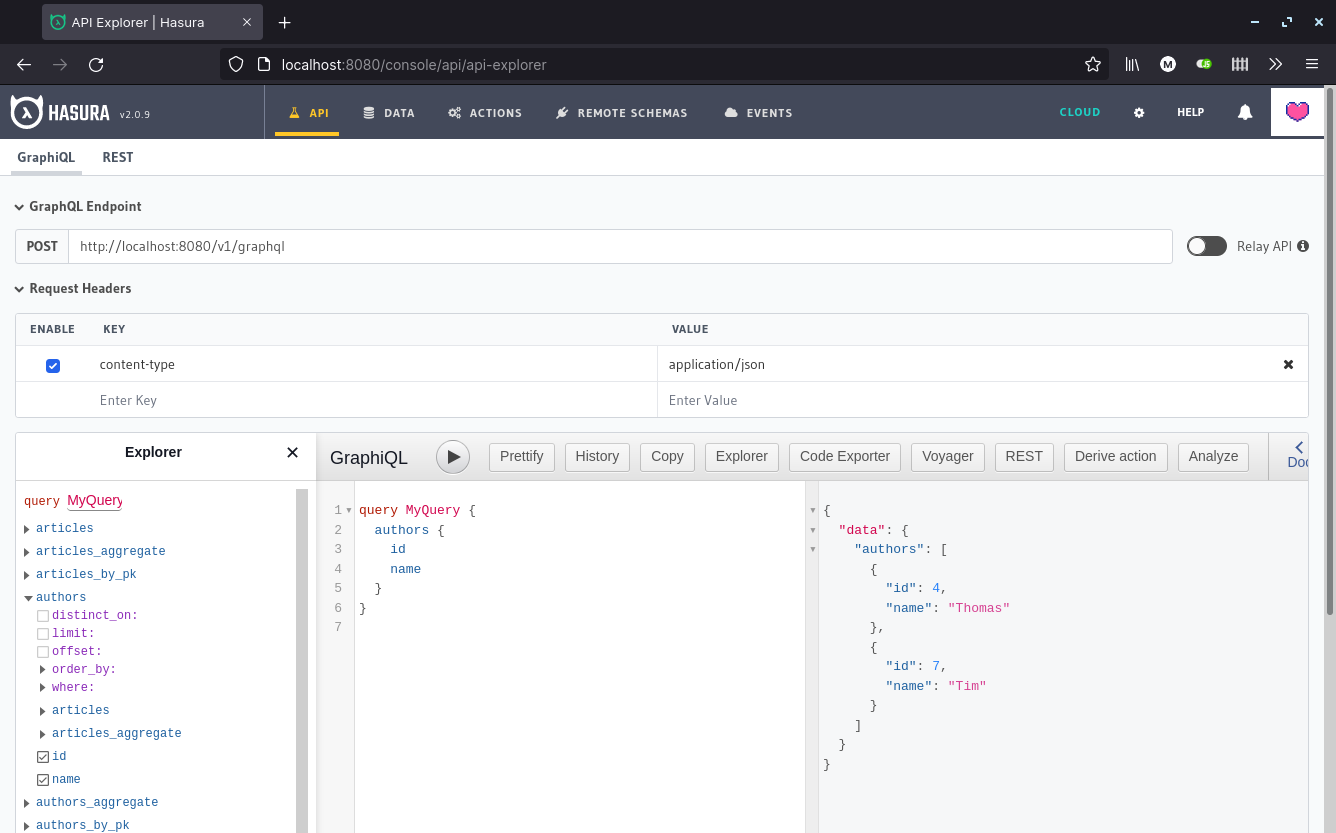
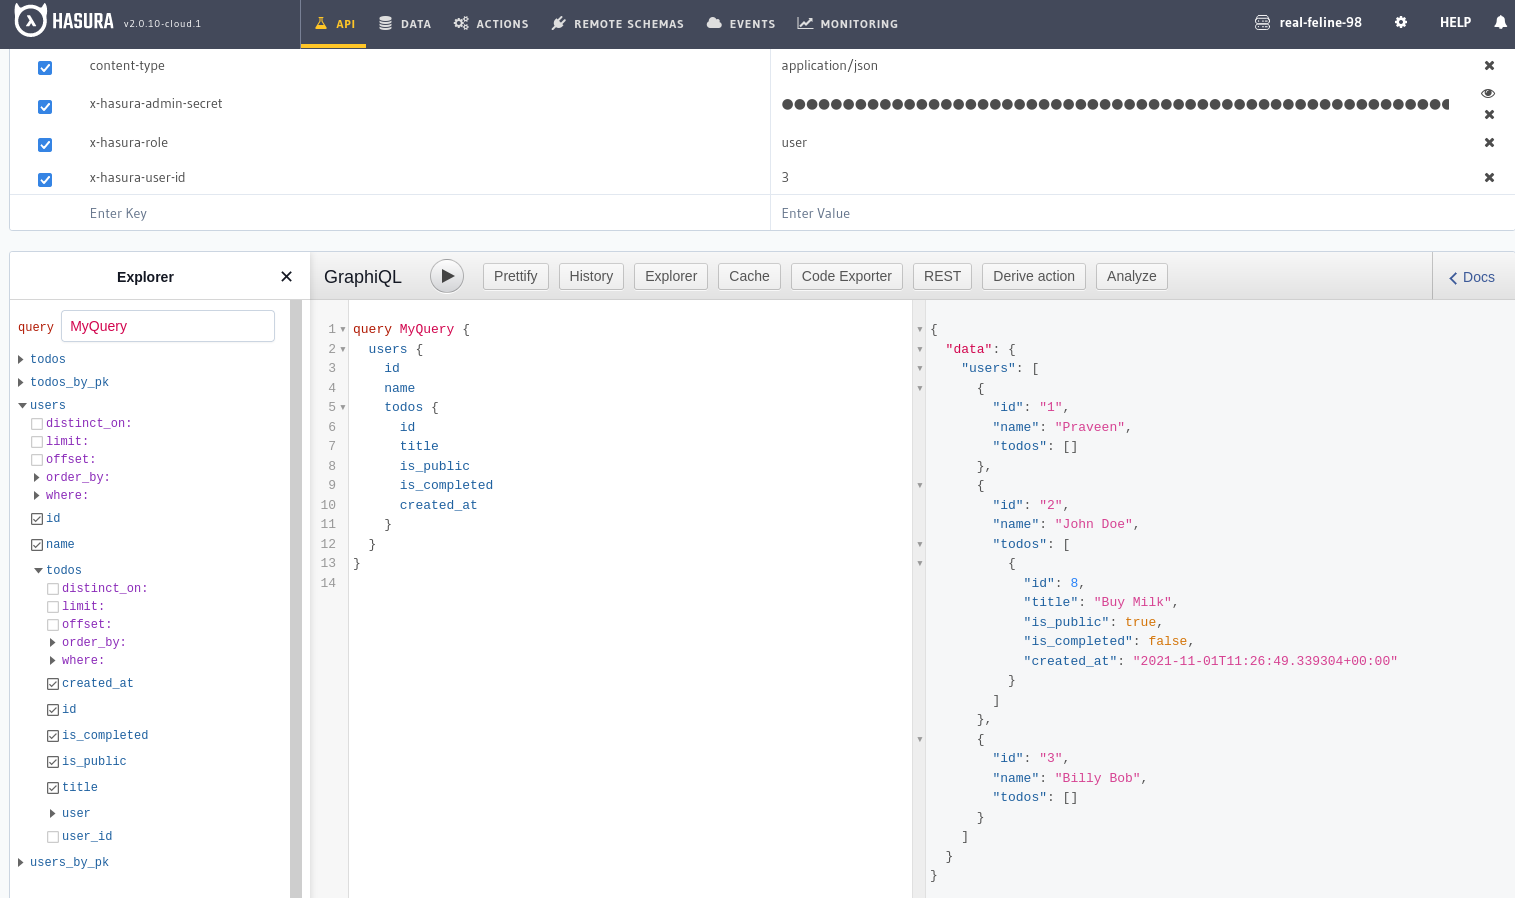
Queries
After designing your schema and defining permissions, you can test your GraphQL queries right within Hasura’s API dashboard. Every table, view and relationship that you’ve defined can be queried, provided tracking was enabled.
The types of queries you can execute include:
- Simple queries: SELECT queries that return one or more objects.
- Nested queries: JOIN queries that return objects in a nested format based on foreign key relationships.
- Aggregation queries: SELECT queries where an arithmetic operation such as sum or average has been performed on the results. It can also be applied to nested objects.
- Filter/Search queries: WHERE queries that filter data using comparison operators on one or more fields. They can also be used to perform searches using pattern or fuzzy matching.
GraphQL query results can be sorted, grouped and paginated. Cursor-based pagination is also supported. Basically, any SQL statement that can be run on PostgreSQL can be exposed via a GraphQL query. In the next section, we’ll look at mutations.
Mutations
GraphQL mutations are statements that are used to modify data. Below are the types of mutations you can perform:
- Insert: create one or more rows of data:
mutation insert_single_article { insert_article_one( object: { title: "Article 1" content: "Sample article content" author_id: 3 } ) { id title } } - Upsert: create, update on conflict. In the example below, the column
valuehas a unique constraint:mutation upsert_single_tag { insert_tags( objects: { value: "Java" } on_conflict: { constraint: tags_value_key, update_columns: value } ) { returning { id value } } } - Update: update one or more rows of data. There are also special operators for working with
intandjsonbdata types. The example below updates all articles with a rating that is less than or equal to 2. The mutation will return the number of affected rows and also list those rows as an array of objects:mutation update_article { update_article( where: { rating: { _lte: 2 } } _set: { rating: 1, is_published: false } ) { affected_rows returning { id title content rating is_published } } } - Delete: delete one or more rows of data. The following example deletes an article by primary key:
mutation delete_an_object { delete_article_by_pk(id: 1) { id title user_id } } - Transaction: perform multiple mutations in one mutation block. If one of them fails, all previously executed mutations within that block will be rolled back. The following example first deletes all articles belonging to an author. In the second mutation, the author’s name is updated:
  mutation reset_author {
    delete_article(where: { author_id: { _eq: 6 } }) {
      affected_rows
    }
    update_author(where: { id: { _eq: 6 } }, _set: { name: "Cory" }) {
      returning {
        id
        name
        articles {
          id
          title
        }
      }
    }
  }
Subscriptions
Hasura’s subscriptions are live queries that execute over a WebSocket protocol. This is a protocol used for fetching real-time data from a database. Any GraphQL query can be turned into a subscription by simply replacing the keyword query with subscription. By default, such queries run an SQL statement every one second. This is a configurable setting that can be tuned to provide a suitable balance between database load and latency. If there’s a change in the underlying data, the new value is pushed to the client.
The following example demonstrates a GraphQL subscription that tracks the location of a vehicle:
# $vehicleId = 3
subscription getLocation($vehicleId: Int!) {
  vehicle(where: { id: { _eq: $vehicleId } }) {
    id
    vehicle_number
    locations(order_by: { timestamp: desc }, limit: 1) {
      location
      timestamp
    }
  }
}
Other use cases of using subscriptions include:
- food delivery tracking
- chat messaging
- online polls
Remote Schemas
Often when building a modern application, you’ll need to integrate with third-party APIs that:
- provide data that’s not in your database — such as sports live scores, or stock price
- provide business logic — such as payment processing, or booking flights
These third-party APIs are usually accessed directly from client apps. With Hasura, you can merge these APIs with your database to create a unified GraphQL API. This creates new opportunities where you can implement authorization and define remote relationships between your tables/view and the remote API. You can also create Actions that perform a certain task based on this type of relationship.
Having a unified GraphQL API makes it easier for frontend developers to build the app. In the next section, we’ll look at what Hasura Actions are.
Actions
Custom business logic in Hasura is handled externally on microservices or serverless functions via webhooks. This means you can write custom logic using any language your prefer, such as Node.js, Python, Go or Ruby on Rails. An Action in Hasura is simply a custom GraphQL query or mutation that maps to a webhook where the input and output interfaces are defined.
An Action definition is made up of:
- type: query or mutation
- action name
- custom types for inputs and outputs
- headers
- handler URL
Let’s look at a simple “Hello, World!” example. First, we define an Action query as follows:
type Query {
  hello(name: String!): HelloResponse
}
The Action above defines a function called hello that accepts a string variable called name as input. The function returns a HelloResponse object, which is a custom type that’s defined as follows:
type HelloResponse {
  message: String!
}
With the interface defined, all that’s left is the implementing the webhook service and a URL that’s accessible to your Hasura instance. Here’s an implementation written for Express.js that has been created with the help of Hasura’s CodeGen assistant:
// Request Handler
app.post("/hello", async (req, res) => {
  // get request input
  const { name } = req.body.input;

  // success
  return res.json({
    message: `Hello, ${name}!`,
  });
});
Event Triggers
In Hasura, you can build apps using a software architecture known as event-driven programming. This is a design pattern that decouples complex state management from a monolithic backend and defers it to individual microservices or serverless functions that execute business logic. This allows for the building of apps that are highly robust and scalable.
With event programming, you can easily handle many use cases, such as:
- sending an email
- sending push notifications
- sending new data to your Algolia search index
In PostgreSQL, you can create triggers that executes SQL statements or stored procedures when an event such as INSERT, UPDATE or DELETE occurs. A trigger is associated with a table or view and can fire before or after an event.
In Hasura, event triggers are similarly defined and are used for invoking web hooks when an event is fired. A web hook in this context is quite similar to the ones we just discussed in the “Actions” section. Event triggers can also be invoked manually via the console or API.
Below is an example of an event trigger definition in YAML format:
- table:
    schema: public
    name: author
  event_triggers:
    - name: author_trigger
      definition:
        enable_manual: false
        insert:
          columns: "*"
        update:
          columns: "*"
      webhook: https://httpbin.org/post
An Event trigger can be defined with headers (for authentication purposes) and usually contains a payload that’s sent to the webhook service for data processing. The only response expected is 200 status. The actual results, if needed, are posted back through a different route — such as posting a GraphQL mutation, or sending an email notification, and so on.
Frontend apps can receive the results by querying through GraphQL subscription. This type of architecture makes it easy to build non-blocking interactive real-time apps that have great user experience. The codebase is also easier to maintain, test and scale for developers.
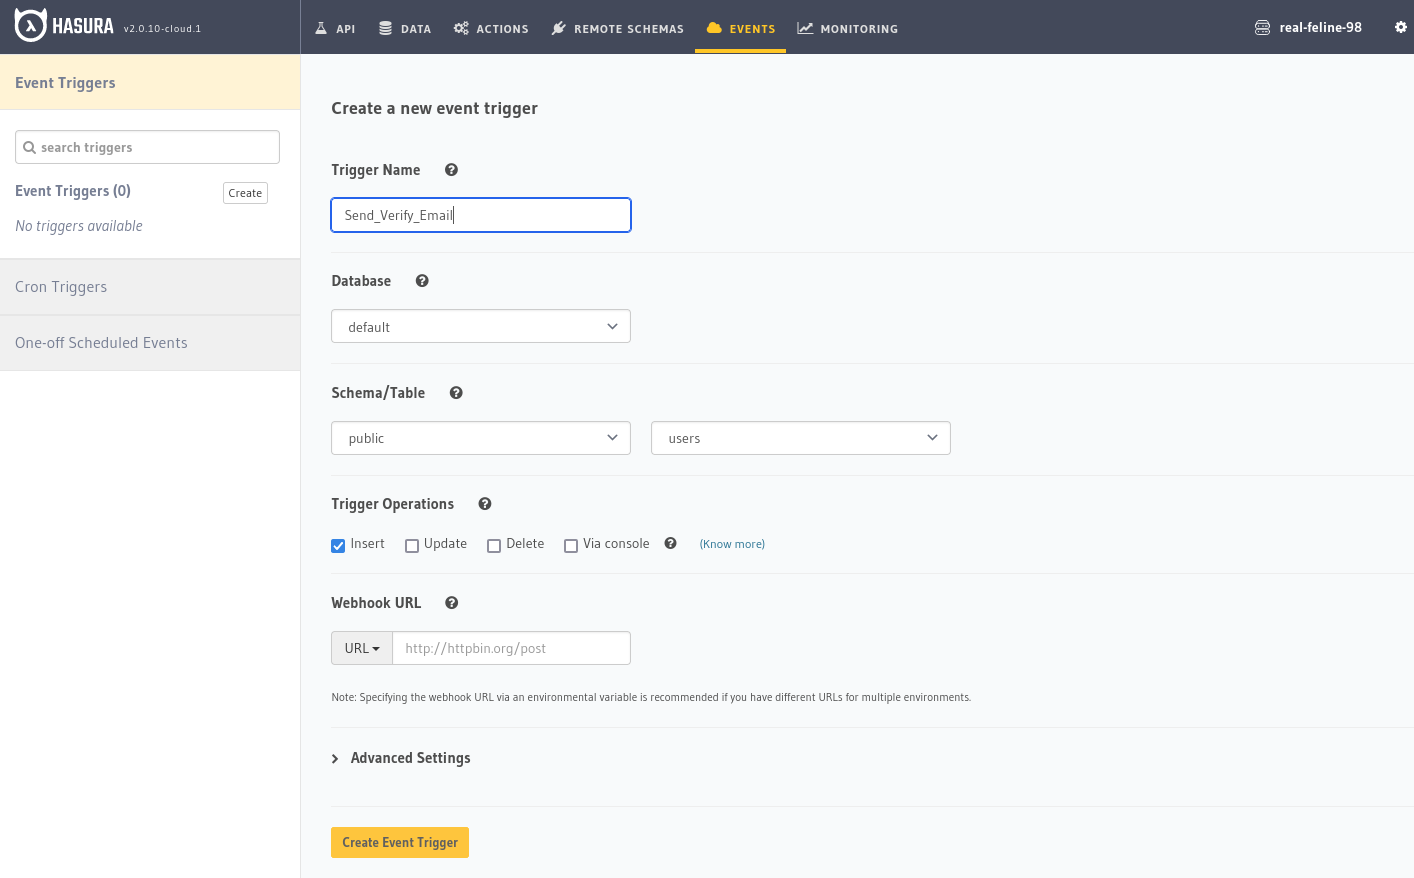
Scheduled Triggers
Scheduled Triggers are time-based events that execute custom business logic via webhooks. There are two types that you can define:
- CRON triggers : used for periodic events at a regular interval
- One-off scheduled events: used for one-off executions
Scheduled triggers can be created either via the web console or via the metadata API. The screenshot below shows the web console example.
The metadata API allows creation of scheduled events using application code. The example below shows how you would structure the creation of a one-time event using the API:
{
  "type": "create_scheduled_event",
  "args": {
    "webhook": "https://my-awesome-serverless-fn.com/send-email",
    "schedule_at": "2022-07-20T12:45:00Z",
    "payload": {
      "email": "bob@ross.com"
    }
  }
}
Hasura provides a number of fault-tolerance mechanisms that ensure scheduled triggers run successfully. For example, let’s say an event that was scheduled for 2:00pm wasn’t processed because Hasura was down at 1:59pm. When Hasura is brought back online, it will rehydrate events and re-run missed scheduled triggers based on a customizable tolerance configuration. The default setting is six hours.
Hasura also provides a flexible retry configuration in case of HTTP failures. You can configure the number of retries and the timeout between each retry. Every trigger invocation is logged — which you can access later for inspection.
Use cases for scheduled triggers include:
- sending reminders
- generating end-of-day reports
- deleting inactive users who haven’t verified their email address within the last 90 days
Migrations and Environments
The ideal development workflow for any software project is to set up multiple environments for development, staging and production. This workflow simplifies testing and ensures developers don’t accidentally delete or corrupt production data when deploying new versions of their software.
In order to transfer the state of a development environment to staging and production, migration files are required. With Hasura, you’ll need:
- database/SQL migration files
- Hasura metadata
Hasura metadata is made up of a snapshot of configuration files that keeps track of:
- relationships
- permissions
- triggers
- actions
- GraphQL schema
- remote schema
You’ll need to install Hasura CLI to be able to create and apply these migration files to a different Hasura instance. These migration files can be versioned and updated incrementally as the schema changes during development.
Creating and applying SQL migration files is done using the hasura migrate command, while the metadata migration files are handled using hasura metadata command. The CLI command also enables you to:
- roll back applied migrations
- create seed data migration
- reset migration files
- squash migration files — that is, replace small incremental updates with one major update
Hasura has a special Docker cli-migration image that automatically applies migrations when the server starts. This image also contains the Hasura CLI tool, which can be used to run CI/CD scripts in your workflow.
Deployment
The easiest way to deploy Hasura for production is by using Hasura Cloud. This is the recommended option, since you get enterprise features not available on the open-source version. Fortunately, Hasura doesn’t lock you in to their platform, unlike most backend-as-a-service providers (BaaS). There are One-click Deploy service providers that you can take advantage of in platforms such as:
You can also deploy Hasura on any Kubernetes platform such as Google Cloud. AWS is also supported, but you have to go through a number of steps to get it working. Hosting externally does give you freedom and more pricing options. However, all the above options require you to set up additional services for:
- authentication
- storage
- custom business logic
In the next section, we’ll briefly look at how you can use NHost to further simplify development of Hasura backend applications.
Deploying with NHost
NHost is an open-source BaaS provider that aims to compete with platforms such as Firebase. Their backend stack consists of:
- PostgreSQL Database
- Hasura GraphQL engine
- an authentication service
- MinIO, an S3 compatible object storage service
- Serverless functions (currently in beta)
The platform comes with a client library called nhost-js-sdk which is used for frontend authentication and file management. The storage service supports image optimization, which saves us the hassle of integrating another service for images.
At the the time of writing, NHost currently provides a 14-day trial for its service. A free tier will be launched soon. There’s a Docker version called Hasura Backend Plus which you can deploy locally on your machine.
Summary
To conclude, Hasura GraphQL Engine and PostgreSQL database is quite revolutionary in terms of how fast you can build backends for both mobile and web applications, without writing lines of code. Most of the computation and analytical logic can be handled by PostgreSQL, while the rest of the custom business logic can be implemented using microservices or serverless functions.
Adopting Hasura means you’ll be able to launch faster and build a product that’s highly performant, secure, fault tolerant, scalable and easy to maintain. Having no infrastructure hassles will also reduce your operating costs and allow you to focus on frontend development and the user-facing part of your app.
Although Hasura isn’t as feature rich as other open-source alternatives such as Parse platform, it supports versioning and environment staging, which is a crucial requirement for CI/CD development workflows. Because it’s open source, you’re protected from risks posed by vendor lock-ins.


