How to Build an MVP with React and Firebase

When prototyping an idea, it’s recommended that you simplify and build only the minimum core features required to launch a product into the market. This helps you determine if there’s market fit for your application before wasting time and money on a product nobody’s interested in. This is known as a “minimum viable product” (MVP). In this tutorial, you’ll learn how to build an MVP using React and Firebase, a backend-as-a-service platform.
In order to provide the most value, we won’t be developing the React + Firebase application step by step. Instead, I’ll break down a working prototype and explain the key concepts using pseudo-like coding language. The actual code is quite verbose, as it’s mostly front-end logic designed to deal with many aspects such as state management, responsive UI design and accessibility.
My goal is to show you the architectural design of building web interfaces that are linked to a serverless back end. The complete Firebase project we’ll use is located in our GitHub repository. At the end of this tutorial, you should be able to apply these concepts in your own MVP web projects.
Why Firebase?
If you’re looking to build a web application on a serverless platform, you’ll come across a myriad of providers that offer all the essential services you need to build your product. These services include authentication, database, cloud functions, storage, analytics and many more.
If you were to pick the best of class for each service, you’d have a pretty high learning curve figuring out how to make all these services work together in your application. You also expose your product to a number of security risks as there are multiple end-points that your product connects to in order to work. There are measures to protect your application, but most developers are unaware of what security issues need to be plugged.
Firebase is a backend-as-a-service platform that conveniently provides a number of essential services under one roof. This reduces the learning curve and also makes it easier to build secure web and mobile applications.
These Firebase services include:
- authentication
- database
- storage
- cloud functions
- analytics
- hosting
Prerequisites
Take note that this tutorial is written for intermediate to advanced React developers who want to quickly learn how to use Firebase for their projects. I’ve provided a few additional topics that you need to be familiar with before proceeding:
- React and TailwindCSS
- React Query
- Vite — a better alternative to
create-react-app
Firebase Project Plan
The project we’ll be looking at is a simple online library that organizes data into books, authors and categories. Below is an entity relationship diagram.

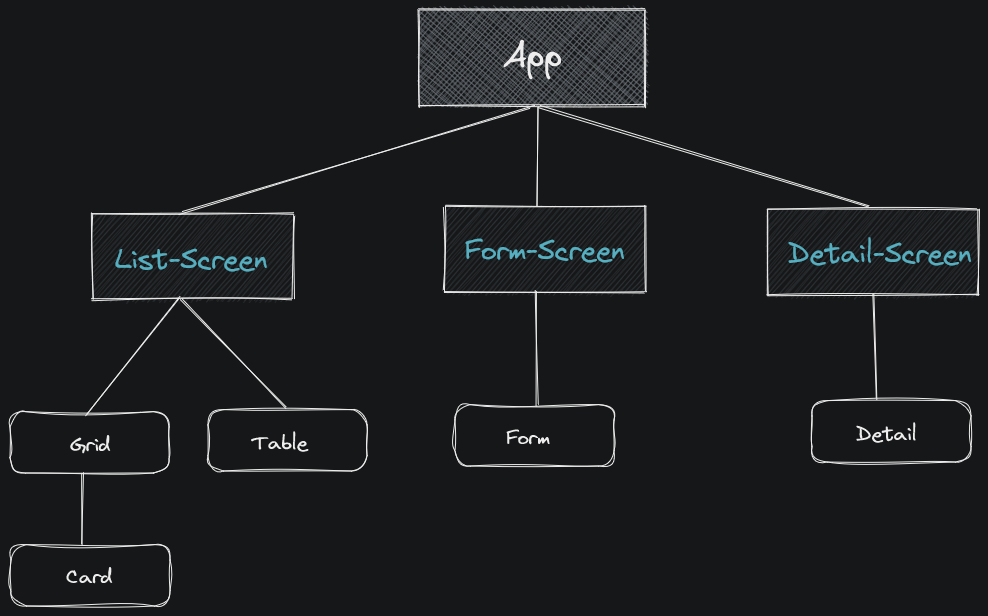
The application logic has been organized into:
- screen containers (pages or views)
- presentational components (forms, tables)
- layout components (footer, navbar)
- shareable UI components (alerts, modals, page headers)
- Firebase services (database, storage)
- Firebase config scripts (back-end connectors)
Below is an illustration of the main project’s architecture:
We’ll be using the following folder structure to organize our code:
├── components
│   ├── entity (e.g. book)
│   │   ├── Card.jsx (-> BookCard)
│   │   ├── Detail.jsx (-> BookDetail)
│   │   ├── Form.jsx
│   │   └── List.jsx
│   └── ui
│       └── Component.jsx (e.g. PageHeader, Alert)
├── layout
│   ├── Footer.jsx
│   └── Navbar.jsx
├── screens
│   ├── entity
│   │   ├── Detail.jsx (-> ScreenBookDetail)
│   │   ├── Form.jsx (-> ScreenBookForm)
│   │   └── List.jsx
│   ├── category
│   │   ├── Form.jsx
│   │   └── List.jsx
│   ├── Home.jsx
│   └── NotFound.jsx
└── services
    └── Service.js (e.g. Database, Storage)
The -> symbol denotes an example of how a functional component is named. Check out this guide for more information on naming conventions for front-end applications.
Firebase Project Setup
The project we’ll use was scaffolded using a Vite + React template. To set up the project in your workspace, simply open a terminal and execute the following:
# Clone project
git clone git@github.com:sitepoint-editors/sitepoint-books-firebase.git
cd sitepoint-books-firebase

# Install dependencies
npm install

# Prepare environment config file
cp env.example .env.local
Don’t launch the dev server just yet, as we need to set up our Firebase back end first, which we’ll do in the next step.
Firebase Setup
Head over to Firebase and sign in with your Google account. Then:
-
Create a new Firebase project and call it
SitePointBooks. -
Don’t enable Google Analytics for this project. Hit the Create project button.
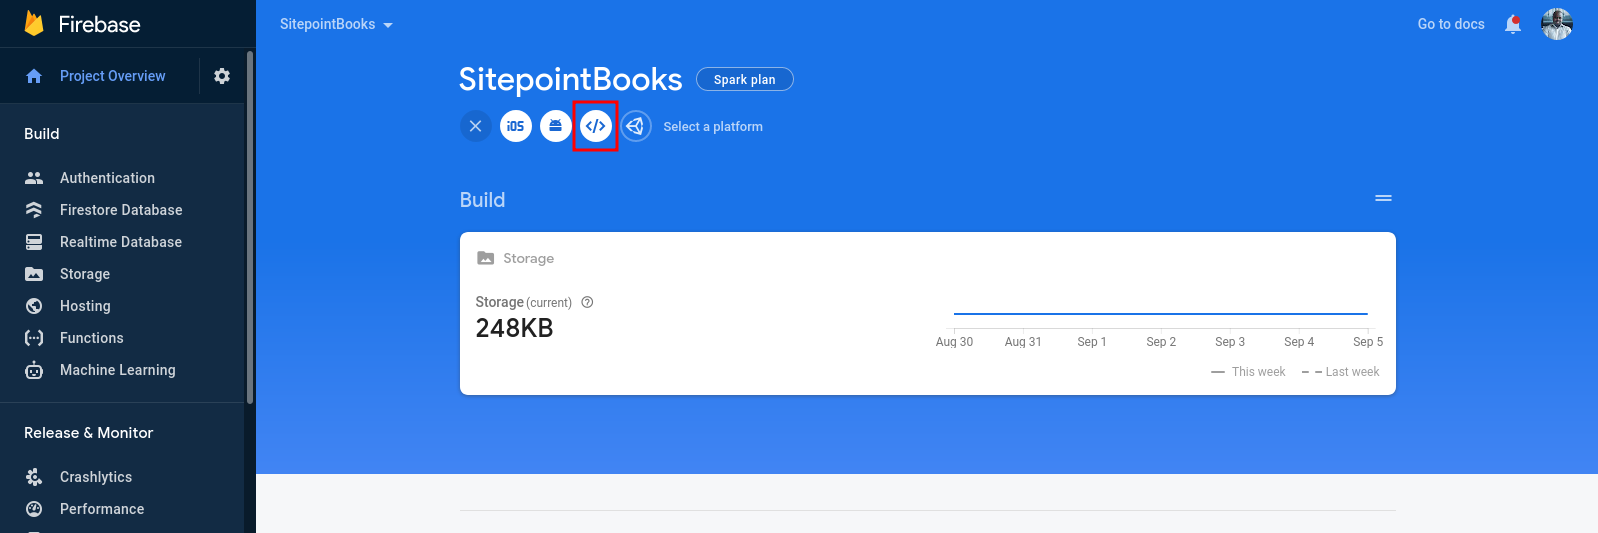
-
In the Firebase console, create a new Web App and call it
sitepoint-books-app. You can access the Firebase console as demonstrated in the screenshot below.
-
In the next step, give your app a name (this can be the same as the project name) and then click Register app.
-
In the Add Firebase SDK section, select Use npm and copy the output.
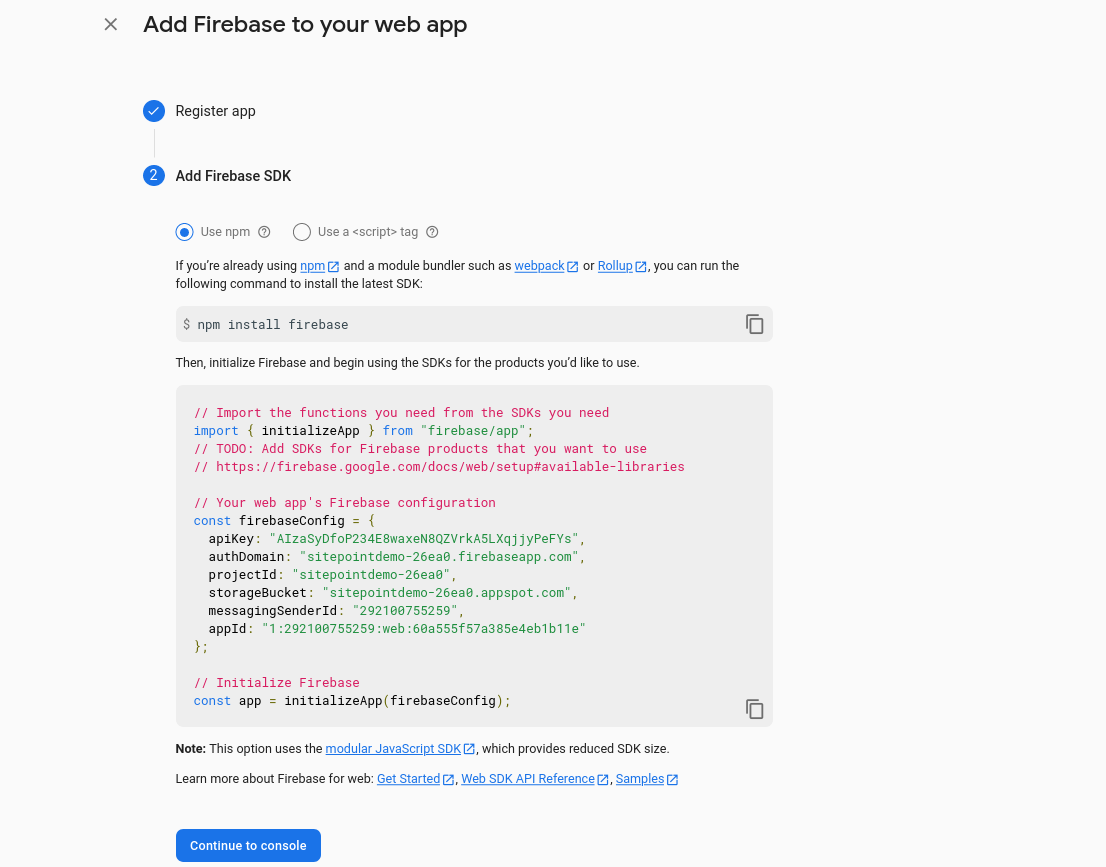
There are a wide number of Firebase SDKs available. You can find out more about these here. -
Finally, make a note of your Firebase config and click Continue to console.
Do note that Firebase API keys are safe to expose to the public, as access to back-end resources is guarded via Firebase security rules. That is, they can only be accessed by an authenticated user. Unfortunately for this tutorial, we’ll need to disable them, since we won’t deal with Firebase authentication.
For a quick setup, you can simply copy the provided script into a firebase.js file. However, I prefer saving the Firebase configuration settings using an .env.local file. Here’s a Firebase configuration example:
VITE_API_FIREBASE_API_KEY=AIzaSyDfoP234E8waxeN8QZVrkA5LXqjjyPeFYs
VITE_API_FIREBASE_AUTH_DOMAIN=sitepointdemo-26ea0.firebaseapp.com
VITE_API_FIREBASE_PROJECT_ID=sitepointdemo-26ea0
VITE_API_FIREBASE_STORAGE_BUCKET=sitepointdemo-26ea0.appspot.com
VITE_API_FIREBASE_MESSAGING_SENDER_ID=292100755259
VITE_API_FIREBASE_FIREBASE_APP_ID=1:292100755259:web:38be20c9ab080b4ab1b11e
Don’t use these Firebase configuration settings, as they were created for a temporary project.
Do note that this only prevents storing of Firebase config keys in your repository. Once you build and deploy your application, it’s quite easy for a malicious attacker to gain access to these keys via the browser inspection tools. This demonstrates the importance of setting up authentication.
Currently, our Firebase back end is empty. In the next steps, we’ll populate it with data.
Cloud storage
Firebase’s Cloud Storage is a service that allows developers to store images, video, audio and other user-generated content. For this tutorial, we’ll only use it to store images. Head over to the Storage page and click the Get Started button. A popup wizard will appear. Simply accept the default rules and choose a location for your default bucket. After clicking done, a storage bucket will be created for you in a short while.
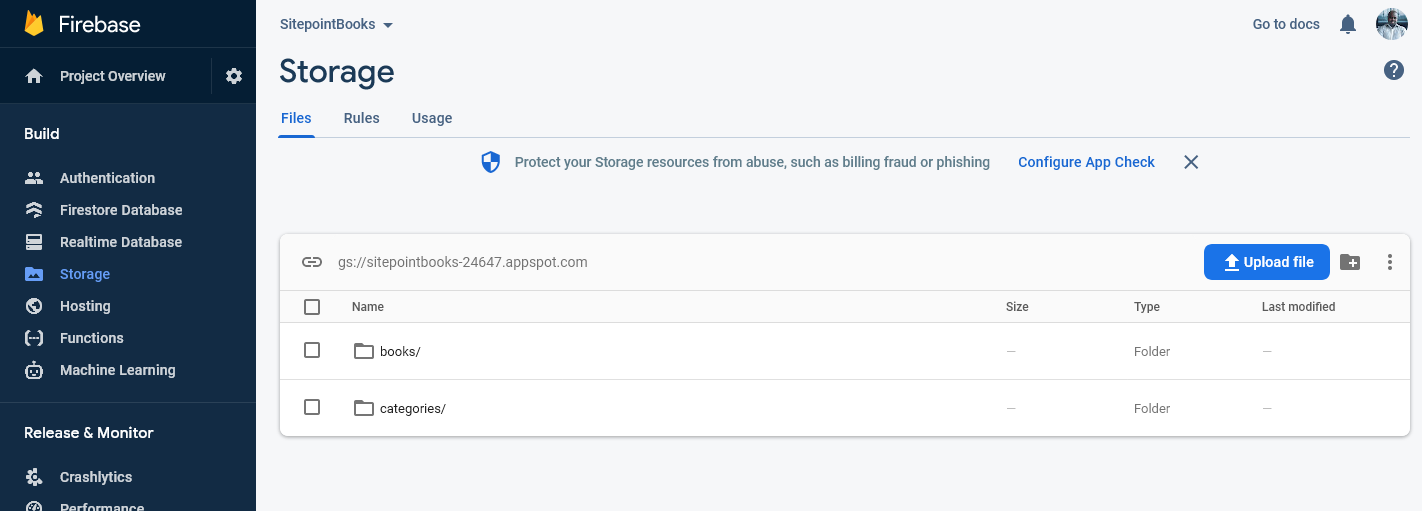
On the next page, perform the following actions:
-
Create the following folders:
categoriesbooks
-
Upload the images I’ve provided via this zip file. You should have the following structure:
-
Click on the Rules tab and update the security rules to allow our unauthenticated app to access these files. Do note the following settings will expose your storage back end to the public:
rules_version = '2';
service firebase.storage {
  match /b/{bucket}/o {
    match /{allPaths=**} {
      allow read, write: if true;
    }
  }
}
Firebase uses a custom language based on Common Expression Language to define its security rules. Due to the learning curve involved, we won’t be able to discuss it in this article. Check out the official docs on this topic.
Once you’ve completed populating your Cloud Storage with the provided images, you can proceed with the next step.
Cloud Firestore
For the database, we’ll use Cloud Firestore, which is a scalable NoSQL database that allows developers to structure data using collections. The older Firebase Realtime Database is also a NoSQL database, but it stores all your data in a flat nested JSON structure that’s difficult to query.
In your console, head over to the Firestore Database page and click the Create Database button. A popup wizard should appear:
- On the first page, set Start in test mode to allow insecure access to the database for the next 30 days.
- On the next page, set the database region then click Enable button.
Once the database is initialized, we can proceed with populating the database. Before you start populating, you should be aware that the Firestore database UI doesn’t support automatic linking and validation when linking two collections. So you’ll need to open a second browser tab and copy an ID from one record to a reference field, as shown below.
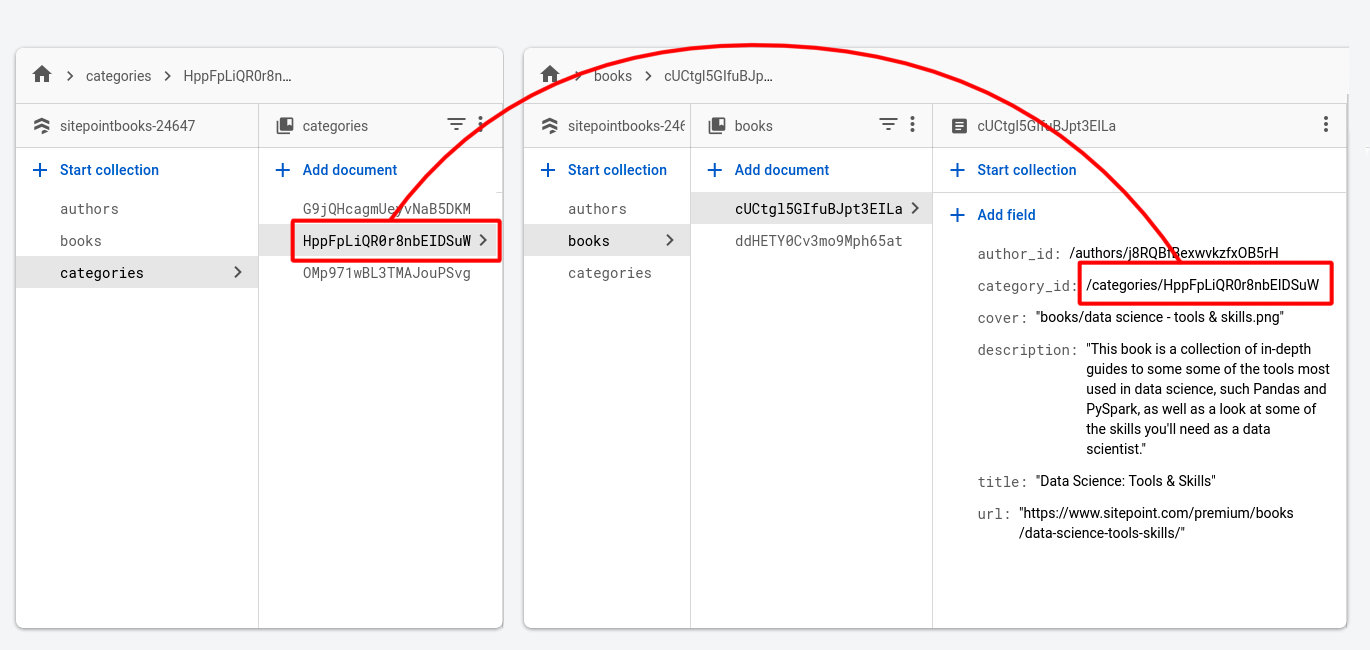
You’ll also need to make sure there’s no white space around the ID value when you paste it in a reference field. Otherwise, a null object will be returned when you perform a query. With that out of the way, you can begin creating and populating your Firestore database as follows:
-
authorscollection, all field types are string:Name Darren Jones Mike Aboagye -
categoriescollection, all field types are string:Name Cover javascript categories/javascript.png python categories/python.png react categories/react.png -
bookscollection, all field types are string exceptauthor_idandcategory_id. You’ll have to manually copy the relevant unique ids(place_id) into the reference fields as demonstrated in the screenshot above:Title Learn to Code with JavaScript Data Science: Tools & Skills Cover books/learn-to-code-with-javascript.jpg books/data science – tools & skills.png author_id (reference) /authors/{place id} /authors/{place id} category_id (reference) /categories/{place id} /categories/{place id} Description This easy-to-follow and fun guide is the perfect place to start on your coding journey. You’ll be learning to program with JavaScript—the most popular programming language on Earth—but the techniques that you’ll master will provide you with a foundation to go on and use in other languages, too. This book is a collection of in-depth guides to some some of the tools most used in data science, such Pandas and PySpark, as well as a look at some of the skills you’ll need as a data scientist. URL https://www.sitepoint.com/premium/books/learn-to-code-with-javascript/ https://www.sitepoint.com/premium/books/data-science-tools-skills/
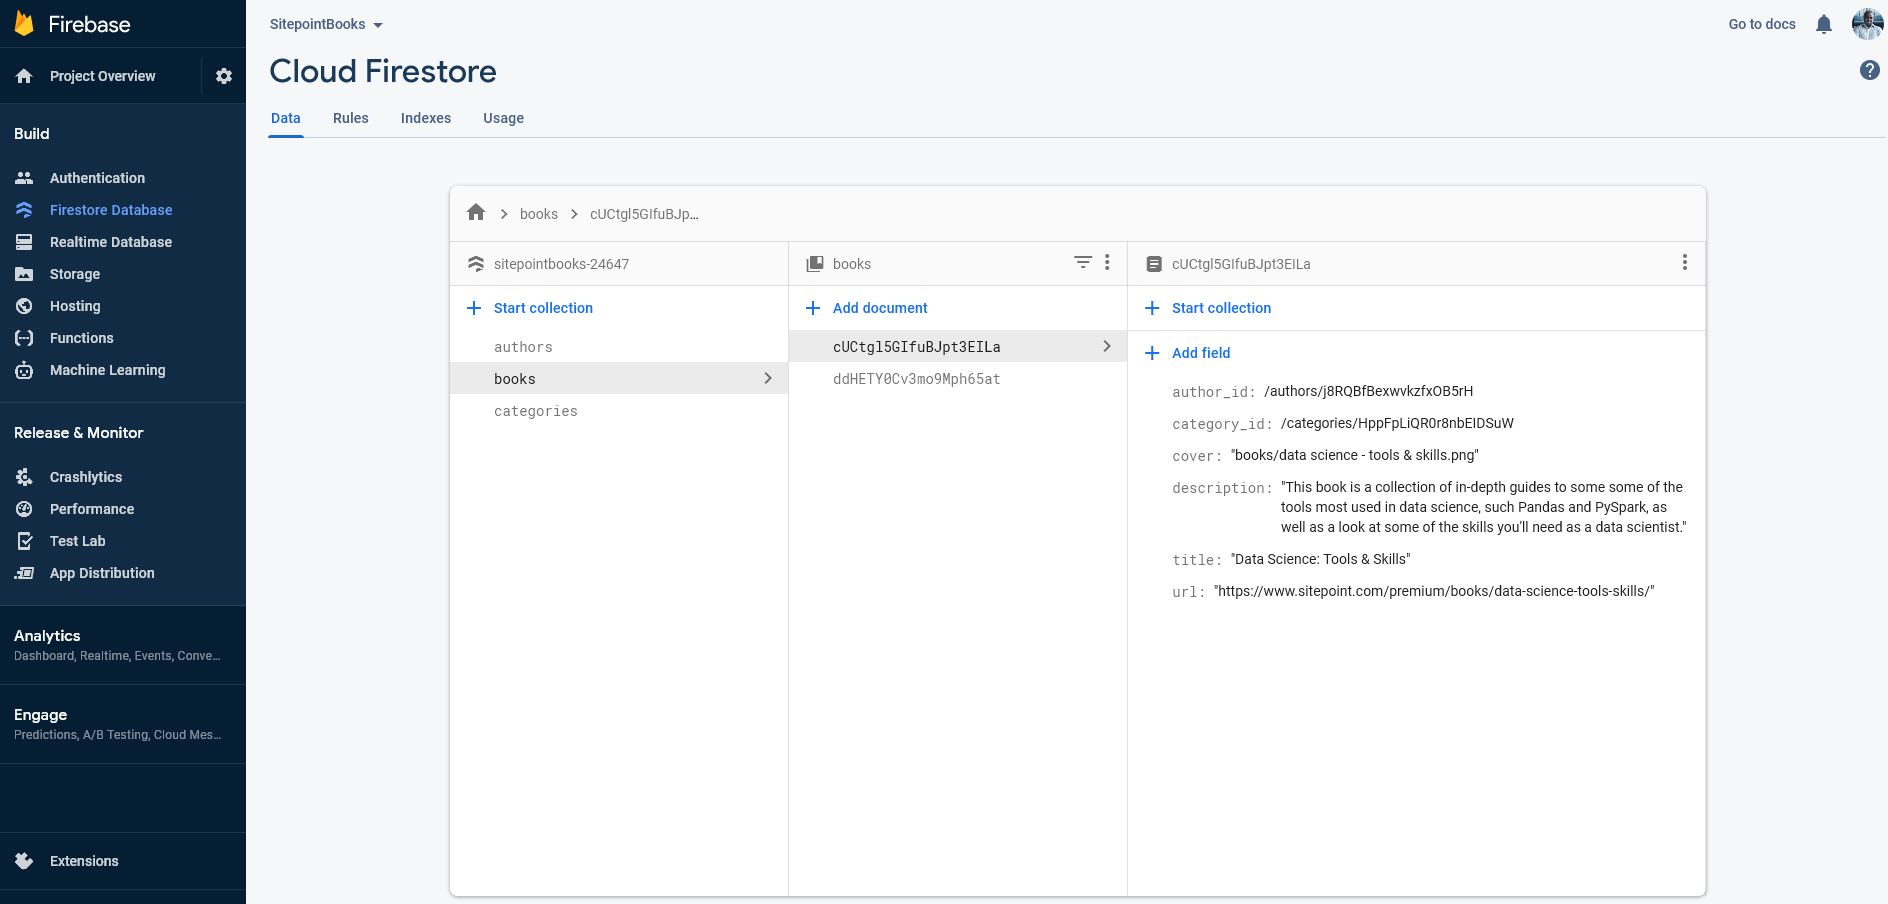
See the screenshot below as an example of how to set up your database structure.
Launching the Dev Server
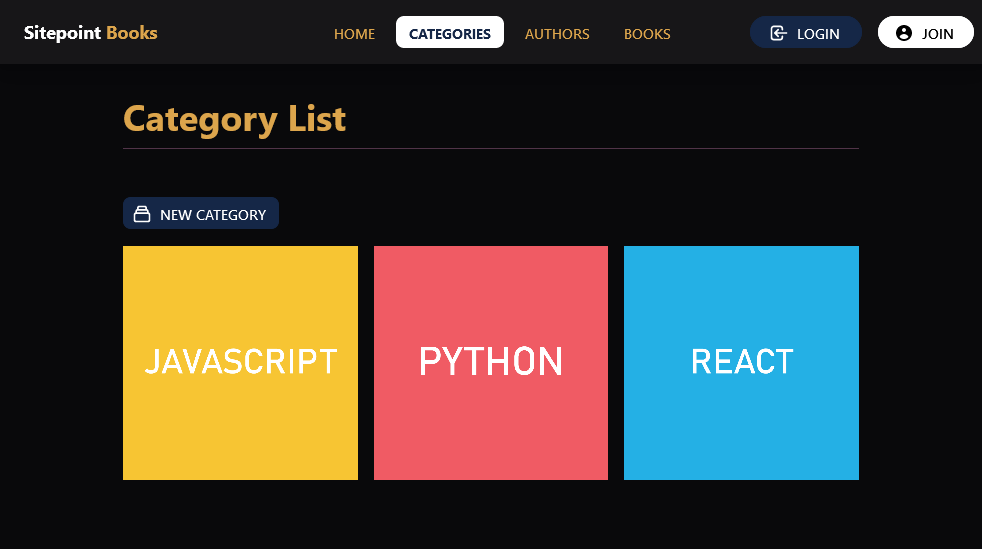
With the database populated, we can now execute npm run dev and browse to localhost:3000 to interact with the project. Do note that it’s a prototype application built for learning and not all features are fully implemented.

Firebase Project Logic
Let’s now start breaking down the project so that you can learn how the front-end interfaces are built to connect and interact with the Firebase back end. The focus will mainly be on state management logic for this tutorial. If you’re unfamiliar with the user interface code used in this Firebase project, please refer to the following documentations for the UI libraries used in the project:
- TailwindCSS and plugins: primary CSS framework
- HeadlessUI: small collection of unstyled UI components
- HeroIcons: collection of handcrafted SVG icons by Tailwind CSS team
- DaisyUI: TailwindCSS component library
- React Hook Form: form state library
- Yup: form validation library
Routing
Building a CRUD interface for a project that involves more than two entities can quickly get complicated. For routing, I used React Router and implemented a routing structure using a standardized syntax. That is:
- list route:
/{entity} - create route:
/{entity}/create - edit route:
/{entity}/edit/:id - detail route:
/{entity}/:id
Here’s a simplified view of how routing has been implemented in App.jsx:
import React from "react";
import { Route, Switch } from "react-router-dom";

// Layout components
import Footer from "@/layout/Footer";
import Navbar from "@/layout/Navbar";

// Screen(pages or views) containers
import Home from "@/screens/Home";
import NotFound from "@/screens/NotFound";
import ScreenBookList from "@/screens/book/List";
import ScreenBookForm from "@/screens/book/Form";
import ScreenBookDetail from "@/screens/book/Detail";

function App() {
  return (
    <div>
      <header>
        <Navbar />
      </header>
      <main>
        <Switch>
          <Route exact path="/">
            <Home />
          </Route>
          <Route exact path="/book">
            <ScreenBookList />
          </Route>
          <Route path="/book/edit/:id">
            <ScreenBookForm />
          </Route>
          <Route path="/book/detail/:id">
            <ScreenBookDetail />
          </Route>
          <Route path="/book/create">
            <ScreenBookForm />
          </Route>
          <Route component={NotFound} />
        </Switch>
      </main>
      <Footer />
    </>
  );
}
Take note that ScreenBookForm has been re-used for both create and edit routes. You’ll later see how a single form container can be used to handle both use cases. Next, we’ll look at how the React app connects to the Firebase back end.
Database service
For web, mobile and Node.js applications, the official Firebase package is required to be installed in your project. This package contains all the tools required to connect to the various back-end Firebase services:
npm install firebase
To connect with your Cloud Firestore database, you’ll need to define the following in firebase.js:
import firebase from "firebase/app";  // include the Firebase module
import "firebase/firestore"; // access firestore database service

const firebaseConfig = {
  apiKey: import.meta.env.VITE_API_FIREBASE_API_KEY,
  authDomain: import.meta.env.VITE_API_FIREBASE_AUTH_DOMAIN,
  projectId: import.meta.env.VITE_API_FIREBASE_PROJECT_ID,
  storageBucket: import.meta.env.VITE_API_FIREBASE_STORAGE_BUCKET,
  messagingSenderId: import.meta.env.VITE_API_FIREBASE_MESSAGING_SENDER_ID,
  appId: import.meta.env.VITE_API_FIREBASE_APP_ID,
};
// Initialize Firebase
const app = firebase.initializeApp(firebaseConfig);

export const db = app.firestore();
export default app;
Next, you can import the db object into any React container and start querying the database directly. I prefer first creating a services/DatabaseService.js that includes all the necessary CRUD logic:
import { db } from "@/firebase";

class DatabaseService {
  collection;

  // Specify 'authors', 'categories', or 'books' as collection name
  constructor(collectionName) {
    this.collection = db.collection(collectionName);
  }

  // returns list of records as an array of javascript objects
  getAll = async () => {
    const snapshot = await this.collection.get();
    return snapshot.docs.map((doc) => {
      return {
        id: doc.id, // append document id to each document
        ...doc.data(),
      };
    });
  };

  // returns a single document in object format
  getOne = async ({ queryKey }) => {
    const { id } = queryKey[1];
    if (!id) return; // entity form is in create mode
    const snapshot = await this.collection.doc(id).get();
    return snapshot.data();
  };

  // resolve a relation, returns the referenced document
  getReference = async (documentReference) => {
    const res = await documentReference.get();
    const data = res.data();

    if (data && documentReference.id) {
      data.uid = documentReference.id;
    }

    return data;
  };

  // save a new document in the database
  create = async (data) => {
    return await this.collection.add(data);
  };

  // update an existing document with new data
  update = async (id, values) => {
    return await this.collection.doc(id).update(values);
  };

  // delete an existing document from the collection
  remove = async (id) => {
    return await this.collection.doc(id).delete();
  };
}

// Create services for each entity type
export const AuthorService = new DatabaseService("authors");

export const CategoryService = new DatabaseService("categories");

export const BookService = new DatabaseService("books");
There are two main components in the above code:
- The
DatabaseServiceclass, which contains the CRUD logic — that is, read (getAll,getOne), create, update and delete. - Database service instances for each of the collection types that we are working with — that is,
books,categoriesandauthors. We’ll use this in the container(screen) components to interact with our Firebase back end.
Some additional notes for the DatabaseService class:
- For the
getAllmethod, when you call thedata.doc()method, you only get data values without the object ID. To fix this, we need to calldoc.idand merge it with the rest of the values. This is necessary in order to allow update and delete operations to work. - I’ll explain the
getReferencefunction later in the “Resolving Document Relations” section. - For the rest of the functions, refer to the inline comments and the Firestore documentation for more information.
With the database service in place, let’s see how data is fetched and used to populate the front-end interface.
List documents
Now that we have our database service set up, we need to call it from a container — such as ScreenAuthorList. Once the data is acquired, it will be passed down via props to a presentation component — that is, AuthorList.
To manage the server data in our front-end application state, we’ll use React Query. Using this package is much simpler than setting up Redux or any other front-end state management solution. Here’s a simplified version of ScreenAuthorList.jsx that demonstrates this concept in action:
import React from "react";
import { useQuery } from "react-query";

import { AuthorService } from "@/services/DatabaseService";
import PageHeading from "@/components/ui/PageHeading";
import AuthorList from "@/components/author/List";

function ScreenAuthorList() {
  const { data, status } = useQuery("authors", AuthorService.getAll);

  return (
    <>
      <PageHeading title="Author List" />
      <div>{status === "success" && <AuthorList data={data} />}</div>
    </>
  );
}

export default ScreenAuthorList;
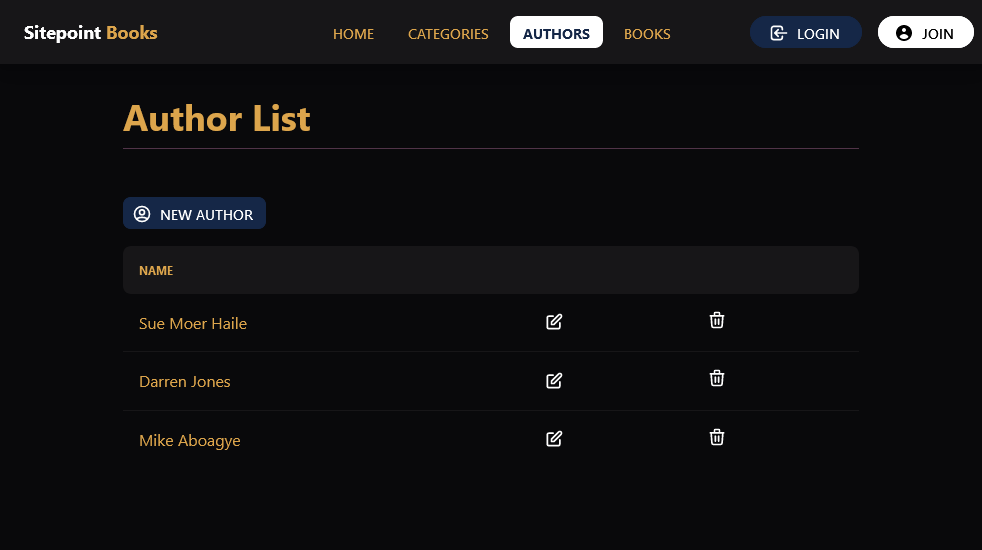
And here’s a simplified version of AuthorList.jsx, which simply accepts the data and displays it in a table format:
import React from "react";
import { Link } from "react-router-dom";

function AuthorList({ data }) {
  return (
    <div>
      <table>
        <thead>
          <tr>
            <th>Name</th>
          </tr>
        </thead>
        <tbody>
          {data.map((author, index) => (
            <tr key={index}>
              <td>{author.name}</td>
            </tr>
          ))}
        </tbody>
      </table>
    </div>
  );
}

export default AuthorList;
Note that I’ve excluded the edit and delete buttons, which we’ll look into next.
Deleting documents with confirmation dialog
The Delete button in the AuthorList component is defined as follows:
<table>
  ...
  <tbody>
    <tr>
      ...
      <td>
        <button
          title={`Delete ${author.name}`}
          onClick={() => showDeleteModal(author.id)}
        >
          <TrashIcon />
        </button>
      </td>
    </tr>
</table>
Let’s take a look at how the showDeleteModal(id) function is defined within the component:
import React, { useState } from "react";

function AuthorList({ data, deleteAction }) {
  const [selected, setSelected] = useState(); // set author.id for deletion
  const [openModal, setOpenModal] = useState(false); // show or hide DeleteModal

  const showDeleteModal = (id) => {
    setSelected(id);
    setOpenModal(true);
  };

  const deleteModalAction = () => {
    deleteAction(selected);
    setOpenModal(false);
  };

  const cancelModalAction = () => {
    setOpenModal(false);
  };

  return (
    <div>
      <DeleteModal
        open={openModal}
        deleteAction={deleteModalAction}
        cancelAction={cancelModalAction}
      />
      <table>// delete button is here</table>
    </div>
  );
}
Basically, when the showDeleteModal(id) function is called, the following occurs:
- the
selectedstate is set to the currentauthor.id - the confirmation dialog is set to visible
The confirmation dialog, aka DeleteModal.jsx, is a little too verbose to display the full code here. For simplicity, I’ve used pseudo language to define its structure in order to make it more readable:
function DeleteModal({ isOpen, deleteAction, cancelAction }) {
  return (
    <Modal.Root show={isOpen}>
      <modal-content>
        <p>
          {" "}
          Are you sure you want to permanently remove this record forever?{" "}
        </p>
      </modal-content>
      <modal-footer>
        <button onClick={deleteAction}>Delete</button>
        <button onClick={cancelAction}>Cancel</button>
      </modal-footer>
    </Modal.Root>
  );
}
The cancelAction function will simply hide the confirmation dialog. The deleteAction function will call the database handler responsible for performing the actual document deletion. This handler is defined at the container level, ScreenAuthorList.jsx. Below is a simplified version of the code:
import { useMutation, useQueryClient } from "react-query";

function ScreenAuthorList() {
  const queryClient = useQueryClient();

  const deleteMutation = useMutation((id) => AuthorService.remove(id), {
    onSuccess: () => {
      queryClient.invalidateQueries("authors");
    },
  });

  const deleteAction = async (id) => {
    deleteMutation.mutateAsync(id);
  };

  return (
    <>
      <AuthorList data={data} deleteAction={deleteAction} />
    </>
  );
}
After successful deletion, we need to call queryClient.invalidateQueries() to ensure that the change is reflected on all components caching the data. Let’s now look at how documents are created and updated via the front-end UI.
Creating and updating documents
To demonstrate how to create and update documents, we’ll use the AuthorForm.jsx, which is the simplest to explain.
First, we need to look at the Create and Edit buttons that routes users to the ScreenAuthorForm page. This is done in the AuthorList.jsx component:
import { Link } from "react-router-dom";
import { UserCircleIcon, PencilAltIcon } from "@heroicons/react/outline";

function AuthorList() {
  return (
    <div>
      <div>
        <Link to="/author/create">
          <UserCircleIcon />
          New Author
        </Link>
      </div>
      <table>
        ...
        <td>
          <Link to={`/author/edit/${author.id}`} title={`Edit ${author.name}`}>
            <PencilAltIcon />
          </Link>
        </td>
        ...
      </table>
    </div>
  );
}
The ScreenAuthorForm container is designed to handle both create and update author use cases. In the case of update, we need to retrieve the id from the URL, then use it to fetch the document for our Firebase database. For create, we’ll just render the form without passing any values:
import { useParams } from 'react-router-dom'
function ScreenAuthorForm() {
const { id } = useParams() // retrieve id from url parameters
// fetch document
const { data, isLoading, error, status } = useQuery(
['author', { id }],
AuthorService.getOne
)
// Render create form
if (!id) {
return (
<>
<PageHeading title="Create Author" />
<AuthorForm submit={onSubmit} />
</>
)
}
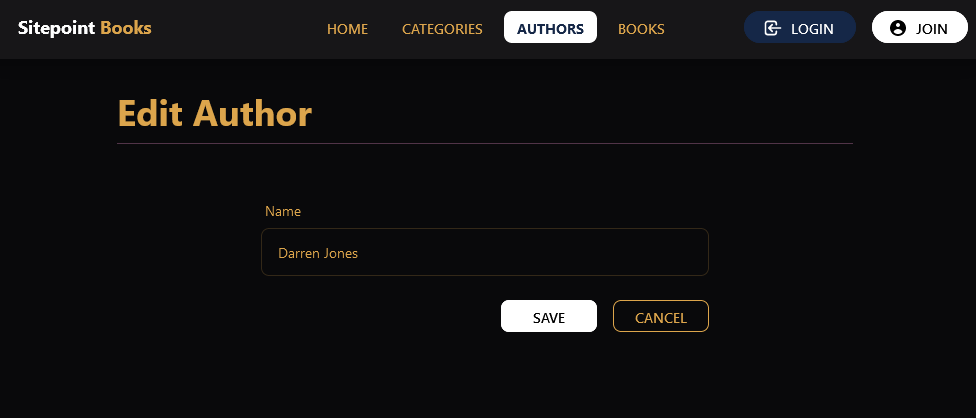
// Render update form
return (
<>
<PageHeading title="Edit Author" />
<AuthorForm values={data} submit={onSubmit} />
<>
)
}
We won’t go into detail on how the form is constructed, but I’ll provide you with a simplified version of the AuthorForm component:
import React, { useState, useEffect } from "react";
import { useForm } from "react-hook-form";

function AuthorForm({ values, submit }) {
  // initialize react-hook-form
  const { register, reset, handleSubmit } = useForm();

  // populate form fields
  useEffect(() => {
    reset(values);
  }, [values]);

  // call container submit handler to save new/updated values
  const onSubmit = (submittedData) => {
    submit(submittedData);
  };

  return (
    <form onSubmit={handleSubmit(onSubmit)}>
      <div className="form-control">
        <label>Name</label>
        <input type="text" {...register("name")} />
      </div>

      <div className="form-footer">
        <button type="submit"> Save </button>
        <Link to="/author"> Cancel </Link>
      </div>
    </form>
  );
}
The inline comments should explain the main sections of the code. Refer to React Hook Form’s documentation on how the library works. We haven’t looked at the submit function, so let’s do that now in the ScreenAuthorForm container:
import { useParams, Redirect } from 'react-router-dom'
import { useQuery, useMutation, useQueryClient } from 'react-query'

function ScreenAuthorForm() {
  const { id } = useParams()
  const queryClient = useQueryClient()

  // call the database service to create or update document depending on presence of id
  const saveData = (data) => {
    if (id) {
      return AuthorService.update(id, data)
    } else {
      AuthorService.create(data)
    }
  }

  // create mutation
  const mutation = useMutation((data) => saveData(data), {
    onSuccess: () => {
      if (id) queryClient.invalidateQueries(['author', { id }])
    },
  })

  // track mutation status i.e. return true after successful mutation
  const { isSuccess } = mutation

  // define submit action handler to be passed down as prop to AuthorForm
  const onSubmit = async (submittedData) => {
    mutation.mutate(submittedData)
  }

  // if mutation is successful, redirect to ScreenAuthorList
  if (isSuccess) {
    return <Redirect to="/author" />
  }

  // render create and update form
  return (
    ...
    <AuthorForm submit={onSubmit} />
    ...
  )
  ...
}
The inline comments should explain what each block of code does. Do refer to React Query’s mutation documentation to understand how it works. In the next section, we’ll look at how we can display the images stored in Firebase’s Cloud Storage service.
Displaying images
For this section, we’ll use CategoryCard to demonstrate rendering of images.
As a reminder, here’s an example of category data:
{
  "name": "javascript",
  "cover": "categories/javascript.png"
}
If you navigate to one of the images you uploaded in cloud storage, you’ll see a URL link in this format:
gs://<app id>.appspot.com/<folder>/<filename>
This link can’t be processed by a browser. It needs to be converted to a HTTP format download link. To do this, we need to import the package that allows our application to interact with Firebase’s Storage service. This is done in firebase.js:
...
import 'firebase/storage'

...
export const storage = app.storage()
Next, we can import the storage instance and define a function that performs in this conversion. This has been done in StorageService.js:
import { storage } from "../firebase";

const storageRef = storage.ref(); // access the default bucket

// accepts file path in the format `folder/filename.ext`
const getImageURL = async (filePath) => {
  const url = await storageRef.child(filePath).getDownloadURL();
  return url;
};

const StorageService = {
  getImageURL,
};

export default StorageService;
Now that we’ve set up a service that will handle the image URL conversion for us, we can define the CategoryCard component as follows:
import React, { useEffect, useState } from "react";
import { Link } from "react-router-dom";
import StorageService from "../../services/StorageService";

function CategoryCard({ category }) {
  const [imageLink, setImageLink] = useState();

  // download the image link
  useEffect(async () => {
    const url = await StorageService.getImageURL(category.cover);
    setImageLink(url);
  }, [category]);

  return (
    <div>
      <Link to={`/category/edit/${category.id}`}>
        <img src={imageLink} alt={category.name} />
      </Link>
    </div>
  );
}

export default CategoryCard;
Unfortunately, this is quite bit of work just to display an image. We’ll talk about this issue later in the summary. For now, let’s take a look at another issue where you need to allow users to select from an available list of files.
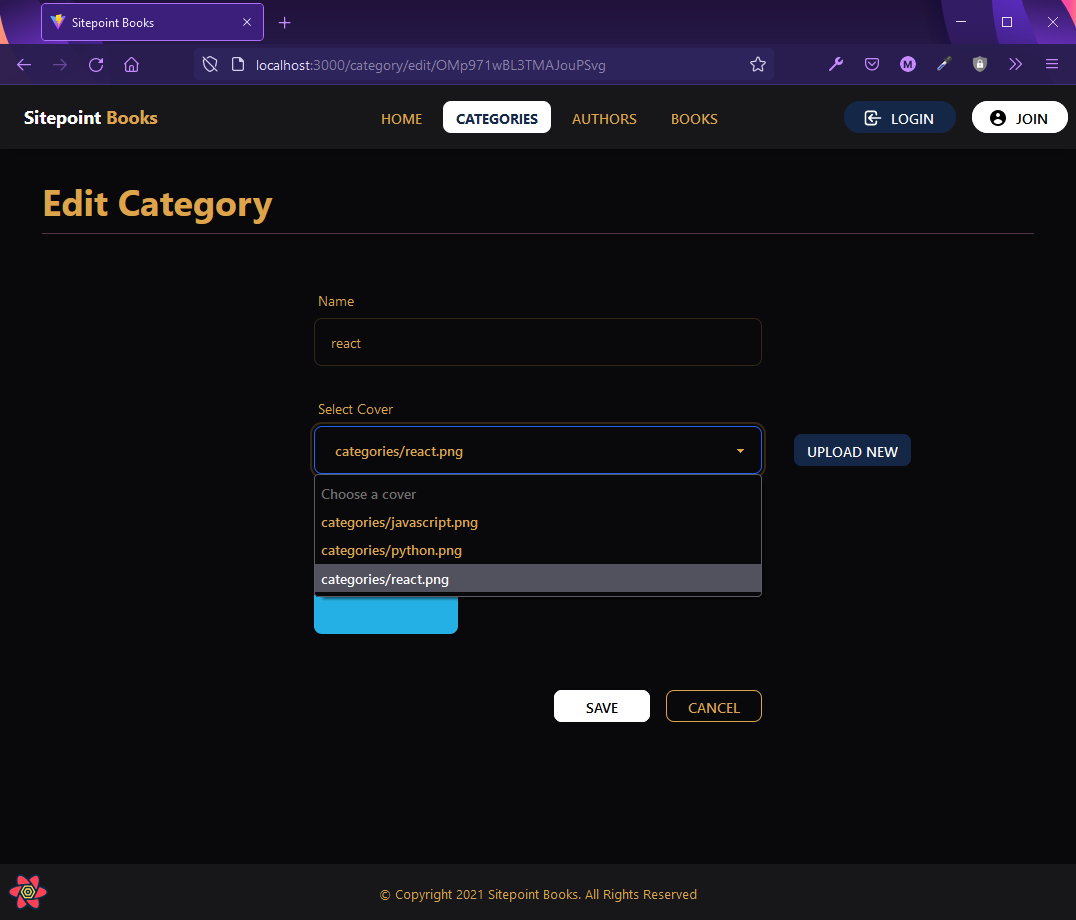
Listing files
When working with images, we can give users the option of uploading new ones or choose from the existing ones. Usually modern interfaces feature asset browsers that allow you to do both. For simplicity, we’ll just use a basic dropdown select input.
In order to get a list of files from the cloud storage from a specific folder, we need to have a function that can handle that task in StorageService.js:
// input: folder name
// output: list of fileNames in array format
const listFiles = async (folder) => {
  const listRef = storageRef.child(folder);
  const res = await listRef.listAll();
  const list = res.items.map((itemRef) => itemRef._delegate._location.path_);
  return list;
};

const StorageService = {
  ...listFiles,
};
With the listFiles function defined, we can now call it from the CategoryForm component:
import React, { useState, useEffect } from "react";
import StorageService from "../../services/StorageService";

function CategoryForm({ values, action }) {
  const [coverOptions, setCoverOptions] = useState([]);

  // Get list of available images from cloud storage
  useEffect(async () => {
    const availableFiles = await StorageService.listFiles("categories");
    setCoverOptions(availableFiles);
  }, []);

  return (
    <form>
      ...
      <div className="form-control">
        <label>Select Cover</label>

        <select {...register("cover")}>
          <option disabled="disabled" value="nocover">
            Choose a cover
          </option>
          {coverOptions.map((fileName, index) => (
            <option key={index} value={fileName}>
              {fileName}
            </option>
          ))}
        </select>
      </div>
      ...
    </form>
  );
}
Using an asynchronous useEffect function, we’re able to retrieve the file names and then populate the select field via the coverOptions state. In the next section, we’ll look at how to resolve document relations.
Resolving document relations
If we recall the book entity structure, it contained reference fields called author_id and category_id. For most database systems and ORM libraries, there’s an option for populating the references with values such that only one query is required to load all the required data.
Unfortunately for the Firestore database, you need to perform additional queries to load in referenced documents. We need to define a specific function for that in DatabaseService.js:
class DatabaseService {
  ...
  getReference = async (documentReference) => {
    const res = await documentReference.get()
    const data = res.data()

    if (data && documentReference.id) {
      data.uid = documentReference.id
    }

    return data
  }
  ...
}
With the function defined, we can now fully load a document with reference fields. See the BookDetail component as an example:
import { BookService } from "@/services/DatabaseService";

function BookDetail({ book }) {
  const [author, setAuthor] = useState();
  const [category, setCategory] = useState();

  // Resolve book.author_id document reference
  useEffect(async () => {
    const authorRef = await BookService.getReference(book.author_id);
    setAuthor(authorRef);
  }, [book]);

  // Resolve book.category_id document reference
  useEffect(async () => {
    const categoryRef = await BookService.getReference(book.category_id);
    setCategory(categoryRef);
  }, [book]);

  return (
    <div>
      ...
      {category && <p>{category.name}</p>}
      ...
      {author && <p>By {author.name}</p>}
      ...
    </div>
  );
}
In the example above, we’re using asynchronous useEffect hooks to perform the additional queries. In the subsequent section, we’ll start concluding the article.
Other Firebase services
Unfortunately, there’s a myriad of Firebase services that I won’t be able to cover in this article. These back-end services are quite essential to building your MVP Firebase app. So I’ll do a quick summary of a few of them:
- Authentication. This service allows you to easily add sign-in functionality on your Firebase app. It supports email, social accounts, GitHub and even SMS authentication methods. Firebase auth integrates tightly with other Firebase services, and can be easily integrated with your custom back end.
- Cloud Functions. This is a service that allows you to write and execute back-end code in response to events triggered by Firebase features and HTTPS requests. Code is written in JavaScript/TypeScript and runs on Google Cloud’s managed environment.
- Hosting. This is a service that provides hosting of web apps, static and dynamic content, and microservices. Content is served via a global CDN (content delivery network).
- Analytics. You can use Google Analytics to collect usage and behavior data for your web app via the
firebase/analyticspackage. You can collect and keep track of events and user attributes (such as language, geographic language) about your audience.
As mentioned earlier, the security rules that we configured allow public read/write access to our back end. To learn how to secure your Firebase account, I recommend checking out the security rules. Do note that you must also implement Firebase authentication on your app in order to allow secure access of data.
Summary
To summarize, you have learned how to:
- structure and organize front-end code
- register a Firebase app
- populate Firestore database and storage
- retrieve both data and files from your Firebase back end
- Link collections in your front-end UI
There are still so many Firebase services we haven’t yet touched. As you can see, it’s easier building an MVP where all back-end services are under one roof. We’ve only installed a single Firebase library that provides the majority of the back-end features that most MVPs need.
We also haven’t looked at Firebase extensions, which are additional functionality we can easily implement to extend our Firebase app. Examples of these extensions include:
And many more. If you have enjoyed the Firebase experience and you’d like a more powerful database, you can check out Supabase, which is an open-source alternative that offers a PostgreSQL database. However, Supabase is quite new in the market and is currently in the beta stage of development at the time of writing.