React Query 3: A Guide to Fetching and Managing Data

Building front-end CRUD applications often starts out easy then turns complicated as you continue adding features. For every API endpoint, you’ll need to deal with state management, synchronization, caching and error handling. In this article, you’ll learn about a library called React Query and how it can help resolve all those issues. The library describes itself as the “missing data-fetching library” providing “server state management” for React.
We’ll be using a complete React Query Demo project to learn about the main features the library provides. You’ll then be able to apply this knowledge into your own projects. First, let’s get acquainted with a number of items before commencing with project setup.
About React Query 3
React Query is an open-source project created by Tanner Linsey. The latest major version, React Query 3, was officially released in December 2020. With this new version, new features were added and existing ones were improved.
You should be aware that there’s a number of breaking changes from React Query 2.x, which was quite popular before the new version came out. There’s a migration guide which clearly explains these changes, as you’ll probably come across a lot of outdated tutorials that were written for the older version.
The new version offers vast improvements and many of the bugs reported earlier have been resolved. Version 3, though ready for production, is still undergoing development as new bugs get squashed on a regular basis.
Prerequisites
This article is written for intermediate to advanced front-end developers who’ve grasped fundamental skills and knowledge in:
In your developer’s machine environment, you’ll need to have set up the following:
- Node.js
- Git
- A REST Client such as Postman, Insomnia or VS Code’s REST extension
With that out of the way, let’s get into setting up the demo project.
About the Project
The demo project that we will analyze is a React front-end application that displays data provided by a REST JSON API server. The app is only made up of five pages that showcase the React Query features we’ll be learning about. These features include:
- Basic Query
- Paginated Query
- Infinite Query
- Create Mutation
- Update Mutation
- Delete Mutation
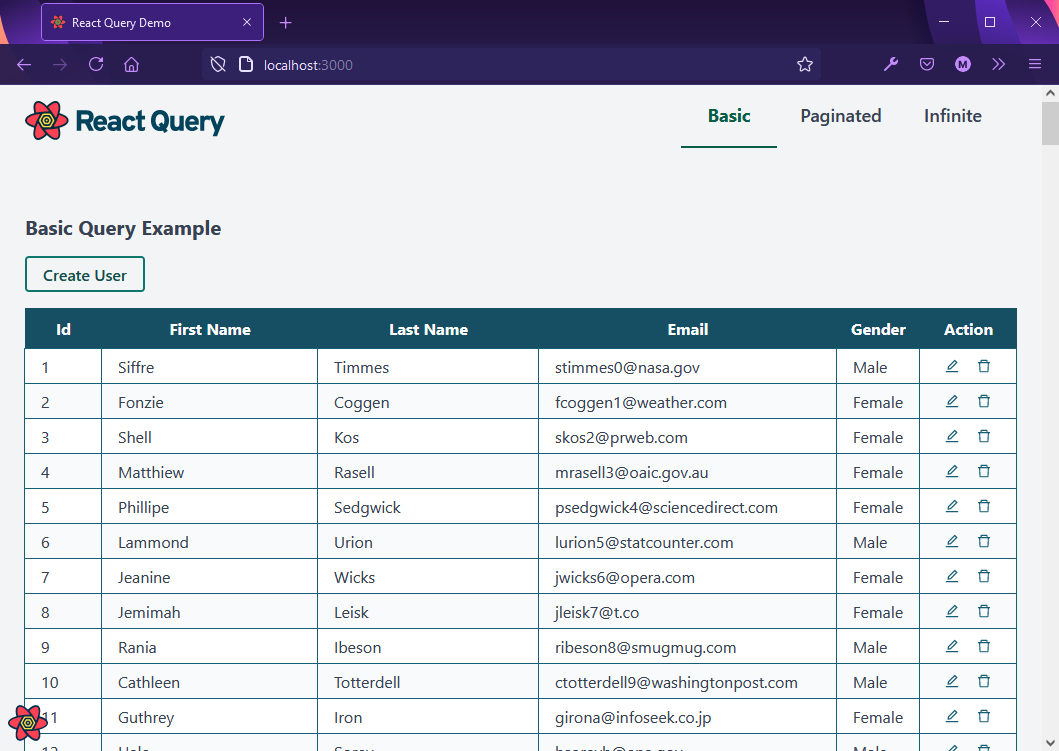
React Query does provide many more features that unfortunately are outside the scope of this article. Below is a preview of the application we’ll be working with.
Project Setup
Before we start setting up, I think it’s best to briefly familiarize yourself with additional dependencies used in the project. These include:
- Vite: a very fast build tool
- WindiCSS: a very fast Tailwind CSS compiler
- React Hook Form: a form builder and validation library using React hooks
- React Modal: an accessible modal component
- Axios: a promise-based HTTP client for browsers
- JSON Server: a full, fake REST API server
To set up the React Query Demo application on your machine, execute the following instructions:
# Clone the project
git clone git@github.com:sitepoint-editors/react-query-demo.git

# Navigate to project directory
cd react-query-demo

# Install package dependencies
npm install

# Setup database file for `json-server`
cp api/sample.db.json api/db.json

# Start the `json-server`
npm run json-server
The database file used by json-server contains an array of users. When you execute npm run json-server, a fake API server is launched on port 3004. You can access users’ data via
[
  {
    "id": 1,
    "first_name": "Siffre",
    "last_name": "Timm",
    "email": "stimmes0@nasa.govz",
    "gender": "Male"
  },
  {
    "id": 2,
    "first_name": "Fonzie",
    "last_name": "Coggen",
    "email": "fcoggen1@weather.com",
    "gender": "Female"
  },
  {
    "id": 3,
    "first_name": "Shell",
    "last_name": "Kos",
    "email": "skos2@prweb.com",
    "gender": "Female"
  }
]
Next, start up the dev server that will run the front-end code:
# In another terminal, start the React dev server
npm run dev
Head over to your browser and open http://localhost:3000 to access the application. You should have an identical experience as shown in the preview above. Ensure you perform the following tasks in order to explore the application’s features thoroughly:
- Review the Basic Query page (home page).
- Visit the Paginated page and interact with the Previous and Next buttons
- Visit the Infinite page and interact with the Load more button.
- Go back to the Basic Query page and click the Create User button. You’ll be directed to the Create User page. Fill in the form and click the Save button.
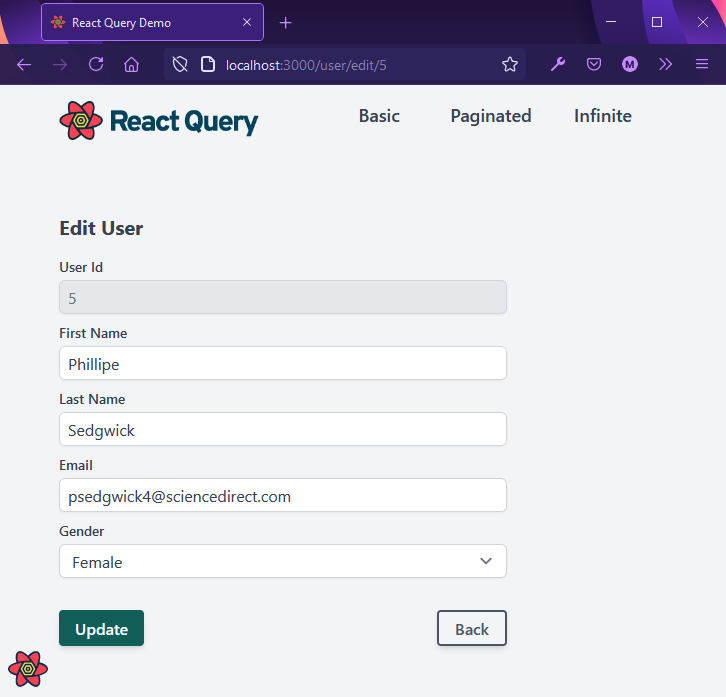
- On the User Table, locate the Edit icon. Click on it. This will take you to the Edit User page. Make any changes you like, then hit the Save button.
- On the User Table, locate the Delete icon. Click on it. This will launch a modal dialog asking you to confirm your delete action. Click on the Delete button to to confirm.
Once we’ve completed all the above tasks, we can start doing a break down of the project. Do review the project structure so that you know where each component and view is located. I’ll be providing stripped-down versions of these throughout the article, so that you can understand the fundamentals of using React Query in your projects.
Note: stripped-down versions have classNames, local state and other UI components removed that aren’t the focus of the subject being discussed.
Installing React Query
React Query can be installed on a blank or existing React project using the following command:
npm install react-query
The package comes with everything you need — including the Devtools utility feature, which we’ll explore at a later section. After installing the package, you’ll need to update your top-most component, — App.jsx — as follows:
import { QueryClient, QueryClientProvider } from "react-query";

function App() {
  const queryClient = new QueryClient();

  return (
    <QueryClientProvider client={queryClient}>
      /* place application containers/views here */
    </QueryClientProvider>
  );
}

export default App;
Any child component of QueryClientProvider will be able to access hooks provided by React Query library. The hooks we’ll be using in this article are:
Here’s an updated (simplified) version of App.jsx containing the child views that we’ll be using:
import { QueryClient, QueryClientProvider } from "react-query";

import BasicQuery from "./views/BasicQuery";
import InfiniteQuery from "./views/InfiniteQuery";
import PaginatedQuery from "./views/PaginatedQuery";
import CreateUser from "./views/CreateUser";
import EditUser from "./views/EditUser";

function App() {
  const queryClient = new QueryClient();

  return (
    <QueryClientProvider client={queryClient}>
      <Switch>
        <Route path="/" exact>
          <BasicQuery />
        </Route>
        <Route path="/paginated">
          <PaginatedQuery />
        </Route>
        <Route path="/infinite">
          <InfiniteQuery />
        </Route>
        <Route path="/user/create">
          <CreateUser />
        </Route>
        <Route path="/user/edit/:id">
          <EditUser />
        </Route>
      </Switch>
    </QueryClientProvider>
  );
}

export default App;
UI Components
Before we proceed to the next section, I think it’s best to have an overview of the main UI components used in the project to display, create and update user data. We’ll start with components/UserTable.jsx. This is table component displays user data and is used by BasicQuery.jsx and PaginatedQuery.jsx pages. It requires one prop, an array of users. Below is a stripped-down version of the completed file:
import React, { useState, useContext } from "react";
import { Link } from "react-router-dom";
import EditIcon from "../icons/edit";
import DeleteIcon from "../icons/delete";

function UserTable({ users }) {
  const rows = users.map((user, index) => (
    <tr key={index}>
      <td>{user.id}</td>
      <td>{user.first_name}</td>
      <td>{user.last_name}</td>
      <td>{user.email}</td>
      <td>{user.gender}</td>
      <td>
        <Link to={`/user/edit/${user.id}`}>
          <EditIcon />
        </Link>
        <button onClick={() => showDeleteModal(user.id)}>
          <DeleteIcon />
        </button>
      </td>
    </tr>
  ));

  return (
    <React.Fragment>
      <div>
        <Link to="/user/create">Create User</Link>
      </div>
      <table>
        <thead>
          <tr>
            <th>Id</th>
            <th>First Name</th>
            <th>Last Name</th>
            <th>Email</th>
            <th>Gender</th>
            <th>Action</th>
          </tr>
        </thead>
        <tbody>{rows}</tbody>
      </table>
    </React.Fragment>
  );
}
Next, we’ll look at components/UserForm.jsx. This form component is used by views/CreateUser.jsx and views/EditUser.jsx pages to perform their tasks. Below is a simplified version of the component:
import React from "react";
import { useForm } from "react-hook-form";
import { useHistory } from "react-router-dom";

import "./form.css";

function UserForm({ user, submitText, submitAction }) {
  const {
    register,
    formState: { errors },
    handleSubmit,
  } = useForm({
    defaultValues: user || {},
  });

  const history = useHistory();

  return (
    <div>
      <form onSubmit={handleSubmit(submitAction)}>
        {user && (
          <section className="field">
            <label htmlFor="id">User Id</label>
            <input type="text" name="id" value={user.id} disabled />
          </section>
        )}

        <section className="field">
          <div>
            <label htmlFor="first_name">First Name</label>
            <input
              type="text"
              {...register("first_name", { required: true })}
            />
            <span className="errors">
              {errors.first_name && "First name is required"}
            </span>
          </div>
          <div>
            <label htmlFor="last_name">Last Name</label>
            <input type="text" {...register("last_name", { required: true })} />
            <span className="errors">
              {errors.last_name && "Last name is required"}
            </span>
          </div>
        </section>

        <section className="field">
          <label htmlFor="email">Email</label>
          <input
            type="email"
            {...register("email", { required: true, pattern: /^\S+@\S+$/i })}
          />
          <span className="errors">
            {errors.email &&
              errors.email.type === "required" &&
              "Email is required"}
            {errors.email &&
              errors.email.type === "pattern" &&
              "Provide a valid email address"}
          </span>
        </section>

        <section className="field">
          <label htmlFor="gender">Gender</label>
          <select {...register("gender", { required: true })}>
            <option value=""></option>
            <option value="Male">Male</option>
            <option value="Female">Female</option>
          </select>
          <span className="errors">
            {errors.gender && "Gender is required"}
          </span>
        </section>

        <div>
          <button type="submit"> {submitText} </button>
          <button type="button" onClick={() => history.goBack()}>
            Back
          </button>
        </div>
      </form>
    </div>
  );
}

export default UserForm;
The UserForm component is designed to perform validation on submitted user data. It expects the following props:
user: data object (optional)submitText: text value for the Submit buttonsubmitAction: function handling form submission
In the next section, we’ll start looking at React Query’s main features.
Basic Query
Fetching data using React Query is quite simple. All you need to do is define a fetch function and then pass it as a parameter to the useQuery mutation. You can see an example of views/BasicQuery.jsx page below:
import React from "react";
import { useQuery } from "react-query";

import UserTable from "../components/UserTable";

function BasicQuery() {
  const fetchAllUsers = async () =>
    await (await fetch("http://localhost:3004/users")).json();

  const { data, error, status } = useQuery("users", fetchAllUsers);

  return (
    <div>
      <h2>Basic Query Example</h2>
      <div>
        {status === "error" && <div>{error.message}</div>}

        {status === "loading" && <div>Loading...</div>}

        {status === "success" && <UserTable users={data} />}
      </div>
    </div>
  );
}

export default BasicQuery;
Let’s break it down:
- First, we import
useQueryvia the statementimport { useQuery } from "react-query". - Next, we declare a promise function —
fetchAllUsers— which retrieves data from our fake JSON API server. - Next, we initiate the
useQueryhook function. The following parameters are required:- a query key, which can either be a String or an array. It’s used to identify and keep track of query results for caching purposes.
- a query function, which must return a promise that will either resolve data or throw an error.
- The
useQueryfunction returns the following state variables:data: this is the result from the fetch (promise) function.error: if an error is thrown, this will be set. Otherwise it’s null if the fetch request is successful.status: this is a string that can have the valueidle,loading,errororsuccess.
The useQuery hook accepts a lot more parameters and returns a lot more variables, which have been documented in the React Query docs. The example above is meant to demonstrate the minimum setup required to perform an API request using the library.
Also, notice how the status variable is reactive. It is initially set to loading. Then, when the request is successful, it’s set to success, causing React to re-render the component and update the UI.
Querying a Single Record
Querying a single record can be achieved using a similar syntax that has been used in the previous section. The difference here is that:
- you need to pass an argument to the fetch function via an anonymous function
- you need a unique query name for each individual record, which you can do using an array:
[queryName, {params}]
function() {
   const fetchUser = async (id) =>
    await (await fetch(`http://localhost:3004/users/${id}`)).json();

  const { data, error, status } = useQuery(["user", { id }], (id) =>
    fetchUser(id)
  );

  return (...)
}
However, there’s an alternative way of passing arguments. Consider the following code:
const { data, error, status } = useQuery(["user", { id }], fetchUser);
Using the above syntax, you’ll need to modify the fetchUser function to accept a queryKey object as follows:
const fetchUser = async ({ queryKey }) => {
  const [_key, { id }] = queryKey;
  const response = await fetch(`http://localhost:3004/users/${id}`);

  if (!response.ok) {
    throw new Error(response.statusText);
  }

  return response.json();
};
Since we’re using the Fetch API, 404 responses are not considered errors. That’s why we need to write additional logic to handle this situation. Performing this additional check isn’t required when using the Axios API client library.
Check out views/EditUser.jsx to see how the entire code has been implemented. There’s some mutation code in there which we’ll discuss later in the article.
Devtools
Debugging React Query code can easily be done using Devtools. This is a utility that visualizes the inner workings of React Query in real time as your application code executes. Setting it up is as follows:
import { ReactQueryDevtools } from "react-query/devtools";

function App() {
  return (
    <QueryClientProvider client={queryClient}>
      {/* The rest of your application */}
      <ReactQueryDevtools initialIsOpen={false} />
    </QueryClientProvider>
  );
}
When you run your application, there’ll be an icon on the bottom left corner that you can click to expand the Devtools panel.
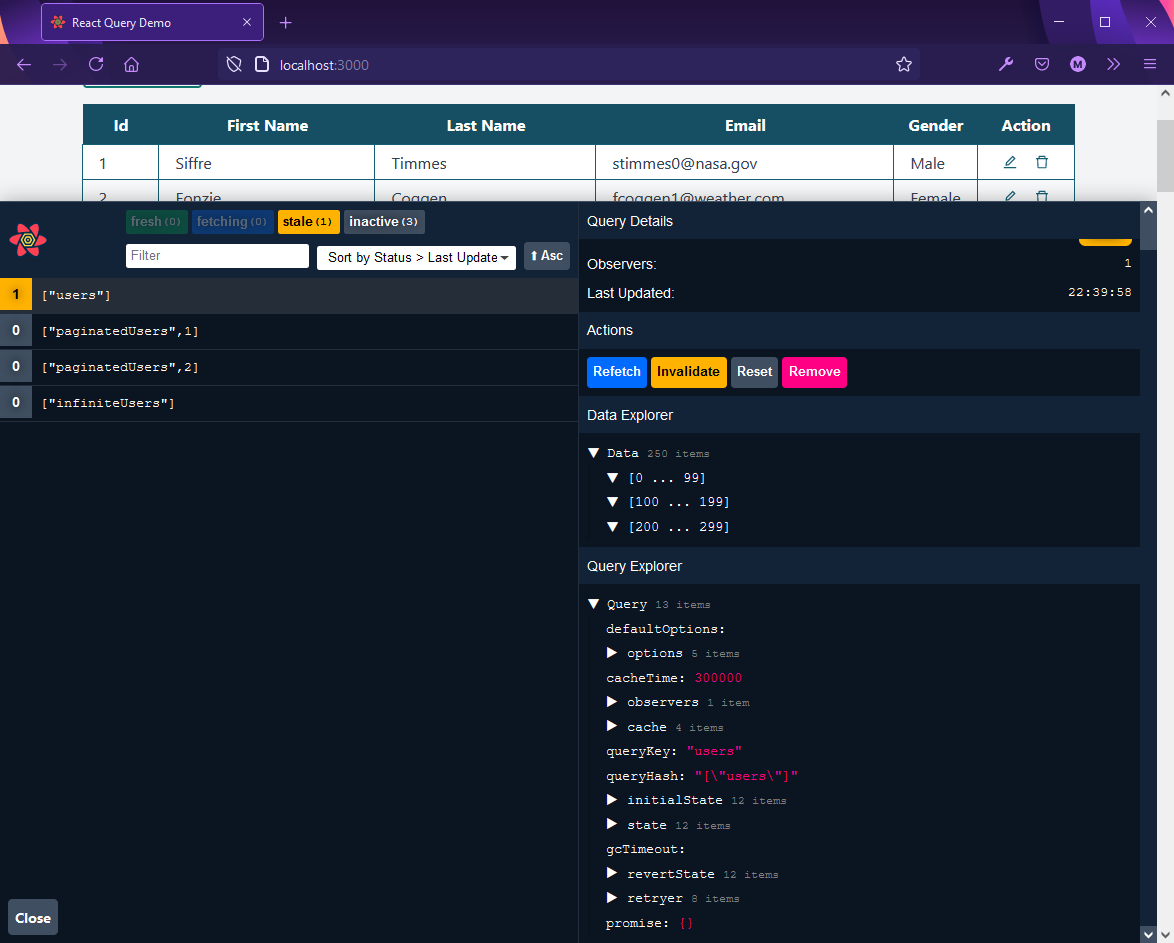
As you can see in the screenshot above, there’s a number of properties you can observe to help you debug your application. In the next section, we’ll look at a couple of configuration options to help you make sense of some these properties and actions.
Configuration
In a React Query application, when a page loads the first time, the library will fetch the data from the API, present it to you and then cache it. You’ll notice a “loading” message when this happens.
When you visit this page a second time, React Query will first return data from the cache and then perform a fetch in the background. Once the asynchronous process is complete, it updates the data on the page. You won’t see a “loading” message at all when this happens.
Caching allows your front-end application to become snappy, especially if you have a slow API server. However, it can present a situation where users may start working with outdated data. In React Query, this is referred to as stale data.
There’s a couple of configuration options that can help you optimize your application for performance or reliability:
- cacheTime: the default is 5 minutes or 300000 milliseconds
- staleTime: defaults to 0 milliseconds
cacheTime determines how long data can be stored in the cache before discarding it. staleTime determines how long it takes for data to become outdated. When data becomes stale, it’s marked for re-fetch. This will happen the next time a user visits the page again or re-focuses the browser window/tab.
Increasing the staleTime value can increase application performance if you know that the data being fetched has a low probability of getting updated. You can define these settings by passing a third argument to the useQuery hook:
 function Todos() {

   const result = useQuery('todos', () => fetch('/todos'), {
     staleTime: 60 * 1000 // 1 minute
     cacheTime: 60 * 1000 * 10 // 10 minutes
   })

 }
You can also set Infinity on either property. This will disable garbage collection for cacheTime and make the data never go stale for staleTime.
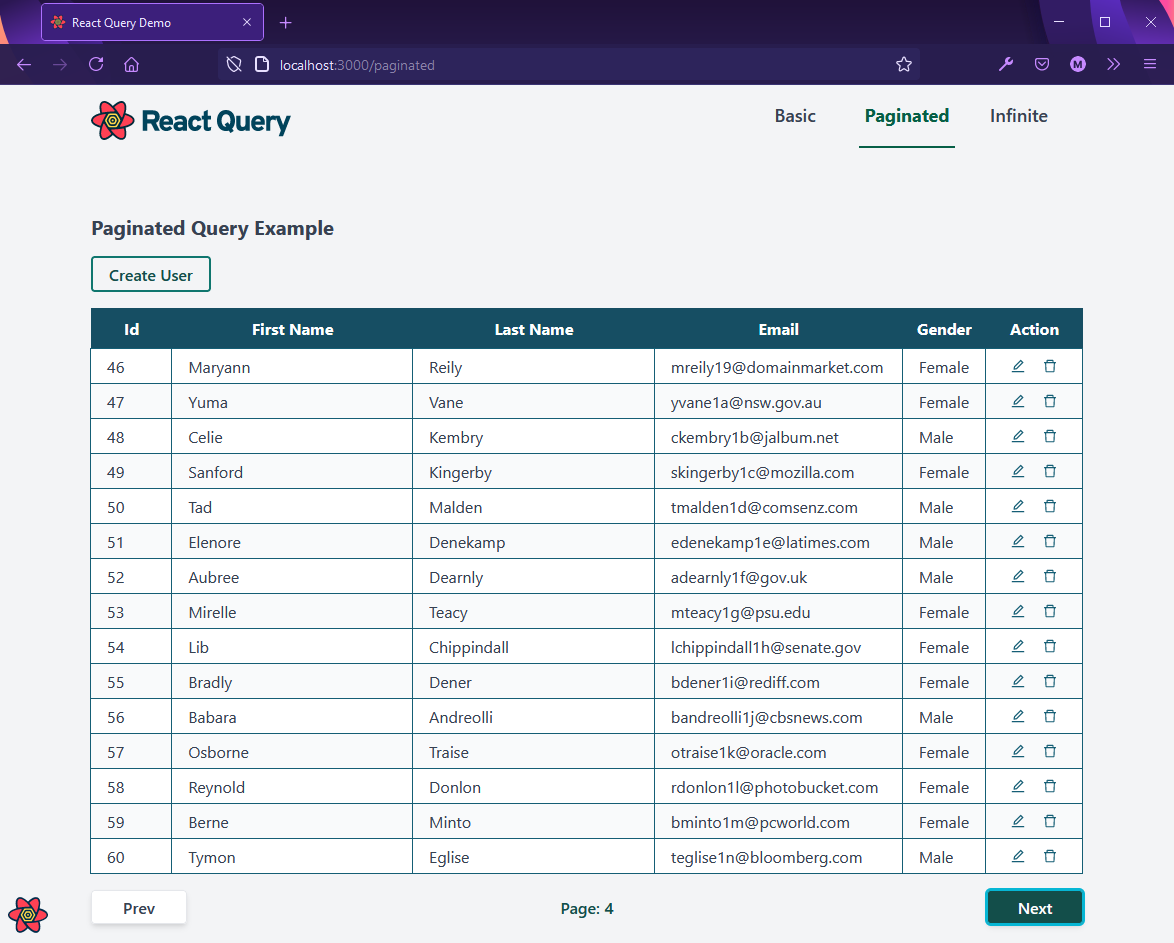
Paginated Queries
In the Basic Query example, all 250 records were loaded all at once. A more user-friendly approach is to paginate the data. We can achieve this using the useQuery hook. In previous versions of React Query, this was done using the usePaginateQuery hook, which is no longer available in React Query 3.
Pagination implementation actually starts with the back-end API server. Lucky for us, json-server does have pagination support. To access this feature, you need to append the following parameters to an endpoint’s URL:
_page: page number_limit: number of records per page
Example: http://localhost:3004/users?_page=5&_limit=10.
Let’s now look at how pagination is achieved using useQuery hook:
import React, { useState } from "react";
import { useQuery } from "react-query";

const pageLimit = 15;

const fetchUsers = async (page = 1) =>
  await (
    await fetch(`http://localhost:3004/users?_page=${page}&_limit=${pageLimit}`)
  ).json();

function Users() {
  const [page, setPage] = useState(1);
  const { data } = useQuery(["paginatedUsers", page], () => fetchUsers(page), {
    keepPreviousData: true,
  });
}
This example is quite similar to the Basic Query we looked at earlier. However, there’s a few key differences:
- The promise function,
fetchUsers, now accepts an integerpageparameter. Page size is set using the variablepageLimit. - The
useQueryhook signature looks quite different:- The first parameter is an array,
["paginatedUsers", page]. This is to keep track of each page data separately. - The second parameter is an anonymous function. It’s defined this way in order to pass the
pageargument to thefetchUsersfunction. - The third argument is an object config where we can pass multiple settings. In this case, setting the
keepPreviousDataproperty to true informs React Query to cache previously fetched data. By default, this setting is false, which causes previous viewed pages to refresh.
- The first parameter is an array,
To further improve page navigation performance, you can prefetch the next page before the user navigates to it. Here’s an example:
import { useQuery, useQueryClient } from "react-query";

function Example() {
  const queryClient = useQueryClient();
  const [page, setPage] = React.useState(0);

  // Prefetch the next page!
  React.useEffect(() => {
    if (data?.hasMore) {
      queryClient.prefetchQuery(["paginatedUsers", page + 1], () =>
        fetchUsers(page + 1)
      );
    }
  }, [data, page, queryClient]);
}
Take note that data.hasMore is a server API specific property. Unfortunately, our fake API server doesn’t support this. When using a real API back-end, you’d probably get a response that looks something like this:
{
  "items": [
    {
      "lives": 9,
      "type": "tabby",
      "name": "Bobby"
    },
    {
      "lives": 2,
      "type": "Ginger",
      "name": "Garfield"
    },
    ...
  ],
  "meta": {
    "itemCount": 10,
    "totalItems": 20,
    "itemsPerPage": 10,
    "totalPages": 5,
    "currentPage": 2
  },
  "links" : {
    "first": "http://cats.com/cats?limit=10",
    "previous": "http://cats.com/cats?page=1&limit=10",
    "next": "http://cats.com/cats?page=3&limit=10",
    "last": "http://cats.com/cats?page=5&limit=10"
  }
}
Notice that there’s additional metadata provided in the response body structure that can help validate pagination buttons. With json-server, performing a paginated request gives us the following output:
HTTP/1.1 200 OK
X-Powered-By: Express
Vary: Origin, Accept-Encoding
Access-Control-Allow-Credentials: true
Cache-Control: no-cache
Pragma: no-cache
Expires: -1
X-Total-Count: 250
Access-Control-Expose-Headers: X-Total-Count, Link
Link: <http://localhost:3004/users?_page=1&_limit=10>; rel="first", <http://localhost:3004/users?_page=4&_limit=10>; rel="prev", <http://localhost:3004/users?_page=6&_limit=10>; rel="next", <http://localhost:3004/users?_page=25&_limit=10>; rel="last"
X-Content-Type-Options: nosniff
Content-Type: application/json; charset=utf-8
ETag: W/"567-FwlexqEes6H/+Xt0qULv2G4aUN4"
Content-Encoding: gzip
Date: Thu, 29 Apr 2021 15:24:58 GMT
Connection: close
Transfer-Encoding: chunked

[
  {
    "id": 42,
    "first_name": "Whitby",
    "last_name": "Damrell",
    "email": "wdamrell15@i2i.jp",
    "gender": "Female"
  },
  {
    "id": 43,
    "first_name": "Fairleigh",
    "last_name": "Staner",
    "email": "fstaner16@tripod.com",
    "gender": "Female"
  },
  ...
]
Take note of the Link attribute provided in the header section. We can use this information to write better pagination code. Unfortunately, the data is not in a format that can readily be used with JavaScript code. We’ll look into how to handle this in the next section. For now, we’ll just use a simple check to determine if we’ve reached the last page.
Below is a stripped-down version of the final views/PaginatedQuery.jsx page:
import React, { useState } from "react";
import { useQuery } from "react-query";

import UserTable from "../components/UserTable";

const pageLimit = 15;

const fetchUsers = async (page = 1) => {
  const response = await fetch(
    `http://localhost:3004/users?_page=${page}&_limit=${pageLimit}`
  );
  return response.json();
};

function PaginatedQuery() {
  const [page, setPage] = useState(1);
  const { data, isLoading, isError, status, error } = useQuery(
    ["paginatedUsers", page],
    () => fetchUsers(page),
    {
      keepPreviousData: true,
    }
  );

  const prevPage = () => {
    if (page > 1) setPage(page - 1);
  };

  const nextPage = () => {
    setPage(page + 1);
  };

  return (
    <div>
      <h2>Paginated Query Example</h2>
      <div>
        {isError && <div>{error.message}</div>}

        {isLoading && <div>Loading...</div>}

        {status === "success" && <UserTable users={data} />}
      </div>

      {/* start of pagination buttons */}
      <div>
        <button onClick={prevPage} disabled={page <= 1}>
          Prev
        </button>
        <span>Page: {page}</span>
        <button onClick={nextPage} disabled={data && data.length < pageLimit}>
          Next
        </button>
      </div>
      {/* end of pagination buttons */}
    </div>
  );
}

export default PaginatedQuery;
In the code example above, we’ve added functions and buttons to provide pagination interaction. Take note that we’re also using isLoading and isError states, which are simply convenient alternatives to using the status state.
Below is a screenshot of the PaginatedQuery page.
Infinite Queries
So far, we’ve only used the useQuery hook to manage data fetching from our back-end API. In this section, you’ll learn how to implement the “infinite scroll” feature. Users will be required to click a Load more button to trigger a data fetch.
To achieve this, we’ll use the useInfiniteQuery hook, which is quite similar to useQuery hook but has several key differences. First, you’ll need a back-end API that supports cursor pagination:
fetch("/api/projects?cursor=0");
Unfortunately, our json-server back end doesn’t. For our purposes, we’ll implement a workaround using the existing pagination support to make infinite querying work. Let’s look at how we define our fetchUsers function:
const pageLimit = 5;

const fetchUsers = ({ pageParam = 1 }) =>
  axios.get(
    `http://localhost:3004/users?_page=${pageParam}&_limit=${pageLimit}`
  );
The function fetchUsers is similar to PaginatedQuery‘s version, except that we’re returning a full Response object instead of a resolved data array. We did this so that we can have access to the Link object provided in the header:
Link: <http://localhost:3004/users?_page=1&_limit=10>; rel="first",
<http://localhost:3004/users?_page=2&_limit=10>; rel="next",
<http://localhost:3004/users?_page=25&_limit=10>; rel="last"
The Link header returns a string that contains meta data about the current position of a page. When using Axios, we can access the above information using response.headers.link. When using the Fetch API to make the request, use response.headers.get('Link') to access the same.
Next, we need to convert the Link metadata into a format that we can easily access in code. We can perform the conversion using this function documented on Josh Frank’s article:
const parseLinkHeader = (linkHeader) => {
  const linkHeadersArray = linkHeader
    .split(", ")
    .map((header) => header.split("; "));
  const linkHeadersMap = linkHeadersArray.map((header) => {
    const thisHeaderRel = header[1].replace(/"/g, "").replace("rel=", "");
    const thisHeaderUrl = header[0].slice(1, -1);
    return [thisHeaderRel, thisHeaderUrl];
  });
  return Object.fromEntries(linkHeadersMap);
};
When we pass the Link‘s header string into the function, we receive the following JavaScript object:
{
  first: "http://localhost:3004/users?_page=1&_limit=5",
  next: "http://localhost:3004/users?_page=2&_limit=5",
  last: "http://localhost:3004/users?_page=50&_limit=5"
}
Now we can extract the value for the next page by using the URLSearch function. You’ll need to supply a partial URL in the format ?_page=2&_limit=5 for it to work. Here’s the snippet of code where we extract the nextPage value:
const nextPageUrl = parseLinkHeader(response.headers.link)["next"];
// split URL string
const queryString = nextPageUrl.substring(
  nextPageUrl.indexOf("?"),
  nextPageUrl.length
); // returns '?_page=2&_limit=5'
const urlParams = new URLSearchParams(queryString);
const nextPage = urlParams.get("_page"); // returns 2
Using the code we’ve defined so far, we now have a “cursor” feature workaround for our fake API back end. You’ll probably have an easier time with a real API back end that supports cursor pagination. With that logic in place, this is how we can define our useInfiniteQuery:
const {
  data,
  error,
  fetchNextPage,
  hasNextPage,
  isFetchingNextPage,
  status,
} = useInfiniteQuery("infiniteUsers", fetchUsers, {
  getNextPageParam: (lastPage) => {
    // The following code block is specific to json-server api
    const nextPageUrl = parseLinkHeader(lastPage.headers.link)["next"];
    if (nextPageUrl) {
      const queryString = nextPageUrl.substring(
        nextPageUrl.indexOf("?"),
        nextPageUrl.length
      );
      const urlParams = new URLSearchParams(queryString);
      const nextPage = urlParams.get("_page");
      return nextPage;
    } else {
      return undefined;
    }
  },
});
The above code snippet looks complicated, so let me clarify the useInfiniteQuery syntax for you:
const { ... } = useInfiniteQuery(queryKey, queryFn, {...options})
The are only three arguments that we’re required to provide:
- The first argument is the
queryKey. - The second argument —
queryFn— is the promise function that fetches cursor paginated data. - The third argument is a config JavaScript object, where you define options such as
staleTimeandcacheTime.
In the case of useInfiniteQuery, you must provide a function called getNextPageParam in order for the infinite scroll button to work. This function determines the next page to load. It has the following syntax:
{
  getNextPageParam: (lastPage, allPages) => {
    // lastPage: the last page(in our case last `Response` object) fetched by `fetchUsers` function
    // allPages: List of all pages that have already been fetched
    // return int|undefined : return `nextPage` as integer. Return `undefined` when there are no more pages
  };
}
Do read the comments to understand the purpose of the function’s inputs and outputs. Let’s now look at the extra states that the hook returns:
data: returns an array of pages,data.pages[]fetchNextPage: when this function is executed, it loads the next page, relying on thegetNextPageParamfunction to workhasNextPage: returns true if there’s a next pageisFetchingNextPage: returns true while fetching the next page withfetchNextPage
Below is a snippet of how the returned states are used to define our Load more button:
<button
  onClick={() => fetchNextPage()}
  disabled={!hasNextPage || isFetchingNextPage}
>
  Load More...
</button>
With the data.pages[] array, each page item is an array containing data records. Each time a user clicks on the Load more button, a new page item is appended to data.pages[] array. We need to define a new function for extracting records from this nested structure. Take note that in this case, each page is an Axios Response object, so we need to specify page.data to access each user record.
Below is the code snippet that we’ll use to map each user to a <li> tag:
userList = data.pages.map((page, index) => (
  <React.Fragment key={index}>
    {page.data.map((user) => (
      <li key={user.id}>
        {user.id}. {user.first_name} {user.last_name}
      </li>
    ))}
  </React.Fragment>
));
By now, you should have a fundamental understanding of how to use the useInfiniteQuery hook. Let’s now see how the entire views/InfiniteQuery.jsx looks:
import React from "react";
import { useInfiniteQuery } from "react-query";
import axios from "axios";

function InfiniteQuery() {
  const pageLimit = 5;

  const fetchUsers = ({ pageParam = 1 }) =>
    axios.get(
      `http://localhost:3004/users?_page=${pageParam}&_limit=${pageLimit}`
    );

  const parseLinkHeader = (linkHeader) => {
    const linkHeadersArray = linkHeader
      .split(", ")
      .map((header) => header.split("; "));
    const linkHeadersMap = linkHeadersArray.map((header) => {
      const thisHeaderRel = header[1].replace(/"/g, "").replace("rel=", "");
      const thisHeaderUrl = header[0].slice(1, -1);
      return [thisHeaderRel, thisHeaderUrl];
    });
    return Object.fromEntries(linkHeadersMap);
  };

  const {
    data,
    error,
    fetchNextPage,
    hasNextPage,
    isFetchingNextPage,
    status,
  } = useInfiniteQuery("infiniteUsers", fetchUsers, {
    getNextPageParam: (lastPage) => {
      // The following code block is specific to json-server api
      const nextPageUrl = parseLinkHeader(lastPage.headers.link)["next"];
      if (nextPageUrl) {
        const queryString = nextPageUrl.substring(
          nextPageUrl.indexOf("?"),
          nextPageUrl.length
        );
        const urlParams = new URLSearchParams(queryString);
        const nextPage = urlParams.get("_page");
        return nextPage;
      } else {
        return undefined;
      }
    },
  });

  let userList;

  if (data) {
    userList = data.pages.map((page, index) => (
      <React.Fragment key={index}>
        {page.data.map((user) => (
          <li key={user.id}>
            {user.id}. {user.first_name} {user.last_name}
          </li>
        ))}
      </React.Fragment>
    ));
  }

  return (
    <div>
      <h2>Infinite Query</h2>
      <div>
        {error && <div>An error occurred: {error.message}</div>}

        {isFetchingNextPage && <div>Fetching Next Page...</div>}

        {status === "success" && <ul className="my-8 ml-4">{userList}</ul>}
      </div>
      <div>
        <button
          onClick={() => fetchNextPage()}
          disabled={!hasNextPage || isFetchingNextPage}
        >
          Load More...
        </button>
      </div>
    </div>
  );
}

export default InfiniteQuery;
Hopefully, the completed code should make sense by now as all the sections have been explained. Below is a screenshot of the “Infinite Query Example” page. I’ve truncated db.json to 13 users to demonstrate the results below:

Take note that the Load more button is disabled, as we’ve reached the last page. This marks the end of our exploration with query hooks. Let’s look at how we can achieve CRUD functionality using the React Query library.
Mutations
So far, we’ve learned different ways to query data. In this section, you’ll learn how to create, update and delete data using the useMutation hook.
The useMutation hook only requires a promise function that will post data to the back-end API. It will return the following states:
isLoading: returns true while the asynchronous operation is runningisError: returns true if an error has occurrederror: returns an error object if presentisSuccess: returns true after the mutation becomes successful
In order to perform the actual mutation action, all you have to do is execute mutation.mutate(data). You can enclose it as a function and assign it to a button’s click event.
Below is a snapshot of the views/CreateUser.jsx page. You can see how each state variable has been used to render various UI elements.
import { useMutation } from "react-query";
import axios from "axios";
import { Redirect } from "react-router-dom";
import UserForm from "../components/UserForm";

const postUser = async (newUser) =>
  await (await axios.post("http://localhost:3004/users", newUser)).data;

function CreateUser() {
  const mutation = useMutation((newUser) => postUser(newUser));
  const { isLoading, isError, error, isSuccess } = mutation;

  const onSubmit = async (data) => {
    mutation.mutate(data);
  };

  if (isSuccess) {
    return <Redirect to="/" />;
  }

  return (
    <div>
      <h2>New User</h2>

      {isError && <div>An error occurred: {error.message}</div>}

      {isLoading && <div>Loading...</div>}

      <UserForm submitText="Create" submitAction={onSubmit} />
    </div>
  );
}
Mutation for the update and delete actions is similar. The only difference is the promise function you provide and the arguments required.
An update mutation example:
const mutation = useMutation((updatedUser) =>
  axios.put(`http://localhost:3004/users/${id}`, updatedUser)
);
A delete mutation example:
const deleteMutation = useMutation((id) =>
  axios.delete(`http://localhost:3004/users/${id}`)
);
If your mutation code is running on the page where your query data is being displayed, you’ll notice that nothing changes after making a commit. In order to trigger a data re-fetch after a successful mutation, you’ll need to execute the queryClient.invalidateQueries() function. See the example below on where to call it:
import { useMutation, useQueryClient } from "react-query";

function UserTable() {
  const deleteMutation = useMutation(
    (id) => axios.delete(`http://localhost:3004/users/${id}`),
    {
      onSuccess: () => {
        queryClient.invalidateQueries();
      },
    }
  );
}
Check out the full reference doc for useMutation to learn about all the states and functions it supports.
Summary
To conclude, React Query is an excellent server state management library for simplifying your data-fetching needs. There are many more features we haven’t looked at that can help you implement even more advance use cases. If you’re wondering if there are any other alternatives to React Query, you should check out their comparison guide for a detailed view of what features each library offers.