Amazon Product API Exploration: Let’s Build a Product Searcher

![]()
In this tutorial, you’ll take a look at Amazon’s Product Advertising API. It’s an API that allows developers to access data about items for sale, seller reviews, customer reviews, and product promotions on all Amazon marketplaces worldwide.
Basic API Concepts
When working with the API, the first thing that you need to know is which Amazon website you wish to target. Not all Amazon websites sell the same kinds of products. If you’re a seller, you’ll really have to target your own locale rather than just the US website (amazon.com). You can find information on what locales are available on this page: Anatomy of a REST Request. Once on that page, look for Product Advertising API Endpoints and you’ll see a list of locales and their corresponding endpoints. Note that you can only make a request to endpoints where you registered. For example, if you registered as an affiliate on the US website, you’ll only be able to make a request to the http://webservices.amazon.com/onca/xml endpoint.
Operations
Operations are the things you can do with the API. Here are a few examples:
- ItemSearch – search for items based on specific parameters such as the category, title, manufacturer, and minimum price. This returns one or more items.
- ItemLookup – search for an item based on an identifier such as ASIN or ISBN (for books). This returns only one item.
- SimilarityLookup – search for items that are similar to the item that you specified in your request.
- CartCreate – creates a remote shopping cart on Amazon’s servers.
- CartAdd – adds item to a remote shopping cart.
Response Groups
Response groups allow you to specify which information about the products you want to include in the response. Note that response groups depend on the operation that you’re using. This means that not all response groups are available to all operations. Here are a few examples of response groups that you can use:
- Small – returns basic information about the item. Example data returned include the ASIN, Title, ProductGroup.
- Reviews – returns the URL of the iframe containing the item’s reviews.
- OfferSummary – returns the lowest price for each condition type (new item, used item, collectible item, refurbished item).
- ItemAttributes – returns all the attributes that an item has. Item attributes depend on the type of the item. For example, a book would have a different set of attributes than computer hardware. However, attributes such as the title or the list price are common to all products.
Browse Nodes
Browse nodes is Amazon’s method for classifying items. They are called browse nodes because each node can have children and each child can also have children of its own. Examples of browse nodes include:
- Books
- Electronics
- Mobile Apps
- Software
- Office Products
- Automotive
The examples given above are all root nodes. In the API you can use root nodes as the value for the search index if you don’t want to be too specific with your request. However, if you want to be specific, you can always dig in deeper towards the child or grandchild of the root node. You don’t want to just search “Books”, for example. You specifically want books about African History. In that case, your browse node traversal would look something like this:
Books -> History -> African
“Books” is the root node, “History” is the child, and “African” is the grand-child. What you want is the ID of the furthest node (the grand-child). Specify that as the value for the BrowseNode parameter in your request so that the API will only look for books on African History. You can find a list of browse nodes and their corresponding IDs on findbrowsenodes.com.
Locale
As previously discussed, there are a few Amazon locales or marketplaces worldwide, and each API request that you’ll be making needs to target a specific locale. But each locale has different valid values for search indices, browse node IDs, sort values and ItemSearch parameters. For example, the Brazil marketplace only has a few search indices available. But if you look at the Canada Marketplace, the search indices available closely match that of the US Marketplace. You can check out specific locale information on the locale reference page.
Getting An Access Key
In order to make requests to the Product Advertising API, you need to have an access key, secret key, and an affiliate ID. Here are the steps to get you started:
-
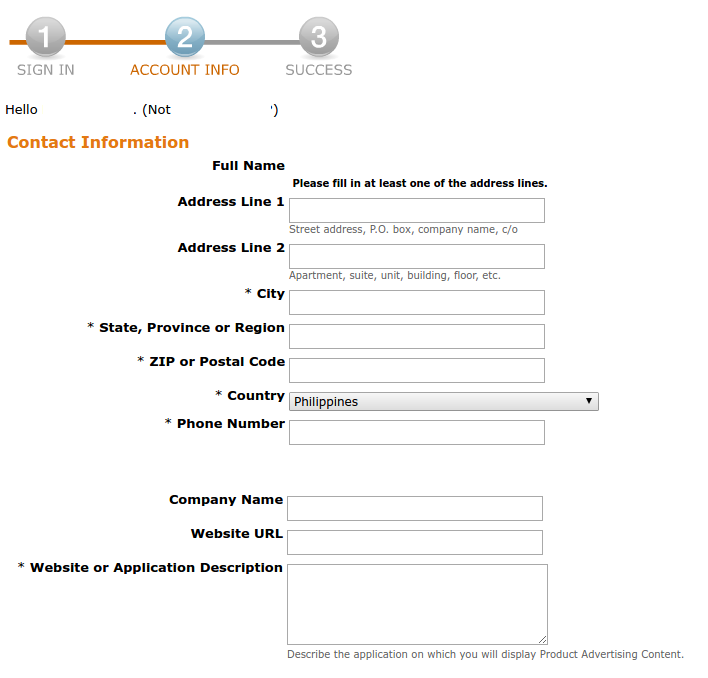
Sign up as a Product Advertising API developer based on your locale. Go to this page and scroll down to the bottom to find the URL for your locale. This requires you to enter the following information:
-
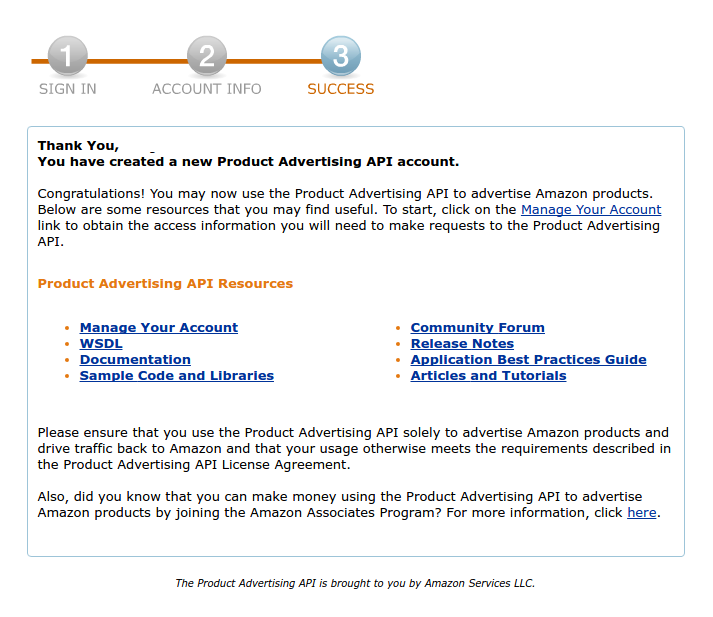
Once you’re done, it should show the following screen:
-
Click on the link for managing your account and it should return the following page:
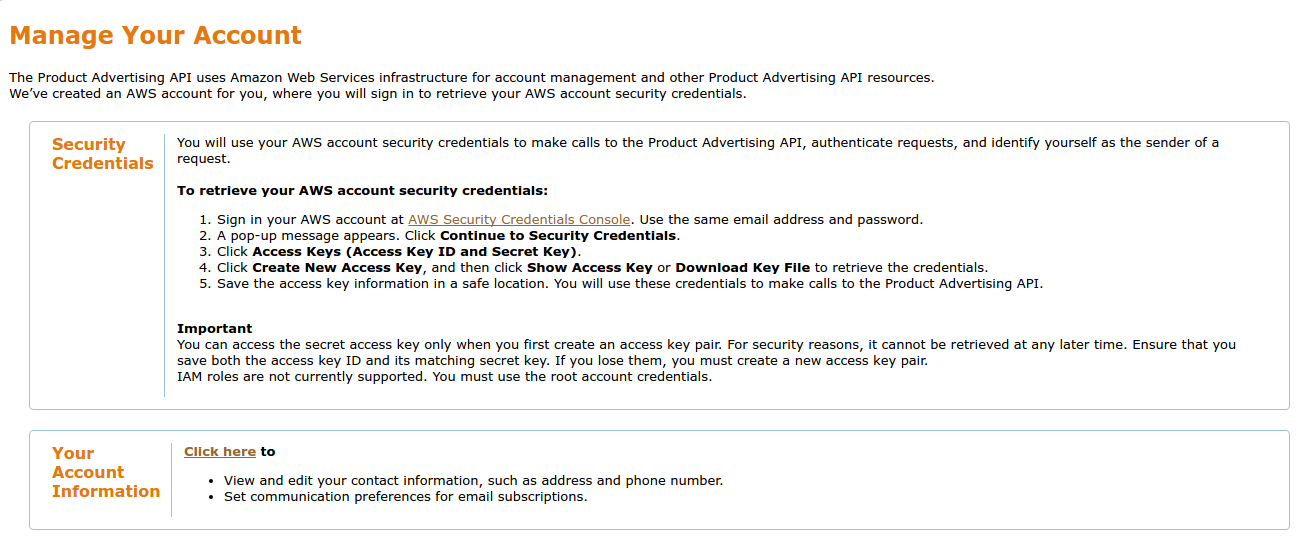
-
Click the link that says AWS Security Credentials Console and you’ll be redirected to the Amazon Web Service console. If this is your first time accessing it, it should show a modal box asking you to continue to security credentials.
-
Click the Access Keys tab to reveal a list of access keys that you already have. By default, there should be one listed but you won’t really be able to use that since you can’t see the corresponding secret key. If this is a new account you can go ahead and delete that.
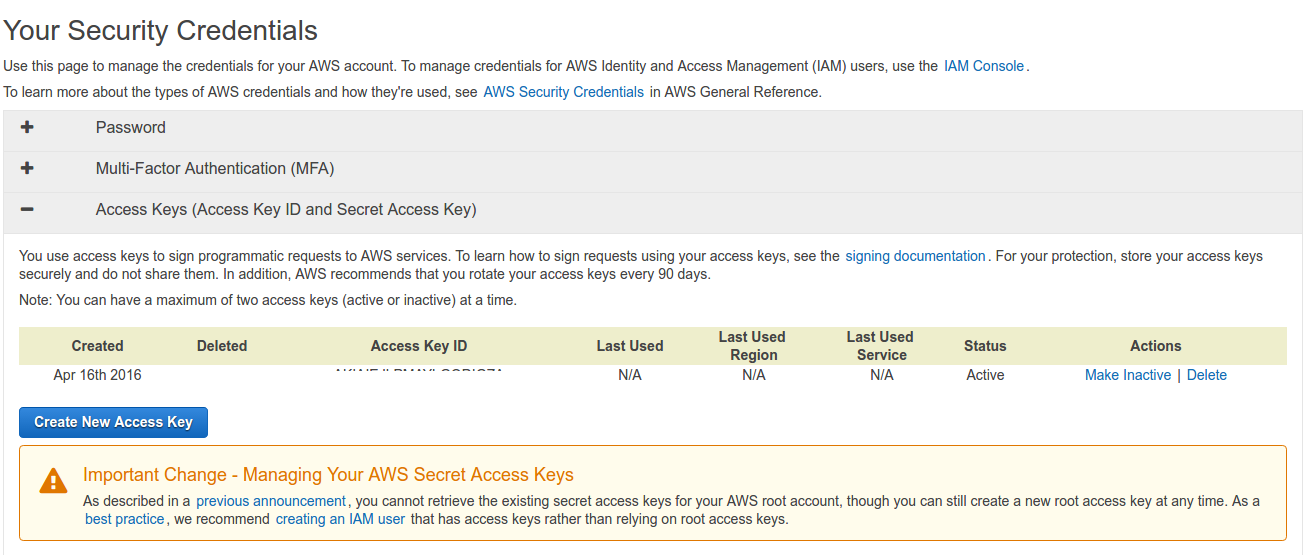
-
Click the Create New Access key button to generate a new access key and secret key combination. Once generated, copy the key combination or download the key file. This is because you won’t be able to see the secret key again on the website.
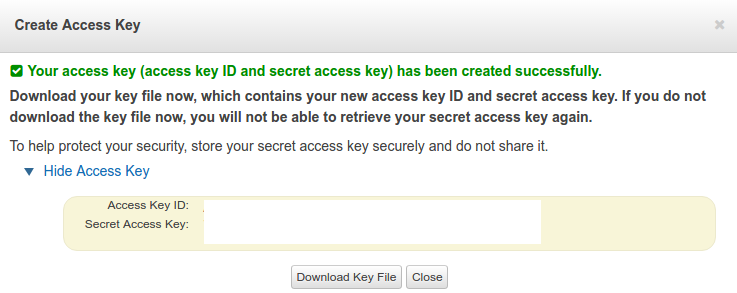
-
Sign up for an Amazon Associates Account based on your locale. This is where they’ll ask the details of your website and the products that you’re selling. It will also ask you to verify your phone number. Once you’re done with all that, you’ll be given a unique associate ID.
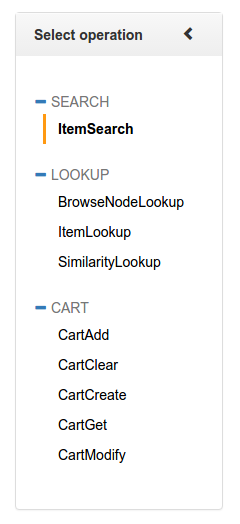
Scratchpad
You can use the scratchpad to play around with the API without having to write code. To use the scratchpad, first select the operation you want to perform:
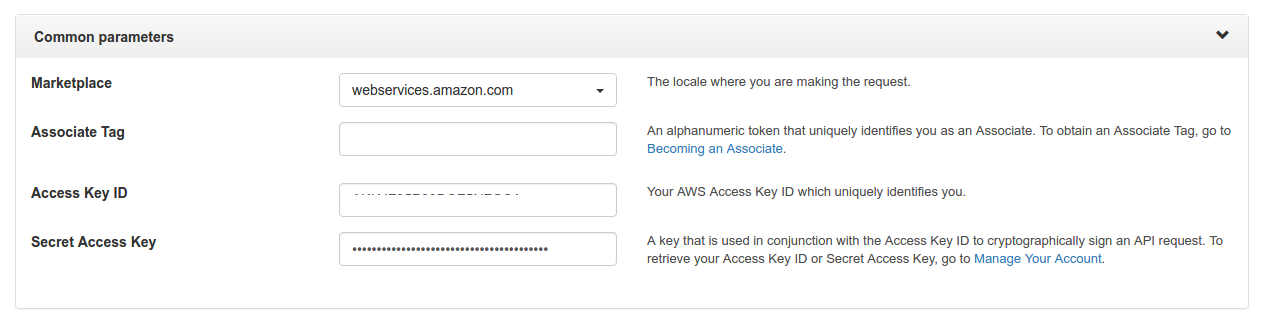
Supply the common parameters. This includes the Amazon website where you want to perform the request, your associate ID, access key, and secret key.
Next are the request parameters. This is where you can choose the category to search (search index), query (keywords), specific product data (response group) that you want to return, sorting, browse node, and any additional parameter that you wish to add to the request.

Click the Run request button to send the request.
Once you get a response back, it should show the following:
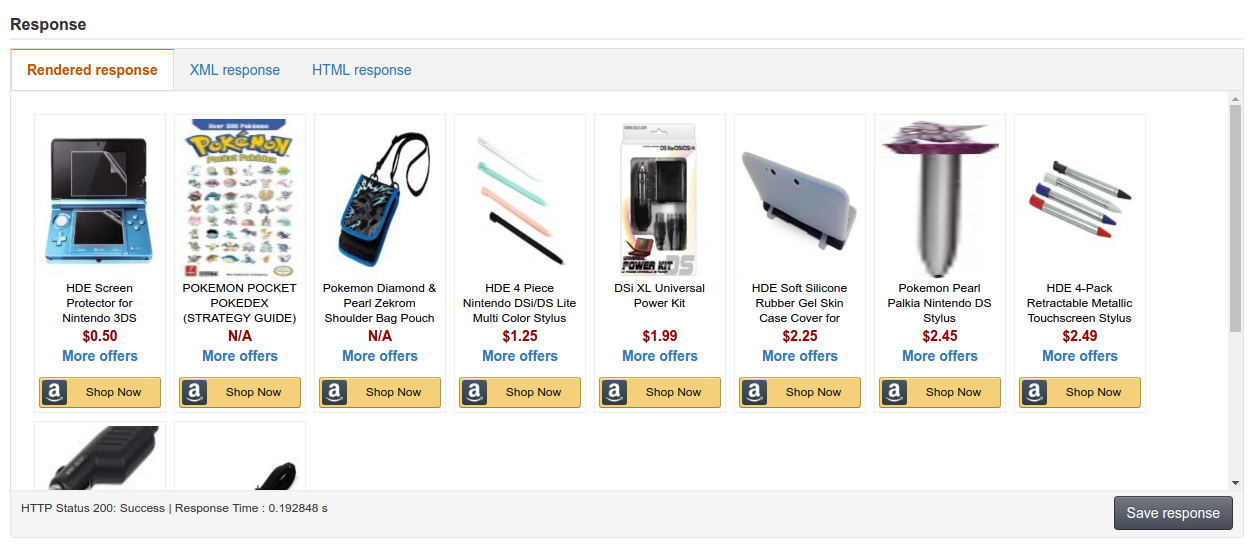
Note that the XML response is what you get from the API. The rendered response is the output of the code that’s in the HTML response tab, but it’s basically using the same data that’s in the XML response.
Making Requests to the API
In this section, you’ll take a look at how you can make requests to the API. You’ll be using Guzzle to do this. Let’s install it with Composer.
composer require guzzlehttp/guzzle:~6.0
Create an amazon-tester.php file and add the following code. Just hard-code the keys for now so you can test things quickly.
<?php
require 'vendor/autoload.php';

$client = new GuzzleHttp\Client();

$access_key = 'YOUR-ACCESS-KEY';
$secret_key = 'YOUR-SECRET-KEY';
$associate_tag = 'YOUR-ASSOCIATE-ID';

$timestamp = date('c');

$query = [
  'Service' => 'AWSECommerceService',
  'Operation' => 'ItemLookup',
  'ResponseGroup' => 'Medium',
  'IdType' => 'ASIN',
  'ItemId' => 'B00BGO0Q9O',
  'AssociateTag' => $associate_tag,
  'AWSAccessKeyId' => $access_key,
  'Timestamp' => $timestamp
];

ksort($query);

$sign = http_build_query($query);

$request_method = 'GET';
$base_url = 'webservices.amazon.com';
$endpoint = '/onca/xml';

$string_to_sign = "{$request_method}\n{$base_url}\n{$endpoint}\n{$sign}";
$signature = base64_encode(
  hash_hmac("sha256", $string_to_sign, $secret_key, true)
);

$query['Signature'] = $signature;

try {
  $response = $client->request(
    'GET', 'http://webservices.amazon.com/onca/xml',
    ['query' => $query]
  );

  $contents = new SimpleXMLElement($response->getBody()->getContents());
  echo "<pre>";
  print_r($contents);
  echo "</pre>";
} catch(Exception $e) {
  echo "something went wrong: <br>";
  echo $e->getMessage();
}
Breaking down the code above, first include the autoload file so you can use Guzzle, then create a new Guzzle client:
require 'vendor/autoload.php';

$client = new GuzzleHttp\Client();
Declare your access key, secret key, associate ID, as well as the current timestamp. Note that the API requires the timestamp to be in ISO 8601 date format.
$access_key = 'YOUR-ACCESS-KEY';
$secret_key = 'YOUR-SECRET-KEY';
$associate_tag = 'YOUR-ASSOCIATE-ID';

$timestamp = date('c');
Declare the query parameters to be supplied to the API. The only thing that’s constant here is the Service, AssociateTag, AWSAccessKeyId, and Timestamp. All the other parameters may change based on what operation you wish to perform. In this case, you’re performing an ItemLookup operation. As mentioned earlier, this operation allows you to get information on a single product based on a unique identifier. The most common product identifier used in Amazon products is the ASIN (Amazon Standard Identification Number). This number is unique to each Amazon Marketplace, which means that the same kind of item can have different ASIN throughout marketplaces. Supply the IdType parameter and give it a value of ASIN to specify that you want to use the ASIN as the product identifier. Then add the IdType to specify the value for the product identifier itself.
$query = [
  'Service' => 'AWSECommerceService',
  'Operation' => 'ItemLookup',
  'ResponseGroup' => 'Small',
  'IdType' => 'ASIN',
  'ItemId' => 'B00BGO0Q9O',
  'AssociateTag' => $associate_tag,
  'AWSAccessKeyId' => $access_key,
  'Timestamp' => $timestamp
];
You can get the ASIN of an item by simply looking at the URL or the page itself. For example, this item has the following URL:
http://www.amazon.com/Pokemon-Sun-Nintendo-3DS/dp/B01C93CWU6?ie=UTF8&keywords=pokemon&qid=1461061906&ref_=sr_1_9&sr=8-9
The ASIN is the string of characters that comes after dp/: B01C93CWU6. If you scroll down to the product’s details, you can see the ASIN as well.
Moving on, use ksort to sort the array keys alphabetically. This is also part of the API’s requirement.
ksort($query);
Generate a URL-encoded query string based on the array of query parameters:
$sign = http_build_query($query);
Next, you need to construct the signature for the request that you’ll be making. The signature consists of the request method, the base URL where the request will be made, the endpoint and the query parameters. Each of these should be separated by a new line.
$request_method = 'GET';
$base_url = 'webservices.amazon.com';
$endpoint = '/onca/xml';

$string_to_sign = "{$request_method}\n{$base_url}\n{$endpoint}\n{$sign}";
Generate a keyed hash value based on the string that you’ve just constructed by calling the hash_hmac method. This accepts the hashing algorithm as its first argument, the string to sign as its second, and a key for its third. The fourth argument is a boolean value for setting whether to output raw binary data (true) or lowercase hexits (false). You then use base64_encode so you can make the signature transportable.
$signature = base64_encode(
  hash_hmac("sha256", $string_to_sign, $secret_key, true)
);
Add the signature into the original query parameters:
$query['Signature'] = $signature;
Make the request:
try {
  $response = $client->request(
    'GET', 'http://webservices.amazon.com/onca/xml',
    ['query' => $query]
  );

  $contents = new SimpleXMLElement($response->getBody()->getContents());
  echo "<pre>";
  print_r($contents);
  echo "</pre>";
} catch (Exception $e) {
  echo "something went wrong: <br>";
  echo $e->getMessage();
}
Note that Guzzle handles converting the array of query parameters into query strings. It will also urlencode the values so you can just supply the array like you did above. Also note that the API returns an XML document, so in order to work with it you need to use the SimpleXMLElement class. This converts the XML document to a simpleXML object which you can work on.
$contents = new SimpleXMLElement($response->getBody()->getContents());
Here’s an example response that you get from the API.
Building an Amazon Product Searcher
Now it’s time to put your newfound skills to the test. You can do that by building a simple app that lets users search for Amazon products. Here’s what it’s going to look like:
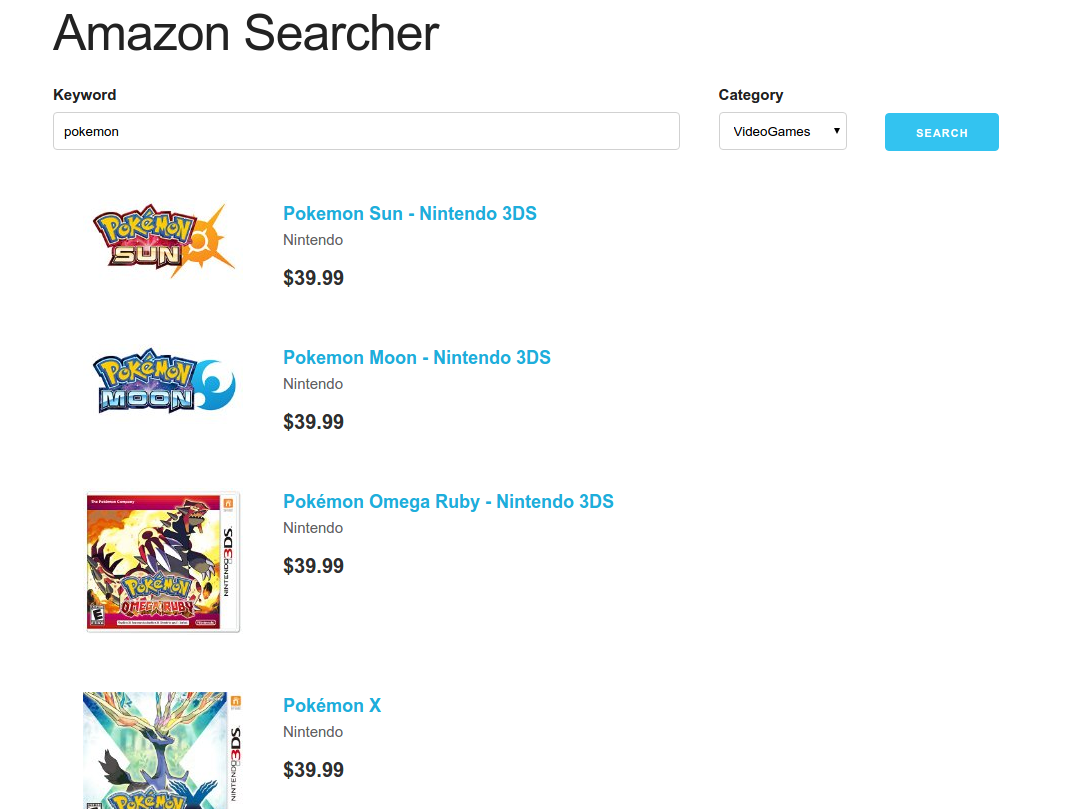
You can access the source code for this project in this Github repo.
Start by installing the dependencies. Create a composer.json file at the root of your working directory and add the following:
{
  "require": {
    "guzzlehttp/guzzle": "~6.0",
    "twig/twig": "^1.24",
    "vlucas/phpdotenv": "^2.2",
    "respect/validation": "^1.0"
  },
  "autoload": {
    "psr-4": {
      "Lib\\": "lib"
    }
  }
}
This will install Guzzle for making requests to the API, Twig for templating, phpdotenv for loading environment variables, and Respect for validating user input.
You’ll also be using a custom class for easily making requests to the Amazon API so you need to add the path to that class in the autoload object:
"autoload": {
  "psr-4": {
    "Lib\\": "lib"
  }
}
Create a lib/Amazon.php file and add the following:
<?php
namespace Lib;

use GuzzleHttp;

class Amazon
{
  public $common_params;

  private $access_key;
  private $secret_key;
  private $associate_tag;
  private $client;

  public function __construct($access_key, $secret_key, $associate_tag)
  {
    $this->access_key = $access_key;
    $this->secret_key = $secret_key;
    $this->associate_tag = $associate_tag;
    $this->common_params = [
      'Service' => 'AWSECommerceService',
      'Operation' => 'ItemSearch',
      'ResponseGroup' => 'Medium',
      'AssociateTag' => $associate_tag,
      'AWSAccessKeyId' => $access_key,
    ];
    $this->client = new GuzzleHttp\Client();
  }

  private function generateSignature($query)
  {
    ksort($query);

    $sign = http_build_query($query);

    $request_method = 'GET';
    $base_url = 'webservices.amazon.com';
    $endpoint = '/onca/xml';

    $string_to_sign = "{$request_method}\n{$base_url}\n{$endpoint}\n{$sign}";
    $signature = base64_encode(
        hash_hmac("sha256", $string_to_sign, $this->secret_key, true)
    );
    return $signature;
  }

  private function doRequest($query)
  {
    $timestamp = date('c');
    $query['Timestamp'] = $timestamp;
    $query = array_merge($this->common_params, $query);
    $query['Signature'] = $this->generateSignature($query);

    try {
      $response = $this->client->request(
        'GET', 'http://webservices.amazon.com/onca/xml',
        ['query' => $query]
      );
      $contents = new \SimpleXMLElement($response->getBody()->getContents());
      return $contents;
    } catch (Exception $e) {
      return [
        'error' => $e->getMessage()
      ];
    }
  }

  public function getSearchIndices()
  {
    return [
      'All',
      'UnboxVideo',
      'Appliances',
      'MobileApps',
      'ArtsAndCrafts',
      'Automotive',
      'Books',
      'Music',
      'Wireless',
      'Collectibles',
      'PCHardware',
      'Electronics',
      'KindleStore',
      'Movies',
      'OfficeProducts',
      'Software',
      'Tools',
      'VideoGames'
    ];
  }

  public function itemSearch($keywords, $search_index)
  {
    $query = [
      'Keywords' => $keywords,
      'SearchIndex' => $search_index
    ];

    $response = $this->doRequest($query);
    return $response;
  }

}
Breaking down the code above: create a new Guzzle client in the constructor by using the access key, secret key, and associate tag that was passed to it.
public function __construct($access_key, $secret_key, $associate_tag)
{
  $this->access_key = $access_key;
  $this->secret_key = $secret_key;
  $this->associate_tag = $associate_tag;
  $this->common_params = [
    'Service' => 'AWSECommerceService',
    'Operation' => 'ItemSearch',
    'ResponseGroup' => 'Medium',
    'AssociateTag' => $associate_tag,
    'AWSAccessKeyId' => $access_key,
  ];
  $this->client = new GuzzleHttp\Client();
}
When someone makes a request, the itemSearch method is called. The parameters required by the API are passed in as an argument.
public function itemSearch($keywords, $search_index)
{
  $query = [
    'Keywords' => $keywords,
    'SearchIndex' => $search_index
  ];

  $response = $this->doRequest($query);
  return $response;
}
The arguments are then passed to the doRequest method which is responsible for making the actual request to the API. This merges the array of common parameters with the argument that was passed to it. Then it calls the generateSignature method to generate the signature for the request. Finally, the result is added as one of the query parameters.
private function doRequest($query)
{
  $timestamp = date('c');
  $query['Timestamp'] = $timestamp;
  $query = array_merge($this->common_params, $query);
  $query['Signature'] = $this->generateSignature($query);

  try {
    $response = $this->client->request(
      'GET', 'http://webservices.amazon.com/onca/xml',
      ['query' => $query]
    );
    $contents = new \SimpleXMLElement($response->getBody()->getContents());
    return $contents;
  } catch (Exception $e) {
    return [
      'error' => $e->getMessage()
    ];
  }
}
The generateSignature method is responsible for generating the signature required by the API.
private function generateSignature($query)
{
  ksort($query);

  $sign = http_build_query($query);

  $request_method = 'GET';
  $base_url = 'webservices.amazon.com';
  $endpoint = '/onca/xml';

  $string_to_sign = "{$request_method}\n{$base_url}\n{$endpoint}\n{$sign}";
  $signature = base64_encode(
      hash_hmac("sha256", $string_to_sign, $this->secret_key, true)
  );
  return $signature;
}
You also have the getSearchIndices method which just returns hard-coded search index values.
public function getSearchIndices()
{
  return [
    'All',
    'UnboxVideo',
    'Appliances',
    'MobileApps',
    'ArtsAndCrafts',
    'Automotive',
    'Books',
    'Music',
    'Wireless',
    'Collectibles',
    'PCHardware',
    'Electronics',
    'KindleStore',
    'Movies',
    'OfficeProducts',
    'Software',
    'Tools',
    'VideoGames'
  ];
}
Create a .env file at the root of your working directory and add your Amazon associate ID, access key and secret key.
APP_TITLE="Amazon Searcher"
ASSOCIATE_TAG=YOUR-ASSOCIATE-ID
ACCESS_KEY=YOUR-AMAZON-ACCESS-KEY
SECRET_KEY=YOUR-AMAZON-SECRET-KEY
Create an index.php file at the root of your working directory and add the following:
<?php
require 'vendor/autoload.php';

use Respect\Validation\Validator as v;

$dotenv = new Dotenv\Dotenv(__DIR__);
$dotenv->load();

$access_key = getenv('ACCESS_KEY');
$secret_key = getenv('SECRET_KEY');
$associate_tag = getenv('ASSOCIATE_TAG');

$amazon = new Lib\Amazon($access_key, $secret_key, $associate_tag);
$search_indices = $amazon->getSearchIndices();

$items = [];
$keyword = '';
$search_index = '';
$has_searched = false;

if (!empty($_GET['keyword'])) {
  $keyword = $_GET['keyword'];
  $search_index = $_GET['search_index'];
  $has_searched = true;

  $keyword_validator = v::alnum()
    ->noWhitespace()
    ->length(3, 80);
  if ($keyword_validator->validate($_GET['keyword']) && in_array($search_index, $search_indices)) {
    $response = $amazon->itemSearch($keyword, $search_index);
    $items = $response->Items->Item;
  }
}

$loader = new Twig_Loader_Filesystem('templates');
$twig = new Twig_Environment($loader, [
  'cache' => 'cache',
  'auto_reload' => true
]);

$selected_filter = new Twig_SimpleFilter('selected', function ($string) {
  $exploded_string =  explode(',', $string);
  $selected_value = $exploded_string[0];
  $current_value = $exploded_string[1];
  return ($selected_value == $current_value) ? 'selected' : '';
});

$twig->addFilter($selected_filter);

$template = $twig->loadTemplate('index.html');
echo $template->render([
  'app_title' => getenv('APP_TITLE'),
  'search_indices' => $search_indices,
  'keyword' => $keyword,
  'search_index' => $search_index,
  'items' => $items,
  'has_searched' => $has_searched
]);
?>
Breaking it down.
First, get the access key, secret key, and associate tag from the .env file:
$dotenv = new Dotenv\Dotenv(__DIR__);
$dotenv->load();

$access_key = getenv('ACCESS_KEY');
$secret_key = getenv('SECRET_KEY');
$associate_tag = getenv('ASSOCIATE_TAG');
Create a new instance of the Amazon class and retrieve the search indices from it.
$amazon = new Lib\Amazon($access_key, $secret_key, $associate_tag);
$search_indices = $amazon->getSearchIndices();
Assign default values for the variables that you’ll be using on the template. $items represent the array of items in the search results, $keyword represents the value entered by the user, $search_index is the search index selected by the user, and $has_searched is a boolean value representing whether the user has searched for anything or not.
$items = [];
$keyword = '';
$search_index = '';
$has_searched = false;
Check if the user has searched. If true, update the default values that you’ve assigned earlier, validate the user input, and search for the products that match the user’s query.
if (!empty($_GET['keyword'])) {
  $keyword = $_GET['keyword'];
  $search_index = $_GET['search_index'];
  $has_searched = true;

  $keyword_validator = v::alnum()
    ->noWhitespace()
    ->length(3, 80);
  if ($keyword_validator->validate($_GET['keyword']) && in_array($search_index, $search_indices)) {
    $response = $amazon->itemSearch($keyword, $search_index);
    $items = $response->Items->Item;
  }
}
Initialize Twig. Here, you specify the directory in which the templates are stored. In this case, it’s the templates directory.
$loader = new Twig_Loader_Filesystem('templates');
Configure the Twig environment by specifying the directory in which to store the cache, and auto_reload to automatically clear the cache when you make changes to either the file supplying the data for your template or the template itself.
$twig = new Twig_Environment($loader, [
  'cache' => 'cache',
  'auto_reload' => true
]);
Add a custom filter for setting the selected value for the search indices select box:
$selected_filter = new Twig_SimpleFilter('selected', function ($string) {
  $exploded_string =  explode(',', $string);
  $selected_value = $exploded_string[0];
  $current_value = $exploded_string[1];
  return ($selected_value == $current_value) ? 'selected' : '';
});

$twig->addFilter($selected_filter);
Supply the data and render the page:
$template = $twig->loadTemplate('index.html');
echo $template->render([
  'app_title' => getenv('APP_TITLE'),
  'search_indices' => $search_indices,
  'keyword' => $keyword,
  'search_index' => $search_index,
  'items' => $items,
  'has_searched' => $has_searched
]);
Here’s the code for the template (templates/index.html):
<!DOCTYPE html>
<html lang="en">
<head>
  <meta charset="UTF-8">
  <title>{{ app_title }}</title>
  <link rel="stylesheet" href="assets/skeleton/css/skeleton.css">
  <link rel="stylesheet" href="assets/css/style.css">
</head>
<body>
  <div id="wrapper" class="container">
    <header>
      <h1>{{ app_title }}</h1>
    </header>
    <main>
      <div id="filter-container">
        <form>
          <div class="row">
            <div class="eight columns">
              <label for="keyword">Keyword</label>
              <input type="text" name="keyword" id="keyword" class="u-full-width" value="{{ keyword }}" placeholder="Keyword">
            </div>
            <div class="two columns">
              <label for="search_index">Category</label>
              <select name="search_index" id="search_index" class="u-full-width">
              {% for index in search_indices %}
                {% set data = search_index ~ "," ~ index %}
                <option value="{{ index }}" {{ data | selected }}>{{ index }}</option>
              {% endfor %}
              </select>
            </div>
            <div class="two columns">
              <button class="button-primary" id="search-button">search</button>
            </div>
          </div>
        </form>
      </div>
      {% if items %}
      <div id="results-container">
        {% for item in items %}
        <div class="item">
          <div class="item-image-container">
            <img src="{{ item.MediumImage.URL }}" alt="{{ item.ItemAttributes.Title }}" class="item-image">
          </div>
          <div class="item-details-container">
            <a href="{{ item.DetailPageURL }}" class="item-title">
              <strong>{{ item.ItemAttributes.Title }}</strong>
            </a>
            <div class="item-brand">{{ item.ItemAttributes.Brand }}</div>
            <div class="item-price">{{ item.ItemAttributes.ListPrice.FormattedPrice }}</div>
          </div>
        </div>
        {% endfor %}
      </div>
      {% elseif has_searched %}
        No results found
      {% endif %}
    </main>
  </div>
</body>
</html>
Breaking it down, link to the stylesheets stored in the assets directory:
<link rel="stylesheet" href="assets/skeleton-css/css/skeleton.css">
<link rel="stylesheet" href="assets/css/style.css">
You’re going to create style.css later but for the skeleton.css you can create a .bowerrc file at the root of your working directory and add the following:
{
  "directory": "assets"
}
Then, install Skeleton by executing the following command in the terminal:
bower install skeleton-css --save
Note that this requires bower to be installed. If you don’t want to bother with it, you can just link to what they have on cdnjs, or completely avoid all NodeJS stuff by using BowerPHP.
For the main content, there are two sections: one for the form for searching products, and one for the search results:
<div id="filter-container">
  ...
</div>
<div id="results-container">
  ...
</div>
The form has only two fields: one for entering a query and one for selecting the search index.
<div class="eight columns">
  <label for="keyword">Keyword</label>
  <input type="text" name="keyword" id="keyword" class="u-full-width" value="{{ keyword }}" placeholder="Keyword">
</div>
<div class="two columns">
  <label for="search_index">Category</label>
  <select name="search_index" id="search_index" class="u-full-width">
  {% for index in search_indices %}
    {% set data = search_index ~ "," ~ index %}
    <option value="{{ index }}" {{ data | selected }}>{{ index }}</option>
  {% endfor %}
  </select>
</div>
Inside the loop for going through all the search indices, use the selected filter that you’ve defined earlier. Here, you’re joining the currently selected search index with the search index value of the current option. The comma is used as the divider so that the filter can separate it.
{% for index in search_indices %}
  {% set data = search_index ~ "," ~ index %}
  <option value="{{ index }}" {{ data | selected }}>{{ index }}</option>
{% endfor %}
Clicking the search button will trigger the form submission.
<div class="two columns">
  <button class="button-primary" id="search-button">search</button>
</div>
Once you get a response from the API, it should fill the items variable with an array of items, which you then loop through:
{% if items %}
<div id="results-container">
  {% for item in items %}
  <div class="item">
    <div class="item-image-container">
      <img src="{{ item.MediumImage.URL }}" alt="{{ item.ItemAttributes.Title }}" class="item-image">
    </div>
    <div class="item-details-container">
      <a href="{{ item.DetailPageURL }}" class="item-title">
        <strong>{{ item.ItemAttributes.Title }}</strong>
      </a>
      <div class="item-brand">{{ item.ItemAttributes.Brand }}</div>
      <div class="item-price">{{ item.ItemAttributes.ListPrice.FormattedPrice }}</div>
    </div>
  </div>
  {% endfor %}
</div>
{% elseif has_searched %}
  No results found
{% endif %}
Finally, here’s the stylesheet (css/style.css) for the page:
#search-button {
  margin-top: 30px;
}

.item {
  overflow: hidden;
  padding: 10px;
  margin-bottom: 30px;
}

.item-image-container {
  width: 200px;
  margin-right: 20px;
  text-align: center;
  float: left;
}

.item-details-container {
  width: 700px;
  float: left;
}

.item-title {
  font-size: 18px;
  text-decoration: none;
}

.item-brand {
  color: #626262;
}

.item-price {
  font-size: 20px;
  font-weight: bold;
  margin-top: 10px;
  color: #2F2F2F;
}
Conclusion
In this tutorial, you’ve taken a look at Amazon’s Product Advertising API and how you can use it to get information about products sold on Amazon. We’ve gone through the API’s basics, and ended up building a simple, well constructed application for searching Amazon items.
If you want to learn more, check out the programming guide in the official docs where the above covered topics are explored more deeply. I recommend you check out the Best Programming Practices page as well, so that you can maximize the use of the API.
Now that we’ve explored the API, here’s some homework for you: try to get the average rating of an individual product in the least possible amount of time. The best solution gets turned into a paid tutorial!