Getting Started with Fuse

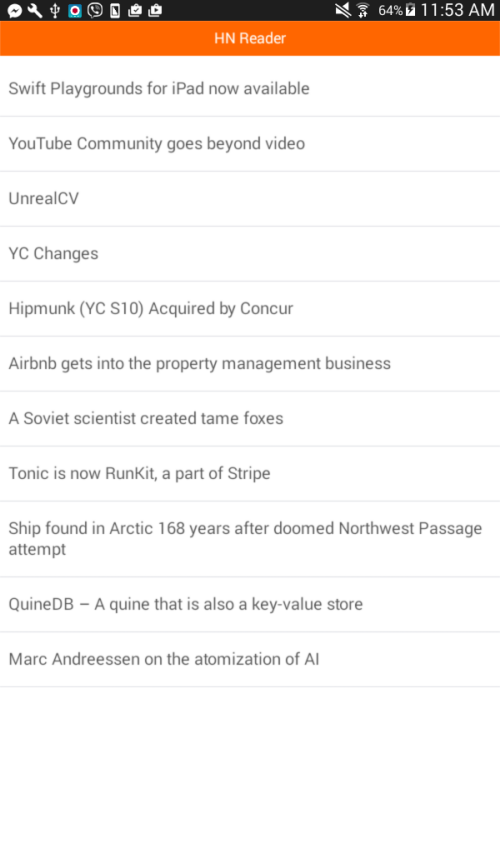
In this tutorial we’ll be creating a Hacker News Reader app with Fuse, a tool for developing cross-platform apps that runs on both Android and iOS devices. You can find the source code of the project on Github. Here’s what the final output will look like:
What is Fuse?
In a nutshell, Fuse is a tool for building cross-platform apps using JavaScript. If you’re familiar with React Native and NativeScript, the idea behind Fuse is pretty similar. It uses a JavaScript VM to run JavaScript, UI components are converted to native UI, and it allows access to the different platform APIs. The motivation behind it is to create a tool that’s both developer- and designer-friendly. And from what I’ve seen so far, I can say that they’re really on the right track. Some of the highlights of Fuse includes native UI performance, powerful and expressive animation, and instant live-reloading across multiple devices.
Installing Fuse
To get started with Fuse, you first have to install the Android SDK for Android development and XCode for iOS. Here are two links to help you out with that:
If your machine has already been previously set up for Android or iOS development, you can skip this step.
Once you’ve installed the Android SDK or XCode, download the Fuse installer from the downloads page. Just enter your email address, accept the license agreement and click on the “Let’s Fuse” button. Once you’ve done that, it should show you the buttons for downloading the installer for each development platform. Download the one applicable to you. But for this tutorial we’ll be using the Windows version.
Once you’ve downloaded the Fuse installer, click it to begin installing. The installer should handle installing the dependencies as well, so it might take a while depending on your internet connection.
Creating a New Project
You can create a new project by launching the Fuse dashboard and click on the “New Project” button. This will ask for the project name and the path to where to save the project.
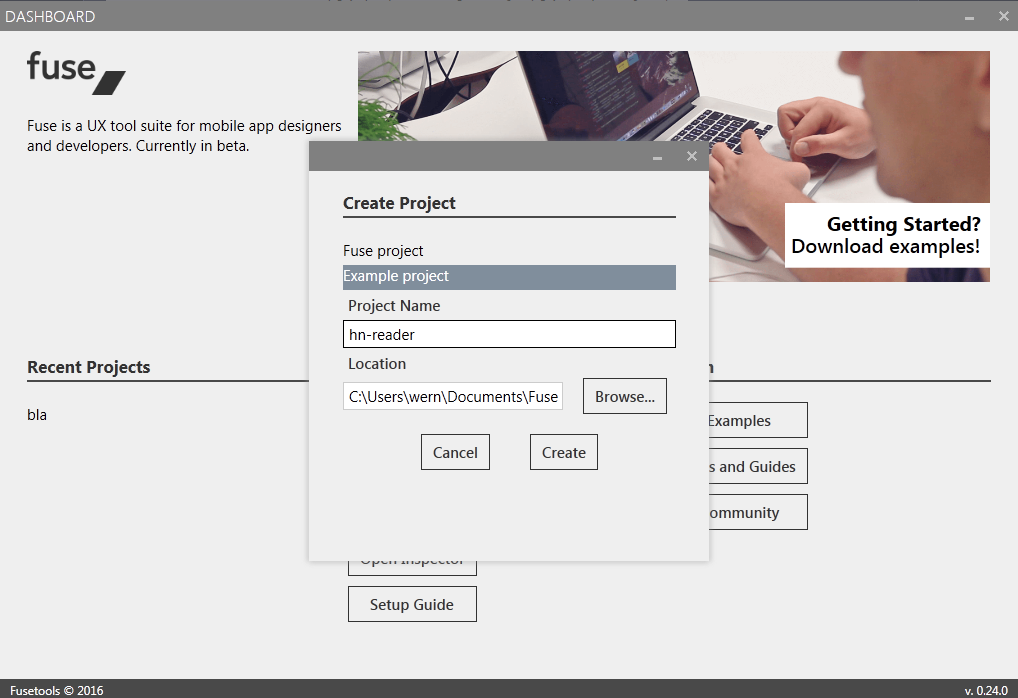
Once the project is created, it should get listed under “Recent Projects” in the dashboard. Click on that and click on “Open in Sublime Text 3”. Fuse has some nice integrations with Sublime Text so it’s the text editor that I recommend when working with Fuse projects. But in order for these integrations to work, you first have to install the Fuse plugin using package control. Once installed, it should add features like code completion and showing the build result so you know exactly what’s wrong with your code. If you’re new to Sublime Text, you can download it here. Package control install instructions can be found here. Once that’s done, you can install the Fuse package by pressing ctrl + shift + P on your keyboard and selecting Package Control: Install Package. From there you can search for “Fuse” and select the first result that shows up.
Development Tools
Before we create the app. Let’s first go through the development tools that comes with Fuse. Knowing how to use each of these tools will save you headaches along the way.
Start by opening the MainView.ux file. It should contain some default code which you could run and play around with. You can do that by going to the Fuse dashboard, and with your project selected, click on the “Preview” button and select “Local”. This should open a new command line window which will launch the Preview Tool.
The Preview Tool allows you to view what your app looks like. As you make changes to the code, the preview will be updated as well. And it does this very fast, this makes Fuse a joy to work with because you can see your changes instantly after you save the file.
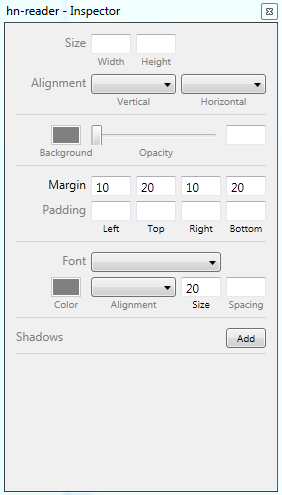
Once the preview is launched, you should see the default app. You can make changes to it by clicking on Fuse -> Design Mode and then Fuse -> Open Inspector. This will open a new window that allows you to make changes to the styling of the element that you selected on the preview. For example, you can change the width, height, background color, and font-size.
Do note that you can’t interact with the app while you’re in design mode because it allows you to change the styles of any element that you select on the preview. This is why interactions are locked while on design mode, to prevent the UI from changing.
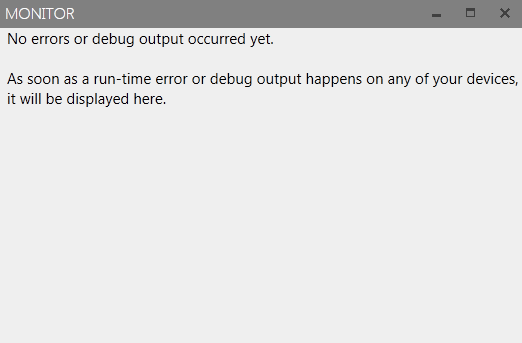
Another tool which you can use is the Monitor Tool. Click on Fuse -> Open Monitor to open it. This should show a new window which logs all the errors that occured in the app. You can also log your own by calling the debug_log() function from your code. This function is pretty much like the console.log() that you’re used to in the browser. Though you can only output strings with it. So you have to use JSON.stringify() if you want to inspect the contents of an object.
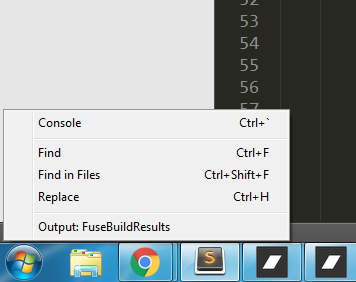
Another tool you should familiarize yourself with is the Build Result. This is integrated with Sublime Text, and you can find it by clicking on the box icon on the bottom-left part of the screen. It should open a context menu, select “Output: FuseBuildResults” and it will open the log console that shows the build results everytime you save the file. If there’s an error with your code, it should show in there. That way you know what’s wrong with your code, and which specific line is the problem, so you can fix it. A good way to test that the last change that you performed caused the error is if the UI doesn’t update even after adding a new element.
Common errors include mispelled attribute names for components, trying to include a package that’s not available, and syntax errors on your JavaScript code.
Building the App
Now that you’re familiar with the tools that Fuse offers, it’s now time to build the app. As mentioned earlier, we will be building a Hacker News Reader app. It’s going to list the top ten news from the Hacker News API, and will allow the user to view the web page that each news item links to.
With the MainView.ux still open, clear all the default code. Start by adding the <app> element. Every page in Fuse starts with this element.
</app><app>
</app>
Create a link to the app-wide JavaScript file:
<javascript File="js/App.js"></javascript>This file is inside the js/ directory in the root of the project, and contains the following code:
const app_title = 'HN Reader';
const Observable = require("FuseJS/Observable");
var current_page = Observable("news_items");
var current_url = Observable("");
var title = Observable(app_title);

function navigatePage(context) {
    if(context.data.url){
        current_url.value = context.data.url;
        title.value = context.data.title.substring(0, 20) + '...';
        current_page.value = 'web_page';
    }else{
        title.value = app_title;
        current_page.value = 'news_items';
    }
}

module.exports = {
    title: title,
    navigatePage: navigatePage,
    current_page: current_page,
    current_url: current_url
};
Breaking down the code above, first we define some default values that will be used by the app. This includes the title that will be displayed on the header, the current page that the user is currently viewing, and the URL of the web page that’s used by the WebView. These values are all set as observable values using FuseJS/Observable, a built-in library in Fuse that allows you to use two-way data-binding. This means that when you change the value of each of these observable variables in the code, it will also get reflected in the UI and vise-versa.
// js/App.js
const app_title = 'HN Reader';
const Observable = require("FuseJS/Observable");
var current_page = Observable("news_items");
var current_url = Observable("");
var title = Observable(app_title);
Define the function for navigating between the news items page and the actual news page (WebView). Here we’re updating the value of the current_url if context.data.url is present in the argument that was passed in the function. We also take the first 20 characters from the title of the news item and then set the current_page to web_page. This allows us to navigate to the page that displays the WebView. Otherwise, set the current_page to the news_items page and set the title back to the title of the app.
// js/App.js
function navigatePage(context) {
    if(context.data.url){
        current_url.value = context.data.url;
        title.value = context.data.title.substring(0, 20) + '...';
        current_page.value = 'web_page';
    }else{
        title.value = app_title;
        current_page.value = 'news_items';
    }
}
So that you could refer to the variables in your UI, you need to use module.exports to make them available:
// js/App.js
module.exports = {
    title: title,
    navigatePage: navigatePage,
    current_page: current_page,
    current_url: current_url
};
Going back to the MainView.ux file, add the following right below the link to js/App.js file. This component automatically handle transition effects when navigating between pages.
<pagecontrol Active="{current_page}">
</pagecontrol>
Inside, define all the pages used throughout your app. Here we only have two: news_items and web_page. Earlier in the <pagecontrol> component, we have added an Active attribute whose value is the current value of the current_page variable. On the js/App.js file, we’ve set this to news_items which means it will use the news items page as its default page. If you want to navigate to the web_page page, you can simply update the value of current_page to web_page. Fuse will automatically handle the transition effects for you. By default it will use a sliding animation.
<page Name="news_items">
</page>

<page Name="web_page">
</page>
News Items Page
Let’s first look at the contents of the news items page. Here we wrap everything in <dockpanel>. This allows us to dock elements in a specific position. By default this is set to Fill which consumes the entire screen.
</dockpanel><dockpanel>
</dockpanel>
Next, link to the js/NewsItems.js file. This is the JavaScript used only by the news items page.
<javascript File="js/NewsItems.js"></javascript> Here are the contents of the file:
const Observable = require("FuseJS/Observable");
var loader_opacity = Observable('1');

var news_items = Observable();

const TOP_STORIES_URL = 'https://hacker-news.firebaseio.com/v0/topstories.json';

var story_promises = [];

fetch(TOP_STORIES_URL)
.then(function(response) { return response.json(); })
.then(function(top_stories) {

    for(var x = 0; x < = 10; x++){
        const story_url = "https://hacker-news.firebaseio.com/v0/item/" + top_stories[x] + ".json";

        const p = fetch(story_url)
        .then(function(response) { return response.json(); })
        .then(function(news) {
            news_items.add({
                title: news.title,
                url: news.url,
                time: news.time
            });
        });

        story_promises.push(p);
    }

    Promise.all(story_promises).then(function(){
        loader_opacity.value = 0;
    });

})
.catch(function(error) {
    console.log('There has been a problem with your fetch operation: ' + error.message);
});

module.exports = {
    news_items: news_items,
    loader_opacity: loader_opacity
};
Breaking down the code above, we use the Observable library again. Note that each instance of the <JavaScript> component in Fuse has its own context, this means that even if we used Observable earlier, it won’t be available here. The same is true with any of the observable variables that we defined.
// js/NewsItems.js
const Observable = require("FuseJS/Observable");
Set the value for the loader opacity. This is the opacity for the loading animation that we will show to the user when they open the app. We need to set it to 1 by default because the news items needs to be loaded from the API first. So while the app is loading the data, we show the animation to the user. Later on we’ll update it’s value to 0 to hide it from the user’s view.
// js/NewsItems.js
var loader_opacity = Observable('1');
Initialize an observable list:
// js/NewsItems.js
var news_items = Observable();
Add the URL for the top stories endpoint of the Hacker News API and an array for storing the promises that will be returned by each fetch() call.
// js/NewsItems.js
const TOP_STORIES_URL = 'https://hacker-news.firebaseio.com/v0/topstories.json';
var story_promises = [];
Make a request to the top stories endpoint using the fetch API:
// js/NewsItems.js
fetch(TOP_STORIES_URL)
.then(function(response) { return response.json(); })
.then(function(top_stories) {


})
.catch(function(error) {
    console.log('There has been a problem with your fetch operation: ' + error.message);
});
This will return an array containing the ID’s of the top stories from Hacker News. We only need the first ten, so we use a for loop to loop through the first ten items. On each iteration, construct the URL for the endpoint which returns the details for each individual news item. Once the URL is constructed, make a separate request for each item and then add it to the observable list that we created earlier. Each promise is also pushed to the story_promises array.
// js/NewsItems.js
for(var x = 0; x < = 10; x++){
    const story_url = "https://hacker-news.firebaseio.com/v0/item/" + top_stories[x] + ".json";

    const p = fetch(story_url)
    .then(function(response) { return response.json(); })
    .then(function(news) {
        news_items.add({
            title: news.title,
            url: news.url
        });
    })
    .catch(function(error) {
        console.log('There has been a problem with your fetch operation: ' + error.message);
    });

    story_promises.push(p);
}
This allows us to determine when exactly should we hide the loading animation. Promise.all accepts an array of promises, and if all of the promises gets resolved, the function that you passed to then() gets executed. This is where we hide the loader by setting its opacity to 0.
// js/NewsItems.js
Promise.all(story_promises).then(function(){
    loader_opacity.value = 0;
});
Don’t forget to export the values that you need in the UI:
// js/NewsItems.js
module.exports = {
    news_items: news_items,
    loader_opacity: loader_opacity
};
Going back to the MainView.ux file, add the placeholder for the status bar. This is because Fuse automatically occupies the whole screen. If you don’t add this, the status bar won’t be visible.
<StatusBarBackground Dock="Top" />Add the header using a <stackpanel>. In Fuse, use a </stackpanel><stackpanel> as a container if you want to stack its children on top of each other (for vertical orientation). Set its Dock attribute to Top so that it will be placed right below the status bar.
</stackpanel><stackpanel Dock="Top" Color="#FF6600">
    <text FontSize="18" Margin="0,10,0,10" Alignment="VerticalCenter" TextAlignment="Center" TextColor="#FFF" Value="{title}"></text>
</stackpanel>
Use a <scrollview> so that a vertical scroll bar is automatically generated if the news items goes over the available space. In Fuse, you use the <each> component to generate a list. For each list item, we create a <panel> which when clicked executes the navigatePage function that we defined earlier. We don’t really need to pass anything to this function because the context in which it is called is automatically passed in as the first argument. This is why we were checking for the value of context.data.url earlier in the js/App.js file.
<scrollview>
    <stackpanel Alignment="Top">
        <each Items="{news_items}">
            <panel Clicked="{navigatePage}" Alignment="VerticalCenter">
                <text Margin="10,20,10,20" TextWrapping="Wrap" FontSize="20" Value="{title}"></text>
            </panel>
            <rectangle Height="1" Fill="#dcdee3"></rectangle>
        </each>
    </stackpanel>
</scrollview>
Web Page
We now move on to the contents of the web page. Just like the news items page, we’re wrapping everything in a <dockpanel> and add the <statusbarbackground> as well. The header is a bit different because this time we have a <text> element which when Clicked or pressed executes the navigatePage button. Since this is executed from the UI, it will also pass in context.data as an argument. The only difference is that there’s no url so the else condition of the navigatePage function will get executed. Which means it will actually go back to the news items page.
<dockpanel>
    <statusbarbackground Dock="Top"></statusbarbackground>
    <wrappanel Dock="Top" Color="#FF6600">
        <text FontSize="18" Margin="10,10,0,10" Alignment="Left" TextAlignment="Left" TextColor="#FFF" Value="Back" Width="100" Clicked="{navigatePage}"></text>

        <text FontSize="18" Alignment="VerticalCenter" TextAlignment="Center" TextColor="#FFF" Value="{title}"></text>
    </wrappanel>
</dockpanel>
Define a re-usable component by supplying a ux:Class attribute. The value that you give to this will be the name of the component which will inherit from this component.
<panel ux:Class="LoadingBar" Width="5%" Height="10" Color="#fc0" Alignment="Left"></panel>Use the component which you just created. All the styles that you defined gets inherited by this component. This will serve as the progress loader for the web page. Supply a ux:Name so you could change the Width later on.
<loadingbar Dock="Top" ux:Name="_loadingBar"></loadingbar>Lastly, use the WebView component to display the news item selected by the user. Note that this component needs to be wrapped inside a <nativeviewhost> because it’s using the native WebView in the device. This also means that you can’t test it using the Preview tool. Also take note of the use of <progressanimation> component. This allows us to change the value of the loading bar to 100% over the course of the page load. This gives the user an idea how much longer to wait for the page to fully load.
<panel>
    <nativeviewhost>
        <webview Dock="Fill" Url="{current_url}" ux:Name="webpage">
            <progressanimation>
                <change _loadingBar.Width="100%"></change>
            </progressanimation>
        </webview>
    </nativeviewhost>
</panel>
Simultaneous Animations
As you’ve seen above, Fuse really shines when it comes to animations. As a bonus, let’s see how we can implement two kinds of animation in one go. This section is optional. You can skip to Running the App if you wish.
Start by creating a loader box using a <rectangle> component. Don’t be confused by its naming, you can actually create a square by setting its Width and Height to the same value. Inside it is where the default scale and rotation is defined. Scaling Factor is set to 1 which means that the default scale is the Width and Height that you defined. Rotation Degrees is set to 0 which means it isn’t rotated. We add a ux:Name property to each one so that we could control the values using an animation timeline.
</rectangle><rectangle Width="50" Height="50" Fill="#FA983C" Opacity="{loader_opacity}">
    <scaling ux:Name="loaderScale" Factor="1"></scaling>
    <rotation ux:Name="loaderRotate" Degrees="0"></rotation>
</rectangle>
Next, we define the animation timeline for the loader box. PlayMode="Wrap" means that the animation will execute infinitely. By default this is set to Once which means that the animation won’t restart once it’s over. To change the value for the scale and rotation, use the Change operator. Then use the ux:Name that you added earlier to the animation properties of the loader box. Here we’re setting the scale factor to 1.5 to increase the size of the box to half of its original size. And then rotate it 360 degrees. These two animations are executed at the same time over the course of 1 second. You can also specify the Easing, but I’ll be leaving it to you to explore what QuadraticInOut does.
<timeline PlayMode="Wrap">
    <change loaderScale.Factor="1.5" Duration="1" Easing="QuadraticInOut"></change>
    <change loaderRotate.Degrees="360" Duration="1" Easing="QuadraticInOut"></change>
</timeline>
Running the App
You can run the app on your device by compiling a debug version:
fuse build --target=AndroidOnce it’s done compiling, you can find the .apk file inside build/Android/Debug directory. Copy it into your device, install it then run it.
Conclusion
That’s it! In this tutorial you’ve learned about Fuse, an exciting new tool in the world of native mobile app development. As you have seen, Fuse really makes it a joy to develop mobile apps. This is due to the following features:
- Super fast auto-reload functionality. This helps in designer and developer productivity.
- Makes it possible to build apps that can run on both iOS and Android devices.
- Design-mode which makes it easy to alter the design through a GUI.
- Monitor tool which helps developers in debugging their app.
- Animations are done using a declarative markup. This makes it very easy for designers to implement animations.
Currently, Fuse is still on beta so it might not be ready yet for complex projects. Though if you only need to build simple apps like the one we just built, there should be no problem using Fuse.


