A Pokemon Crash Course on CouchDB

In this tutorial, we’ll walk through working with CouchDB, a NoSQL database from Apache. This tutorial will focus more on the practical side, so we won’t cover what CouchDB is good for, how to install it, why use it, etc. We’ll focus on how to perform database operations through CouchDB’s HTTP API and how to work with it in PHP, laying the foundation for future, more complex posts.
We’ll assume you’ve already set up CouchDB and Futon (CouchDB’s web-based administration console) on your machine. If you’d like to follow along, we recommend you use our HI box.

Note: for simplicity, we’ll refer to our local machine with localhost here, but if you’re using a fully configured VM you probably have a custom vhost and local domain set up, along with forwarded ports. With Homestead Improved it’s just a matter of listing the ports you want forwarded in the Homestead.yaml configuration file before provisioning the virtual box.
Creating a Database
To create a new CouchDB database, visit Futon at http://localhost:5984/_utils/. You’ll see the following interface:
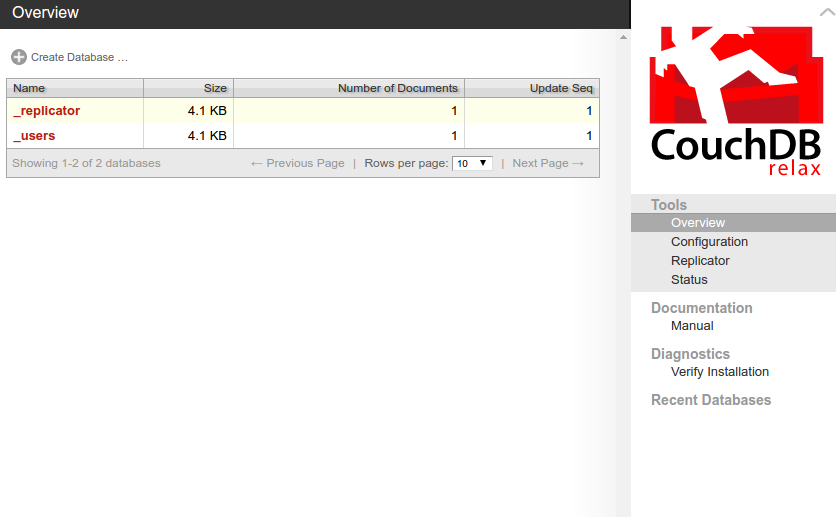
Click on create database, enter a database name and click on create to create the database.
Once created, you’ll be greeted with the following screen:
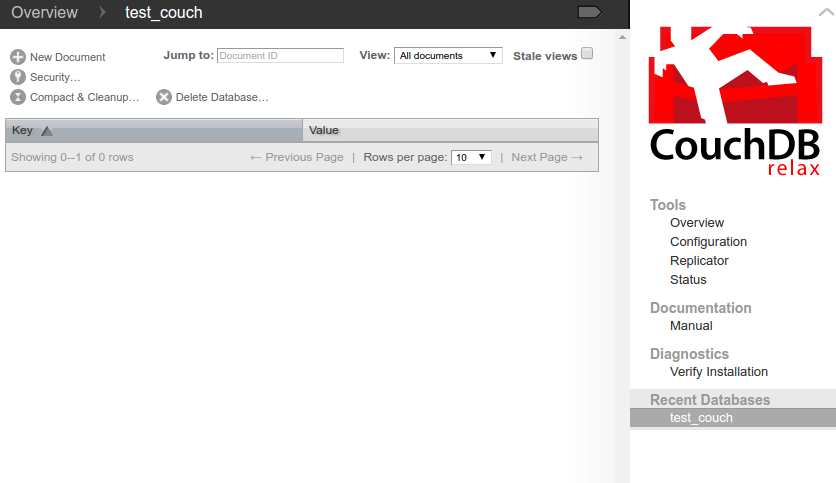
Notice that there’s only an option to create a new document. In CouchDB, a document is the equivalent of a table row in a relational database. So, how do we create tables?
If you’re coming from a NoSQL database such as MongoDB, the first thing that you have to know is that there’s no such thing as collections or tables in CouchDB. There are only documents. However, this doesn’t mean that you can only store one type of data per database. Since each document that you create in CouchDB doesn’t belong to any table, you can have a different structure for each type of data. For example, if you want to store user data, you can have a structure similar to the following:
{
    "id": 123,
    "fname": "doppo",
    "lname": "kunikida",
    "pw": "secret",
    "hobbies": ["reading", "sleeping"]
}
On the other hand, if you want to store blog post information, you can have the following structure:
{
    "title": "The big brown fox",
    "author": "fox",
    "text": "Lorem ipsum dolor sit amet, consectetur adipisicing elit. Earum, quasi in id voluptates. Natus qui iure corporis ea voluptatem eius, possimus optio modi facere blanditiis quo, sequi suscipit eos nostrum.",
    "publish_date": "2016-07-07"
}
To make it easier to query a specific type of document (e.g. users, blog posts) you can add a field for storing the type of document:
{
    "id": "123",
    "fname": "doppo",
    "lname": "kunikida",
    "pw": "secret",
    "hobbies": ["reading", "sleeping"],
    "type": "users"
}
Note that type isn’t a special type of field. This is only used for convenience.
Talking to the HTTP API
Since CouchDB exposes an HTTP API, we can also use curl to create a database:
curl -X PUT http://localhost:5984/<database name>
Executing the above command should return the following:
{"ok":true}
CouchDB returns JSON strings as the response. This makes it very easy to use in both the browser and on the server side of things.
We recommend Postman for experimentation during this tutorial, as it allows for easy communication with CouchDB’s HTTP API. If you’re new to Postman, this intro might help: API Building and Testing Made Easier with Postman.
Creating New Documents
To create new documents, we need to send a POST request to the database we’ve created:
http://localhost:5984/test_couch
When sending a request to CouchDB, one should always remember the following:
- Specify the
Content-Typeofapplication/jsonin the header when passing in some data throughPOST,PUTorDELETE. - Wrap strings in double quotes.
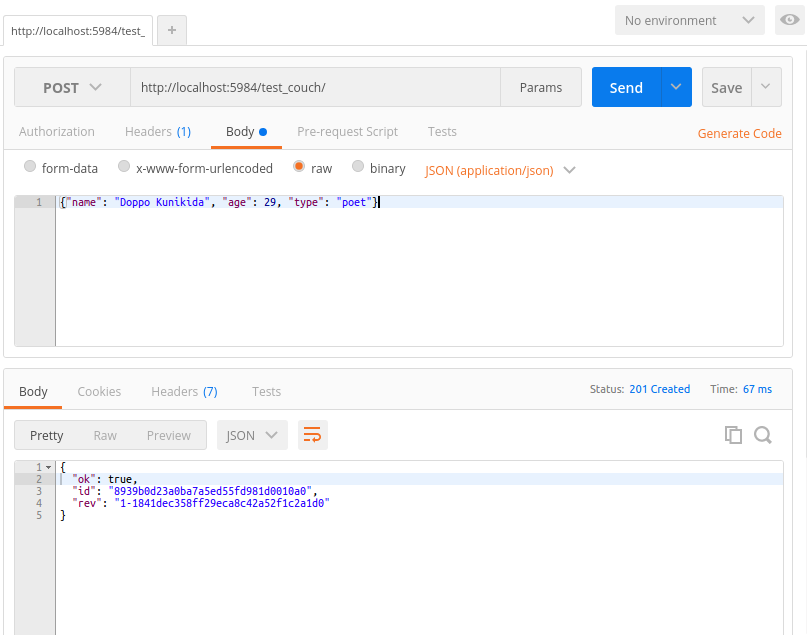
Here’s an example request for creating a new document:
Bulk Insert
To insert multiple rows of data in a single request:
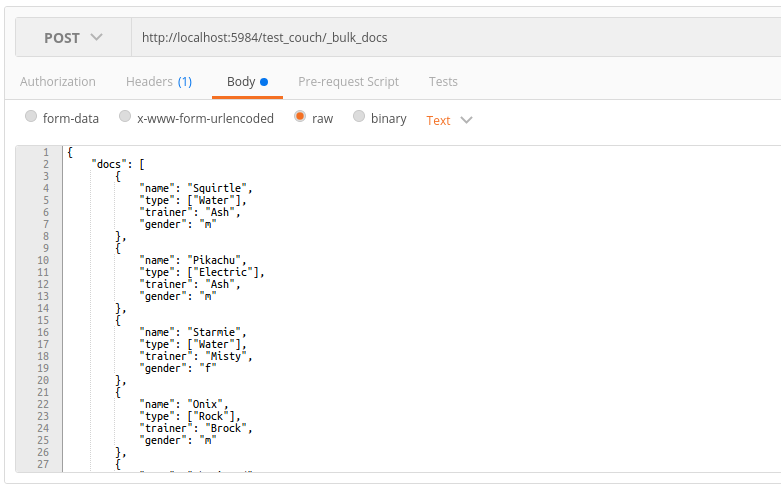
We will also use this data when we play around with retrieving documents later. If you want to follow along, here’s the data to insert: couchdb-bulk.json
Retrieving Documents
Let’s try to retrieve all the documents that are currently stored in the database:
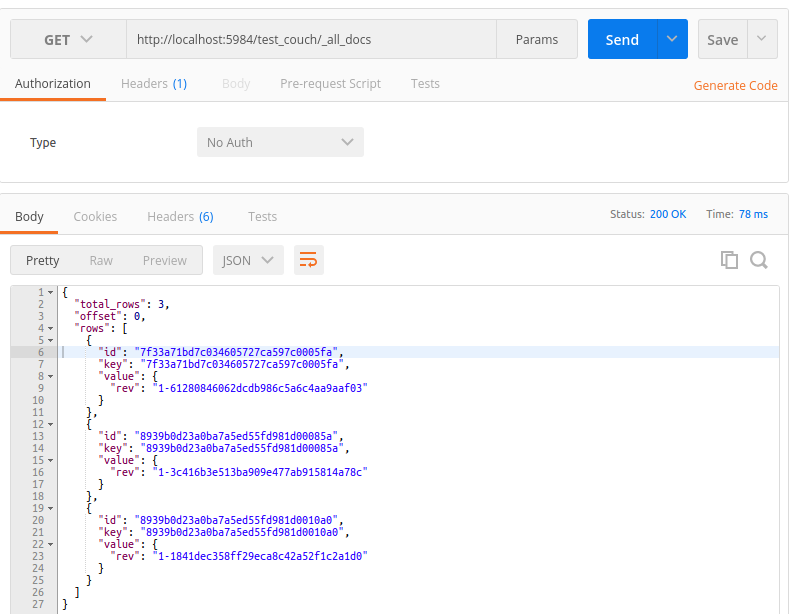
By default, CouchDB only returns the unique ID, a key (the same as a unique ID), and the value which is, by default, an object containing the latest revision number (unique string that represents a specific version of the document). We’ll talk more about revisions later.
To retrieve the data that we have saved earlier, we have to specify include_docs as a query parameter and set it to true:
http://localhost:5984/test_couch/_all_docs?include_docs=true
Retrieving Specific Documents
In CouchDB, you can retrieve specific documents by using the document ID:
http://localhost:5984/test_couch/8939b0d23a0ba7a5ed55fd981d0010a0?include_docs=true
You can also retrieve a specific version of the document by specifying a revision number through the query parameter rev:
http://localhost:5984/test_couch/8939b0d23a0ba7a5ed55fd981d0010a0?rev=1-1841dec358ff29eca8c42a52f1c2a1d0&include_docs=true
Every time you create a new document or update an existing one, a unique revision number is generated by CouchDB. It then assigns it to that state of the document. For example, if you add a new field called skill and then save the document, CouchDB still keeps a copy of the document right before the skill field was added. It does this every time you make a change (e.g. updating a value for a specific field, removing a field, renaming a field, adding a new field) to the document. This is really useful if you need to keep historical data.
If you access a specific document in Futon, you can also navigate through its previous versions:

Views
Views allow us to extract specific data from the database and order them in a specific way.
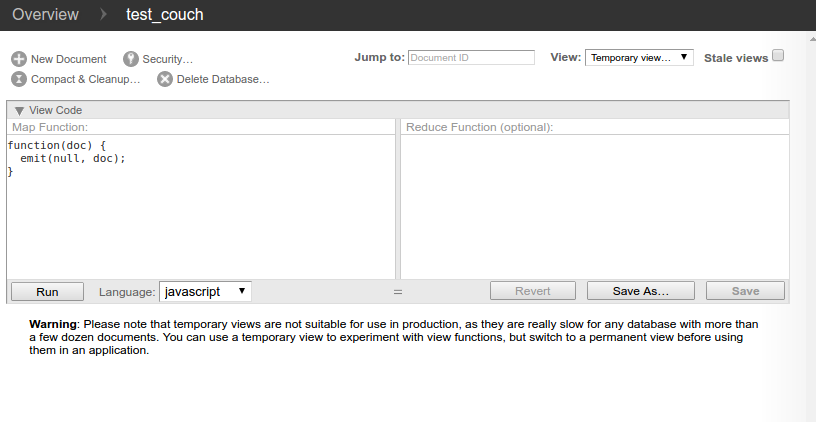
To create a view, access your database on Futon and in the drop-down in the upper right corner select temporary view. This will show you the following interface:
For the rest of the tutorial we’ll be using the data that we’ve inserted earlier.
First, let’s look at a function that filters Pokemon by their trainer:
function(doc) {
  emit(doc.trainer, doc.name);
}
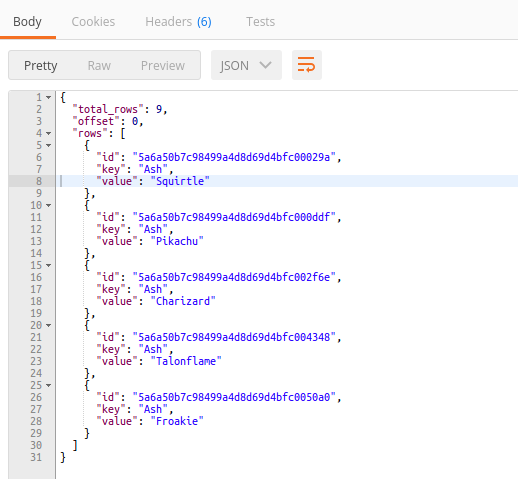
Add this function as the value for Map Function. This function uses the built-in emit method, which accepts two arguments: the key and the value. The key is the one that’s used for filtering the documents, while the value is the value we want returned for each row.
Here’s the response that we get when we execute the function:
As you can see, it just returns everything. This is because we haven’t really specified any value to be used as the filter. To actually see this function in action, we need to save the view by clicking the save as button.
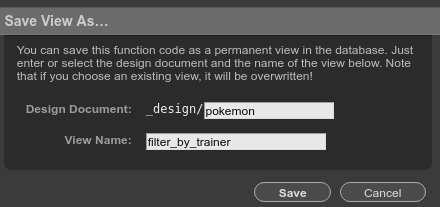
This will ask us for the name of the design document and the name of the view. You can think of design documents as a collection of related views. We’ll name it pokemon since the documents that we’re working on mainly deal with Pokemon data. As for the view, we’ll name it after what it does: filter_by_trainer.
Now let’s make a request to the view that we’ve just created:
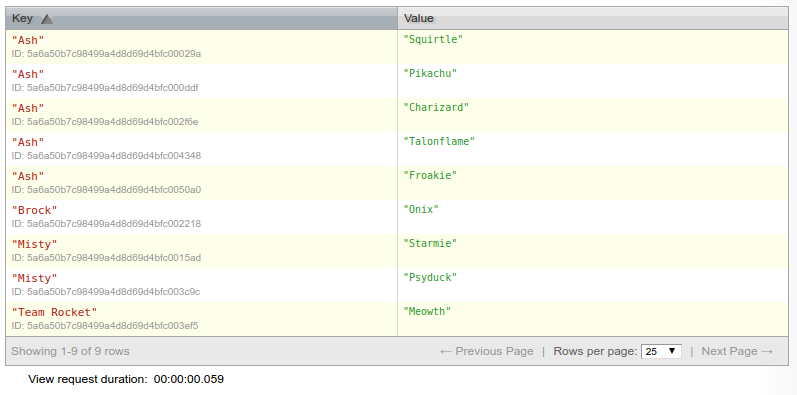
http://localhost:5984/test_couch/_design/pokemon/_view/filter_by_trainer?key="Ash"
This will return the following results:
What ever you pass in as the value for the query parameter key will be used for filtering the results.
Filtering by an Array Field
What if we need to filter by an array field such as the type field?
For that, we’ll need to loop through all the array items and emit documents from inside the loop like so:
function(doc) {
  for(var x = 0; x < doc.type.length; x++){
     emit(doc.type[x], doc.name);
  }
}
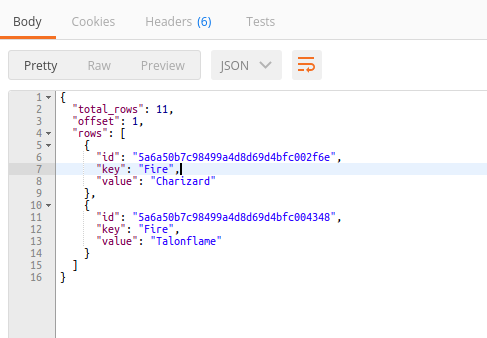
Save this view as filter_by_type then send a GET request to the following URL:
http://localhost:5984/test_couch/_design/pokemon/_view/filter_by_type?key="Fire"
This will return all the Pokemon with “Fire” as one of their types:
Sorting and Limiting Results
To sort results, all you have to do is emit the field you want to sort with. In this case, we’ll emit the owned field as the key so that we can sort by the date on which the Pokemon was owned or caught.
function(doc){
   emit(doc.owned, doc.name);
}
Save this view as order_by_owned then send a request to the following URL:
http://localhost:5984/test_couch/_design/pokemon/_view/sort_by_owned
By default, CouchDB returns the documents in ascending order, so the Pokemon that have been owned the longest come first. To sort the documents in descending order, specify descending=true as a query parameter:
http://localhost:5984/test_couch/_design/pokemon/_view/sort_by_owned?descending=true
To limit the number of documents returned, set limit equal to the number of documents to return:
http://localhost:5984/test_couch/_design/pokemon/_view/sort_by_owned?limit=5
Grouping Results
If you want to return the number of Pokemon that each unique trainer has, we need to use a reduce function. The reduce function allows us to perform grouping and aggregation operations on the results returned by the map function. CouchDB comes with three built-in reduce functions: _count, _sum, and _stats. We’ll only look at the _count function in this section.
We can use the _count function to get the number of Pokemon that each trainer has. Start by adding the following map function:
function(doc) {
   emit(doc.trainer, doc.name);
}
For the reduce function, put in _count. Then save the view with the name group_by_trainer.
Make a request to the following URL:
http://localhost:5984/test_couch/_design/pokemon/_view/group_by_trainer?group=true
Setting group=true is important because we’ll get the following result from the reduce function by default:
{
  "rows": [
    {
      "key": null,
      "value": 9
    }
  ]
}
The result above only shows the total number of documents that are currently in the database. This means that the reduce function considered the whole result set returned by the map function to be a single group.
Setting group=true tells CouchDB to group the documents by the specified key (doc.trainer), which then returns the following result:
{
  "rows": [
    {
      "key": "Ash",
      "value": 5
    },
    {
      "key": "Brock",
      "value": 1
    },
    {
      "key": "Misty",
      "value": 2
    },
    {
      "key": "Team Rocket",
      "value": 1
    }
  ]
}
Updating Documents
To update documents, we send a PUT request to the same URL used for retrieving a specific document and pass in the latest revision number along with the updated data:
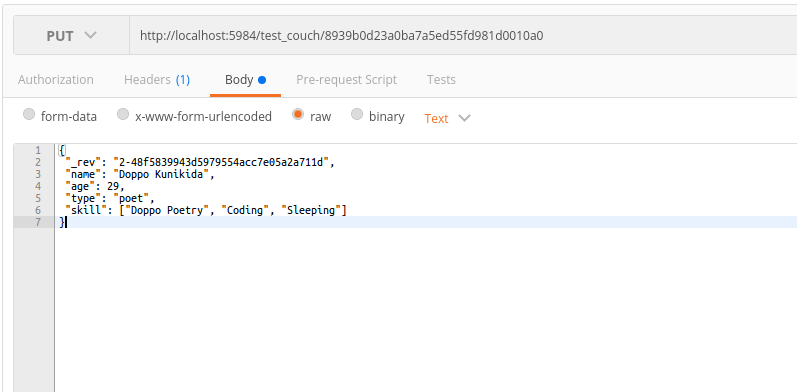
Based on the screenshot above, you can see that CouchDB doesn’t support updating of specific fields: you have to fetch the existing data, do your updates and then send the updated data back to the database.
Deleting Documents
To delete a document, perform a DELETE request to the following URL:
http://localhost:5984/test_couch/<Document ID>?rev=<Revision ID>
It has the same format as the URL for retrieving a document, and because we’re passing in a revision ID, this means that we can delete specific revisions of a document as well (undo function anyone?).
Working with PHP
There are two ways to work with CouchDB in PHP. The first is through Guzzle, and the other one through a library specifically created to work with CouchDB, like the CouchDB Client from Doctrine. We’ll take a look at how to work with each of these libraries in this section.
Guzzle
When retrieving data, we have to use a GET request and then pass in a query to specify the options.
<?php
require 'vendor/autoload.php';

use GuzzleHttp\Client;

$client = new GuzzleHttp\Client(['base_uri' => 'http://localhost:5984']);

$response = $client->request('GET', '/test_couch/_all_docs', [
    'query' => [
        'include_docs' => 'true'
    ]
]);

$json = $response->getBody()->getContents();
$data = json_decode($json, true);
Next, let’s do a bulk insert:
$docs = [
    'docs' => [
        [
            "name" => "Tangela",
            "type" => ["Grass"],
            "trainer" => "Erika",
            "gender" => "f",
            "owned" => "1999-07-27"
        ],
        [
            "name" => "Wobbuffet",
            "type" => ["Psychic"],
            "trainer" => "Elesa",
            "gender" => "m",
            "owned" => "2014-09-09"
        ],
        [
            "name" => "Gogoat",
            "type" => ["Grass"],
            "trainer" => "Ramos",
            "gender" => "m",
            "owned" => "2015-10-17"
        ]
    ]
];

$client->request('POST', '/test_couch/_bulk_docs', [
    'headers' => [
        'Content-Type' => 'application/json'
    ],
    'body' => json_encode($docs)
]);
From the above code, you can see that the same rules still apply.
To update a document, use a PUT request, pass in the ID of the document as a path right after the name of the database. And then pass in the modified document in the body:
$doc = [
    '_rev' => '2-ff235602e45c46aed0f8834c32817546',
    'name' => 'Blastoise',
    'type' => ['Water'],
    'gender' => 'm',
    'trainer' => 'Ash',
    'owned' => '1999-05-21'
];

$client->request('PUT', '/test_couch/5a6a50b7c98499a4d8d69d4bfc00029a', [
    'headers' => [
        'Content-Type' => 'application/json'
    ],
    'body' => json_encode($doc)
]);
To delete a document, use a DELETE request, pass in the document ID as a path after the database name and then pass in the latest revision number in the query:
$client->request('DELETE', '/test_couch/7c7f800ee10a39f512a456339e0019f3', [
    'query' => [
        'rev' => '1-967a00dff5e02add41819138abb3284d'
    ]
]);
Doctrine CouchDB Client
Next, let’s take a look at how to work with a CouchDB database with the CouchDB Client.
First, we have to create a new instance of the CouchDBClient and pass in an array containing the name of the database we want to work with.
<?php
require 'vendor/autoload.php';

$client = \Doctrine\CouchDB\CouchDBClient::create(['dbname' => 'test_couch']);
Then, we pass in the document we wish to create as an array. Behind the scenes, this will be converted into a JSON string that is accepted by CouchDB.
$client->postDocument([
    "name" => "Lucario",
    "type" => ["Fighting", "Steel"],
    "trainer" => "Korrina",
    "gender" => "f",
    "owned" => "2015-02-13"
]);
To retrieve documents using a specific view, we pass in the name of the design document and the name of the view as arguments to the createViewQuery function. Then, we can set the key by using the setKey method. To get a response, we call the execute method.
$query = $client->createViewQuery('pokemon', 'filter_by_trainer');
$query->setKey('Ash');
$result = $query->execute();
echo "Pokemon trained by Ash: <br>";
foreach($result as $row){
    echo $row['value'] . "<br>";
}
This will produce the following result:
Pokemon trained by Ash:
Blastoise
Pikachu
Charizard
Talonflame
Froakie
If you have added a reduce function to the view, you have to call the setGroup method and set it to true so that the reduce function will not consider the whole result set to be a single group. Setting setGroup to true means that every unique key (the trainer field) is considered to be a single group.
$query = $client->createViewQuery('pokemon', 'group_by_trainer');
$query->setReduce('true');
$query->setGroup('true');
$result = $query->execute();
foreach($result as $row){
    echo $row['key'] . "<br>";
    echo "Pokemon count: " . $row['value'] . "<br>";
    echo "<br>";
}
This will give us the following result:
Ash
Pokemon count: 5

Brock
Pokemon count: 1

Elesa
Pokemon count: 1

Erika
Pokemon count: 1

Korrina
Pokemon count: 1

Misty
Pokemon count: 3

Ramos
Pokemon count: 1

Team Rocket
Pokemon count: 1
To update a document, first we have to find the most recent version of it. This is because the CouchDB client doesn’t provide the functionality that lets us just pass in the fields that we want to update. CouchDB is an append-only database so we always need to get the current version of the document, update or add the fields that we want, and then do the actual update.
$doc_id = '5a6a50b7c98499a4d8d69d4bfc003c9c';
$doc = $client->findDocument($doc_id);

$updated_doc = $doc->body;
$updated_doc['name'] = 'Golduck';
$updated_doc['owned'] = '1999-07-29';

$client->putDocument($updated_doc, $doc->body['_id'], $doc->body['_rev']);
Just like with updating a document, we need to do a GET request to the database so we can get the latest revision number. Then, we call the deleteDocument function and pass in the document ID and the latest revision number as its arguments.
$doc_id = '7c7f800ee10a39f512a456339e0027fe';
$doc = $client->findDocument($doc_id);
$client->deleteDocument($doc_id, $doc->body['_rev']);
Conclusion
CouchDB is a very user friendly and easy-to-use document database with an emphasis on performance and version control.
You’ve now learned how to work with it and perform different database operations by using Postman and two PHP clients. If you want to learn more, I recommend you check out the Definitive Guide which contains everything you need to know about CouchDB. In a future post, we’ll go much more in depth and build a proper multi-platform app using everything we’ve seen so far.
Until then, do like their slogan says – relax!