Image Recognition with the Google Vision API and Ionic

Image recognition allows computers to recognize images in a similar way to humans. In the past developers had to use complex image recognition techniques and algorithms such as pattern recognition. With the release of the Cloud Vision API by Google, developers now have a powerful suite of tools available from a company with some of the best image recognition functionality available.
In this tutorial you’ll build an Ionic app that allows users to take a picture recognizable by the Cloud Vision API.
Getting Started
Using the API involves uploading a JSON file containing the type of image detection wanted and the base64 encoding of the image to the API endpoint.
Here’s an example of the JSON file:
{
  "requests":[
    {
      "image":{
        "content":"base64-encoded-image"
      },
      "features":[
        {
          "type":"LABEL_DETECTION",
          "maxResults":1
        }
      ]
    }
  ]
}
In this example, you have to replace base64-encoded-image with the actual base64 encoded string representation of the image. The features property is where you supply an array of objects containing the type of image detection that you want. LABEL_DETECTION attempts to classify the image by giving it a label or description.
Once you have a response, it will be something like the below:
{
  "responses": [
    {
      "labelAnnotations": [
        {
          "mid": "/m/0bt9lr",
          "description": "dog",
          "score": 0.89208293
        }
      ]
    }
  ]
}
Since you specified LABEL_DETECTION for the feature and maxResults to 1, you get a single object in the responses array. In this case, labelAnnotations.
Aside from LABEL_DETECTION, you could also use the following:
FACE_DETECTION: Detects human faces in a photo, returning coordinates which you could use to draw around the detected faces.LANDMARK_DETECTION: Detects landmarks such as the Opera House in Sydney or Stonehenge in Wiltshire.LOGO_DETECTION: Detects different company logos.TEXT_DETECTION: Employs Optical Character Recognition (OCR) technology to extract text from images.SAFE_SEARCH_DETECTION: Classifies an image based on safe-search parameters. This classifies the image asadult,spoof,medical, orviolence.
Signing up for the Cloud Vision API
At time of writing, the Google Cloud Vision API is in beta, which means that it’s free to try. Go to the Google Cloud Platform website and click the try for free button. This will take you to a page asking for your business and credit information, but don’t worry, Google won’t charge you anything up to $300.
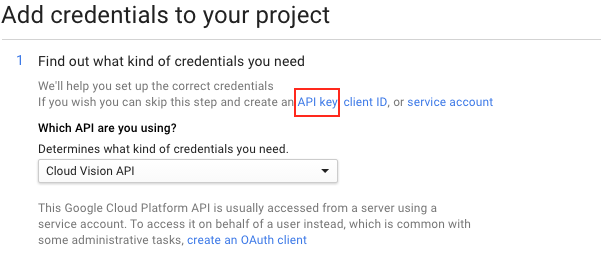
Once complete, create a new project on Google console, enable billing for your project, and enable the Cloud Vision API. I recommend you skip the normal process and use the ‘API Key’ option.
Building the App
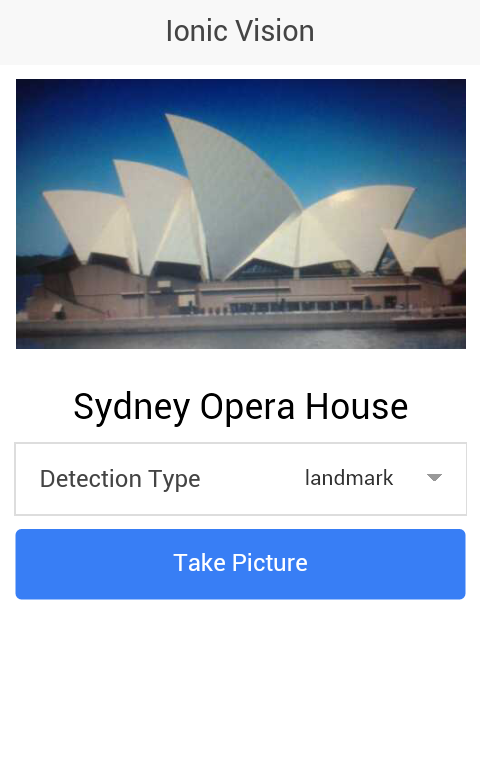
Now you’re ready to build the app. But first I’d like to give a brief overview of the app you’re going to build. The app will have one page which contains all the elements needed to interact with the Cloud Vision API. It will have a dropdown for selecting what type of image detection the user wants, a button for taking a picture, an image element for displaying the picture taken, and a heading element for displaying the description of the picture.
Here’s how the final app will look:
You can find the final code for the project on GitHub.
Installing Dependencies
In your working directory, open a new terminal window an install Cordova and Ionic:
npm install -g cordova ionicCreate a new Ionic project using the blank template:
ionic start ionic-vision blankAdd the platforms you want to use. I’m only going to install Android, but the code should work on iOS as well.
ionic platform add androidYou need to install a few plugins for interacting with the device APIs for working with the camera, file and uploading files.
cordova plugin add cordova-plugin-camera
cordova plugin add cordova-plugin-file
cordova plugin add cordova-plugin-file-transfer
Install ngCordova using bower:
bower install ngCordovaThe ngCordova library provides AngularJS wrappers for the plugins installed. These wrappers makes it easier for working with the plugins inside an Ionic app.
Adding the Controller
Open the www directory, create a controllers/HomeController.js file inside the js directory and add the following code:
(function(){
    angular.module('starter')
    .controller('HomeController', ['$scope', '$ionicModal', '$cordovaFile', '$cordovaFileTransfer', '$cordovaCamera', HomeController]);

    function HomeController($scope, $ionicModal, $cordovaFile, $cordovaFileTransfer, $cordovaCamera){

        var me = this;
        me.current_image = 'img/koro-sensei.png';
        me.image_description = '';
        me.detection_type = 'LABEL_DETECTION';

        me.detection_types = {
          LABEL_DETECTION: 'label',
          TEXT_DETECTION: 'text',
          LOGO_DETECTION: 'logo',
          LANDMARK_DETECTION: 'landmark'
        };

        var api_key = 'your-google-api-key';


        $scope.takePicture = function(){

            var options = {
                destinationType: Camera.DestinationType.DATA_URL,
                sourceType: Camera.PictureSourceType.CAMERA,
                targetWidth: 500,
                targetHeight: 500,
                correctOrientation: true,
                cameraDirection: 0,
                encodingType: Camera.EncodingType.JPEG
            };

            $cordovaCamera.getPicture(options).then(function(imagedata){

                me.current_image = "data:image/jpeg;base64," + imagedata;
                me.image_description = '';
                me.locale = '';

                var vision_api_json = {
                  "requests":[
                    {
                      "image":{
                        "content": imagedata
                      },
                      "features":[
                        {
                          "type": me.detection_type,
                          "maxResults": 1
                        }
                      ]
                    }
                  ]
                };

                var file_contents = JSON.stringify(vision_api_json);

                $cordovaFile.writeFile(
                    cordova.file.applicationStorageDirectory,
                    'file.json',
                    file_contents,
                    true
                ).then(function(result){

                    var headers = {
                        'Content-Type': 'application/json'
                    };

                    options.headers = headers;

                    var server = 'https://vision.googleapis.com/v1/images:annotate?key=' + api_key;
                    var filePath = cordova.file.applicationStorageDirectory + 'file.json';

                    $cordovaFileTransfer.upload(server, filePath, options, true)
                        .then(function(result){

                            var res = JSON.parse(result.response);
                            var key = me.detection_types[me.detection_type] + 'Annotations';

                            me.image_description = res.responses[0][key][0].description;
                      }, function(err){
                        alert('An error occurred while uploading the file');
                      });
                }, function(err){
                    alert('An error occurred while trying to write the file');
                });

            }, function(err){
              alert('An error occurred getting the picture from the camera');
            });
        }
    }
})();
Breaking down the code above. First you create the controller and import the libraries needed.
(function(){
    angular.module('starter')
    .controller('HomeController', ['$scope', '$cordovaFile', '$cordovaFileTransfer', '$cordovaCamera', HomeController]);

function HomeController($scope, $cordovaFile, $cordovaFileTransfer, $cordovaCamera){
...
}
Inside the controller, set the default data used by the view. This includes the placeholder image to display, an empty description, and the default detection type. LABEL_DETECTION is used since its more generalized than the others.
var me = this;
me.current_image = 'img/koro-sensei.png';
me.image_description = '';
me.detection_type = 'LABEL_DETECTION';
Below that is an object containing all the detection types and the API key from Google:
me.detection_types = {
  LABEL_DETECTION: 'label',
  TEXT_DETECTION: 'text',
  LOGO_DETECTION: 'logo',
  LANDMARK_DETECTION: 'landmark'
};

var api_key = 'your-google-api-key';
Next, create the method executed when pressing the camera button.
$scope.takePicture = function(){
    ...
};
Inside the method, declare the options for the camera plugin, setting destinationType to Camera.DestinationType.DATA_URL. This means that once the picture is selected, the callback function will have the data URI of the image. As this data URI is already base64 encoded, it no longer needs converting.
sourceType is Camera.PictureSourceType.CAMERA so it uses the image taken from the camera as the source. targetWidth and targetHeight set the preferred dimensions of this image. correctOrientation is true so that it automatically changes the image orientation to portrait and cameraDirection is 0 so it uses the back camera. Finally, encodingType is Camera.EncodingType.JPEG, allowing you to prepend data:image/jpeg;base64, to the data URI so you can display the image.
var options = {
    destinationType: Camera.DestinationType.DATA_URL,
    sourceType: Camera.PictureSourceType.CAMERA,
    targetWidth: 500,
    targetHeight: 500,
    correctOrientation: true,
    cameraDirection: 0,
    encodingType: Camera.EncodingType.JPEG
};
This opens the default camera app on the device by calling $cordovaCamera.getPicture. It uses options as an argument, calling then and supplying the success and error callback functions. The same pattern is true for all plugins that you’ll be using later.
$cordovaCamera.getPicture(options).then(function(imagedata){
    ...
}, function(err){
    alert('An error occurred getting the picture from the camera');
});
Inside the success callback, update the image source (current_image) and reset the description to an empty string.
me.current_image = "data:image/jpeg;base64," + imagedata;
me.image_description = '';
Construct the object using the data URI from the camera plugin and the detection type (me.detection_type) selected by the user. Then convert it to a string so you can use it as content for the JSON file sent to the API.
var vision_api_json = {
  "requests":[
    {
      "image":{
        "content": imagedata
      },
      "features":[
        {
          "type": me.detection_type,
          "maxResults": 1
        }
      ]
    }
  ]
};

var file_contents = JSON.stringify(vision_api_json);
Use the Cordova File plugin to write the file_contents to the file.json file stored in the root directory of the apps sandbox. The third argument for the writeFile method is a boolean value for setting whether to create the file if it doesn’t already exist.
$cordovaFile.writeFile(
    cordova.file.applicationStorageDirectory,
    'file.json',
    file_contents,
    true
).then(function(result){
    ...
}, function(err){
    alert('An error occurred while writing to the file');
});
When the contents are written to the file, declare the variables needed by the file transfer plugin to work. Below is a headers variable which is the http headers for the request. Since you’re sending a JSON file, you have to set the Content-Type to application/json. The server is the full URL of the API to send the request to and filePath the full path to the JSON file that you’ll be sending.
var headers = {
    'Content-Type': 'application/json'
};

options.headers = headers;

var server = 'https://vision.googleapis.com/v1/images:annotate?key=' + api_key;
var filePath = cordova.file.applicationStorageDirectory + 'file.json';
You send the file to the server using the upload method of the file transfer plugin. The fourth argument supplied to the upload method is a boolean value for setting whether to accept security certificates from all hosts. Once you get a response, convert it to a JavaScript object using JSON.parse. Construct the key by concatenating the value of the current detection type and the word ‘Annotations’. This allows you to form the string labelAnnotations if the user selected LABEL_DETECTION as the detection type. You can then use this string to extract the actual description of the image.
$cordovaFileTransfer.upload(server, filePath, options, true)
    .then(function(result){

        var res = JSON.parse(result.response);
        var key = me.detection_types[me.detection_type] + 'Annotations';
        me.image_description = res.responses[0][key][0].description;

}, function(err){
    alert('An error occured while uploading the file');
});
Adding the View
Create a templates/home.html file and add the following code:
<ion-view title="IonicVision" ng-controller="HomeController as home_ctrl">
    <header class="bar bar-header bar-stable">
        <h1 class="title">Ionic Vision</h1>
    </header>

    <ion-content class="has-header padding">
        <img src="{{ home_ctrl.current_image }}" class="picture">
        <h3 class="text-center" ng-show="home_ctrl.image_description">{{ home_ctrl.image_description }}</h3>
        <label class="item item-input item-select">
          <div class="input-label">
            Detection Type
          </div>
          <select ng-model="home_ctrl.detection_type">
            <option value="{{detection_type}}" ng-repeat="(detection_type, detection_type_value) in home_ctrl.detection_types">{{detection_type_value}}</option>
          </select>
        </label>
        <button class="button button-positive button-block" ng-click="takePicture()">
        Take Picture
        </button>
    </ion-content>
</ion-view>
Breaking down the code above. First it creates a new ion-view and specifies the controller to use.
<ion-view title="IonicVision" ng-controller="HomeController as home_ctrl">
</ion-view>
Inside the ion-view is the header and the ion-content which are the UI elements that you see below the header. Things like the image, image description, the list of detection types, and the button for taking a picture.
<header class="bar bar-header bar-stable">
    <h1 class="title">Ionic Vision</h1>
</header>

<ion-content class="has-header padding">
    <img src="{{ home_ctrl.current_image }}" class="picture">
    <h3 class="text-center" ng-show="home_ctrl.image_description">{{ home_ctrl.image_description }}</h3>
    <label class="item item-input item-select">
      <div class="input-label">
        Detection Type
      </div>
      <select ng-model="home_ctrl.detection_type">
        <option value="{{detection_type}}" ng-repeat="(detection_type, detection_type_value) in home_ctrl.detection_types">{{detection_type_value}}</option>
      </select>
    </label>
    <button class="button button-positive button-block" ng-click="takePicture()">
    Take Picture
    </button>
</ion-content>
Styling
Most of the styling work is handled by Ionic, so you only need a couple of style declarations. Add the following to css/style.css:
.text-center {
    text-align: center;
}

.picture {
  max-width: 100%;
  max-height: 100%;
}
Bringing Everything Together
Open the js/app.js file that contains the code for initializing Ionic and ngCordova. If you used the Ionic blank starter template, most of the code is already filled out. All that’s needed is to specify the use of ngCordova and edit the contents of the config method to point to the home.html file.
angular.module('starter', ['ionic', 'ngCordova'])

.run(function($ionicPlatform) {
  $ionicPlatform.ready(function() {
    if(window.cordova && window.cordova.plugins.Keyboard) {

      cordova.plugins.Keyboard.hideKeyboardAccessoryBar(true);

      cordova.plugins.Keyboard.disableScroll(true);
    }
    if(window.StatusBar) {
      StatusBar.styleDefault();
    }
  });
})
.config(function($stateProvider, $urlRouterProvider) {
  $stateProvider

  .state('home', {
    url: '/home',
    templateUrl: 'templates/home.html'
  });

  $urlRouterProvider.otherwise('/home');
});
Open index.html and link to the ng-cordova.js file after the ionic.bundle.js file. Below the app.js file, link to the HomeController.js file.
Don’t forget to specify starter as the value for the ng-app, and inside body, add ion-nav-view so that it will display the home.html view.
<!DOCTYPE html>
<html>
  <head>
    <meta charset="utf-8">
    <meta name="viewport" content="initial-scale=1, maximum-scale=1, user-scalable=no, width=device-width">
    <title></title>

    <link href="lib/ionic/css/ionic.css" rel="stylesheet">
    <link href="css/style.css" rel="stylesheet">

    <!-- IF using Sass (run gulp sass first), then uncomment below and remove the CSS includes above
    <link href="css/ionic.app.css" rel="stylesheet">
    -->

    <!-- ionic/angularjs js -->
    <script src="lib/ionic/js/ionic.bundle.js"></script>

    <script src="lib/ngCordova/dist/ng-cordova.js"></script>
    <!-- cordova script (this will be a 404 during development) -->
    <script src="cordova.js"></script>

    <!-- your app's js -->
    <script src="js/app.js"></script>

    <script src="js/controllers/HomeController.js"></script>
  </head>
  <body ng-app="starter">
    <ion-nav-view></ion-nav-view>
  </body>
</html>
Running the App
You can run the app on your device or on an emulator by executing the following command:
ionic run androidFinal Thoughts
In this tutorial you built an image recognition app with ionic and the help of the Cloud Vision API. I covered the use of different image detection types such as the label, landmark, logo, and text detection. I didn’t cover Face detection or safe-search detection, but for face detection, you can use something like Fabric.js. This will convert the image into a canvas object and draw circles on the detected faces.
For more information on the Cloud Vision API, read the official documentation and I would love to hear your experiences and thoughts.


