PredictionIO and Lumen: Building a Movie Recommendation App

In the intro, we covered the basics of PredictionIO and installed its dependencies. In this part, we’re going to build the movie recommendation app.
Environment Config File
Inside your app directory, create a .env file and add the following configuration:
APP_ENV=local
APP_DEBUG=true
APP_KEY=some-random-key

PIO_KEY=your-pio-app-key
TMDB_KEY=your-tmdb-api-key

CACHE_DRIVER=file
SESSION_DRIVER=file
QUEUE_DRIVER=database
Make sure to replace the value of APP_KEY with a unique random key. Since we’re using Lumen, you can generate one by executing php artisan key:generate. Also, replace the value for PIO_KEY with the key of the PredictionIO app that you created, and the TMDB_KEY with the API key provided by the TMDB website.
Importing Data from TMDB
We will be importing the data using the PredictionIO SDK, so we first need to tell Lumen to use it. Create a Classes directory under lumen/app. Then inside it, create a Pio.php file and add the following code.
<?php
namespace App\Classes;

use predictionio\EventClient;
use predictionio\EngineClient;

class Pio
{

    public function eventClient()
    {

        $pio_accesskey = env('PIO_KEY');
        $pio_eventserver = 'http://127.0.0.1:7070';

        return new EventClient($pio_accesskey, $pio_eventserver);

    }

    public function predictionClient()
    {

        $pio_predictionserver = 'http://127.0.0.1:8192';

        return new EngineClient($pio_predictionserver);

    }

}
This class will serve as a container for the PredictionIO event client and engine client. This way, we don’t have to instantiate those classes every time we need to use them.
The event client is used for talking to the event server which is responsible for collecting data for our app. The client needs the app key and the URL the event server runs on. By default, it runs on port 7070.
The engine client on the other hand, is used for talking to the engine which is responsible for serving the recommendations.
Next, open the bootstrap/app.php file and uncomment the middleware that is responsible for handling sessions. This allows us to persist a unique ID for the user who is currently rating some movies.
$app->middleware(
    [
//Illuminate\Cookie\Middleware\EncryptCookies::class,
//Illuminate\Cookie\Middleware\AddQueuedCookiesToResponse::class,
        Illuminate\Session\Middleware\StartSession::class,
//Illuminate\View\Middleware\ShareErrorsFromSession::class,
//Laravel\Lumen\Http\Middleware\VerifyCsrfToken::class,
    ]
);
Create a new controller and name it AdminController.php. Controllers are stored in the app/Http/Controllers directory. Set it to use the Pio class that we created earlier.
<?php
namespace App\Http\Controllers;

use Laravel\Lumen\Routing\Controller as BaseController;
use App\Repos\Pio;

class AdminController extends BaseController
{

}
Create an importMovies method. We will use this method to import movies from the TMDB API:
    public function importMovies(Pio $pio)
    {

        $index = 1;
        $pio_eventclient = $pio->eventClient();

        $http_client = new \GuzzleHttp\Client();
        $es_client = new \Elasticsearch\Client();

        for ($x = 1; $x <= 100; $x++) {

            $movies_url = 'https://api.themoviedb.org/3/movie/popular?api_key=' . env(
                    'TMDB_KEY'
                ) . '&page=' . $x;

            $movies_response = $http_client->get($movies_url);
            $movies_body = $movies_response->getBody();

            $movies_result = json_decode($movies_body, true);
            $movies = $movies_result['results'];

            if (!empty($movies)) {

                foreach ($movies as $row) {

                    $id = $row['id'];
                    $title = $row['title'];
                    $poster_path = '';
                    if (!empty($row['poster_path'])) {
                        $poster_path = $row['poster_path'];
                    }

                    $moviedetails_url = 'https://api.themoviedb.org/3/movie/' . $id . '?api_key=' . env(
                            'TMDB_KEY'
                        );

                    $moviedetails_response = $http_client->get(
                        $moviedetails_url
                    );
                    $movie_details_body = $moviedetails_response->getBody();

                    $movie = json_decode($movie_details_body, true);

                    $overview = $movie['overview'];
                    $release_date = $movie['release_date'];

                    $genre = '';
                    if (!empty($movie['genres'][0])) {
                        $genre = $movie['genres'][0]['name'];
                    }

                    $popularity = $movie['popularity'];


                    $movie_data = [
                        'itypes' => 1,
                        'tmdb_id' => $id,
                        'title' => $title,
                        'poster_path' => $poster_path,
                        'overview' => $overview,
                        'release_date' => $release_date,
                        'genre' => $genre,
                        'popularity' => $popularity,
                    ];

                    $pio_response = $pio_eventclient->setItem(
                        $index, $movie_data
                    );

                    //create elasticsearch index
                    $params = [];
                    $params['body'] = $movie_data;
                    $params['index'] = 'movierecommendation_app';
                    $params['type'] = 'movie';
                    $params['id'] = $index;
                    $es_res = $es_client->index($params);

                    $index++;
                }
            }
        }
    }
Breaking it down:
-
We inject the
Pioclass to theimportMoviesmethod -
Initialize the index to 1. This will serve as the unique ID for the movies that we’re going to import.
-
Call the
eventClientmethod in thePioclass. This initializes the PredictionIO event client which we can use for saving movie data. -
Create a new instance of the Guzzle HTTP Client, the PredictionIO Event Client and the ElasticSearch Client.
$index = 1; $pio_eventclient = $pio->eventClient(); $http_client = new \GuzzleHttp\Client(); $es_client = new \Elasticsearch\Client(); -
Create a loop that would execute 100 times. This allows us to get about 2000 movies because each request that we make to the TMDB API returns 20 movies. Each iteration of the loop changes the value for
$xwhich we use for accessing the next page for each iteration.for ($x = 1; $x <= 100; $x++) { ... } -
Inside the loop, we make a request to the TMDB API using Guzzle. Since we want to get as many likes as we can, we make a request for the most popular movies of all time. We get the value for
api_keyfrom the.envfile. We then use thegetmethod provided by Guzzle to perform the request. And then we get the response body using thegetBodymethod. This is basically a JSON string containing all 20 movies and their details. We convert this to an array usingjson_decodeand extract the results.$movies_url = 'https://api.themoviedb.org/3/movie/popular?api_key=' . env('TMDB_KEY') . '&page=' . $x; $movies_response = $http_client->get($movies_url); $movies_body = $movies_response->getBody(); $movies_result = json_decode($movies_body, true); $movies = $movies_result['results']; -
Check if it actually contains anything. If it does then we proceed with looping through all the movies returned so that we can get further details about it by making another request to the TMDB API. Once we’ve made the request we extract the details that we need.
if (!empty($movies)) { foreach ($movies as $row) { $id = $row['id']; $title = $row['title']; $poster_path = ''; if (!empty($row['poster_path'])) { $poster_path = $row['poster_path']; } $moviedetails_url = 'https://api.themoviedb.org/3/movie/' . $id . '?api_key=' . env( 'TMDB_KEY' ); $moviedetails_response = $http_client->get($moviedetails_url); $movie_details_body = $moviedetails_response->getBody(); $movie = json_decode($movie_details_body, true); $overview = $movie['overview']; $release_date = $movie['release_date']; $genre = ''; if (!empty($movie['genres'][0]['name'])) { $genre = $movie['genres'][0]['name']; } $popularity = $movie['popularity']; } } -
Construct an array that contains the details that we want to supply to PredictionIO and then call the
setItemmethod to save it. This method accepts the unique ID that we want to assign to the item and the actual data as the second argument.$movie_data = array( 'itypes' => 1, 'tmdb_id' => $id, 'title' => $title, 'poster_path' => $poster_path, 'overview' => $overview, 'release_date' => $release_date, 'genre' => $genre, 'popularity' => $popularity ); $pio_response = $pio_eventclient->setItem($index, $movie_data); -
Index the movie data in the ElasticSearch server. We will use this later on to show details of the random movies that we will recommend to the user as well as the actual recommendation that PredictionIO will return. Note that we’re using the
$indexas the ID so we also need to increment it for every iteration of the loop.$params = array(); $params['body'] = $movie_data; $params['index'] = 'movierecommendation_app'; $params['type'] = 'movie'; $params['id'] = $index; $es_res = $es_client->index($params); $index++; -
Finally, we can add the route that we will be accessing in order to begin importing some movies. Open up
app/Http/routes.phpfile and add the following route:$app->get('/movies/import', 'AdminController@importMovies');
After that, the /movies/import path becomes accessible in the browser to begin importing some movies from TMDB. If you don’t want to do it this way, you can also use commands.
This might take a while to complete so go grab a cup of coffee or watch an episode of your favorite show.
Picking Random Movies
Now that we have some movies, we’re ready to show some random ones to the user. First, create a new controller, name it HomeController.php then add the following code:
<?php
namespace App\Http\Controllers;

use Illuminate\Http\Request;
use Laravel\Lumen\Routing\Controller as BaseController;
use App\Repos\Pio;

class HomeController extends BaseController
{

    public function index(Pio $pio)
    {

    }

}
Inside the index method, generate a unique ID using PHP’s built-in uniqid method, then assign it to the user_id session item. Also, initialize movies_viewed with a value of 0. This will represent the number of movies that we have shown to the current user. We will increment it later on as random movies get suggested. Then, we use the event client to save the user into the database. We can do that by calling the setUser method which accepts the user ID as its argument. Finally, we render the index page.
$user_id = uniqid();

session(array('user_id' => $user_id, 'movies_viewed' => 0));

$pio_eventclient = $pio->eventClient();
$pio_eventclient->setUser($user_id);

return view('index');
Don’t forget to add the corresponding route in the routes file:
$app->get('/', 'HomeController@index');
Here’s the code for the index page that we we’re rendering:
<!DOCTYPE html>
<html lang="en">
<head>
  <meta charset="UTF-8">
  <title></title>
  <link rel="stylesheet" href="/assets/css/bootstrap.min.css">
  <link rel="stylesheet" href="/assets/css/style.css">
</head>
<body>
  <div id="wrapper">
    <div class="navbar navbar-default">
      <div class="navbar-header">
        <button type="button" class="navbar-toggle" data-toggle="collapse" data-target=".navbar-responsive-collapse">
          <span class="icon-bar"></span>
          <span class="icon-bar"></span>
          <span class="icon-bar"></span>
        </button>
        <a class="navbar-brand" href="">Movie Recommender</a>
      </div>
      <div class="navbar-collapse collapse navbar-responsive-collapse">
        <ul class="nav navbar-nav">
          <li><a href="/">Home</a></li>
        </ul>
      </div>
    </div>

    <div class="container">

      <div class="row">

        <div id="movie-container" class="col-md-10 col-centered">

        </div>

      </div>

      <script id="movie-template" type="text/x-handlebars-template">
        <div class="col-md-8">
          <img src="http://image.tmdb.org/t/p/w500{{_source.poster_path}}">
        </div>
        <div class="col-md-4">
          <h3>{{_source.title}}</h3>
          <div class="release-date">
            {{_source.release_date}}
          </div>
          <div class="genre">
            Genre: {{_source.genre}}
          </div>
          <div class="overview">
            {{_source.overview}}
          </div>
          <div class="button-container">
            <button class="btn btn-success btn-block btn-next" data-id="{{_id}}" data-action="like">Like</button>
            <button class="btn btn-danger btn-block btn-next" data-id="{{_id}}" data-action="dislike">Dislike</button>
            <a href="/movies/recommended" class="show-recommendations">Show Recommendations</a>
          </div>
        </div>
      </script>


      <span class="label label-success"></span>


    </div>
  </div>
  <script src="/assets/js/jquery.min.js"></script>
  <script src="/assets/js/bootstrap.min.js"></script>
  <script src="/assets/js/handlebars.min.js"></script>
  <script src="/assets/js/main.js"></script>
</body>
</html>
As you can see from the above code, we’re mainly using client-side templating to render the details for the movie. For this app, we’re using handlebars. We’re loading the details of each movie using ajax.
From the above code you can see that we’re using Bootstrap for styling. We also have basic styling for the whole app which is added in the style.css file:
.col-centered {
  float: none;
  margin: 0 auto;
}

.button-container {
  margin-top: 20px;
}

.show-recommendations {
  display: none;
}

#recommended-movies > div {
  height: 1000px;
}
For the scripts, we use jQuery, Bootstrap’s JavaScript file, Handlebars and the main JavaScript file for the app.
For the main JavaScript we have the following code:
var movie_src = $("#movie-template").html();
var movie_template = Handlebars.compile(movie_src);

function getRandomMovie(request_data){

  request_data = typeof request_data !== 'undefined' ? request_data : {};

  $.post('movie/random', request_data, function(response){
    var data = JSON.parse(response);

    var movie_html = movie_template(data);
    $('#movie-container').html(movie_html);

    if(data.has_recommended){
      $('.show-recommendations').show();
    }

  });
}

getRandomMovie();

$('#movie-container').on('click', '.btn-next', function(){
  var self = $(this);
  var id = self.data('id');
  var action = self.data('action');
  getRandomMovie({'movie_id' : id, 'action' : action});

});
Breaking it down, we first compile the Handlebars template which is stored in the div with the ID of movie-template:
var movie_src = $("#movie-template").html();
var movie_template = Handlebars.compile(movie_src);
We then declare the getRandomMovie method. This accepts the request_data as an optional parameter. Inside the function, we use jQuery’s post method to issue a POST request to the movie/random path. This returns random movie data from the server in JSON format. We then convert it to an object that can be used by JavaScript using the JSON.parse method. Once that’s done we supply it to the Handlebars template that we have compiled earlier and then update the contents of movie-container div. If the returned data has the has_recommended item, we show the link which will lead the user to the page where the movies recommended by PredictionIO are displayed.
function getRandomMovie(request_data){

  request_data = typeof request_data !== 'undefined' ? request_data : {};

  $.post('movie/random', request_data, function(response){
    var data = JSON.parse(response);

    var movie_html = movie_template(data);
    $('#movie-container').html(movie_html);

    if(data.has_recommended){
      $('.show-recommendations').show();
    }

  });
}
Once the script is loaded, we execute the function to load the first random movie.
getRandomMovie();
We then listen for the click event on the button with the btn-next class. If you remember the overview of the app earlier, we have two buttons: like and dislike. Those buttons have the btn-next class. So every time those are clicked, the code below is executed. What it does is call the getRandomMovie function and supply the movie ID and the action. The action can have a value of either like or dislike:
$('#movie-container').on('click', '.btn-next', function(){
  var self = $(this);
  var id = self.data('id');
  var action = self.data('action');
  getRandomMovie({'movie_id' : id, 'action' : action});
});
Going back to the server side, we’re now ready to write the code for getting a random movie from the database. First, declare a new route that responds to POST requests to the movie/random path:
$app->post('/movie/random', 'HomeController@randomMovie');
In the above code, we’re using the the same controller that we used earlier for rendering the home page of the app. But this time we’re using the randomMovie method. So go ahead and declare it in your app/Http/controllers/HomeController.php file. We’re going to make use of the Request class in this method so we pass it in as a parameter. This allows us to get the user input that was passed along in the HTTP request. And don’t forget to pass in the Pio class as well.
public function randomMovie(Request $request, Pio $pio) {
  ...
}
Inside the randomMovie method:
-
We get the details of the request and then check if a user session has been set. If there’s a user session we get the number of movies that have been viewed by the current user.
-
Declare a new instance of the ElasticSearch client then we get a random movie by generating a random value from 1 to 1000 using PHP’s
mt_randfunction. If you remember from earlier, when we imported movies to ElasticSearch, we were using an index as the value for the ID, which we incremented by 1 for every iteration of the loop. That’s why this works. Once we get a response, we just extract the details that we need. -
Check if there’s a
movie_idsupplied in the request. If there is, then it means that the user is rating a movie. -
Call the
recordUserActionOnItemmethod in the PredictionIO Event Client. This accepts the action as its first argument. If you remember, earlier we customized the engine so that it can accept like or dislike as a form of rating. That’s the action that we’re referring to. The second argument is the ID of the user performing the action, and the third is the ID of the movie being rated. -
Increment the movies viewed and then check if there are already 20 movies that were viewed. If so, then we pass in an additional field
has_recommendedto the movie details. The existence of this field will then be checked on the client side to show the link for the recommendation page. Next, we save the movies viewed into session and then return the movie details.
if (session('user_id')) {

    $movies_viewed = session('movies_viewed');

    $es_client = new \Elasticsearch\Client();

    $search_params['index'] = 'movierecommendation_app';
    $search_params['type'] = 'movie';
    $search_params['id'] = mt_rand(1, 1000);
    $movie = $es_client->get($search_params);

    if (!empty($request->input('movie_id'))) {

        $user_id = session('user_id');
        $movie_id = $request->input('movie_id');
        $action = $request->input('action');

        $pio_eventclient = $pio->eventClient();
        $pio_eventclient->recordUserActionOnItem($action, $user_id, $movie_id);

        $movies_viewed += 1;
        if ($movies_viewed == 20) {
            $movie['has_recommended'] = true;
        }
        $movie['movies_viewed'] = $movies_viewed;

        session(['movies_viewed' => $movies_viewed]);
    }

    return $movie;
}
Recommending Movies
Now that we’re done with the learning phase, it’s time to proceed with writing the code for the recommendation phase.
First, create a new route that will respond to GET requests on the /movies/recommended path:
$app->get('/movies/recommended', 'HomeController@recommendedMovies');
Inside the recommendedMovies method:
-
Create a new instance of the PredictionIO Engine Client. Note that this is different from the Event Client that we have been using so far as this is used for actually getting the prediction results from the engine. With that in mind, we now make the request using the
sendQuerymethod. This accepts an array as its argument. The array should contain theuserandnumas its items.useris the user ID andnumis the number of movies that we want the engine to return. -
If the request is successful, we use the
array_mapmethod to extract only the movie IDs. Thearray_mapmethod accepts a function which returns the item that we want and the array that we want to manipulate as its second argument. This returns an array of movie IDs. -
Create a new instance of the ElasticSearch client and perform a request to the
movierecommendation_appindex. We can then pass the movie IDs as a search query. Next we use thesearchmethod and pass in the search parameters. This returns the details of the movies that were returned by the PredictionIO Engine Client. -
Reset the movies viewed count and set the user ID to
nullso that the next time someone uses the app, it will create a brand new user. Finally, we render therecommended_moviesview and pass in the movie details.
public function recommendedMovies(Pio $pio){

  $recommended_movies = array();

  try{
    $user_id = session('user_id');

    $pio_predictionclient = $pio->predictionClient();
    $recommended_movies_raw = $pio_predictionclient->sendQuery(array('user' => $user_id, 'num' => 9));

    $movie_ids = array_map(function($item){
      return $item['item'];
    }, $recommended_movies_raw['itemScores']);

    $es_client = new \Elasticsearch\Client();

    $search_params['index'] = 'movierecommendation_app';
    $search_params['type']  = 'movie';
    $search_params['body']['query']['bool']['must']['terms']['_id'] = $movie_ids;

    $es_response = $es_client->search($search_params);
    $recommended_movies = $es_response['hits']['hits'];

  }catch(Exception $e){
      echo 'Caught exception: ', $e->getMessage(), "\n";
  }

  session(array('movies_viewed' => 0, 'user_id' => null));

  return view('recommended_movies', array('recommended_movies' => $recommended_movies));

}
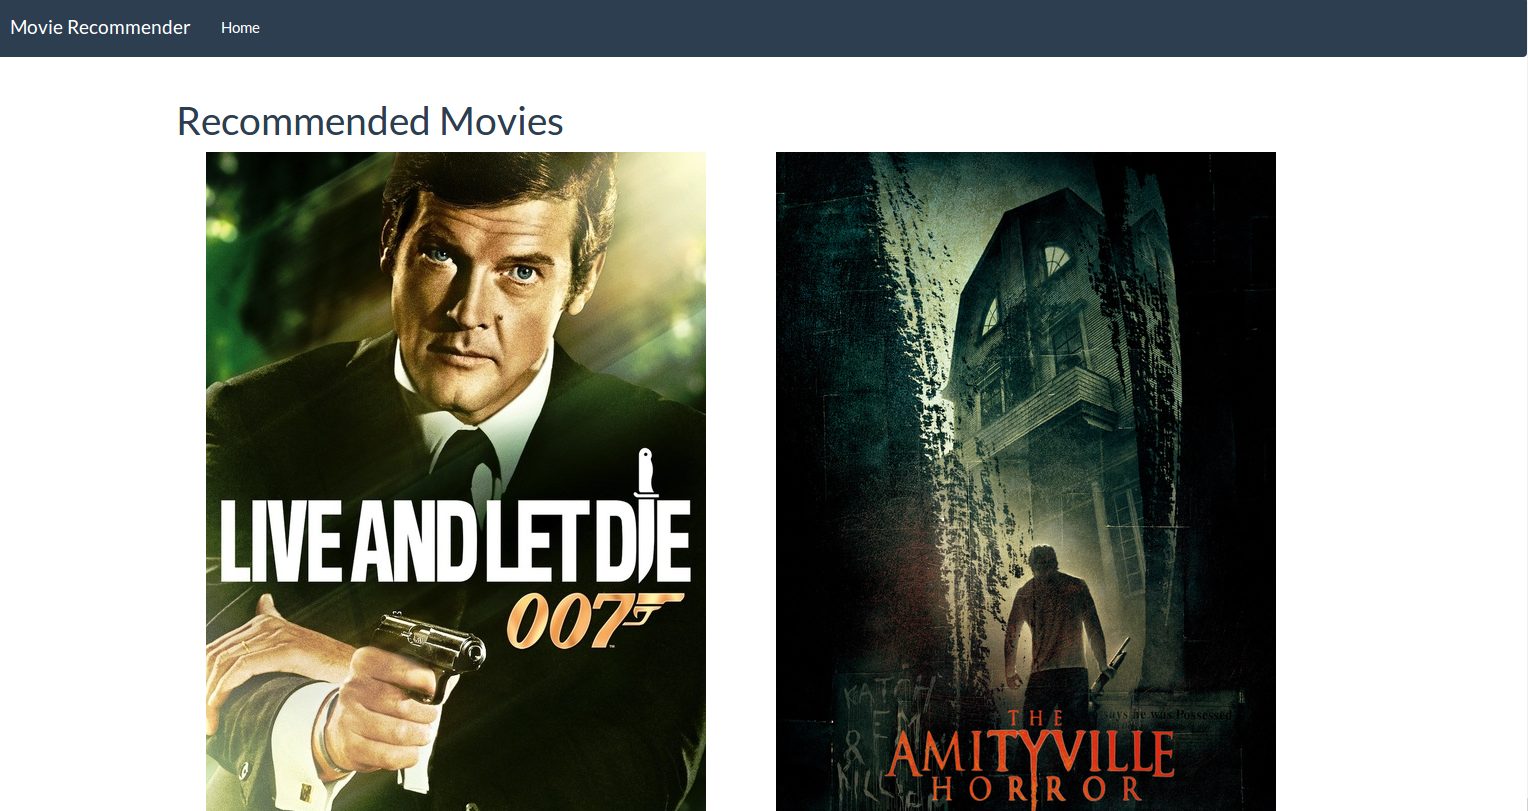
Here’s the HTML for the recommended movies page:
<!DOCTYPE html>
<html lang="en">
<head>
  <meta charset="UTF-8">
  <title></title>
  <link rel="stylesheet" href="/assets/css/bootstrap.min.css">
  <link rel="stylesheet" href="/assets/css/style.css">
</head>
<body>
  <div id="wrapper">
    <div class="navbar navbar-default">
      <div class="navbar-header">
        <button type="button" class="navbar-toggle" data-toggle="collapse" data-target=".navbar-responsive-collapse">
          <span class="icon-bar"></span>
          <span class="icon-bar"></span>
          <span class="icon-bar"></span>
        </button>
        <a class="navbar-brand" href="">Movie Recommender</a>
      </div>
      <div class="navbar-collapse collapse navbar-responsive-collapse">
        <ul class="nav navbar-nav">
          <li><a href="/">Home</a></li>
        </ul>
      </div>
    </div>

    <div class="container">

      <div class="row">
        <h1>Recommended Movies</h1>
        <div id="recommended-movies" class="col-md-12">
        <?php
        foreach($recommended_movies as $rm){
        ?>
        <div class="col-md-6">
          <img src="http://image.tmdb.org/t/p/w500<?php echo $rm['_source']['poster_path'] ?>" alt="<?php echo $rm['_source']['title'] ?>">
          <h4><?php echo $rm['_source']['title']; ?></h4>
          <div class="release-date">
          <?php echo $rm['_source']['release_date']; ?>
          </div>
          <div class="genre">
          <?php echo $rm['_source']['genre']; ?>
          </div>
          <div class="overview">
          <?php
          echo $rm['_source']['overview'];
          ?>
          </div>
        </div>

        <?php
        }
        ?>
        </div>
      </div>

    </div>
  </div>

</body>
</html>
What we’re doing above is looping through the $recommended_movies array and then echoing out the values for the relevant fields: the title, release date, genre, overview and the image.
Deploying the Engine
At this point, we are ready to deploy the engine – we need to assign the app to it. To do that, navigate to the directory where your engine is saved and open the engine.json file. It should look something like this:
{
  "id": "default",
  "description": "Default settings",
  "engineFactory": "wern.RecommendationEngine",
  "datasource": {
    "params" : {
      "appName": "INVALID_APP_NAME"
    }
  },
  "algorithms": [
    {
      "name": "als",
      "params": {
        "rank": 10,
        "numIterations": 20,
        "lambda": 0.01,
        "seed": 3
      }
    }
  ]
}
We need to change two things: the appName under the datasource.params object and the appId on that same object. If you’re not sure what the app ID is, you can execute the pio app list command in your terminal. It should look something like this:

Just copy the value under the ID column.
After updating, your engine.json file should look something like this:
{
  "id": "default",
  "description": "Default settings",
  "engineFactory": "wern.RecommendationEngine",
  "datasource": {
    "params" : {
      "appId": 1,
      "appName": "MovieRecommendationApp"
    }
  },
  "algorithms": [
    {
      "name": "als",
      "params": {
        "rank": 10,
        "numIterations": 20,
        "lambda": 0.01,
        "seed": 3
      }
    }
  ]
}
Next, we need to build the engine by executing the pio build command in the root directory of your engine. This downloads all the files that the engine needs and bakes them into the engine. This might take a while depending on your computer’s speed and internet connection. I recommend adding the --verbose option so that you can see exactly what’s going on.
Once that’s done, it should show something similar to the following:
[INFO] [Console$] Your engine is ready for training.
Once you see that, you can access the app in your browser and start liking and disliking movies until it shows the link that leads to the movie recommendation page. To train the data, you need to execute the pio train command. Make sure you’re still in the engine directory when you execute this.
If the training completed successfully it should show something like this:
[INFO] [CoreWorkflow$] Training completed successfully.
If not, you probably got something like the following:
[ERROR] [Executor] Exception in task 0.0 in stage 42.0
If that’s the case, you can try changing the numIterations under the algorithms property of your engine.json file. For me, changing it to 10 worked.
"algorithms": [
  {
    "name": "als",
    "params": {
      "rank": 10,
      "numIterations": 10,
      "lambda": 0.01,
      "seed": 3
    }
  }
]
The error has something to do with the input data and the available memory in the computer: the problem is that Apache Spark needs a lot of memory in order to train the data for a specific number of iterations. The fewer iterations are required, the less memory it will need. If your system doesn’t have the memory required, you get that error. That’s why decreasing the number of iterations works.
Next, you can deploy the engine with the pio deploy --port 8192 command. This will deploy the recommendation engine and it will be accessible at port 8192 of your computer. It should show some information about the engine and the server when you access http://IP:8192 in your browser, where IP is your local machine’s IP (192.168.10.10 in the case of Homestead Improved). You can also go back to the browser and access the movie recommendation page. It should now contain some movie recommendations.
Now you can add the pio train and pio deploy commands to your crontab so that it executes every 5 minutes. This way it constantly runs in the background to train new data and deploys when ready.
*/5 * * * * cd /path/to/engine; pio train
*/5 * * * * cd /path/to/engine; pio deploy
Conclusion
In this tutorial, you have learned how to use PredictionIO to provide machine learning capabilities to your PHP app. You can check out this project’s Github repo to see the full source.
We’ve barely scratched the surface in this series and there’s much more that you can do with PredictionIO. I recommend that you check out the official docs if you want to learn more.
If you know of any alternatives to PredictionIO or some interesting use cases, let us know in the comments!