Building a Hacker News Reader with Lumen

In this tutorial, we’re going to build a reader for Hacker News. We will be using the Hacker News API and the Lumen framework to implement this.
The final output looks something like this:
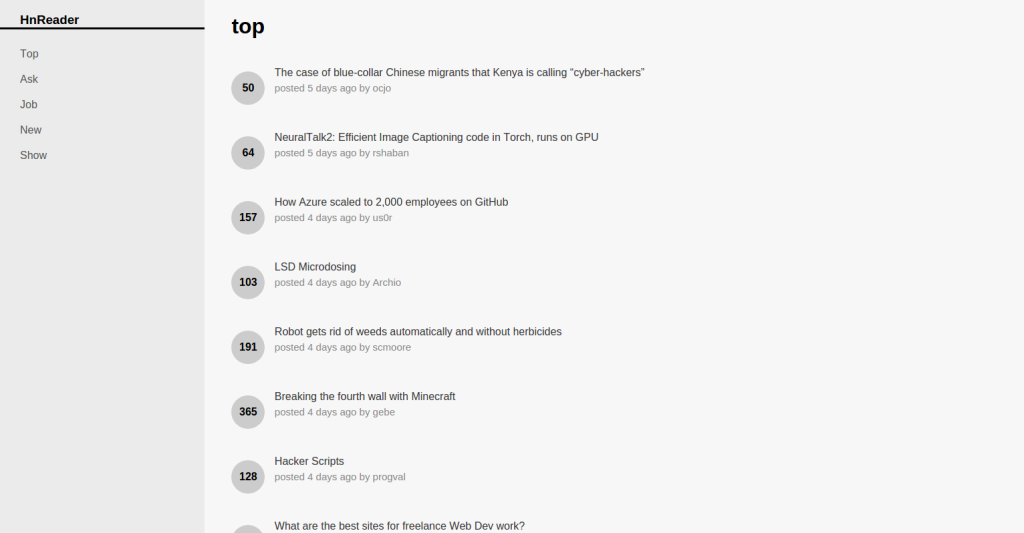
If you’re excited, let’s go ahead and jump right into it.
Installing and Configuring Lumen
The first thing that you need to do is to install Lumen. You can do so with the following command, where hnreader is the folder you want the project installed into and --prefer-dist just speeds up the download of the required Composer packages:
composer create-project laravel/lumen hnreader --prefer-dist
Create an .env file with the contents:
APP_DEBUG=true

APP_TITLE=HnReader

DB_CONNECTION=mysql
DB_HOST=localhost
DB_PORT=3306
DB_DATABASE=hnreader
DB_USERNAME=homestead
DB_PASSWORD=secret
APP_DEBUG allows us to turn on debugging in Lumen so that we can see the errors in the app. And the DB_* is for the database configuration. We will be using the MySQL database for storing the items that we will be getting from the Hacker News API. This way, we won’t need to make a separate HTTP request every time a user accesses the app. You will probably just leave the values for DB_CONNECTION, DB_HOST, DB_PORT as they are if you’re using Homestead Improved. Of course, we need to create the database, too.
mysql -u homestead -psecret
CREATE DATABASE hnreader;
Next, let’s open the bootstrap/app.php file and uncomment the following line:
Dotenv::load(__DIR__.'/../');
This specific line loads the configuration options from the .env file created earlier.
Also uncomment the following line so that you can use facades such as DB:
$app->withFacades();
Database
For this app, we’re only going to need one table for storing the items that we’ve fetched from the API. You can create the table by creating a new migration with the following command:
php artisan make:migration create_items_table
That will create a new migration in the database/migrations directory. Open the file and update the contents of the up and down method to the following:
public function up()
{
    Schema::create('items', function(Blueprint $table){
        $table->integer('id')->primary();
        $table->string('title');
        $table->text('description');
        $table->string('username');
        $table->char('item_type', 20);
        $table->string('url');
        $table->integer('time_stamp');
        $table->integer('score');
        $table->boolean('is_top');
        $table->boolean('is_show');
        $table->boolean('is_ask');
        $table->boolean('is_job');
        $table->boolean('is_new');
    });
}

public function down()
{
    Schema::drop('items');
}
What the up method does is create the items table. Here’s a brief description of each of the fields:
- id – the unique item ID that comes from the API.
- title – the title of the item. This is the field that we’ll be displaying later on in the news page.
- description – a brief description of the item. This will be displayed on hover in a tooltip.
- username – the username of the user who submitted the item on hacker news.
- item_type – the type of item. This can either be story or job.
- url – the URL pointing to the full details of the item. This is usually the website of the item that was added but it can also be empty, in which case the full description of the item is available on the hacker news website itself.
- time_stamp – the unix timestamp for time of submission.
- score – the current ranking of the item.
The following are flags representing whether the item belongs to the top stories, show HN, ask HN, Hacker News job postings or if it is newly posted.
- is_top
- is_show
- is_ask
- is_job
- is_new
Under the down method we simply drop the table.
Schema::drop('items');
To run the migration use the following command:
php artisan migrate
This will create the table in the database.
Adding the Routes
Open the app/routes.php file and add the following:
$app->get('/{type}', 'HomeController@index');
$app->get('/', 'HomeController@index');
The first route allows us to respond to requests for a specific type of items. Things like jobs, new stories, top stories, and others. The second route is for the home page.
News Updater
In order to add or update the news items in the database, we use Laravel’s task scheduler. Lumen is basically the lightweight version of Laravel, so the task scheduler is available in Lumen as well. This allows us to update the database at a specific time. For example, at 8:00pm every day.
To work with the task scheduler, we first need to create a task. You can do that by creating a new file inside the app/Console/Commands directory. Name the file UpdateNewsItems.php:
<?php
namespace App\Console\Commands;

use Illuminate\Console\Command;

use DB;
use GuzzleHttp\Client;

class UpdateNewsItems extends Command
{

    protected $name = 'update:news_items';

    public function fire()
    {


        $client = new Client(array(
            'base_uri' => 'https://hacker-news.firebaseio.com'
        ));

        $endpoints = array(
            'top' => '/v0/topstories.json',
            'ask' => '/v0/askstories.json',
            'job' => '/v0/jobstories.json',
            'show' => '/v0/showstories.json',
            'new' => '/v0/newstories.json'
        );

        foreach($endpoints as $type => $endpoint){

            $response = $client->get($endpoint);
            $result = $response->getBody();

            $items = json_decode($result, true);

            foreach($items as $id){
                $item_res = $client->get("/v0/item/" . $id . ".json");
                $item_data = json_decode($item_res->getBody(), true);

                if(!empty($item_data)){

                    $item = array(
                        'id' => $id,
                        'title' => $item_data['title'],
                        'item_type' => $item_data['type'],
                        'username' => $item_data['by'],
                        'score' => $item_data['score'],
                        'time_stamp' => $item_data['time'],
                    );

                    $item['is_' . $type] = true;

                    if(!empty($item_data['text'])){
                        $item['description'] = strip_tags($item_data['text']);
                    }

                    if(!empty($item_data['url'])){
                        $item['url'] = $item_data['url'];
                    }

                    $db_item = DB::table('items')
                        ->where('id', '=', $id)
                        ->first();

                    if(empty($db_item)){

                        DB::table('items')->insert($item);

                    }else{

                        DB::table('items')->where('id', $id)
                            ->update($item);
                    }
                }
            }
        }
        return 'ok';

    }
}
This class inherits from Illuminate’s Command class, so we need to import it.
use Illuminate\Console\Command;
Import the database class and Guzzle so that we can work with the database and make HTTP requests using the Guzzle HTTP Client.
use DB;
use GuzzleHttp\Client;
Specify the name of the command:
protected $name = 'update:news_items';
This allows us to use artisan to execute this command from the terminal like so:
php artisan update:news_items
Under the fire method, create a new instance of the Guzzle Client and declare an array containing the various endpoints in the Hacker News API. In the case of this app, we’ll only be using the endpoints for the top stories, ask HN, jobs, show HN and new stories.
$client = new Client(array(
    'base_uri' => 'https://hacker-news.firebaseio.com'
));

$endpoints = array(
    'top' => '/v0/topstories.json',
    'ask' => '/v0/askstories.json',
    'job' => '/v0/jobstories.json',
    'show' => '/v0/showstories.json',
    'new' => '/v0/newstories.json'
);
Loop through all of the endpoints so that we can add or update the news items available to each of those.
foreach($endpoints as $type => $endpoint){
    ...
}
Inside the loop we make a request to the Hacker News API and convert the contents of the response body to an array. This array contains the IDs of the news items that have been returned for the current endpoint.
$response = $client->get($endpoint);
$result = $response->getBody();

$items = json_decode($result, true);
Loop through all those IDs and make a separate request to the API to get more information about each item. Here we’re using the item endpoint (/v0/item/{ITEM_ID}.json). Once we get the response back, we construct the data that we will be saving in the database based on the data that has been returned by the API. Notice that we’re checking if the response actually has some content. This is because sometimes the IDs returned from a specific endpoint (e.g. top stories) don’t actually point to an actual item.
foreach($items as $id){
    $item_res = $client->get("/v0/item/" . $id . ".json");
    $item_data = json_decode($item_res->getBody(), true);

    if(!empty($item_data)){

        $item = array(
            'id' => $id,
            'title' => $item_data['title'],
            'item_type' => $item_data['type'],
            'username' => $item_data['by'],
            'score' => $item_data['score'],
            'time_stamp' => $item_data['time'],
        );
    }

    ...
To be able to easily fetch items based the route the user accesses later on, we set the value of a specific type to true.
$item['is_' . $type] = true;
Set the description and URL if they are present in the item.
if(!empty($item_data['text'])){
    $item['description'] = strip_tags($item_data['text']);
}

if(!empty($item_data['url'])){
    $item['url'] = $item_data['url'];
}
Create a new row for the item in the database if it doesn’t already exist, and update it if it already exists.
$db_item = DB::table('items')
    ->where('id', '=', $id)
    ->first();

if(empty($db_item)){

    DB::table('items')->insert($item);

}else{

    DB::table('items')->where('id', $id)
        ->update($item);
}
Return something at the end of the function to signal that this is where the function ends.
return 'ok';
Now that we’re done creating a new task, it’s time to add it to the console kernel. Open the app/Console/Kernel.php file to do that. Under the commands array, add the path to the task that we’ve just created.
protected $commands = [
     'App\Console\Commands\UpdateNewsItems',
];
Under the schedule function, add the command and specify the time at which it will run. 19:57 here means that the command update:news_items should run every day at 7:57pm.
protected function schedule(Schedule $schedule)
{
    $schedule->command('update:news_items')->dailyAt('19:57');
}
Next, you need to make sure that the app uses the same timezone used in the server. Open the .env file and add the timezone configuration:
APP_TIMEZONE=Asia/Manila
Just change Asia/Manila to a valid PHP timezone which applies to your server. You can get a list of valid timezones in the List of Supported Timezones page.
Lastly, add a new item to cron by executing the following command:
sudo crontab -e
And on the last line add the following:
* * * * * php /path/to/hn-reader/artisan schedule:run >> /dev/null 2>&1
Be sure to change /path/to/hn-reader/ to the actual path of the app in your file system. You can test things out by executing the following command while inside the root directory of the app.
php artisan schedule:run
Of course, this will have no effect if the time specified in the scheduler doesn’t match the time you’re running the command at, so tweak it for a real test.
News Page
For the news page, create app/Http/controllers/HomeController.php:
<?php

namespace App\Http\Controllers;

use Laravel\Lumen\Routing\Controller as BaseController;
use DB;

class HomeController extends BaseController {

    private $types;

    public function __construct(){
        $this->types = array(
            'top',
            'ask',
            'job',
            'new',
            'show'
        );
    }

    public function index($type = 'top'){

        $items = DB::table('items')
            ->where('is_' . $type, true)
            ->get();

        $page_data = array(
            'title' => $type,
            'types' => $this->types,
            'items' => $items
        );

        return view('home', $page_data);
    }

}
Inside the class we declare a private variable called $types. This is where we store the types of items that can be viewed in the news page. Note that these are the same as the keys that we’ve used earlier in the $endpoints array in the task for updating news items.
In the index function, we’re accepting the type as an argument and default it to top. This way, the home page shows the top stories by default.
Then, we fetch the items depending on the type that was set to true. Each item can have more than one type enabled. For example, a job posting might also be one of the top stories so it has a value of true for both is_job and is_top fields in the table, which means that some items are repeated across different pages.
Once we have fetched the items, we can now add them to an array to be supplied as the data for the news page. Here we’re also passing in the different types, so that the user can select which HN items they want to view. The title of the page is set to the current type.
$page_data = array(
    'title' => $type,
    'types' => $this->types,
    'items' => $items
);

return view('home', $page_data);
The view for displaying news (resources/views/home.blade.php) contains the following:
<!DOCTYPE html>
<html lang="en">
<head>
    <meta charset="UTF-8">
    <title>{{ env('APP_TITLE') }}</title>
    <link rel="stylesheet" href="{{ url('assets/css/hint.min.css') }}">
    <link rel="stylesheet" href="{{ url('assets/css/style.css') }}">
</head>
<body>
    <div id="sidebar">
        <h3>{{ env('APP_TITLE') }}</h3>
        <ul id="types">
            @foreach($types as $type)
            <li>
                <a href="/{{ $type }}">{{ ucwords($type) }}</a>
            </li>
            @endforeach
        </ul>
    </div>

    <div id="items-container">
        <h1>{{ $title }}</h1>
        <ul id="items">
            @foreach($items as $item)
            <li class="item">
                <span class="item-score">{{ $item->score }}</span>
                <a href="{{ URLHelper::getUrl($item->id, $item->url) }}">
                    <span class="item-title hint--bottom" data-hint="{{ str_limit(strip_tags($item->description), 160) }}">{{ $item->title }}</span>
                    <span class="item-info">posted {{ \Carbon\Carbon::createFromTimestamp($item->time_stamp)->diffForHumans() }} by {{ $item->username }}</span>
                </a>
            </li>
            @endforeach
        </ul>
    </div>
</body>
</html>
We’re loading APP_TITLE from the .env file earlier by calling the env function.
We then generate the URL for hint.css and the main stylesheet using the url helper. Following that, we loop through all the types and format the unordered list accordingly.
The next part shows the current type that’s being viewed and loops through all the items that have been fetched from the database. Here we’re using a custom helper class called URLHelper to return the correct URL that links to the actual item. This is needed because some items doesn’t actually have a website, so the URL would be the hacker news page assigned to that specific item. This is true for all Ask HN items. We’ll look at the code for that helper shortly. For now, just remember that we’re passing in the ID and the URL to the getURL function of that class.
For the time that the item is posted, we are converting the unix timestamp to a human friendly time such as 4 seconds ago. This is done with the help of Carbon.
For the item description, we’re using hint.css to display it. In the span that contains the item title we added the hint--bottom class to control the position of the tooltip, while data-hint contains the description text which is limited to 160 characters by using the str_limit helper function.
In URLHelper (app/Helpers/URLHelper.php), the getURL function checks if the URL is empty. If it’s not, then it returns the URL. Otherwise, it returns the HN URL pointing to the page assigned to the item.
<?php

class URLHelper {

    public static function getURL($id, $url = ''){
        if(!empty($url)){
            return $url;
        }
        return "https://news.ycombinator.com/item?id={$id}";
    }
}
Before we can use this helper, we need to do one more modification in composer.json. Under the autoload object, look for classmap. That’s an array containing the paths to the directories whose files are autoloaded. Since we’ve saved the URLHelper under the app/Helpers directory, we add in app/Helpers to the classmap array.
"autoload": {
    "psr-4": {
        "App\\": "app/"
    },
    "classmap": [
        "database/",
        "app/Helpers"
    ]
},
Finally, we add the stylesheet (public/assets/css/style.css).
body {
    font-family: Helvetica Neue, Helvetica, Arial, sans-serif;
    padding: 0;
    margin: 0;
}

h1 {
    padding-left: 40px;
}

#sidebar {
    width: 20%;
    float: left;
    background-color: #EBEBEB;
    position: fixed;
    height: 100%;
}

#items-container {
    width: 80%;
    float: left;
    position: relative;
    margin-left: 20%;
    background-color: #F7F7F7;
}

ul li {
    list-style: none;
}

#sidebar h3 {
    border-bottom: 3px solid;
    padding: 0;
    padding-left: 30px;
}

#types li {
    padding: 10px 30px;
}

ul#types {
    padding: 0;
}

#types li a {
    text-decoration: none;
    color: #575757;
}

#items {
    padding: 0 20px;
}

#items li a {
    text-decoration: none;
    color: #3A3A3A;
    display: inline-block;
}

#items li {
    padding: 20px;
}

#items li:hover {
    background-color: #DFDFDF;
}

.item-score {
    font-weight: bold;
    display: inline-block;
    width: 50px;
    border-radius: 50%;
    background-color: #ccc;
    height: 50px;
    text-align: center;
    line-height: 50px;
    margin-right: 10px;
}

.item-info {
    display: inline-block;
    width: 100%;
    font-size: 15px;
    color: #8A8A8A;
    margin-top: 5px;
}
Conclusion
That’s it! In this tutorial, you’ve learned how to work with the Hacker News API to build a news reader. We’ve only used a portion of the API in this tutorial, so be sure to check out the documentation if you want to use more of its features. All the source code used in this tutorial is available in this Github repo. Questions? Comments? Suggestions? Leave them below!