Forecasting the Weather with Your Raspberry Pi and Bluemix

IBM Bluemix and Raspberry Pi are a perfect combination when it comes to building a device with incredible potential. In this series, we’ve been exploring that potential and slowly building up what our Raspberry Pi can do. In the first article, we explored how to connect up a Raspberry Pi to IBM Bluemix, IBM Watson and Node-RED and in the second, we gave our Raspberry Pi a voice with IBM Watson’s text to speech. If you haven’t read those just yet, I’d recommend reading them and then heading back here! In this article, we’re going to give our Pi the ability to tell us the weather forecast for our area.
Artwork by SitePoint/PatCat, Logo rights: IBM and Raspberry Pi Foundation
This example can be completely standalone from the previous creation, but it will use the same nodes for the text to speech functionality — so you’ll want to keep those around!
Adding the Weather Company Data Service to Bluemix
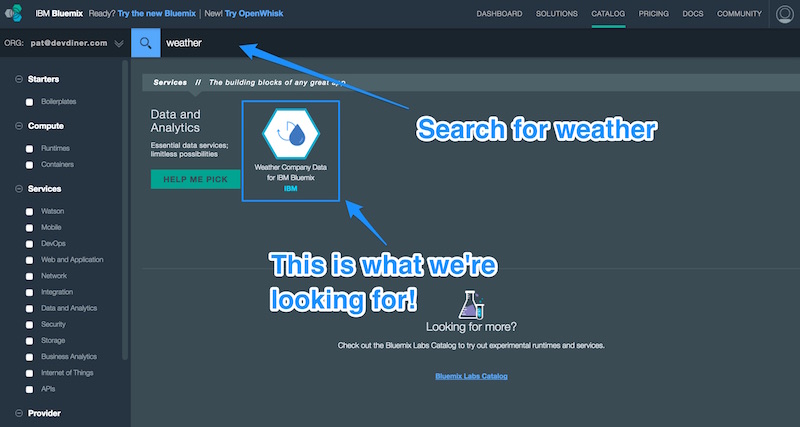
In order to bring you some pretty valuable weather results, the guys at IBM literally purchased The Weather Company. This means you now have access to all of that worldwide data, forecasts and more! There’s a lot there. To add it into your IBM Bluemix set up, head back over to the Bluemix Services page and type in “weather” to filter your options and find the “Weather Company Data for IBM Bluemix” service:
The initial plan available for us to test with is a free plan. It comes with the following restrictions:
The Weather Company Data Free plan allows you to make a maximum of 10 calls to The Weather Company per minute, up to a maximum of 10,000 API calls, for each Bluemix Account.
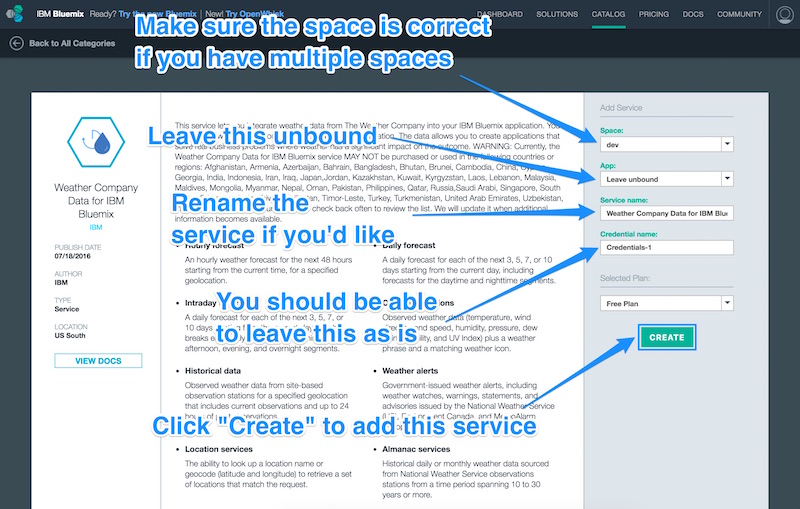
In the options that pop up, leave your space as “dev” (if that’s the space you’ve been using in the other tutorials), leave the service unbound so you can reuse it in other apps, rename the service if you’d like (I left it as is), leave the credentials as is and click “Create”!
In order to be able to use this service from Node-RED (or anywhere really), we’ll need our credentials that prove we’re the ones asking for it. Head to the “Service Credentials” page and copy the username and password details somewhere safe:

Accessing our Weather Data in Node-RED
Open up the same flow as we had from the previous tutorials (if you are starting from scratch, you’ll be able to follow along with most of these steps, just know you’ll need to go back to part 2 for details on how to do the text to speech bit).
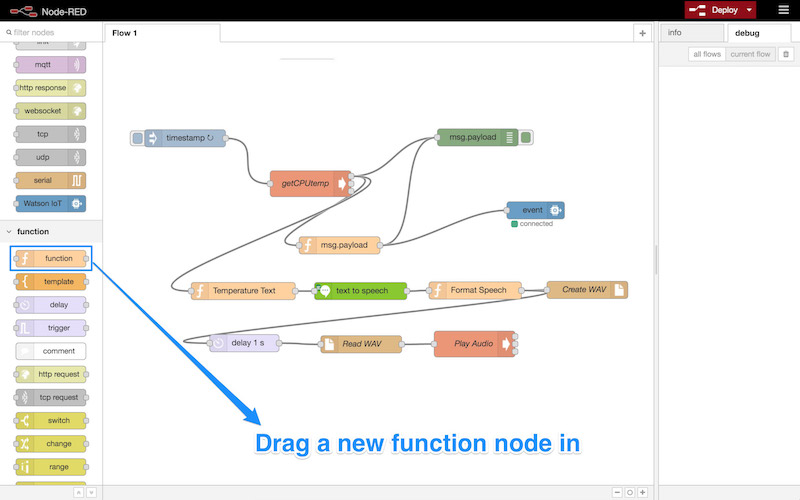
We drag a new function node into our flow, I put it underneath the other one (you could create a whole new flow for this if you’d like):
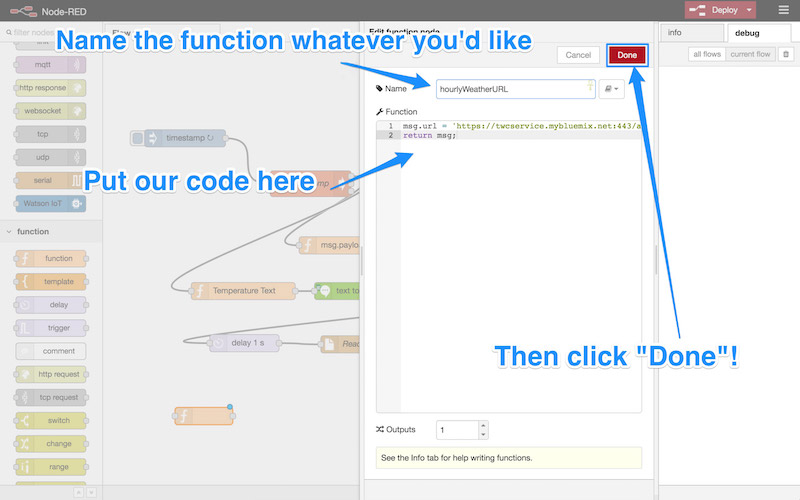
Name that function “hourlyWeatherURL”, or whatever you’d like. Then put in the following JavaScript code:
msg.url = 'https://twcservice.mybluemix.net:443/api/weather/v1/geocode/{latitude}/{longitude}/forecast/hourly/48hour.json?units=m&language=en-US';
return msg;
You’ll notice there are two spots you need to customise there. Add in your own latitude and longitude into the {latitude} and {longitude} fields. If you aren’t sure of your city’s values, NASA has a lovely latitude and longitude finder. For my city, Sydney, it looked like so:
msg.url = 'https://twcservice.mybluemix.net:443/api/weather/v1/geocode/-33.8671417236/151.2071075439/forecast/hourly/48hour.json?units=m&language=en-US';
return msg;
There is also a units variable you can change if you’d prefer farenheit rather than celsius. units=m is for the metric system (celsius) and units=e is for the imperial system (farenheit). As we use the celsius here in Australia, I used units=m.
Once you’ve put all that in, click “Done”:
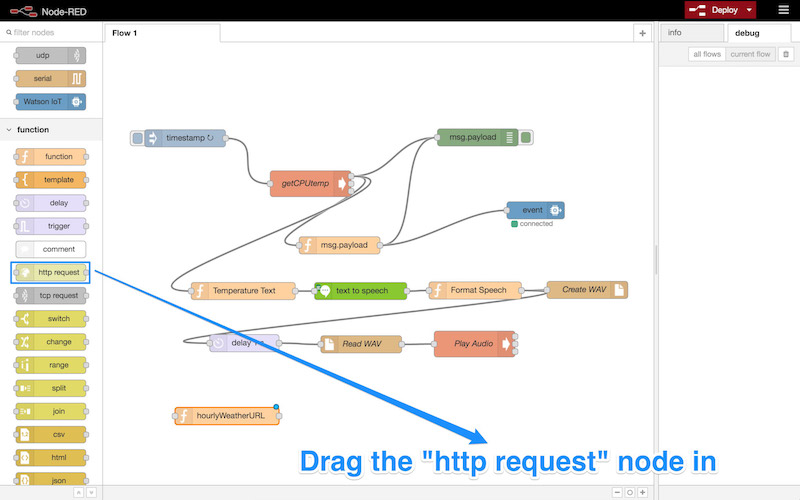
Next up, we want to be able to make a HTTP request to the weather data service that uses this URL we set up in the first node. To do so, we drag the “http request” node in:
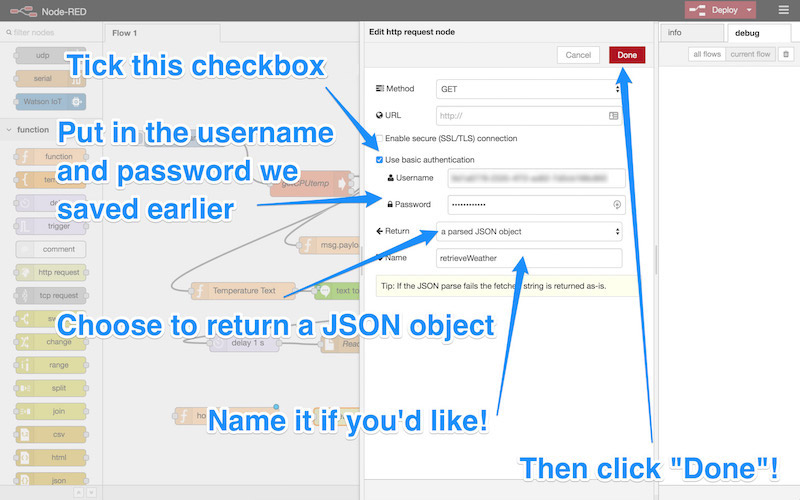
Then, we double click it to open up its settings and do the following:
- Tick “Use basic authentication” — we’ll need that to include the username and password we copied earlier.
- Add in the aforementioned username and password from earlier.
- Select the “a parsed JSON object” as our return value — that way we’ll receive a JSON object that we can further filter through in following nodes.
- Name it whatever you’d like, I chose “retrieveWeather”.
- Click “Done”!
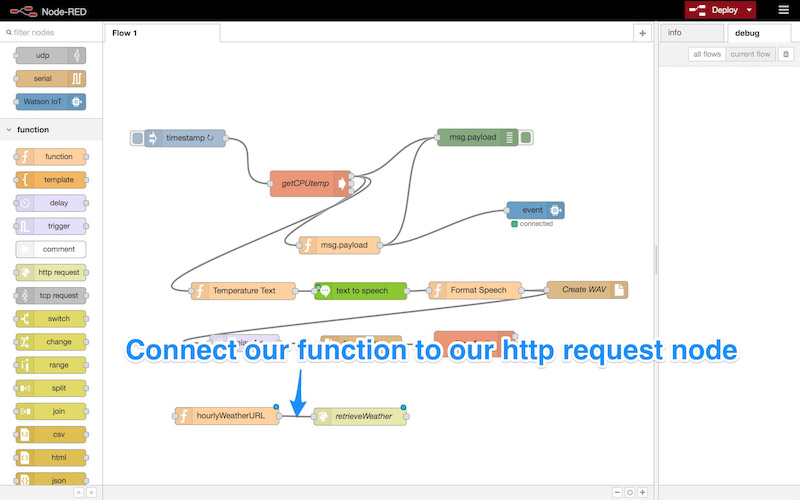
In order to bring the URL from our first node, we’ve gotta remember to connect it to our “http request” node:
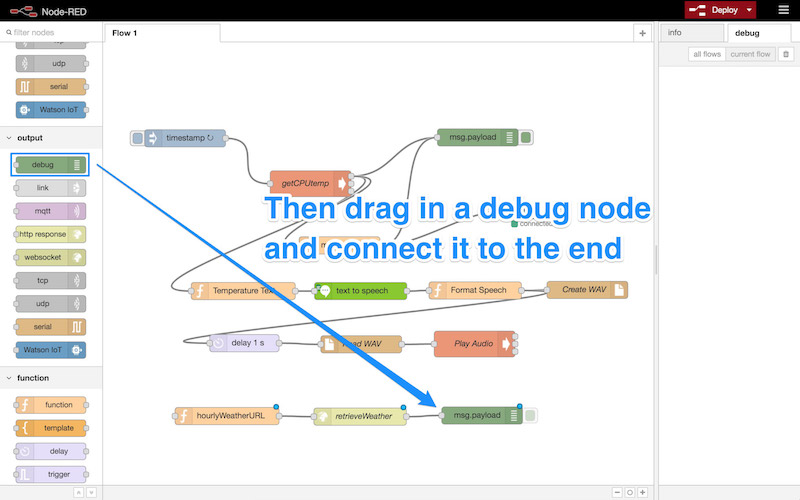
Then, drag in a “debug” node and connect it to the end. This will let us see logs of what data is coming through to check if it’s working:
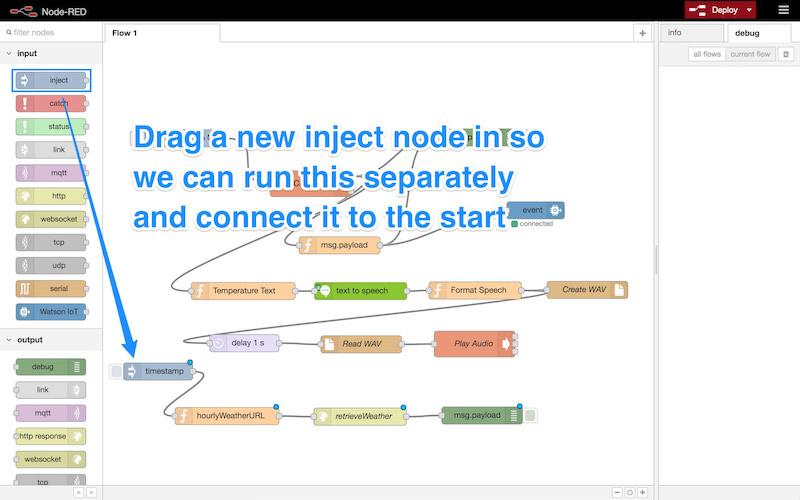
Finally, we need a way of starting this whole process. To do that, drag in a new “inject” node and connect it to the start:
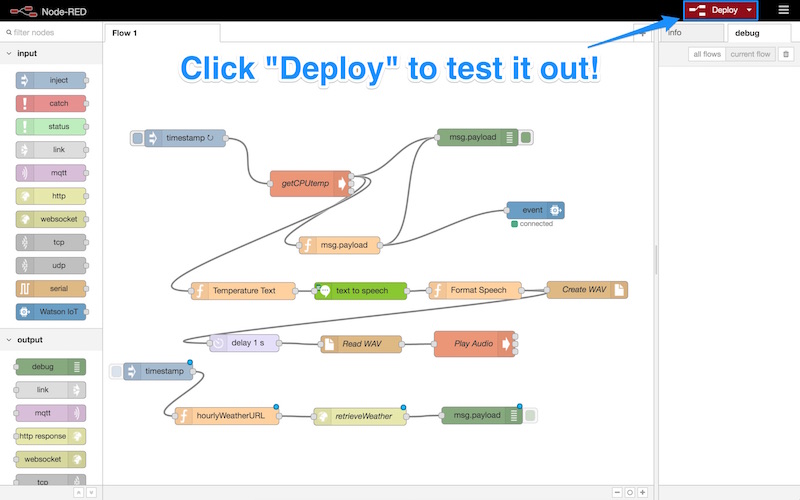
Now we’re ready to test it out! Click “Deploy”:
In order to run our flow, we need to click the small square button on our “inject” node with the label “timestamp”. That will run our request for the weather and bring up the data in our debug tab:
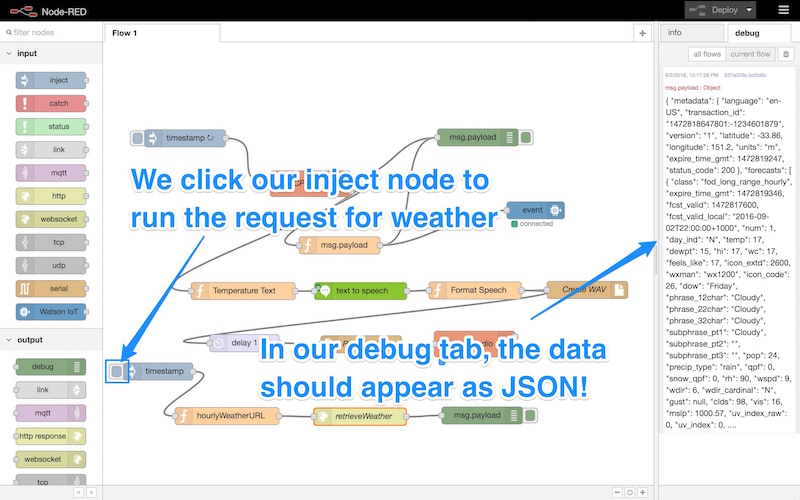
Excellent! That should all be working as we’d hoped.
The msg.payload that is returned contains an array of forecasts for the upcoming hours. We take the first item in the array to get the current hour. The msg.payload looks a bit like so overall:
{
  "metadata": {
    ...
  },
  "forecasts": [
    {
      "class": "fod_long_range_hourly",
      "expire_time_gmt": 1472786395,
      "fcst_valid": 1472785200,
      "fcst_valid_local": "2016-09-02T13:00:00+1000",
      "num": 1,
      "day_ind": "D",
      "temp": 16,
      "dewpt": 14,
      "hi": 16,
      "wc": 16,
      "feels_like": 16,
      "icon_extd": 1200,
      "wxman": "wx2500",
      "icon_code": 12,
      "dow": "Friday",
      "phrase_12char": "Rain",
      "phrase_22char": "Rain",
      "phrase_32char": "Rain",
      "subphrase_pt1": "Rain",
      "subphrase_pt2": "",
      "subphrase_pt3": "",
      "pop": 93,
      "precip_type": "rain",
      "qpf": 0.96,
      "snow_qpf": 0.0,
      "rh": 92,
      "wspd": 8,
      "wdir": 17,
      "wdir_cardinal": "NNE",
      "gust": null,
      "clds": 100,
      "vis": 6.0,
      "mslp": 1006.8,
      "uv_index_raw": 0.83,
      "uv_index": 1,
      "uv_warning": 0,
      "uv_desc": "Low",
      "golf_index": 2,
      "golf_category": "Very Poor",
      "severity": 1
    },
    ... (the next hours go here)
Now let’s move beyond the basic debug log and get our Pi to tell us this data through its previously learnt ability to speak!
Reminding our Pi How to Talk
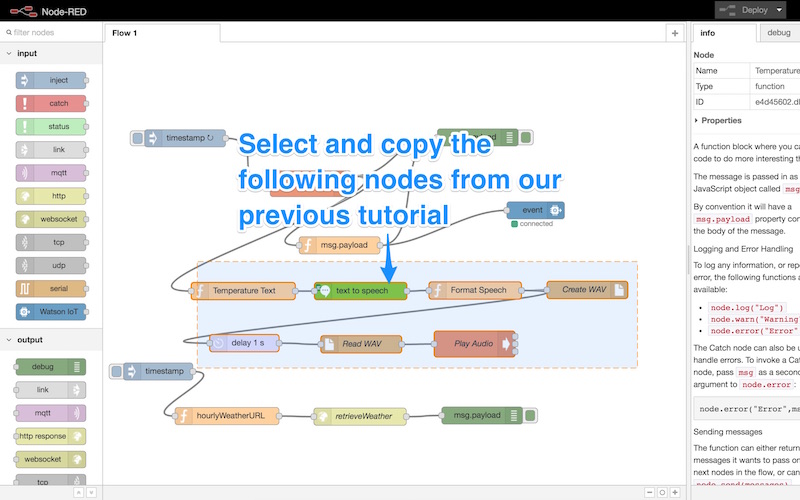
To get our Pi to speak, just like it does with the CPU temperature from the previous article in the series, we just need to copy the last seven nodes from that tutorial. You can copy them by dragging and selecting them all, then pressing Ctrl+C (on Windows) or Cmd+C (on Mac):
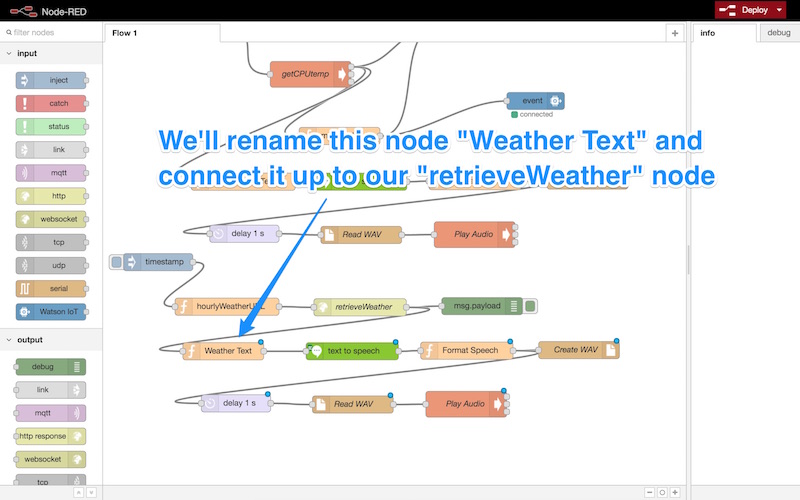
Paste them using Ctrl+V (on Windows) or Cmd+V (on Mac), and place them neatly underneath our new weather flow. Rename the first function “Weather Text” and connect it to our “retrieveWeather” node so that it also takes the output from this node:
Then double click the “Weather Text” function. Within this, we can set up what we would like our Pi to say. To start with, lets put this JavaScript code into it:
msg.payload = "The current temperature is " +
              msg.payload.forecasts[0].temp +
              " degrees celsius";
return msg;
This will tell our Pi that we’d like the output to be structured to return “The current temperature is X degrees celsius” (if you’re using fahrenheit, feel free to change that here).
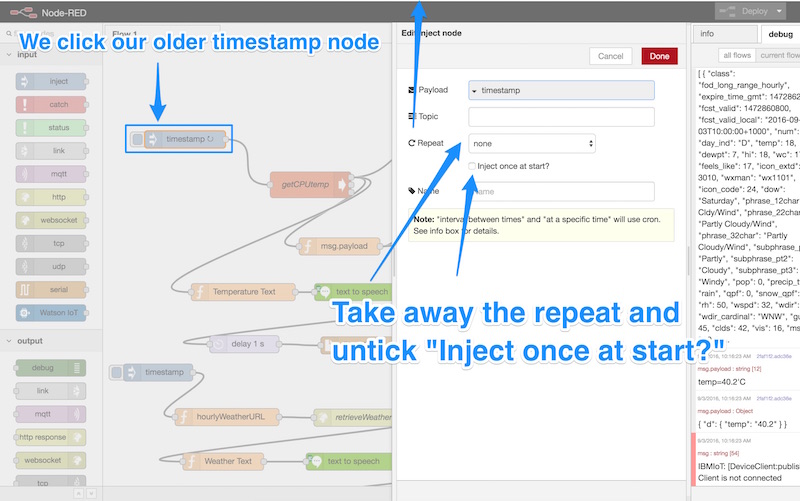
Now, you can skip this particular step if you’d like the Pi to continue telling you its CPU temperature, however I personally find the weather a bit more interesting and don’t want to hear about its CPU anymore. If you’re like me, double click the older “timestamp” node from the other flow. Take away the repeat setting and untick “Inject once at start?”. This way, that flow will only run if we click and tell it to run. Then click “Done”:
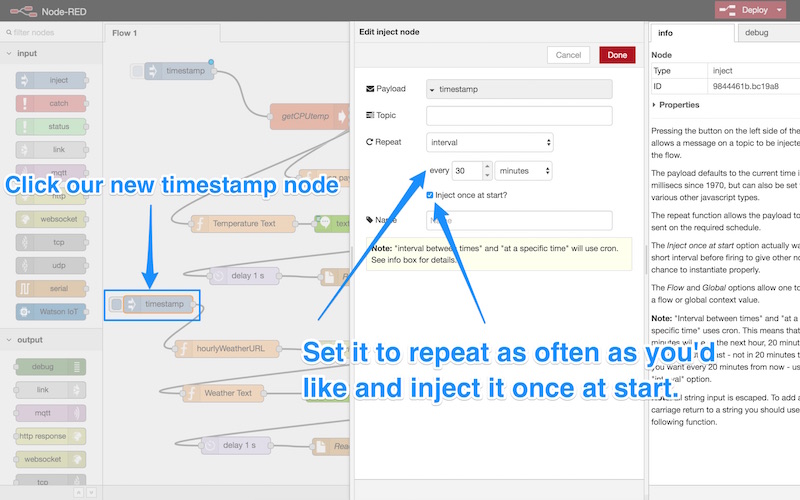
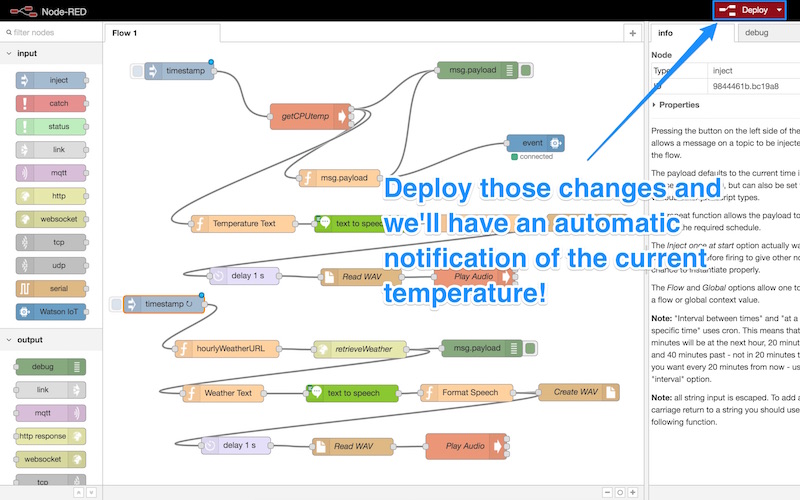
Now, we can set our weather flow to run automatically instead. Double click the new “timestamp” node and set it to repeat as frequently as you’d like (I chose every 30 minutes). Click “Inject once at start?” so that it runs automatically when you deploy the flow as well. Then click “Done” as usual:
Deploy those changes and we’ll have an automatic notification of the current temperature nicely spoken to us!
What Else Can We Do?
Wondering what other data is available from the service? You can find all of the possibilities that the weather API can provide on the Weather Company Data For IBM Bluemix APIs page. We are using the “48-Hour Hourly Forecast by Geocode” API in this example. To make our example a bit more advanced, let’s add data on whether it’ll rain in an hour like so (the next hour is just the second value in the array returned):
msg.payload = "The current temperature is " +
              msg.payload.forecasts[0].temp +
              " degrees celsius. " +
              "There is a " +
              msg.payload.forecasts[1].pop +
              " percent chance of " +
              msg.payload.forecasts[1].precip_type +
              " in an hour.";
return msg;
We can even go a step further and add info on whether the temperature (when you add humidity and wind) will actually feel like that temperature. The API has a field for that and we can access it like so:
var tempToSay = msg.payload.forecasts[0].temp != msg.payload.forecasts[0].feels_like ?
        "The current temperature is " + msg.payload.forecasts[0].temp +
        " degrees celsius, but it will feel more like " +
        msg.payload.forecasts[0].feels_like + ". " :
        "The current temperature is " + msg.payload.forecasts[0].temp +
        " degrees celsius. ";

msg.payload = tempToSay +
              "There is a " +
              msg.payload.forecasts[1].pop +
              " percent chance of " +
              msg.payload.forecasts[1].precip_type +
              " in an hour.";
return msg;
Basically, the code above only mentions the msg.payload.forecasts[0].feels_like value if it is different to the msg.payload.forecasts[0].temp value.
Conclusion
With that, we’ve got a Raspberry Pi that can tell us the weather forecast in all sorts of ways. There are a lot more bits of information in there from wind data to snow accumulation! There’s even a value representing the weather conditions for playing golf, which seems bizarrely specific. The power is now in your hands!
If you’re craving more functionality for your Raspberry Pi with Bluemix, never fear! There’s more to come in this series as we continue to explore more possibilities with the Bluemix platform. I’m quite enjoying the process and have grand aspirations here!
Have you built anything exciting with Bluemix and Raspberry Pi? Or do you have anything you’d love to make using Bluemix that you’d like us to cover? Leave a note in the comments!


