Connecting a Raspberry Pi to IBM Watson, Bluemix and Node-RED

IBM recently helped spark the Internet of Things enthusiasm into a bunch of developers by sending out Raspberry Pi 3 computers to developers who signed up for their Bluemix platform trial. I had been eager to give Bluemix and IBM Watson a try and figured this was as good a time as any to sign up! I was lucky enough to be one of the developers who received a Raspberry Pi 3 and so, I did what I always do with new emerging technology, I began tinkering and writing about my experience.
Artwork by SitePoint/PatCat, Logo rights: IBM and Raspberry Pi Foundation
This is the first part of a series of articles around combining the Raspberry Pi with IBM Watson and Bluemix. This article focuses on the various ways you can connect up the Raspberry Pi to IBM’s cloud services, along with my tips along the way for when things didn’t quite go to plan for me. It was a lot of fun and I highly recommend people give IBM Bluemix and Watson a try, especially if you have a spare Raspberry Pi lying around!
Setting Up a Quick Test of Watson IoT on Our Raspberry Pi
To set up the IBM Watson IoT Platform on our Raspberry Pi, we run the following commands on the Pi itself:
First, we download the Watson IoT Platform installer from IBM’s GitHub:
curl -LO https://github.com/ibm-messaging/iot-raspberrypi/releases/download/1.0.2.1/iot_1.0-2_armhf.debThen, we run the following command to install it:
sudo dpkg -i iot_1.0-2_armhf.debOnce this has installed, it will automatically run the IBM Watson IoT Platform service on our device. In fact, the service runs automatically each time our Pi is booted up. If you aren’t sure if it is running and want to be certain, run the following command:
service iot statusThat should bring up a response that looks something like so:
● iot.service - LSB: IoT service
   Loaded: loaded (/etc/init.d/iot)
   Active: active (running) since Fri 2016-04-29 23:33:47 UTC; 15s ago
   CGroup: /system.slice/iot.service
           └─11960 /opt/iot/iot /dev/null
If you see the above message, you’re good to go! In fact, we can already see Raspberry Pi data being streamed to the IBM’s cloud. To do so, type in:
service iot getdeviceidIt will return an ID for our device and a URL we should visit:
The device ID is abcdefghijkl
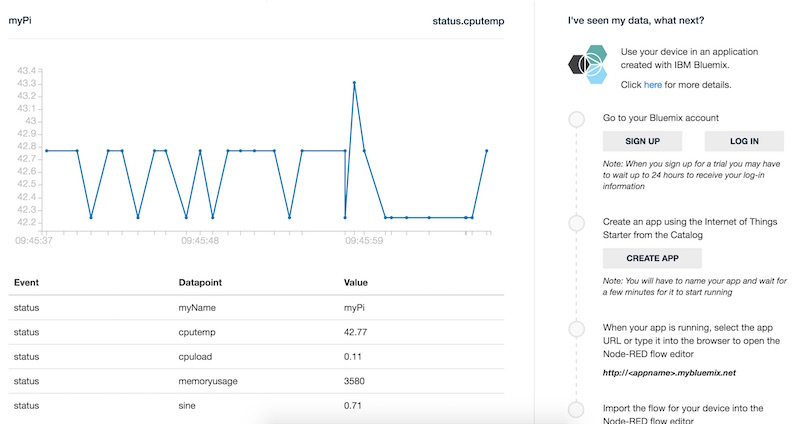
For Real-time visualization of the data, visit http://quickstart.internetofthings.ibmcloud.com/?deviceId=abcdefghijklIf we head to http://quickstart.internetofthings.ibmcloud.com/?deviceId=abcdefghijkl (with our device’s ID rather than the placeholder), we should see a pretty neat visualization from IBM! In it, we can see our Raspberry Pi’s CPU temperature and other stats from the cloud.
Now, let’s approach it in a different way and set up IBM Bluemix to handle our data.
Getting Started in Bluemix
To log into Bluemix, head to the IBM Bluemix login page. You can sign up for an IBM ID and BlueMix from there too if you do not already have an account.
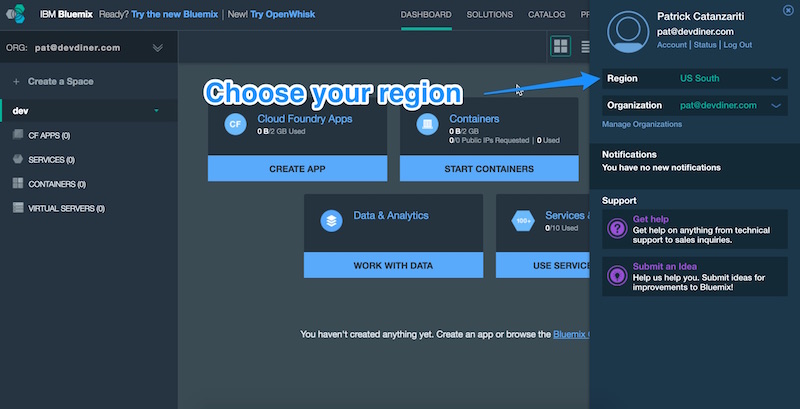
Once Bluemix loads, we select our region by clicking the top right-hand corner account icon:
Then, if Bluemix requests that we create a space in that region, we do so. I’ve named my space “dev”:

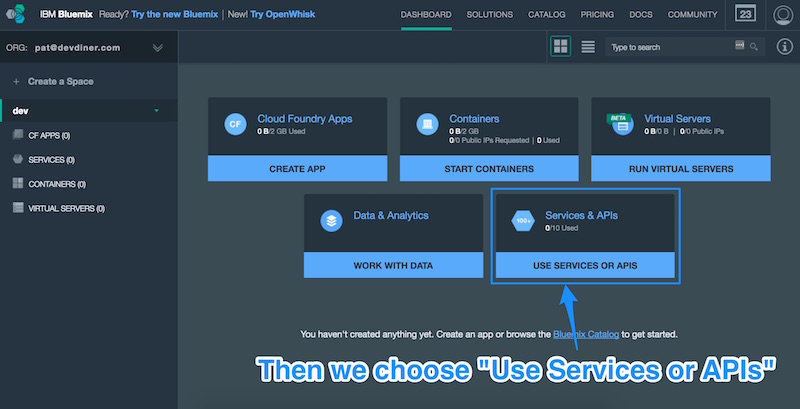
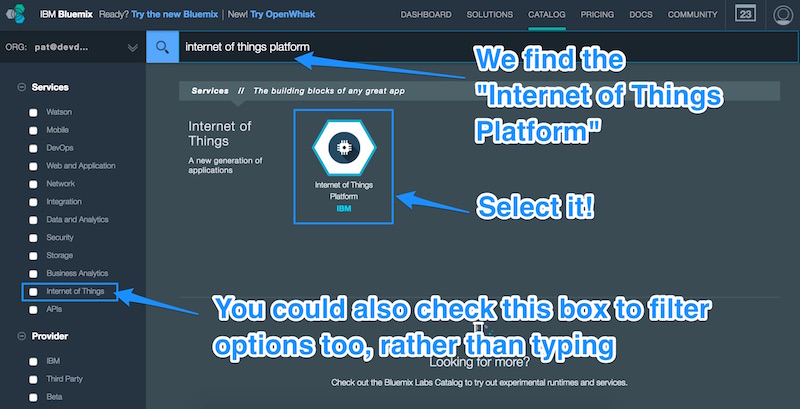
Then, we click on “Use Services or APIs” to find a good initial service for our app.
In this screen, we need to find the “Internet of Things Platform” service. You can do so by either clicking the “Internet of Things” checkbox on the left hand side to filter the selections down, or by typing into the search bar “Internet of Things Platform”. However we search for it, once we have it we select it for our app.
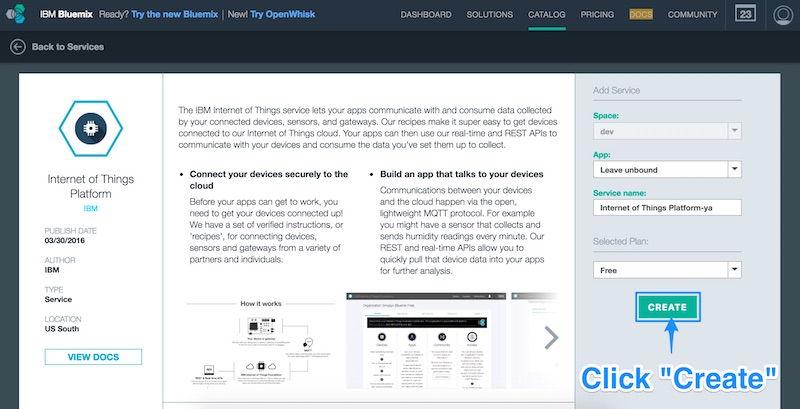
We then click “Create” on the next screen, you could change the “Service Name” if you wanted to adjust this. It doesn’t really affect much, so for my example I just left it as is. You could name it something like “Raspberry Pi Service” if you so desired:
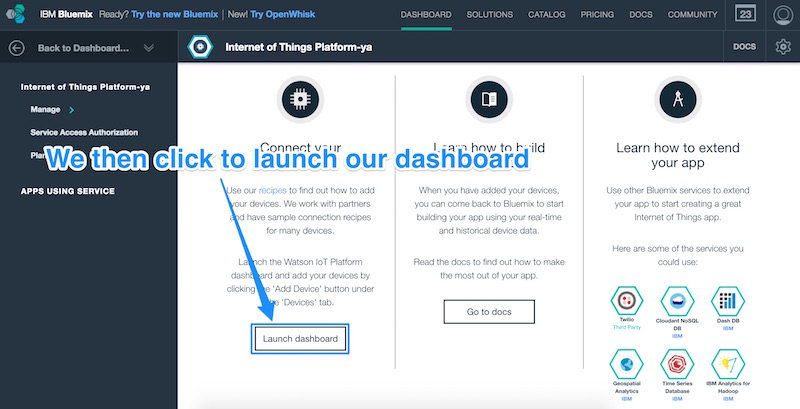
We scroll down on the welcome screen that appears and choose “Launch Dashboard”:
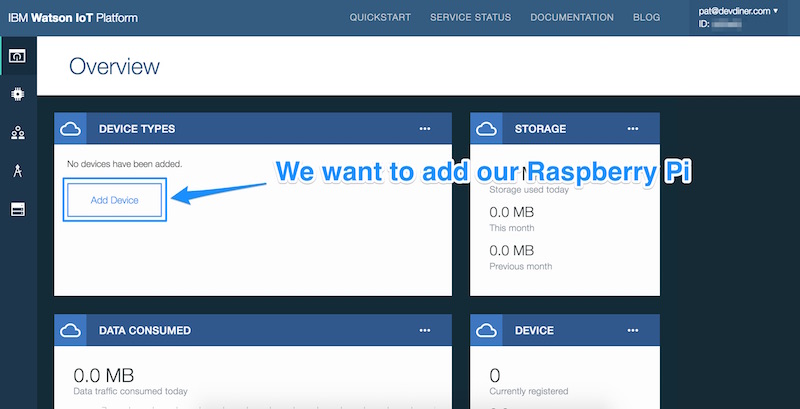
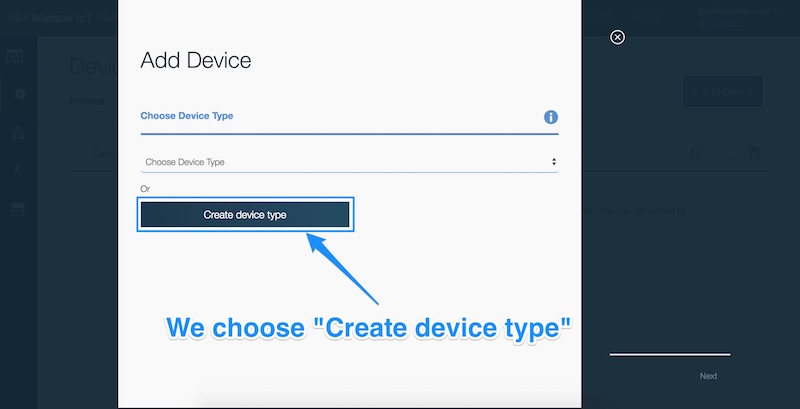
Now we can add our Raspberry Pi to this new service by clicking “Add Device”:
Click to “Create device type”:
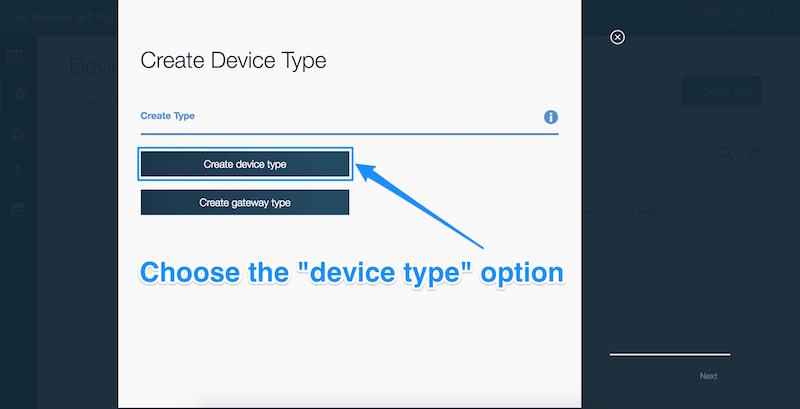
Another screen will appear asking whether we want to create a device type or gateway type. We want a device type:
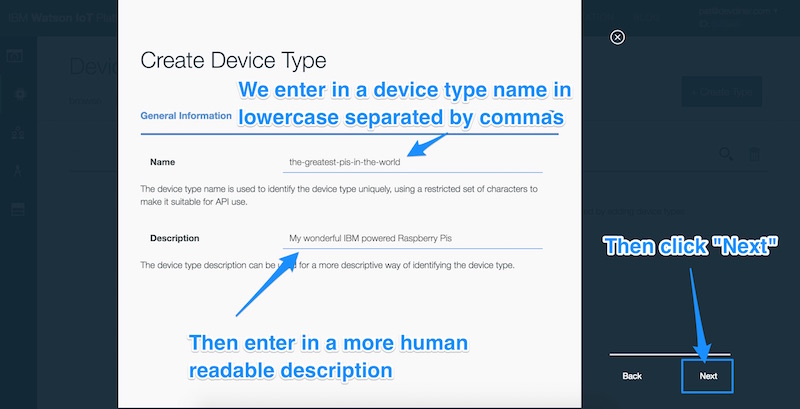
Finally, we name our device type. The first field is for a device type name that will be used in our APIs and such, so keep it lowercase and separated by dashes. e.g. “my-pis” or “iot-sample-devices”. Underneath that, you can write a longer and more human readable description:
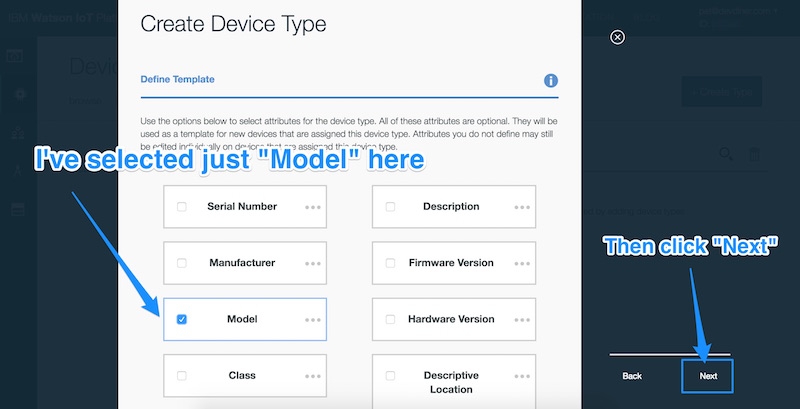
The next screen gives us options for our device template, providing fields we can use for each device to define its characteristics. This is very much up to you and what device data you’d like to record in this device type. As I am using this device type to just track Raspberry Pis, I’ve chosen only to define their “Model” (e.g. Raspberry Pi 2, Raspberry Pi 3… etc).
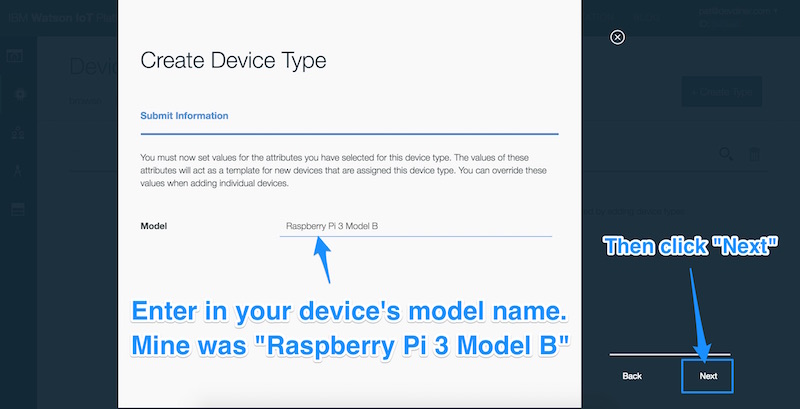
Then, we set our default model type. I set my main model type for this device template to be “Raspberry Pi 3 Model B”:
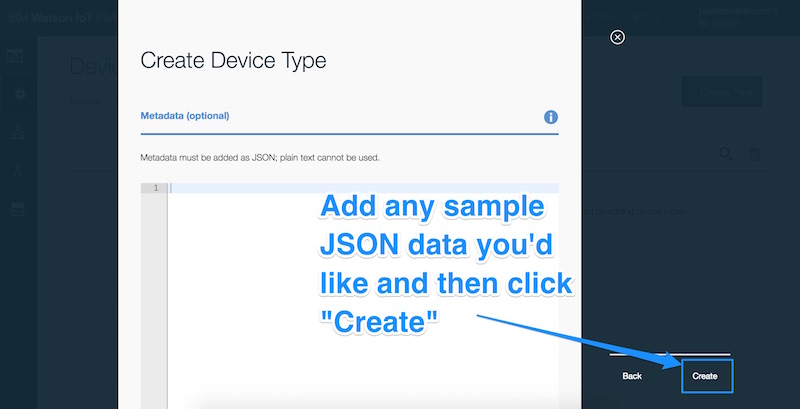
You can add your own custom metadata in JSON format if you would like, for our purposes in this simple tutorial, we can skip this step.
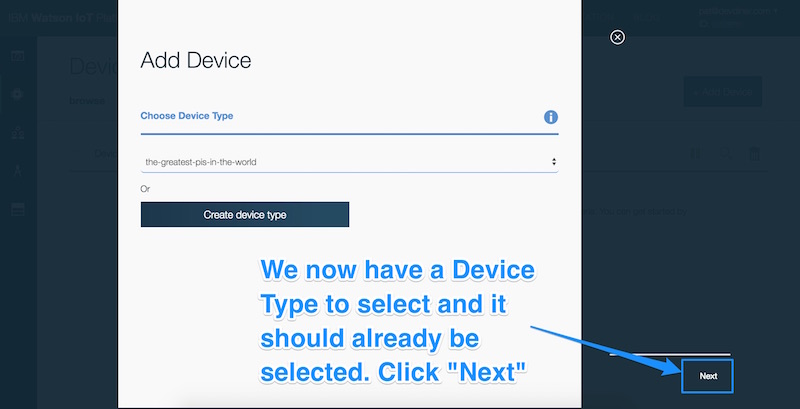
Now our device type is ready to be used! We should be back at the “Add Device” screen. This time, our new device type should be selected. Check that is the case and click “Next”.
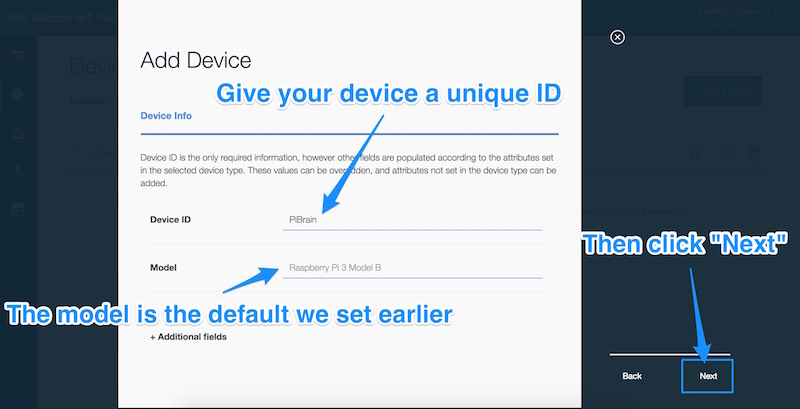
We now set up our individual device info for our Raspberry Pi into the Bluemix system. We give our device a unique ID (something that will be different to all other devices in your system) such as “PiBrain” (feel free to choose your own witty name or use mine!). The model should be the default one you set earlier. If you’ve changed to a different model, feel free to change this value. Once all these values are correct, we click “Next”:
We can skip the metadata part again, unless there is specific data you would like to store about your device. Then, we set up our authentication token. You can define a custom one or leave it blank for the system to automatically generate one for you. If you’d like to generate your own one, ensure it follows their guidelines — “The token must be between 8 and 36 characters long, and should contain a mix of lower and upper case letters, numbers, and symbols (hyphen, underscore, and period are permitted). The token should be free of repetition, dictionary words, user names, and other predefined sequences.” One tip — if you’re looking to generate one yourself, a random password generator like the one in LastPass would be great for this.
In my case, I was more than happy for them to generate one for me:
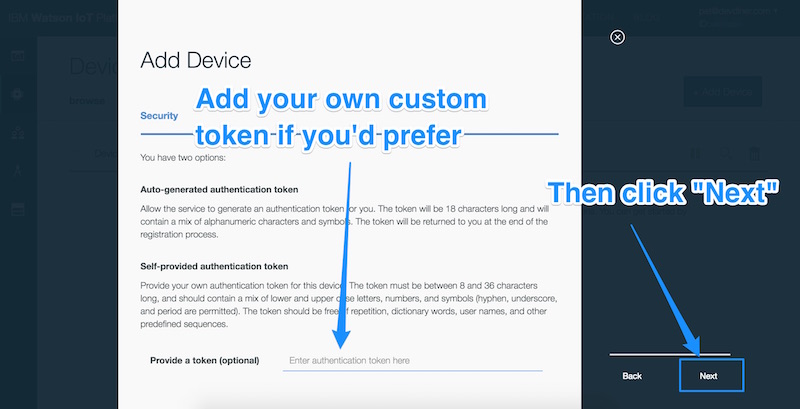
Check the details to ensure they are correct and then click “Add”:
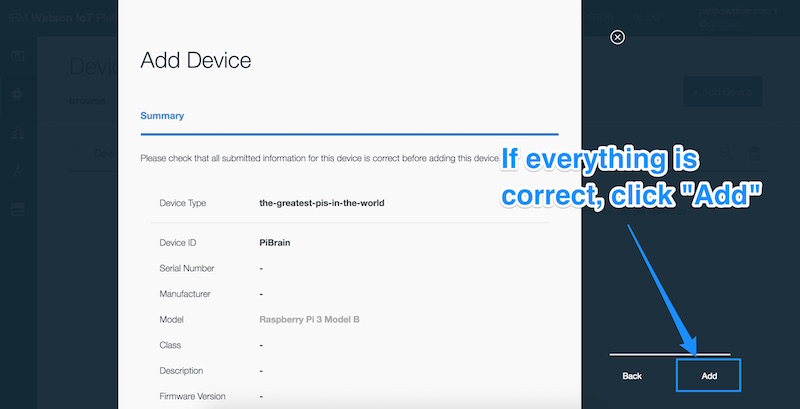
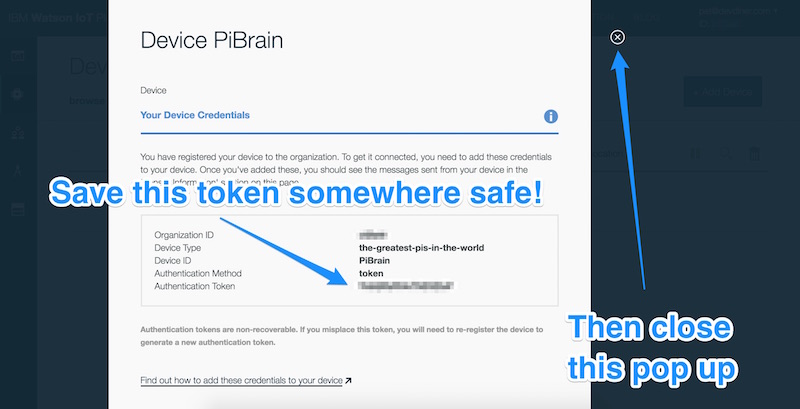
The final screen will show all of the device’s details, including the generated authentication token (or the one you put down for it). Copy all of these details into a safe and easy to find place! Especially ensure that you have the authentication token saved somewhere that’s easy to access as you cannot get this value ever again without access to your Pi. Once you have definitely got all these values saved (you do right?), close this pop-up window.
Linking Our Raspberry Pi to Our Device in Bluemix
Now we want to link up our Raspberry Pi to the device we just set up in Bluemix. To do so, we need to first stop our Watson IoT service running on the Pi that was started earlier as a test:
sudo service iot stopThen, type in the following to open up the Watson IoT config file for your Raspberry Pi (it will be created when you save the file if it does not already exist):
sudo nano /etc/iotsample-raspberrypi/device.cfgUsing the details we saved somewhere safe earlier, which should have looked like so:
Organization ID abcde
Device Type the-greatest-pis-in-the-world
Device ID PiBrain
Authentication Method token
Authentication Token YOURTOKENWOULDBEHERE
We input them into our config file in this format:
#Device configuration file
org = abcde
type = the-greatest-pis-in-the-world
id = PiBrain
auth-method = token
auth-token = YOURTOKENWOULDBEHERE
#End of Configuration file
It may be easiest to set this up in a simple text editor first, then copy it all and paste it into the editor using Ctrl + V.
We save those changes by pressing Ctrl + X and then typing “Y” when it asks if we’d like to “Save modified buffer”. Keep the file name as is to write to the same file (be sure it is /etc/iotsample-raspberrypi/device.cfg. Hit enter if it shows the right filename.
Once that is saved, we are ready to set up Node-RED!
Setting Up Node-RED on Our Raspberry Pi
To do some more advanced things, we will install and run Node-RED, an environment that lets you work with connected devices and data without needing to delve into too much coding.
Let’s go to the terminal on our Raspberry Pi and type in the following to update everything on our Raspberry Pi to the latest versions. Newer versions of Raspian for the Raspberry Pi (Raspbian Jessie), come with Node-RED and Watson IoT already. However, I found it was important to update them all to get things to work correctly. So either way, update everything to be safe or install them from scratch if you don’t have them yet!
sudo apt-get updateRun this one too:
sudo apt-get dist-upgradeIf you run Node-RED further down in this guide and you cannot see “Watson IoT” as an input or output, you need to run sudo apt-get dist-upgrade. It didn’t appear for me until I did so!
If you have a Raspberry Pi 3 or any Raspberry Pi with Raspbian Jessie installed, you won’t need to install Node-RED as it should already be there (and be updated to the latest version through that last command you just ran!).
If you do not have the latest version of Raspbian, you may need to install Node-RED. You can do this by first installing all of its dependencies:
sudo apt-get install build-essential python-dev python-rpi.gpioIf you receive an error about sudo: npm: command not found after attempting the next command, you will need to run the following to install npm first (I haven’t needed to do so on one Pi, but then needed to do this on another):
sudo apt-get install npmThen, by installing Node-RED itself via npm:
sudo npm install -g --unsafe-perm node-redIn order to have access to the the IBM Watson IoT Node, we run this command too:
sudo npm install -g node-red-contrib-ibm-watson-iot(For me, the above command didn’t work and fails due to an error with the script referencing node rather than nodejs — my guess is that this will happen on Raspbian Jessie and if so, you don’t need to worry as this is already installed for you on that version of Raspbian!).
If you would like to access Node-RED from your computer, rather than the Pi — you will need to know your Pi’s local IP address. You can find that using:
hostname -IOr, if you prefer much more detail:
ifconfigIf all is installed successfully, we should be able to run Node-RED on your Pi using the following command:
node-redWhen it runs, we should see output like so:
Welcome to Node-RED
===================

30 Apr 02:32:27 - [info] Node-RED version: v0.13.4
30 Apr 02:32:27 - [info] Node.js  version: v0.10.29
30 Apr 02:32:27 - [info] Linux 4.1.18-v7+ arm LE
30 Apr 02:32:27 - [info] Loading palette nodes
30 Apr 02:32:33 - [info] Settings file  : /home/pi/.node-red/settings.js
30 Apr 02:32:33 - [info] User directory : /home/pi/.node-red
30 Apr 02:32:33 - [info] Flows file : /home/pi/.node-red/flows_raspberrypi.json
30 Apr 02:32:33 - [info] Server now running at http://127.0.0.1:1880/
30 Apr 02:32:33 - [info] Starting flows
30 Apr 02:32:33 - [info] Started flows
If we then go to either http://127.0.0.1:1880 on our Pi itself or http://{your-pi-ip-address}:1880 from another computer on the same network, we should see Node-RED ready and waiting. Check that within the interface, underneath both Input and Output, you see Watson IoT as an option:

Linking Up Bluemix to Our Raspberry Pi
We now have the Node-RED Watson IoT Platform installed on our Pi, Node-RED installed on our Pi and Bluemix set up ready and waiting for our Pi. All that is left is to link our Pi to Bluemix through Node-RED.
IBM have a sample set of nodes that we can use as a quick test and all we need to do is import it in! Copy the JSON from this link from IBM into your clipboard. The start should look a bit like so:
[{
"id": "41e935d1.d2619c",
"type": "inject",
"z": "d100b337.680e88",
"name": "",
"topic": "",
"payload": "",
"payloadType": "date",
"repeat": "5",
"crontab": "",
"once": true,
"x": 205,
"y": 178.5,
"wires": [["8332d581.5c7d58"]]
}]
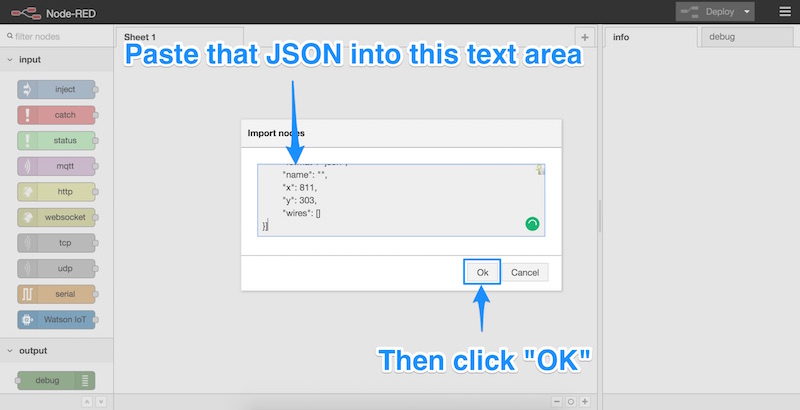
// ... actual JSON file continues past here!Then go to Menu > Import > Clipboard in Node-RED:
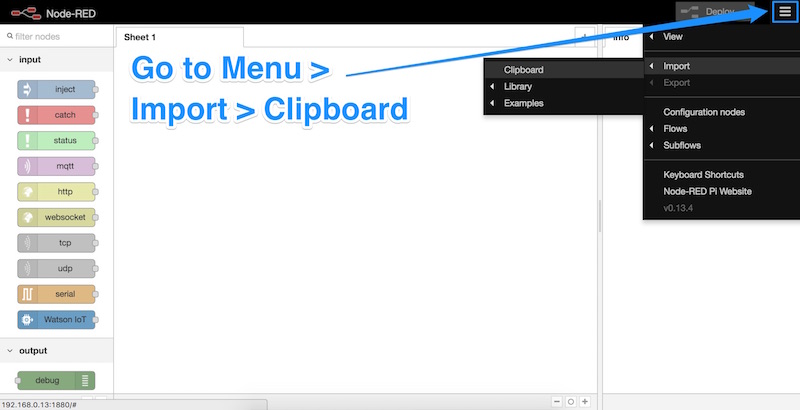
Paste that JSON data into the textarea and click OK:
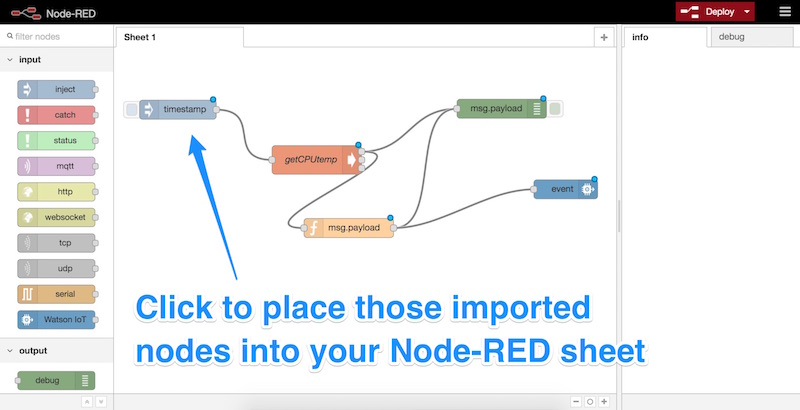
The imported nodes will now be following your mouse cursor, click to place them somewhere neat on your Node-RED sheet:
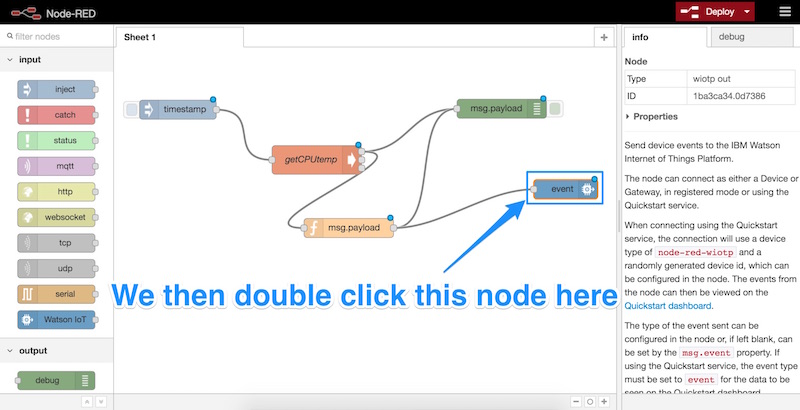
To set up Node-RED so that it can link the Pi we set up in Bluemix to our Pi here, we double click the “event” node:
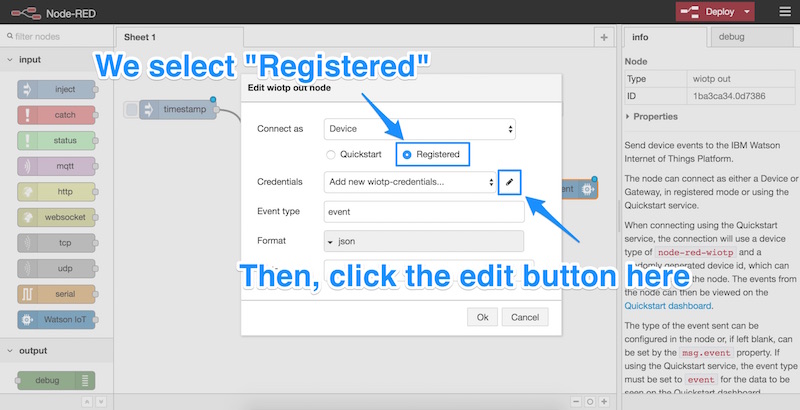
We then click “Registered” in the pop up that appears and click the pencil icon next to the “Credentials” row:
We fill in the details just as we did before in the device.cfg file on our Pi (we don’t need to worry about the “Name” field). Once done, we click “Add”:
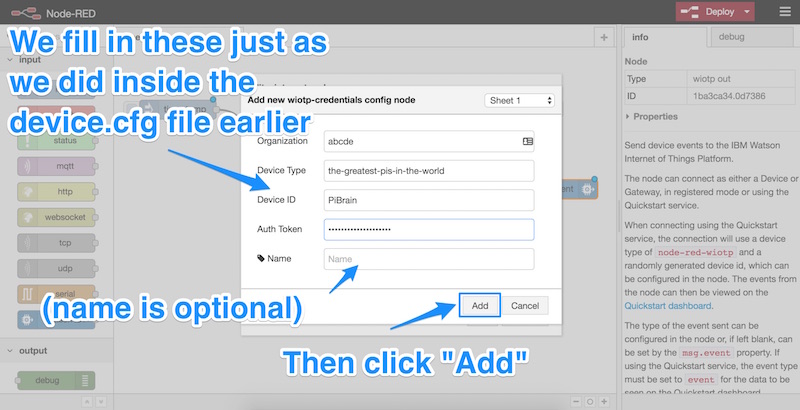
Then click “OK”.
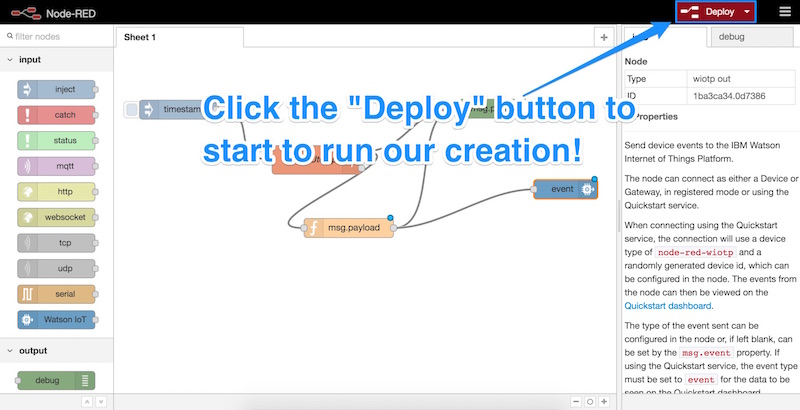
Now everything should be ready for a test run! Click the “Deploy” button in the top right hand corner:
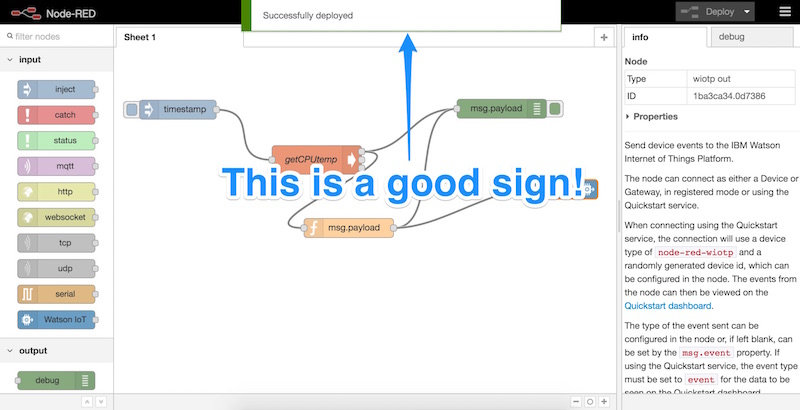
We should see a message saying “Successfully deployed”:
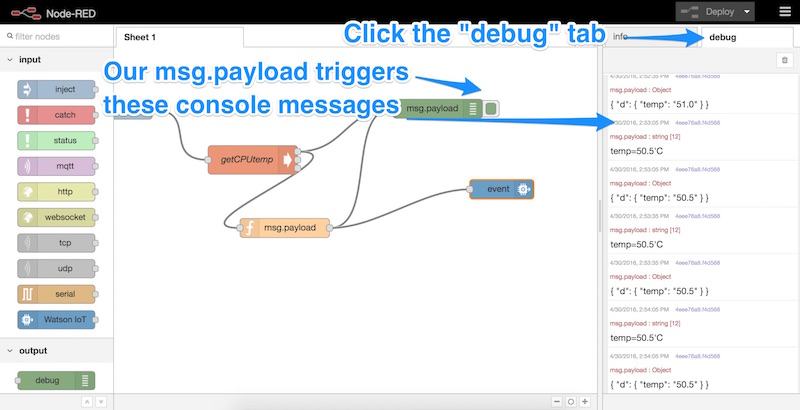
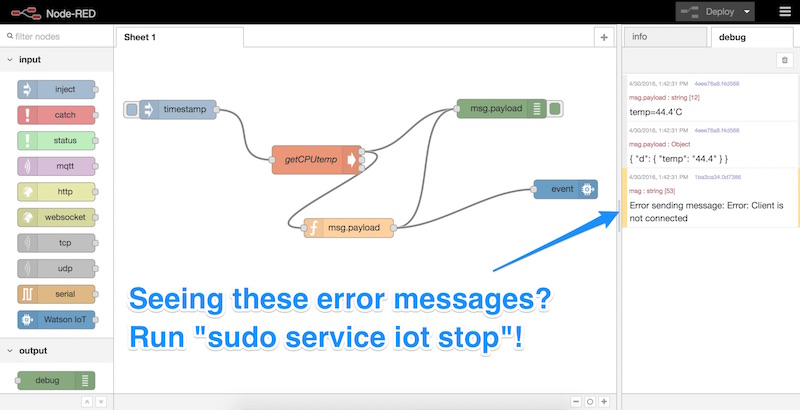
Click the “Debug” tab on the right to see the output from our nodes. The msg.payload triggers some console debugging messages which show the temperature in two formats (one string and one JSON object).
Note: If you see errors like “Error sending message: Error: Client is not connected” from the event node, you need to first run sudo service iot stop to stop the other Watson IoT service. We do not want that running at the same time! I’ve made that mistake a few times myself!
Seeing Your Values in Watson’s IoT Platform Within Bluemix
To see whether your Raspberry Pi values are coming through successfully, go to https://{YOURORGANISATIONID}.internetofthings.ibmcloud.com/dashboard/#/overview.
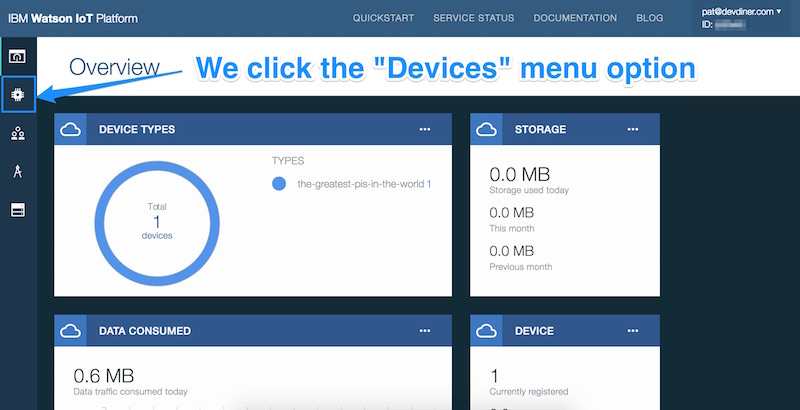
From here, we click the “Devices” option on the left hand menu (second item in the menu):
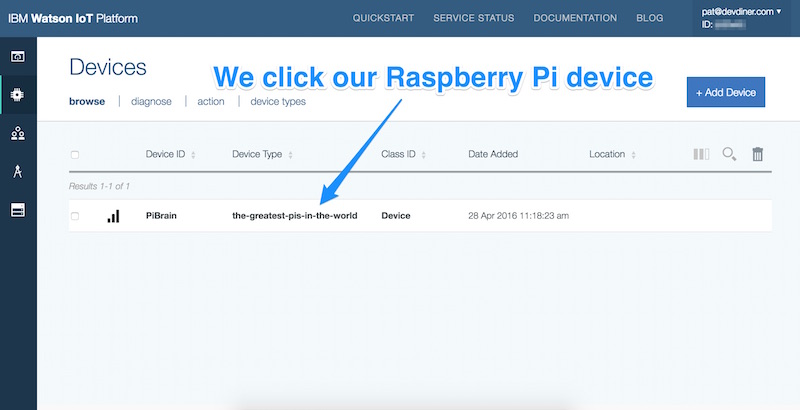
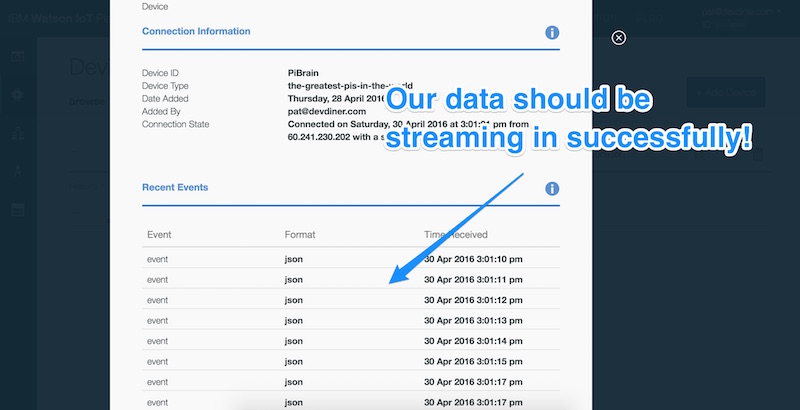
Our Raspberry Pi device should be listed here, click it to open up more details:
Our data should be streaming in successfully!
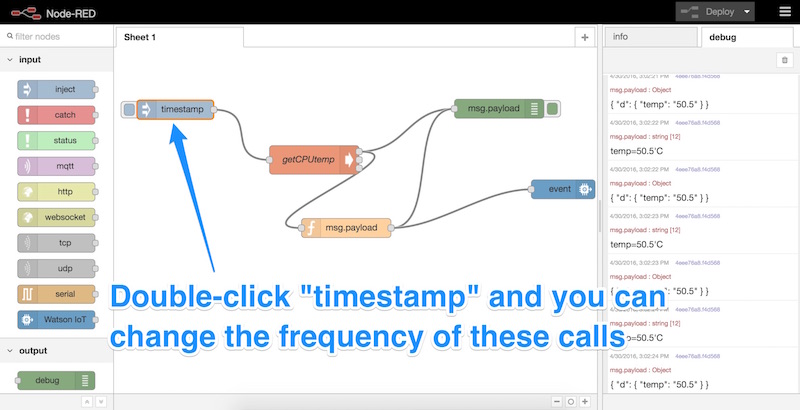
Adjusting Our Node-RED Flow
We can adjust the settings of how this Node-RED flow runs by editing the settings in each node. For example, if we double-click the timestamp node, we can change how frequently it runs:
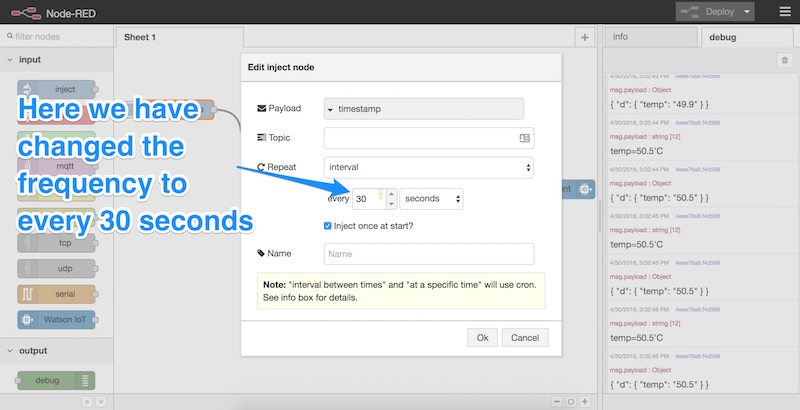
We can then change the interval to be less frequent/ more frequent. For example, below we’ve changed it to 30 seconds:
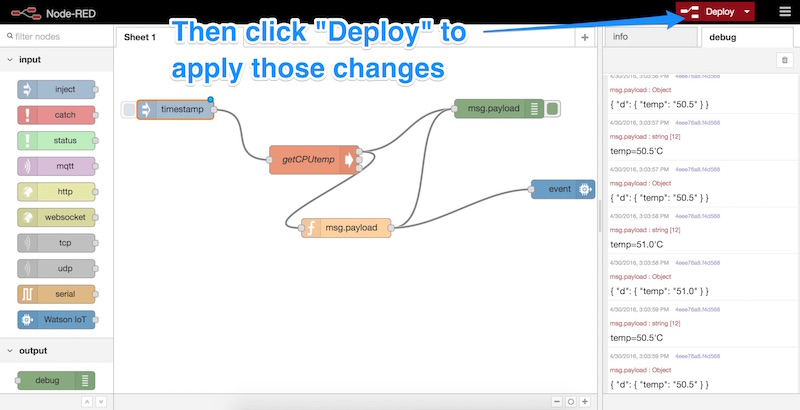
Click the “Deploy” button once again to apply those changes and slow things down a bit:
Conclusion
We now can connect up a Raspberry Pi to IBM’s IoT cloud services in a range of ways, laying the groundwork for innovatively using IBM Watson, data analysis and other cloud services with our Raspberry Pi. We can use Node-RED to build any number of features and functionality which can hook up to the cloud and various APIs. In the next article in this series, we take this further and take advantage of the cloud and IBM Bluemix by adding text to speech to give our Pi a voice!


