Tessel 2: Pairing JavaScript and the Internet of Things with Ease

The Tessel 2 is a microcontroller which allows you to build connected devices that run JavaScript and Node.js. It runs Linux at its core with Node.js running on top of that — providing access to plenty of npm modules and all of their potential. Over the next few weeks, I’ll be covering some of the possibilities available for developers using the Tessel 2. This week we will start by looking at getting your Tessel 2 up and running with a simple test app.
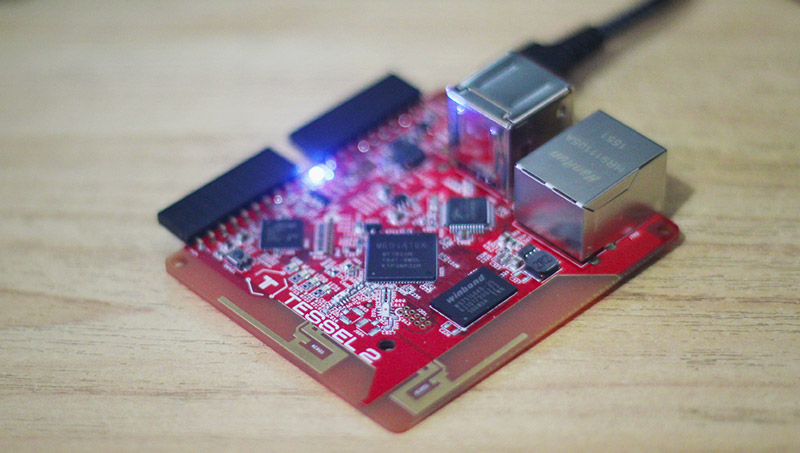
My Tessel 2 Microcontroller which I will be using for this demo!
Preparing Node.js
Make sure that you’ve got Node.js v4.2.0 or higher installed on your computer. You can check that using:
node -vIf you do not have Node.js installed yet, head over to the Node.js website and download Node.js v4.4.3.
If you are installing Node.js for the first time or looking to upgrade it to a newer version, I would recommend installing version 4.4.3 as later versions seem to have a bit of a bug with the Tessel 2 (particularly on Mac OS X). Feel free to try the latest version (chances are it was just my computer) but if you do have issues, try v4.4.3!
If you were like me and needed to upgrade Node.js, I did so initially by following this guide from David Walsh. However, it may be neater (and safer) to work with the NVM method if you have got a lot of Node dependencies running on your computer. I also reinstalled different versions with the .pkg download file from the Node.js site and it downgraded and upgraded with no issues. Whatever method you use, aim to install version 4.4.3.
The error in particular that you may see with later versions of Node after 4.4.3 occurs when trying to run t2 list. If you see the following error messages when running this command later in this guide, your version of Node may be the cause:
node(12328,0x7fff7830b000) malloc: *** error for object 0xffffffff: pointer being freed was not allocated
*** set a breakpoint in malloc_error_break to debug
Abort trap: 6
or:
ERR! WARNING: No usb controller found on this system.
INFO Crash Reported: http://crash-reporter.tessel.io/
Installing The Tessel CLI
Once you’ve definitely got a compatible version of Node running on your computer, run the following command to install Tessel’s CLI (command line interface) to your computer via npm:
npm install -g t2-cliFinding Your Tessel
After the Tessel CLI has successfully installed, plug in your Tessel to one of your USB ports and let it boot up. After about 30 seconds, run the following command to find your tessel:
t2 listThat will run and should show a list of Tessels it can find that looks like so:
INFO Searching for nearby Tessels...
        USB	Tessel-6465762064696E6572
While a name like “Tessel-6465762064696E6572” is incredibly catchy, you can rename it to make that name even better! To do so, run the following command, replacing “Castiel” with your own choice of name:
t2 rename CastielYou will see the following run through on the Tessel CLI, finishing with a success message:
INFO Looking for your Tessel...
INFO Connected to Tessel-6465762064696E6572.
INFO Changed name of device Tessel-6465762064696E6572 to Castiel
If you then run t2 list again, you should see your Tessel now has an incredibly catchy name:
INFO Searching for nearby Tessels...
        USB	Castiel
Connecting Your Tessel To Wi-Fi
The Tessel 2 comes with built in Wi-Fi, allowing it to connect to Wi-Fi networks relatively easily. To do so, run the following command:
t2 wifi -n "Your Witty WiFi Name" -p yourwifipasswordThat’ll show the following in the Tessel CLI, hopefully ending with a successful connection:
INFO Looking for your Tessel...
INFO Connected to Castiel.
INFO Wifi Enabled.
INFO Wifi Connected. SSID: Your Witty WiFi Name, password: yourwifipassword, security: psk2
The Tessel has an amber colored LED that represents Wi-Fi connectivity, if you see that blinking, then all is well!
Pushing Code Over Wi-Fi
A wonderfully convenient feature of the Tessel is the ability to push and run code from your computer to the Tessel over Wi-Fi, so that you do not need to have it connected via USB all the time. This is especially handy for those with many devices or those who have a plan for their Tessel creation that involves placing it in a hard to reach location in the home.
To give your computer access to run and push code to your Tessel over Wi-Fi, run the following command:
t2 provisionThat will set up public and private keys to allow your computer to work with the Tessel over Wi-Fi. You should see the messages like the following if everything is successful:
INFO Looking for your Tessel...
INFO Connected to Castiel.
INFO Creating public and private keys for Tessel authentication...
INFO SSH Keys written.
INFO Authenticating Tessel with public key...
INFO Tessel authenticated with public key.
Then, ensuring that you are on the same Wi-Fi network as your Tessel, run the t2 list command once more. You should now see your Tessel listed both as a USB device and a Wi-Fi one:
INFO Searching for nearby Tessels...
        USB	Castiel
        LAN	Castiel
Updating Your Tessel
Chances are high that you’ve only just received your Tessel and it has slightly older firmware on it that dates to the time it was manufactured and shipped. As is the case with many Internet of Things devices, things move fast and your Tessel is likely in need of an update. Run the following code to update your Tessel:
t2 updateIt should run and you should see something that looks like so if your Tessel is indeed in need of updating:
INFO Looking for your Tessel...
INFO Connected to Castiel.
INFO New firmware version found...0.0.12
INFO Updating Castiel to latest version (0.0.12)...
INFO Beginning update download. This could take a couple minutes..
  Downloading [====================] 100% 0.0s remaining
INFO Download complete!
INFO Updating OpenWRT (1/2)
INFO Transferring image of size 19.14 MB. This will take 2-4 minutes...
INFO Transfer complete.
INFO Starting OpenWRT update.
INFO Please do not remove power from Tessel.
INFO This process will take at least two minutes...
INFO Updating firmware (2/2)
INFO Firmware update complete!
INFO Updated Castiel from  0.0.11  to  0.0.12
You may need to hit Ctrl + C, to get back to the command line after this… for me, it finished but didn’t end the program. If that happens to you, Ctrl + C shall fix it!
Our Tessel should be completely ready for a test app. Let’s make our Tessel flash colors like crazy.
Our First Colorful Tessel App
Create a folder for your Tessel app called “rainbows” or whatever name you’d prefer. Go to that folder in your Terminal/Command Line. When you are inside the folder, type the following command to set up the initial barebones for your Tessel app:
t2 initThat will put together a basic “Hello World” app set up once it finishes running:
Created package.json.
Created .tesselinclude.
Wrote "Hello World" to index.js
Our functionality in this sample app is found within index.js. If you open that up, the initial code it places in the sample app should look like so:
// Import the interface to Tessel hardware
var tessel = require('tessel');

// Turn one of the LEDs on to start.
tessel.led[2].on();

// Blink!
setInterval(function () {
  tessel.led[2].toggle();
  tessel.led[3].toggle();
}, 100);

console.log("I'm blinking! (Press CTRL + C to stop)");
Run that code using the following command:
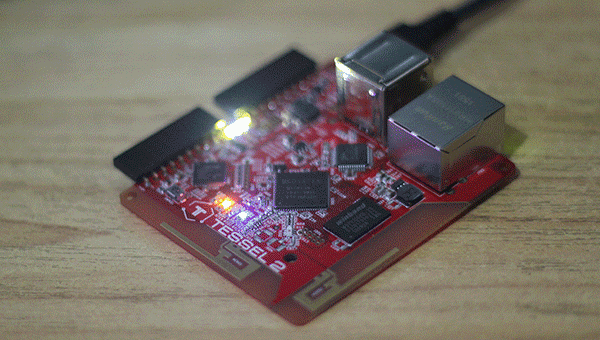
t2 run index.jsIf you run that, you’ll see two of the LEDs on your Tessel blinking back and forth. That’s an exciting first step but I prefer to ramp things up a bit. Let’s blink all four LEDs and blink them a bit more rapidly.
The Tessel 2 has four onboard LEDs — ERR (red), WLAN (amber), LED0 (green) and LED1 (blue). You will see all four lined up beside each other just above the “Tessel 2” logo and text on the board. For real world apps, chances are low that you will want to be taking over the ERR and WLAN LEDs. For a fun little test app though — I say why not!
Each LED is addressable in JavaScript within the tessel.led array. The order they are stored within this array is shown below:
- ERR (Red) –
tessel.led[0] - WLAN (Amber) –
tessel.led[1] - LED0 (Green) –
tessel.led[2] - LED1 (Blue) –
tessel.led[3]
This order matches the order they appear on the Tessel board itself.
If we adjust the index.js file above, we can access all of these LEDs, rather than just two:
var tessel = require("tessel");

tessel.led[0].on();
tessel.led[2].on();

setInterval(function() {
  tessel.led[0].toggle();
  tessel.led[1].toggle();
  tessel.led[2].toggle();
  tessel.led[3].toggle();
}, 80);

console.log("Rainbow madness! (Press CTRL + C to stop)");
In the code above, we switch on both the ERR and LED0 LEDs to start with. Then, every 80 milliseconds, we toggle all four LED states, which makes them blink in an alternating pattern — first the ERR and LED0 blink on and then the WLAN and LED1 LEDs blink. They continue doing this forever, until you press CTRL + C!
Here is a sample GIF of it in all its glory:
Conclusion
That completes the basics of getting started with a Tessel 2 microcontroller. In the next article in this series on Tessel, we will look at setting up a Tessel GPS module and how to retrieve location data from it!
If you have a Tessel 2 and have built something fun with it, I’d love to hear what you’ve built! Let me know in the comments below, or get in touch with me on Twitter at @thatpatrickguy.


