Build Virtual Reality in VR with Primrose and WebVR

Virtual reality is really hitting its stride this year, with VR headsets selling out all over the place. Virtual reality development is steadily gaining more attention from development platforms right now as they begin to cater to these eager developers. One of the most exciting features both Unity and Unreal Engine are introducing is the ability to edit virtual reality scenes while in virtual reality. Developers working with WebVR and JavaScript will be pleased to know that there is a framework emerging for them too that brings this capability for WebVR prototyping and experiments — Primrose.
What is Primrose?
Primrose is best described by their official website,
Primrose is a cross-browser, multi-device framework for building productivity tools in WebVR applications.
Primrose provides a nice framework for developers to open up in their browser, experiment with new ideas and explore how they look within VR. It is open source, still very new and within active development.
What You’ll Need
To follow along and begin your journey to WebVR wizardry with Primrose, you will need:
- A WebGL enabled browser, preferably one with WebVR support such as the latest Chromium WebVR build or Firefox Nightly.
- An Oculus Rift headset (potentially the HTC Vive too) or Google Cardboard — however, you can experiment and work within the browser without a headset too!
- A web server of some kind — a local web server like WAMP/MAMP/static Node server/static Python server will do!
- The ability to touch type — you won’t be able to see your keyboard while in VR!
Getting Started
You can try out a completely working version of the live coding over at Primrose’s website (make sure you visit it using a WebGL enabled browser like the ones mentioned above, otherwise you’ll only see a static screenshot).
If you would like to have your own copy running locally, you can download/clone the latest version along with its examples from the Primrose GitHub repo.
Our Simplified Version on GitHub
For this article, I’ve put together a simplified version of the live coding demo. It uses the same code as the Primrose demo, just with reduced functionality to keep things simple to explain early on. To follow along with this article, head to this GitHub repo for that version.
Running Our Simplified Version
To run our simplified version of the live coding demo, copy it onto your web server and then open that location in your WebGL enabled browser (e.g. http://localhost/primrose or even just http://localhost if you put it in your server’s root directory.
Note: This will not run from your file system! If you are trying to run it from a location like file:///Users/yourname/primrose/index.html, it will break as browsers will not give permission for JavaScript to access the texture files and such this way.
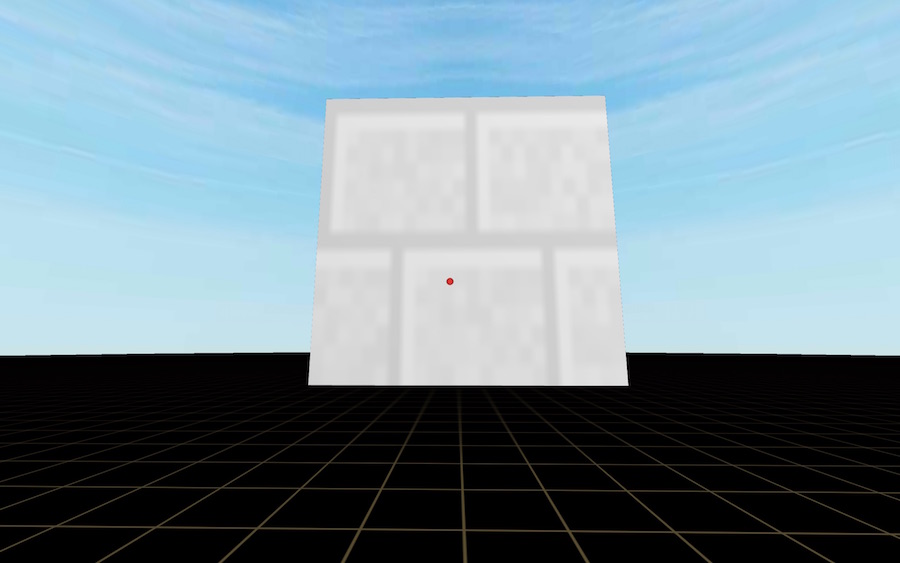
With this running, you should see something that looks like so:
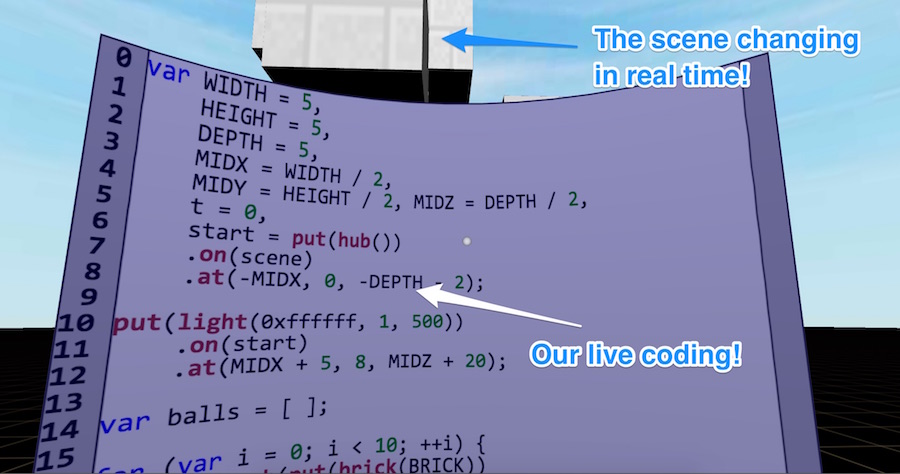
If you look around in this scene, you’ll see a code editor ready and waiting for you. You can point your cursor at lines in the code, click to place your cursor there and then type away as you would in a regular text editor. If we click just after 10 within for (var i = 0; i < 10; i++) and change it to for (var i = 0; i < 100; i++) like so:
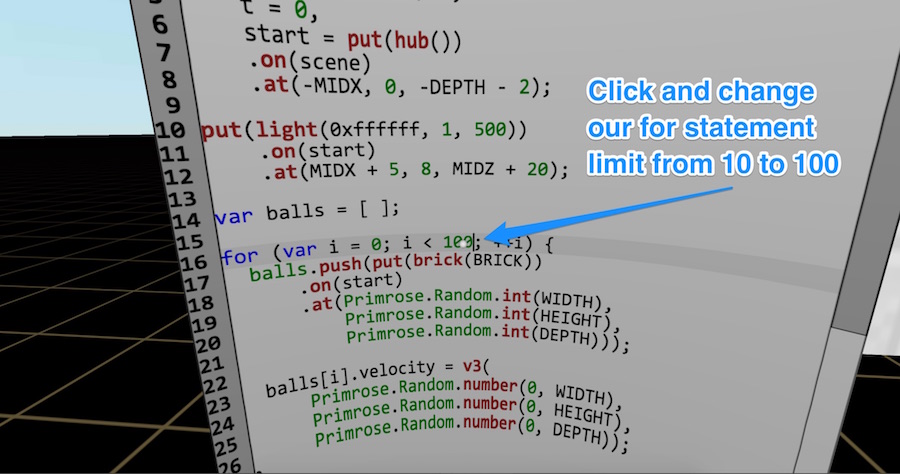
Our scene will change in real time to now have 100 blocks randomly moving about!

If you want a better look at it from various angles, you can look at the floor and click to where you’d like to move to:
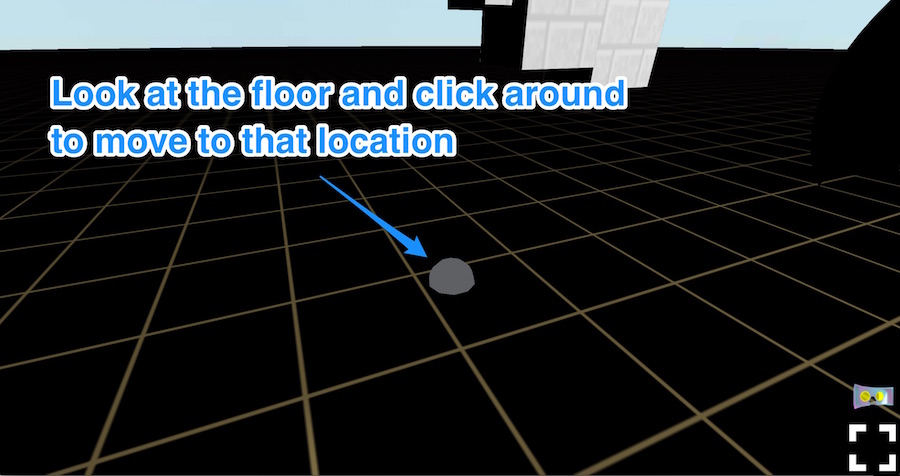
You can also use the keyboard to walk around the scene too using the arrow keys.
How It Works
Most of the time, you will not need to rebuild much of Primrose’s live code editor example — it is simple to plug in the example code they provide on GitHub and adapt it into your own scene. However, I thought I’d provide a simplified version to explore a few of the concepts of what is going on behind the scenes while showing some of what Primrose is capable of within its framework.
The start of our Primrose application looks like so:
var BRICK = "images/brick.png",
    GROUND = "images/deck.png",
    SKY = "images/bg2.jpg",
    app = new Primrose.BrowserEnvironment("Our Simplified 3D Editor", {
      skyTexture: SKY,
      groundTexture: GROUND
    }),
Those lines of code define our three texture files and then instantiates our Primrose app inside the app variable. The Primrose.BrowserEnvironment() method sets our scene up with its sky and ground textures.
We also have an editorFrame variable that sets up a 2048 by 2048 area for our editor to be placed inside:
editorFrame = new Primrose.Surface({
  bounds: new Primrose.Text.Rectangle(0, 0, 2048, 2048)
});
Another common aspect of all Primrose apps (and many JavaScript frameworks for that matter) is to initialize our elements within addEventListener("ready", function() {});. Within here, we add in:
subScene– What we will be able to add and change elements inside of from our live code editor.editor– Our live code editor in our scene (we’ll look at this in a bit more detail below!).- Initial code from
getSourceCode()– Within my simplified version, this retrieves the default bit of code that comes with the Primrose editor and gets displayed in our VR text editor. Within the much more complex Primrose editor, it can do a bit more with local storage.
app.addEventListener("ready", function() {
  app.scene.add(subScene);

  editor = new Primrose.Text.Controls.TextBox({
    bounds: new Primrose.Text.Rectangle(
      0, 0,
      editorFrame.surfaceWidth,
      Math.floor(editorFrame.surfaceHeight)
    ),
    tokenizer: Primrose.Text.Grammars.JavaScript,
    value: getSourceCode(isInIFrame),
    fontSize: 45
  });

  editorFrame.appendChild(editor);
});
Primrose recently had a new release where the editor was revamped with a range of new framework objects in Primrose.Text:
Primrose.Text.Controls.TextBox— this sets up a text area and gives a whole range of functionality by default.Primrose.Text.Rectangle— this allows us to define a rectangular boundary for the text area to be placed within. You may have noticed it when we defined oureditorFrametoo.Primrose.Text.Grammars.JavaScript— this is used within thetokenizerkey to set up JavaScript code highlighting. You can do plaintext highlighting viaPrimrose.Text.Grammars.PlainText.
When working with Primrose applications, there are a few events outside of "ready" which you can look out for, these include:
"update"– This is the only other event we use within the sample editor code, it runs every frame. You use this within Primrose to run animations and check for updates within the scene."keydown","keyup"and"keypress"– Runs when a key is pressed down, released, and pressed down and released respectively."mousedown"and"mouseup"– The same as above but with the mouse."mousemove"– Detects mouse movements."wheel"– Detects when the user moves the mouse scroll wheel."touchstart","touchend"and"touchmove"– Detects when a finger touches down on an element in the scene using a touchscreen, lifts their finger from the screen and slides their finger across the screen respectively."unload"– Runs when the app is being closed. My simplified version of the editor does not use this, however the full Primrose editor uses this to save the editor content to local storage."load"– Runs when the app loads up once again."pointerstart","pointerend"and"pointermove"– Responds to both click and touch events on objects, so you don’t need to look out for both individually."gazestart"– Responds to the very moment a user looks at an object."gazecomplete"– Responds to when a user looks at an object for the default of one second."gazecancel"– Responds to when a user looks away before the default of one second elapses. You can change the one second default value viagazeLengthbut that’s beyond this article’s scope.
I won’t paste all of the simplified code within this article (it would get rather long and unwieldy!). You can check it out in the GitHub repo linked above. However, we will go over what a few of the event responses and functions contain.
Within our simplified app’s "update" event, it checks for any code changes within the editor, updates them on every scriptUpdateTimeout (a timeout that runs every half second), and runs any animations it already knows about.
Inside the response to "keydown" events, it clears that scriptUpdateTimeout timeout, delaying when our app tries to update things!
The updateScript() function is run each time the scriptUpdateTimeout finishes. This is what checks if our editor’s script has changed and replaces the running script if it sees an update. It clears our subScene from above and changes the elements according to our VR editor’s code.
Setting Button Functionality
In order to be able to experience the proper, immersive live coding experience (or whatever other Primrose-powered application you have built), we will want it to be able to go full screen. This is essential for VR, as it will not work any other way! To do so, we add buttons to trigger these modes. Primrose has most of this covered for us, we just add in a button with an ID of goVR and one with goRegular, then we call app.setFullScreenButton passing in the ID name, that it is a click event and either true for VR or false for regular fullscreen mode:
app.setFullScreenButton("goVR", "click", true);
app.setFullScreenButton("goRegular", "click", false);
Making Primrose Magic Happen
We currently have various cubes roaming about and changing in real time when we adjust our code — but what other things can we build in Primrose? Here are a few elements you can add to either testDemo() in your app.js or into your scene live in VR!
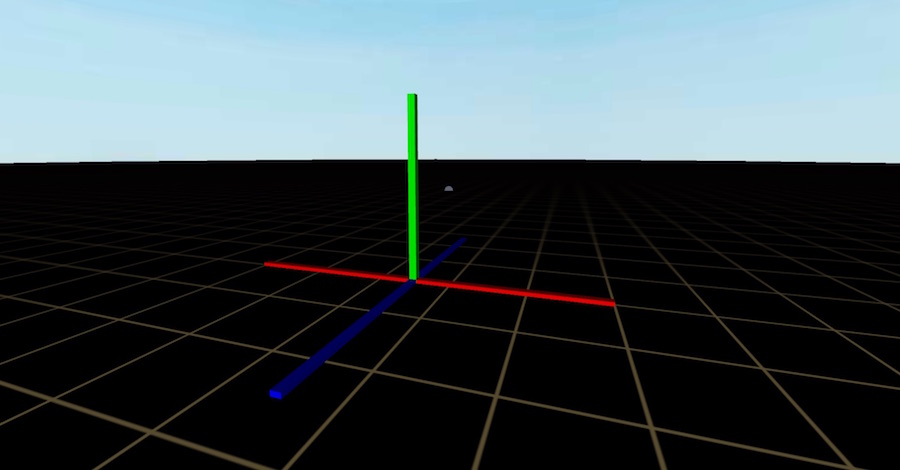
Axis
An axis provides you with a set of red, green and blue bars which show you the direction of x, y and z respectively. This works via axis(length, width), for example:
put(axis(5,0.1)).on(start);Generates this end result:
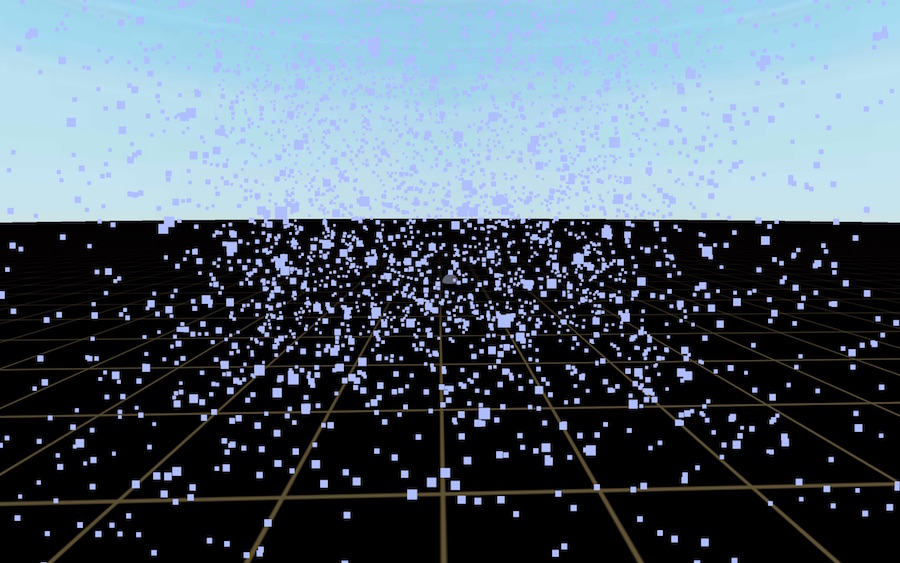
Point Cloud
A point cloud can be generated with lots of small square points via the cloud(verts, color, size) function. The verts variable is an array of vertices. An example of a point cloud would look like so:
var verts = [];

for (var i = 0; i < 5000; ++i) {
  verts.push(
    v3(Primrose.Random.number( -0.5 * WIDTH, 0.5 * WIDTH),
      Primrose.Random.number(-0.5 * HEIGHT, 0.5 * HEIGHT),
      Primrose.Random.number(-0.5 * DEPTH, 0.5 * DEPTH)
    )
  );
}

put(cloud(
  verts, this.options.backgroundColor, 0.05)
).on(start).at(MIDX, MIDY, MIDZ);MIDX, MIDY and MIDZ are variables already in our sample code that are specifying a focal point for our scene. You could use any numbers in their place.
That generates the following in our scene:
Hub
One thing you might have noticed in my examples above is that we were adding to something called start. This is actually a hub() — a special point in our scene in which we can group other objects. Our start hub in particular was defined like so:
start = put(hub())
          .on(scene)
          .at(-MIDX, 0, -DEPTH - 2);
Light
Lights can be defined via light(color, [intensity, [distance, [decay]]]). The default lighting in our scene is a white light that looks like so:
put(light(0xffffff, 1, 500))
  .on(start)
  .at(MIDX + 5, 8, MIDZ + 20);
Box
Boxes — and the shapes after this — require texturing before they’ll show up in our scene. They are wrapped in a textured() function that gives them a texture from our image files. The format for a box looks like so: box(width, height, length).
put(textured(box(2, 2, 2), BRICK))
  .on(start).at(MIDX, MIDY, MIDZ);
This creates a mega-sized Three.js BoxGeometry object in our scene:
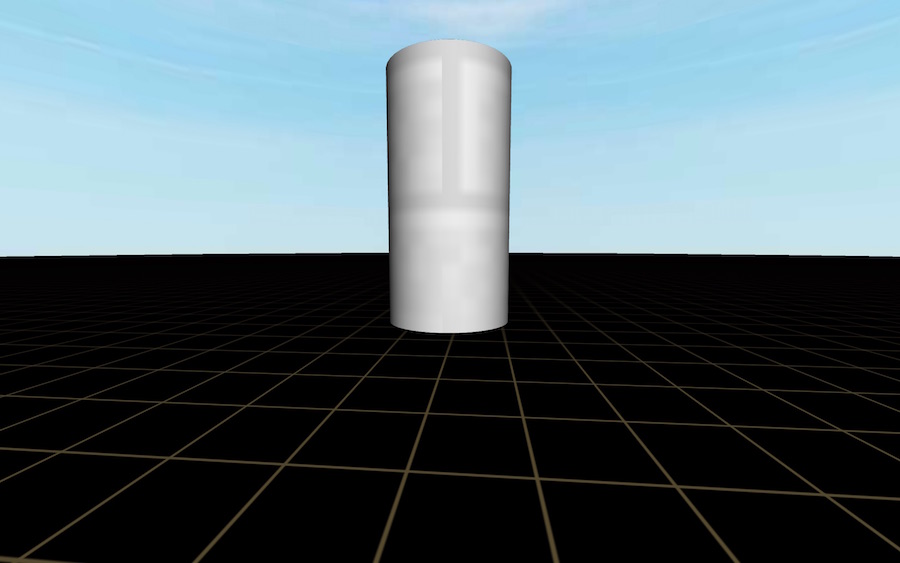
Cylinder
Cylinders are possible via:
cylinder(
  radiusTop,
  radiusBottom,
  height,
  radiusSegments,
  heightSegments,
  openEnded,
  thetaStart,
  thetaEnd
)
This creates a Three.js CylinderGeometry object. For example, here is a cylinder with its top and bottom radius of 1. Its height is 5 and radius/height segments are 40:
put(textured(cylinder(1, 1, 4, 40, 40), BRICK))
    .on(start).at(MIDX, MIDY, MIDZ);
That looks like so:
Others
There are plenty of other options you can find over at the Primrose docs under “Scripting Functions”, including quad(), shell(), sphere() and more. Explore and experiment!
Conclusion
Primrose is an incredibly powerful WebVR framework that will surely power some very useful VR applications in the future. Despite it being early days within both the framework and with WebVR itself, this looks primed to grow and develop with WebVR in a great way as both mature over time.
Love the potential here? Keep in mind that it is a project in early stages that you can get involved in too! Get in touch with its creator, Sean McBeth, and get involved!
If you use Primrose for your own VR application, I’d love to see what you put together! Let me know in the comments below, or get in touch with me on Twitter at @thatpatrickguy.
If you find the area of virtual reality and WebVR fascinating, I spoke to Sean McBeth himself about developing for VR and Primrose over on my Dev Diner website. It is one of my favorite interviews I’ve ever done! Sean is an inspirational guy.


