Getting Started with Microservices Using Syncano’s Codeboxes

This article was sponsored by Syncano. Thank you for supporting the sponsors who make SitePoint possible.
Syncano is a really fascinating platform that gives you a hand with the backend and middleware of applications. We had a look at the capabilities of Syncano in my last article on How to Build a Daily Affirmations SMS Service with Stripe & Syncano where we put together a service that sent out daily SMS affirmations in a subscription service. All the backend and middleware is taken care of by Syncano. Very neat!
In this article, we are going to focus on Syncano’s concept of CodeBoxes more closely — what CodeBoxes are, how we make and run them in Syncano, and how we can connect them to external APIs. We’ll put together a demo using GitHub’s API to showcase just what is possible.
What is a CodeBox?
A CodeBox is a snippet of code that can be run in the cloud in a number of ways. Each CodeBox is intended to provide a single piece of our web application puzzle — one bit of functionality that contributes to the app as a whole.
To provide specifics about what we’d like the CodeBox to do in our web application, we can pass in arguments to a CodeBox, just as you would pass in arguments to a HTTP request. For example, we could have a CodeBox that looks up song lyrics stored in a database. It would accept two parameters, the song name and artist. A sample input for that CodeBox could be “Jack Sparrow” and “The Lonely Island”. The CodeBox would run using those parameters and provide the song lyrics if it knew the song. If not, it’d return a message saying it couldn’t find them.
One of my favourite things about CodeBoxes is that they can be created in a number of different languages. Syncano supports CodeBoxes written in Python, Golang, Node.js, Swift, PHP and Ruby. Not only that — CodeBoxes written in different languages can all work together to create a functioning web application. It is incredibly flexible!
The Code
For those who would like to follow along with the examples, the working code is available on GitHub. Use it, enjoy it, expand it — do as you wish.
How to Create a CodeBox
To illustrate the use of CodeBoxes in a Syncano application, we’ll be putting together a really simple app that looks up pull requests from a GitHub repo. It’s about time we had a way to keep an eye on how our GitHub team projects are going right?
To begin, we head to the Syncano Dashboard and create a new app. If you’re totally new to Syncano and need a bit of guidance on this, have a look at the previous SitePoint article on Syncano — it should help you out.
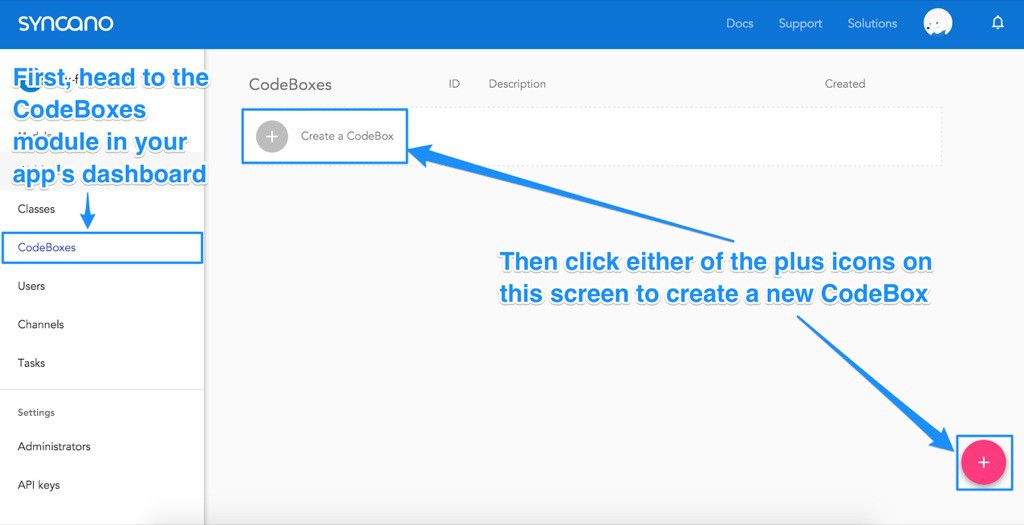
Then, we head to the “CodeBoxes” section on the left and click either of the icons with a plus on it to create a new CodeBox:
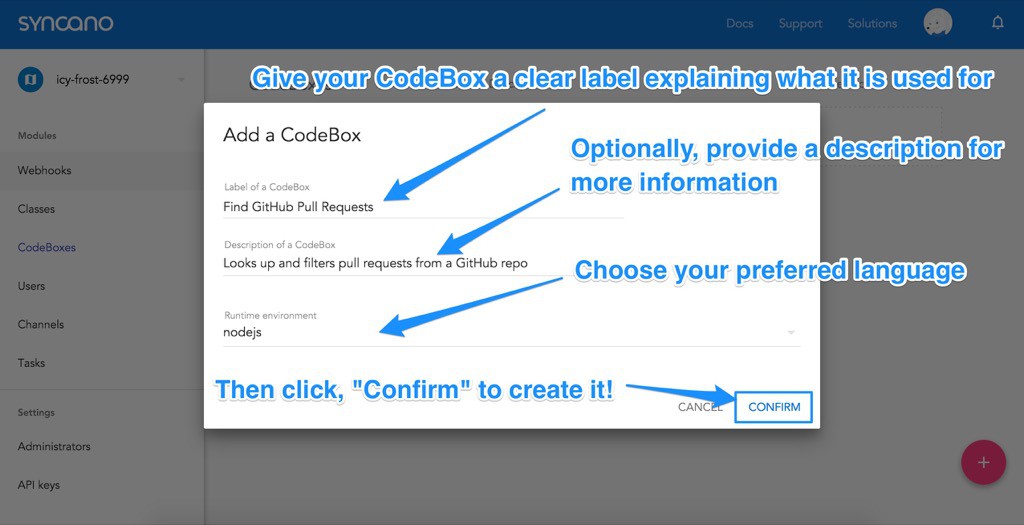
Then, in the popup box that appears:
- Enter in a title for your CodeBox – This can be a short but clear label to help you find it in the Dashboard, e.g. “Find GitHub Pull Requests”.
- Enter in a description for your CodeBox – This isn’t needed but I prefer to use it to include more details on exactly how the CodeBox is going to work, e.g. “Looks up and filters pull requests from a GitHub repo”.
- Choose the runtime environment you’d prefer to work in – In this article, we’ll be using Node.js, so if you’d like to follow along directly, choose that one!
- Click “Confirm” to create that CodeBox!
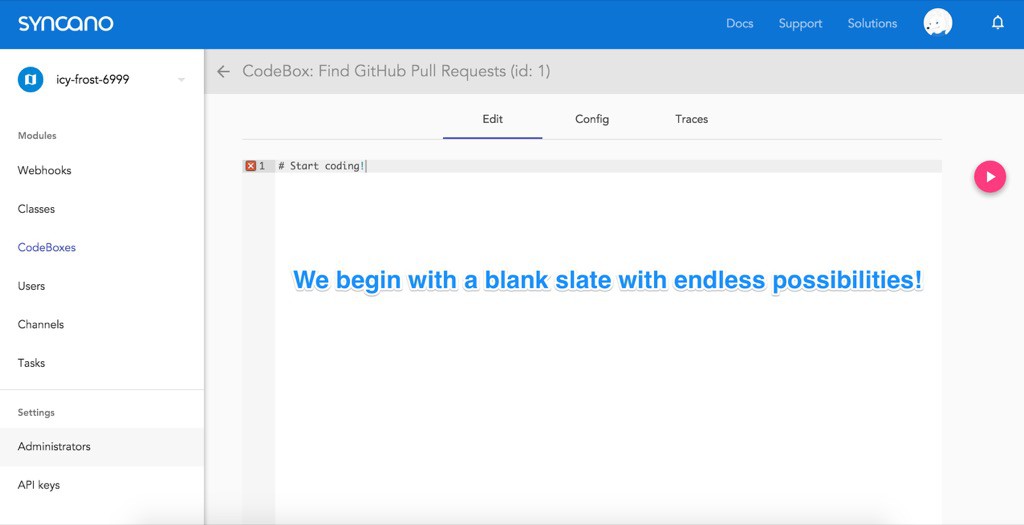
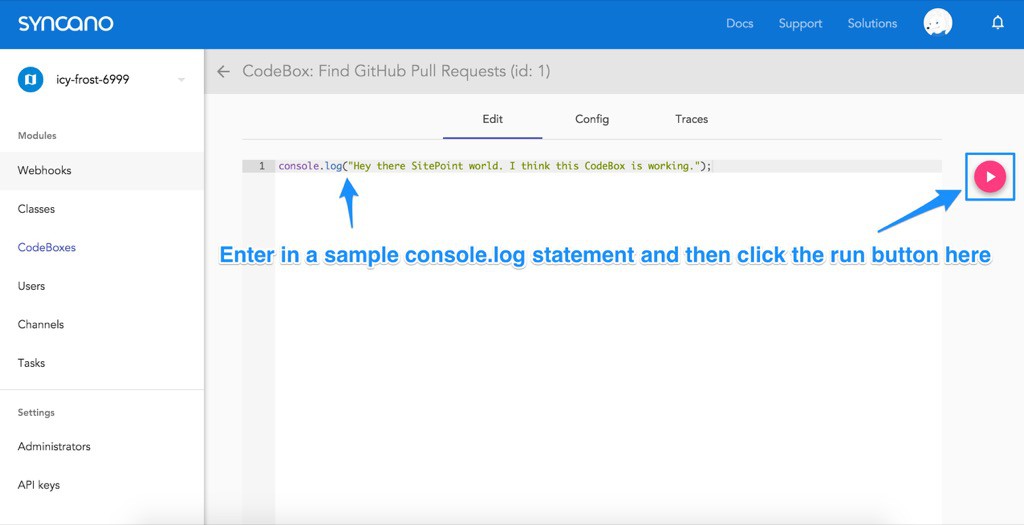
Once you have created your CodeBox, Syncano should bring you straight to the CodeBox editing screen. You’ll see a blank page with the text # Start coding!. We should follow that instruction and put something simple in there as an initial test run.
Running a CodeBox
Enter in a simple console.log() statement and then click the run button to the right to give it a test run:
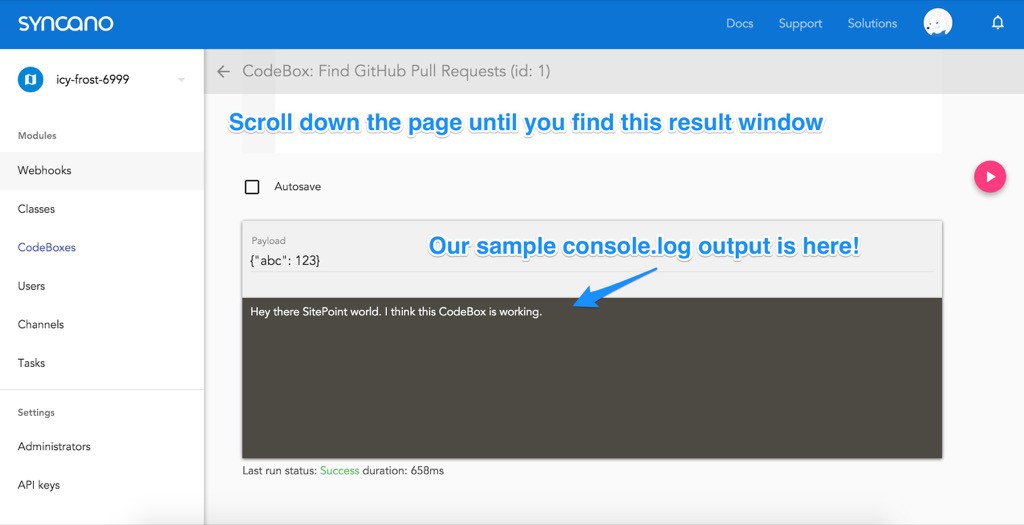
Then, if we scroll down the page, we find a result screen with the successful output:
Running From Outside Syncano
We can also run a CodeBox from outside Syncano. This is where the true power lies! There are two methods of receiving access to our CodeBoxes from outside Syncano — running the CodeBox directly via cURL, JavaScript or Python or running the CodeBox via a Webhook. Running a CodeBox directly requires an account key (and thus admin access) and causes the CodeBox to be run in the background. Your result is not returned immediately which can be messy. Webhooks on the other hand, do not require an account key and are run synchronously — you’ll receive the result of the CodeBox’s execution in the response.
As two examples, we will look at accessing a CodeBox directly via the cURL command and via a Webhook.
To access the CodeBox via cURL, we need our account key to prove we are authorized to do so. Webhooks do not require account keys, so if you aren’t interested in knowing how to use cURL, feel free to skip to the next section! However, it can be quite handy to know where to find your account key.
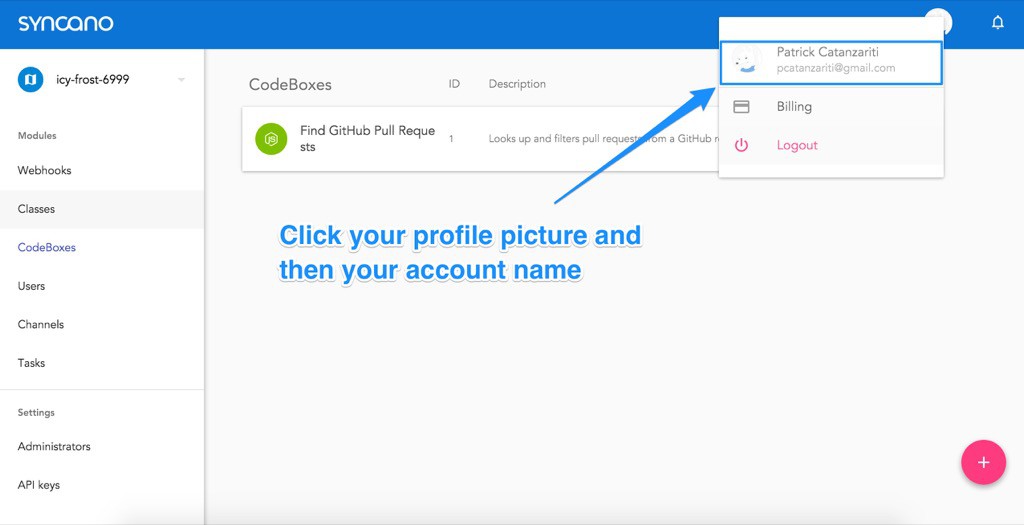
Finding Your Account Key
To find your account key, click on your profile picture at the top right of the Syncano Dashboard and click your account name:
From this page, click the “Authentication” section on the right hand side. This screen shows your account key. Copy that key by pressing the “Copy” button on that screen or by copying the key that you see beside the button manually:
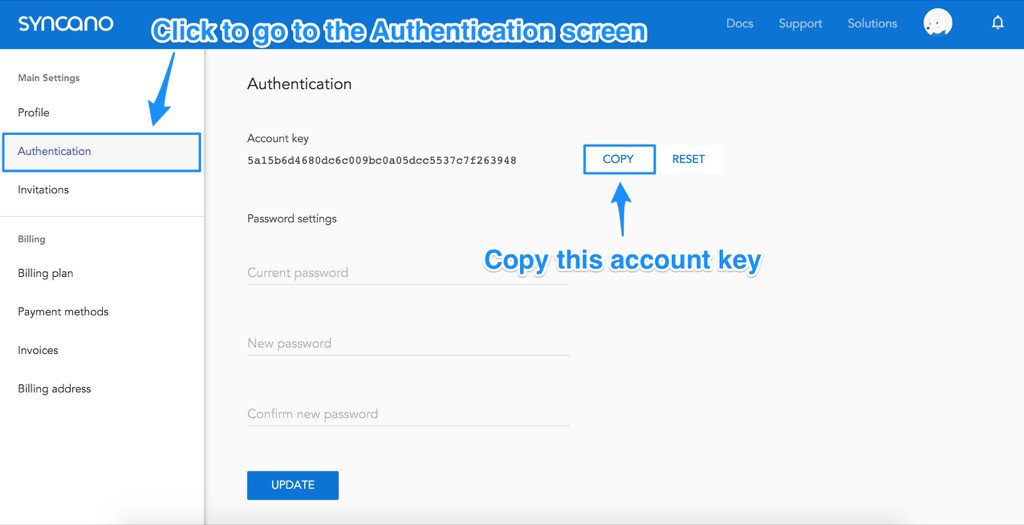
Store that key somewhere safe, we will be using it in the next step!
Running a CodeBox via cURL
Our first option for running a CodeBox remotely is via the cURL command which you can run from the command line. For those interested, you can install it on Windows 64 bit and 32 bit by following those links. For those using OS X, Apple has already provided cURL for you as part of the OS.
Open up your command prompt and enter the following, replacing YOUR_ACCOUNT_KEY_YOU_COPIED_EARLIER with your account key and YOUR_INSTANCE_NAME with your instance name (mine was icy-frost-6999). The 1 is your CodeBox ID. If you only have one CodeBox so far, its ID will be 1:
curl -X POST \
-H "X-API-KEY: YOUR_ACCOUNT_KEY_YOU_COPIED_EARLIER" \
-H "Content-Type: application/json" \
"https://api.syncano.io/v1/instances/YOUR_INSTANCE_NAME/codeboxes/1/run/"
When this runs, it should result in the following:
{"status":"pending","links":{"self":"\/v1\/instances\/icy-frost-6999\/codeboxes\/1\/traces\/3\/"},"executed_at":null,"result":{},"duration":null,"id":3}This doesn’t show us the result yet, as the trace of the result is accessible via a different command. Within this response, we can see one main piece of information we will need to trace the result — "id":3. This is the ID of our trace we want to look at. To see whether our console.log() has run in that trace, we run the following cURL command with our CodeBox ID of 1 and our trace ID of 3:
curl \
-H "X-API-KEY: YOUR_ACCOUNT_KEY_YOUCOPIED_EARLIER" \
"https://api.syncano.io/v1/instances/YOUR_INSTANCE_NAME/codeboxes/1/traces/3/
The result should look like so:
{"status":"success","links":{"self":"\/v1\/instances\/icy-frost-6999\/codeboxes\/1\/traces\/3\/"},"executed_at":"2016-01-08T03:25:53.881717Z","result":{"stderr":"","stdout":"Hey there SitePoint world. I think this CodeBox is working."},"duration":1489,"id":3}Our console.log() has run successfully!
Running a CodeBox via Webhooks
For our web app, we will want to be able to run our CodeBox via JavaScript on the front end. In order to run a CodeBox publicly without exposing the account key, we set up something called a Webhook. A Webhook gives us a public URL to send a POST request to in order to run the CodeBox.
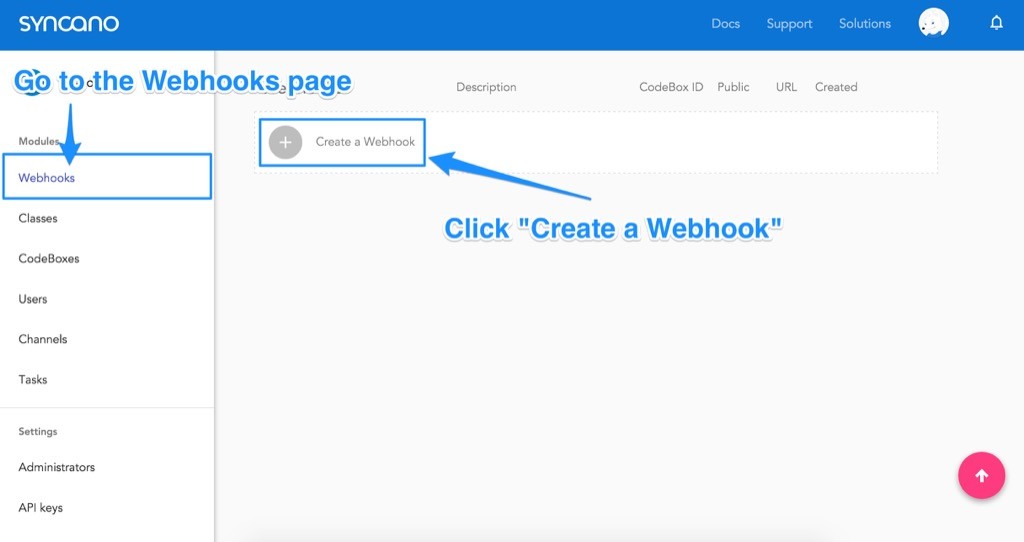
To set up a public Webhook, go to the Syncano Dashboard for your instance and click the “Webhooks” menu item on the left. Then click “Create a Webhook”:
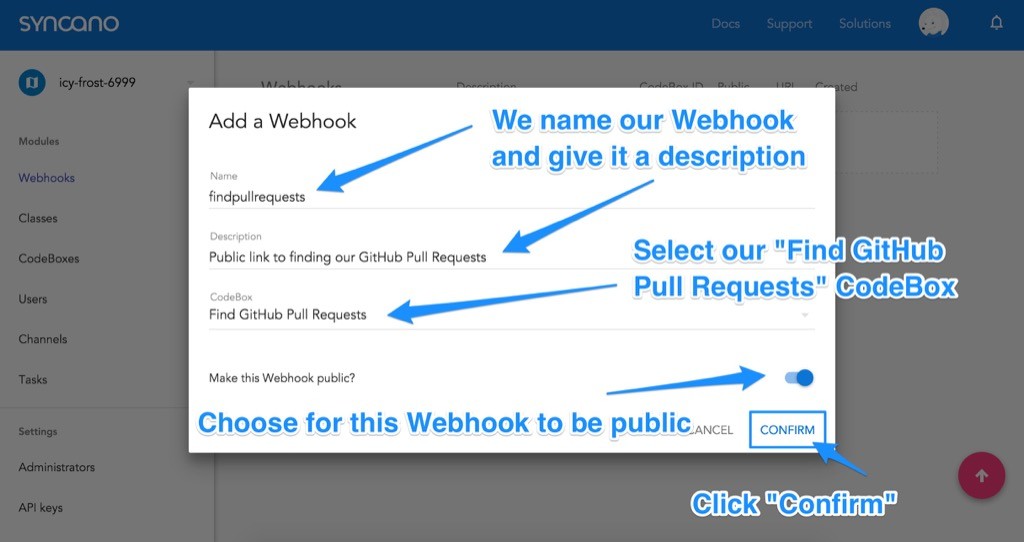
In the pop up that appears, we call the Webhook “findpullrequests” and give it a description of “Public link to finding our GitHub Pull Requests”. The description is solely for your own reference so feel free to describe it in any way that you would like! Then, we choose our CodeBox in the last field to set it as the CodeBox that will be run. Click to “Make this Webhook public” and click “Confirm” when ready:
Syncano then returns us to our list of Webhooks, revealing our new Webhook. There is a link on this Webhook under the URL column — we click that to copy the public URL we will use to run our CodeBox.
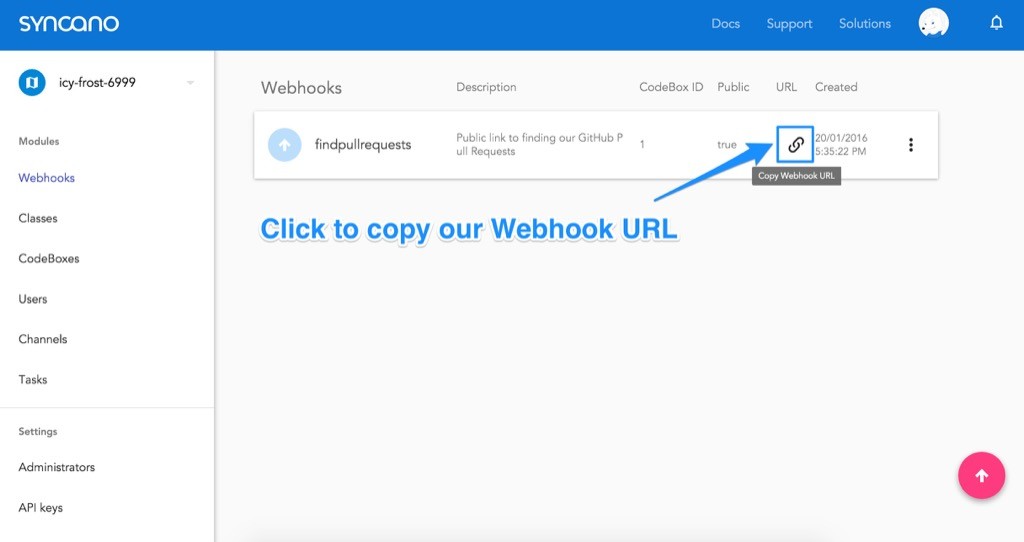
It is worth noting — you can paste this link into your browser to test Webhooks without needing to create an entire app initially.
Running a CodeBox via JavaScript and Webhooks
Our front end HTML is going to be incredibly simple. You could use a JavaScript framework for various examples in this article, however to keep things simple and as general as possible, we’ve stuck with simple JavaScript on the front end with jQuery for our POST request.
<!doctype html>
<html>
  <head>
    <title>GitHub Pull Request Checker</title>
  </head>
  <body>
    <div id="main">
      <h1>Pull Requests</h1>

      <div id="pull-requests">

      </div><!-- pull-requests -->
    </div><!-- main -->

    <script src="js/vendor/jquery.min.js"></script>
    <script src="js/vendor/syncano.min.js"></script>
    <script src="js/app.js"></script>
  </body>
</html>
The main line of code to note here is our inclusion of the Syncano JavaScript file after jQuery (you can get the Syncano JavaScript file from their GitHub):
<script src="js/syncano.min.js"></script>Within our own JavaScript, which we’ve called app.js, we will create a JavaScript file with the following code:
(function() {
  $.ajax({
    type: "POST",
    url: "https://api.syncano.io/v1/instances/YOUR-INSTANCE-NAME/webhooks/p/abcd/findpullrequests/"
  })
  .done(function(res) {
    console.log('Response:');
    console.log(res);
  });
}());
We copy in the webhook URL into the jQuery AJAX POST request’s url field:
$.ajax({
  type: "POST",
  url: "https://api.syncano.io/v1/instances/YOUR-INSTANCE-NAME/webhooks/p/abcd/findpullrequests/",
The .done() callback runs when our request returns successfully. Within our callback function, we start by logging that it has successfully ran and then we log what the response was. The response from our Syncano CodeBox returns a res variable with the data response.
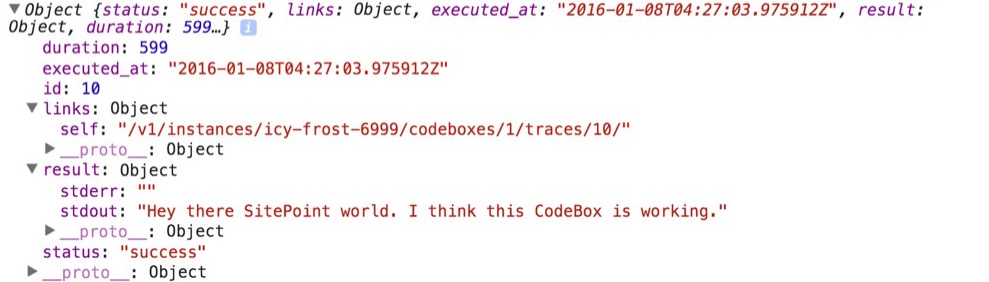
If we run our web app with this code in place, it shows our console.log() in all of its glory:
We are now ready to improve this CodeBox to give us some useful information, let’s get it to read in our latest GitHub pull requests.
Connecting our CodeBox to GitHub
To get our CodeBox to read from Github we have a few bits of functionality to add. We need the ability to:
- Make HTTP requests – We will use the
requestnode module to do so in our CodeBox. - Make a HTTP request to the GitHub API – In particular, we want to retrieve pull requests.
- Tell the CodeBox our GitHub username and repo name – We want to be able to reuse this CodeBox for any GitHub repo by anyone, so we set these as arguments for our CodeBox.
- Filter these requests by label – We want to be able to ask the CodeBox to give us pull requests with a certain label, so we set this as an optional argument for our CodeBox too. We will be using the
lodashnode module to look through the data. - Return the title, URL and labels for each pull request – These are what we will be displaying in our web app. We don’t need any other data.
In order to achieve this, our CodeBox looks like so:
var request = require("request"),
    _ = require("lodash"),
    username = ARGS.POST.username,
    repo = ARGS.POST.repo,
    pullLabel = ARGS.POST.label;

var options = {
  url: "https://api.github.com/repos/" + username + "/" + repo + "/issues?state=all",
  headers: {
    "User-Agent": "syncano-sample-pull-app"
  }
};

if (!username || !repo) {
    console.log("Error: Need more info!"); return false;
}

request(options, function (error, response, body) {
  if (error) {
    console.log("Error: ", JSON.stringify(error));
  } else if (!error && response.statusCode == 200) {
    var pulls = JSON.parse(body),
        returnValue = "[";

    _(pulls).forEach(function(pull) {
      var display = false;

      if (pullLabel) {
          if (_.filter(pull.labels, _.matches({"name": pullLabel})).length > 0) {
            display = true;
          }
      } else {
        display = true;
      }
      if (display) {
        returnValue += "{\"title\":\"" + pull.title + "\", \"url\":\"" + pull.html_url + "\",  \"state\":\"" + pull.state + "\",  \"labels\":" + JSON.stringify(pull.labels) + "},";
      }
    }).value();
    returnValue = returnValue.substring(0, returnValue.length - 1);
    returnValue += "]";
    console.log(returnValue);
  }
});
Our CodeBox Explained
The CodeBox begins with require statements for the request and lodash modules that we mentioned above:
var request = require("request"),
    _ = require("lodash"),
Then, we set up the arguments our CodeBox can accept using ARGS.POST.theargumentname format. For it to receive arguments outside of POST requests, you can instead use ARGS.theargumentname.
username = ARGS.POST.username,
repo = ARGS.POST.repo,
pullLabel = ARGS.POST.label;
We then begin setting up our HTTP request that we want to make to GitHub. We set up the URL we want to send a HTTP request to the GitHub’s Issues API. In my own example, I’m looking to request https://api.github.com/repos/patcat/GreatestRepoOfAllTime/issues?state=all. I set state to all so that both open and closed pull requests come through. Technically this call will retrieve both issues and pull requests, so we could rename the title to “Issues and Pull Requests” on our page if we wanted to! I’ve left it as is as my repo doesn’t have any issues.
var options = {
  url: "https://api.github.com/repos/" + username + "/" + repo + "/issues?state=all",
Another important option for our HTTP request is to include a User-Agent header as GitHub uses these to keep track of where calls are coming from. You can call yours anything you’d like, just try to make it unique.
headers: {
    "User-Agent": "syncano-sample-pull-app"
  }
};
If our CodeBox has not been given a username or repo name in the arguments, it returns an error and does not go any further.
if (!username || !repo) {
  console.log("Error: Need more info!"); return false;
}
Otherwise, we run the HTTP request we defined above. If there’s an error, it will appear in the error variable. We will detect that variable and log it. If there are no errors and we have a successful HTTP 200 response, our CodeBox will continue interpreting the pull request data it has received.
request(options, function (error, response, body) {
  if (error) {
    console.log("Error: ", JSON.stringify(error));
  } else if (!error && response.statusCode == 200) {
Our pull request data will be in the body variable that is returned. It is in the form of a JSON string, so we parse that into something JavaScript can look through and save it in a variable called pulls. We also start a new variable called returnValue which is where we will compile the array of JSON data we will provide as a result to whoever runs the CodeBox.
var pulls = JSON.parse(body),
    returnValue = "[";
We then use the lodash module’s forEach() function to look through each pull request that GitHub returns and work with it:
_(pulls).forEach(function(pull) {
  ...
}
Within that forEach() function, we set a new variable called display which will determine if each pull request should be displayed to whoever requested the pull requests from the CodeBox. If the CodeBox has a pullLabel argument, it knows that we are looking for results from one particular label. In that case, it loops through each of the labels within the pull.labels returned from GitHub and if there are any matches, it sets this pull request to be displayed.
var display = false;

if (pullLabel) {
    if (_.filter(pull.labels, _.matches({"name": pullLabel})).length > 0) {
      display = true;
    }
}
Otherwise, if there is no pullLabel argument, then we aren’t filtering by label and we definitely want this pull request to be shown.
else {
  display = true;
}
After deciding whether or not we want to show the pull request, we check that display variable and then add a JSON string to our returnValue with pull.title, pull.state and pull.labels. pull.labels is turned into a JSON string as there can be multiple labels returned from GitHub and we want these to nest nicely in the JSON we return.
if (display) {
    returnValue += "{\"title\":\"" + pull.title + "\", \"url\":\"" + pull.html_url + "\",  \"state\":\"" + pull.state + "\",  \"labels\":" + JSON.stringify(pull.labels) + "},";
  }
}).value();
One we have looked through each pull request, we remove the final character from returnValue (it is a trailing comma because each pull request loop added in a comma to that string) and we then close the array of JSON objects.
returnValue = returnValue.substring(0, returnValue.length - 1);
returnValue += "]";
To finalize this and send off that data, we log it to the console so it can be picked up by our web app.
console.log(returnValue);
  }
});
Updating Our App’s HTML
The front end code of our app is quite simple. We’ve added some styles to make it look a bit cleaner and we have updated the JavaScript to look like so:
(function() {
  $.ajax({
    type: "POST",
    url: "https://api.syncano.io/v1/instances/YOUR-INSTANCE-NAME/webhooks/p/abcd/findpullrequests/",
    data: {"username":"patcat", "repo":"GreatestRepoOfAllTime", "label":"invalid"}
  })
  .done(function(res) {
    var pulls = JSON.parse(res.result.stdout),
        pullsHTML = "";

    for (var i = 0; i " + pulls[i].labels[j].name + "";
      }
      pullsHTML += "" + pulls[i].title + stateHTML + ""
    }

    document.getElementById('pull-requests').innerHTML = pullsHTML;
  });
}());
Our Front End JavaScript Updates Explained
The parts of the CodeBox which have been adjusted are:
Our CodeBox running function now has a payload of arguments we wish to send in the data value — this allows us to ask for the specific username, repository and label we want to get pull requests from. For my own example, I am only showing pull requests with the name “invalid”:
data: {"username":"patcat", "repo":"GreatestRepoOfAllTime", "label":"invalid"}Once the request is successful, we parse the JSON string from our CodeBox’s res.result.stdout response (that is where the console.log response can be found) and save it in a variable called pulls. We also set up a variable called pullsHTML for our HTML output we will be putting onto the page.
var pulls = JSON.parse(res.result.stdout),
    pullsHTML = "";
Similar to how we looked through our GitHub array, but without lodash (you could bring in lodash into your front end if you wanted to!), we loop through each pull request and display it as a link. If there are any labels, we also add those into the mix. We also style the state of pull requests with a class called either pull-open or pull-closed.
for (var i = 0; i < pulls.length; i++) {
    var stateHTML = "";
    for (var j = 0; j < pulls[i].labels.length; j++) {
        stateHTML += "<div class=\"label\">" + pulls[i].labels[j].name + "</div>";
    }
    pullsHTML += "<a class=\"pull pull-" + pulls[i].state + "\" href=\"" + pulls[i].url + "\" target=\"_blank\">" + pulls[i].title + stateHTML + "</a>"
}
Finally, we place that code into our #pull-requests element on the page:
document.getElementById('pull-requests').innerHTML = pullsHTML;In Action
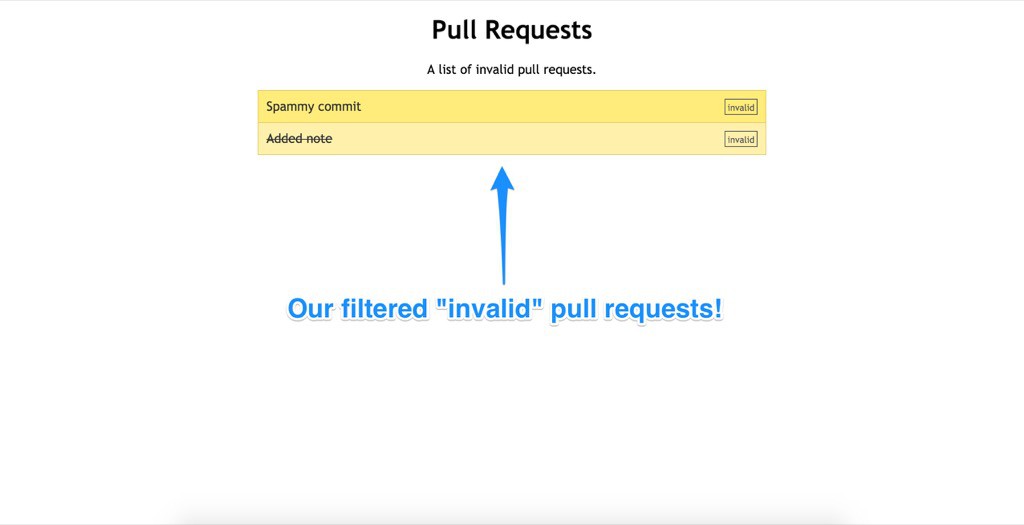
If we take a look at my GitHub repo we’ll be using as an example, we can see four pull requests waiting. Two of these are labeled as invalid and one of the invalid pull requests is closed:

If we run our web app by loading index.html, Syncano provides our app with only two of the GitHub pull requests — the two requests marked as invalid. One of the requests is crossed out, which is part of the styling for a closed ticket in my sample CSS (you could style the whole app anyway you would like or take a look at the demo code!).
Conclusion
CodeBoxes and Syncano bring a really nice and simple way of setting up a modular and reusable serverless platform for your web applications. The GitHub pull request example runs entirely on Syncano’s service, with only a static HTML page with some basic JavaScript to pull in the data. For those who aren’t too excited by the idea of setting up a backend environment for your next project, Syncano and its CodeBoxes could be the perfect choice.