Empowering Your Api.ai Assistant with Entities

If you’re keen to learn more on AI, check out our screencast Microsoft Cognitive Services and the Text Analytics API, for AI sentiment in your bot.

Here at SitePoint, we’ve looked at the basics of setting up your own personal assistant using Api.ai and delved further into intents and context. In this article, you’ll be going one step further in the process, teaching your assistants completely custom concepts using Api.ai entities.
Note: this article was updated in 2017 to reflect recent changes to Api.ai.
Building an AI assistant with Api.ai
This post is one of a series of articles aimed to help you get a simple personal assistant running with Api.ai:
- How to Build Your Own AI Assistant Using Api.ai
- Customizing Your Api.ai Assistant with Intent and Context
- Empowering Your Api.ai Assistant with Entities (this one!)
- How to Connect Your Api.ai Assistant to the IoT
What is an Entity?
An entity is a concept you want your personal assistant to understand when it’s mentioned by the user in conversation. Each entity has a range of values and properties that contain the terms the assistant will need to understand to respond to this concept.
There are three types of entities in Api.ai:
- System: Entity types defined by Api.ai such as date, color, email, number and so on, which Api.ai already understands. You can find a full list of these entities in Api.ai’s documentation on System Entities.
- Developer: Entities which we create for our individual needs. These are what you’ll be focused on in this article.
- User: These are created for individual users while they use the assistant and can be generated by the Api.ai API to be used within a single session. I won’t be covering these in this article, but if there’s enough reader interest, I might explore this in future!
Api.ai’s small talk is an example of a range of statements with no entities whatsoever. They’re listening for statements whose meaning doesn’t change based on keywords in the sentence. When someone asks “How are you?”, there’s no variation Api.ai understands. However, if we adjusted that to “How is Jimmy Olsen?”, we’re moving this sentence into the realm of entities. “Jimmy Olsen” would be an entity that represents a person. Teaching your agent that entity would mean if someone asks “How is Bruce Wayne?”, your agent would know that they mean to ask how a person is, and that they want to know about Bruce Wayne specifically.
As another example, an entity of “superhero” is not something Api.ai knows about. You could train your assistant to understand a range of superheroes and their various names — “Superman”, “Batman”, “The Flash”, “Green Lantern”, “Wonder Woman”, “Santa” and so on. It could then understand that these are specific concepts you want to trigger actions with, such as contacting these heroes when villains strike via an API when you say things like “We need The Flash!”.
You can also teach your assistant synonyms for each of these, so that alongside names like “Superman”, it would also understand that Superman is also known as “Kal-El”, “The Man of Steel”, “Supes” and “Smallville”. If you say a different name in the spur of the moment (or someone else tries to request help from your assistant and they call them something else), help from your hero will still come!
While I’d have loved to keep that entity example going for the whole article, I thought it might be best to focus on a more realistic example in the demo itself! In your demo, you’ll teach your assistant to understand one important metric I get from my Jawbone Up — sleep. The end goal is for your assistant to understand statements like “How many hours of sleep did I get last night?” and “How much deep sleep did I get last night?”
In this article, I’ll look at the first step of this process — setting up the entities required for your assistant to understand these statements. In the next article in this series, I’ll look at connecting up your assistant web app to third party APIs to give it the information it needs to respond.
Creating a New Entity
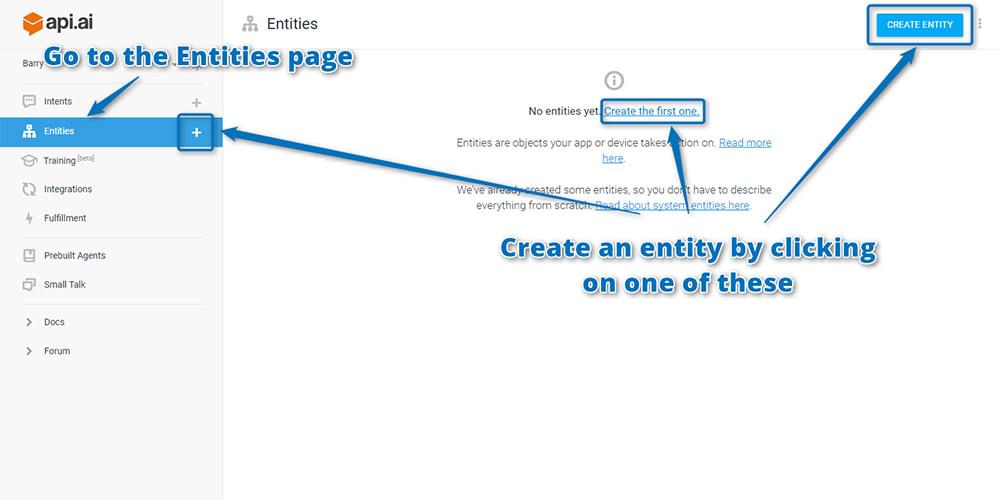
To create a new entity, open the Api.ai console and go to the “Entities” page using the menu on the left. Then create an entity by clicking either “Create Entity”, the plus symbol on the “Entities” menu item or the “Create the first one” link which appears for those who have yet to create an entity:
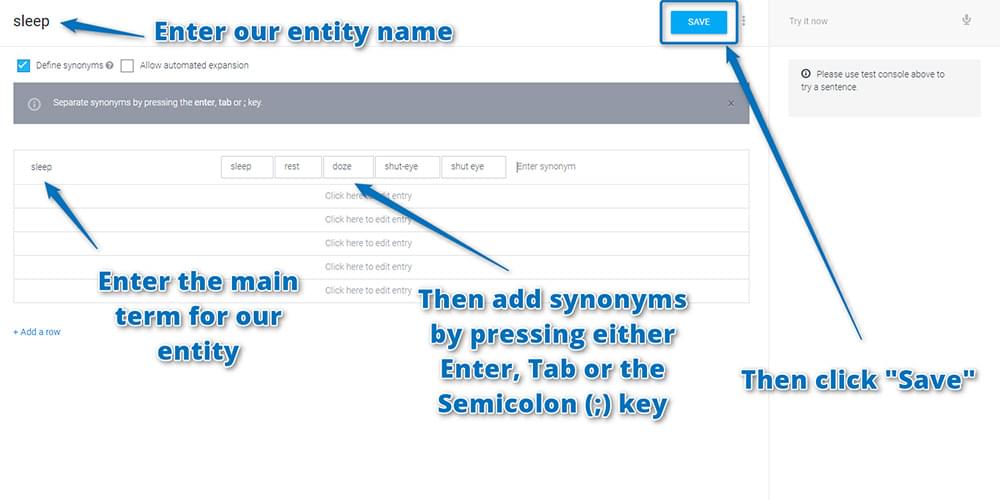
In the page that appears, enter in your entity name. A common convention is to write this in lowercase with words separated by dashes. Call your new entity “sleep”. Leave “Define synonyms” checked and enter one term in the section below it — “sleep”. You can also add in synonyms, so cover a few more options by entering in “rest”, “doze” and “shut-eye” next to “sleep”. You add each synonym by pressing either the Enter key, Tab key or semicolon (;) key. When done, click Save:
If you return to the “Entities” page, your new entity is shown with the name you’ll use to access it — @sleep.

Using Your Entity in an Intent
You now need to create a new intent that will train your personal assistant to recognize the sentences that trigger your sleep-related requests. Start by heading to the “Intents” page and creating a new intent as you’ve done a few times by this point in the series.
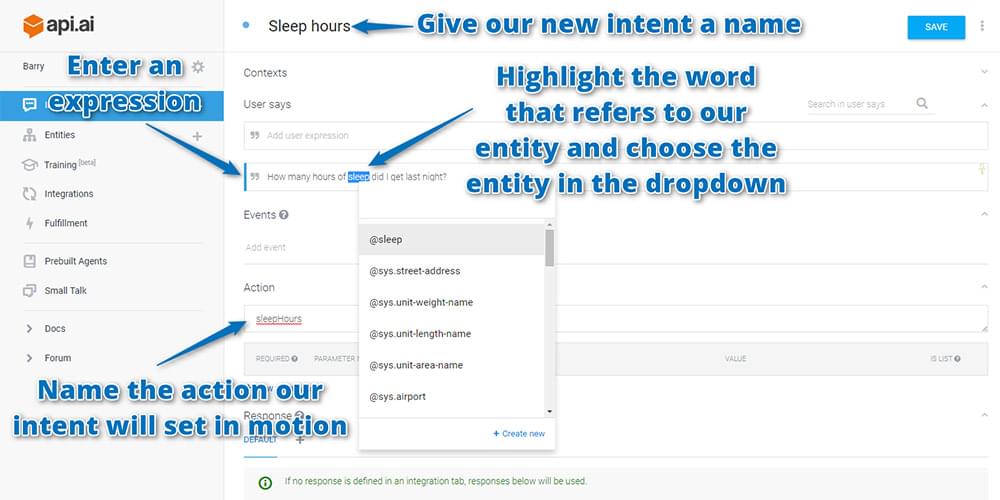
On your new intent page, include your entity within “User Says” statements. In the case of your sleep entity, enter in a statement that includes a generic word to represent an example of your entity. In this case, type in “How many hours of sleep did I get last night?” Your entity in this case is “sleep”.
To teach Api.ai that “sleep” is your entity, highlight that word and a dropdown will appear. One of the options should be your new sleep entity — @sleep. Choose that and the word will be highlighted to represent that it can potentially change in statements spoken to your agent.
You also have a field for the action name. This is the name that will be passed to your web app to show what Api.ai thinks the user wants to do. Name your action “sleepHours”.
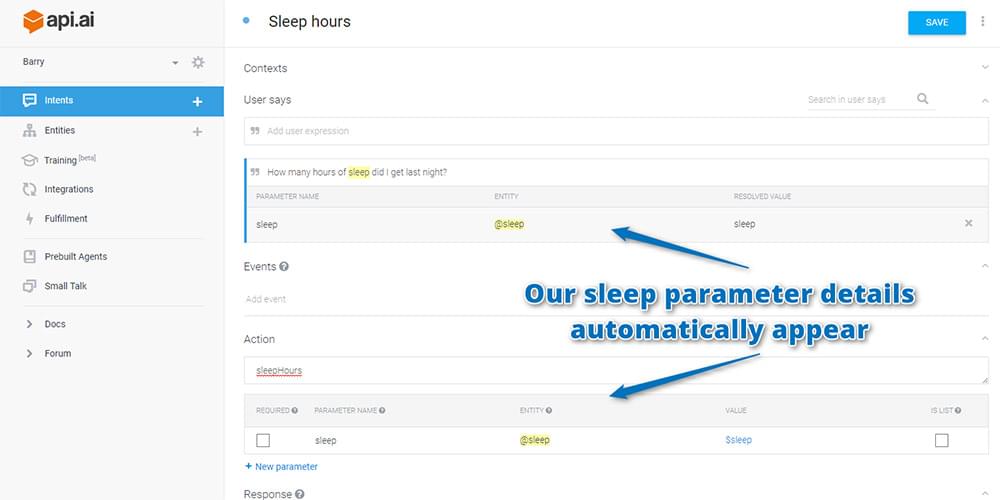
Upon including your sleep entity, it should appear as parameters for the intent like so:
You can then add a variety of different ways to say the same sort of statement, just as you did in the previous article on creating intents. However, this time, include the word “sleep” within them whenever you’re referring to a type of sleep and Api.ai will automatically highlight them for you:
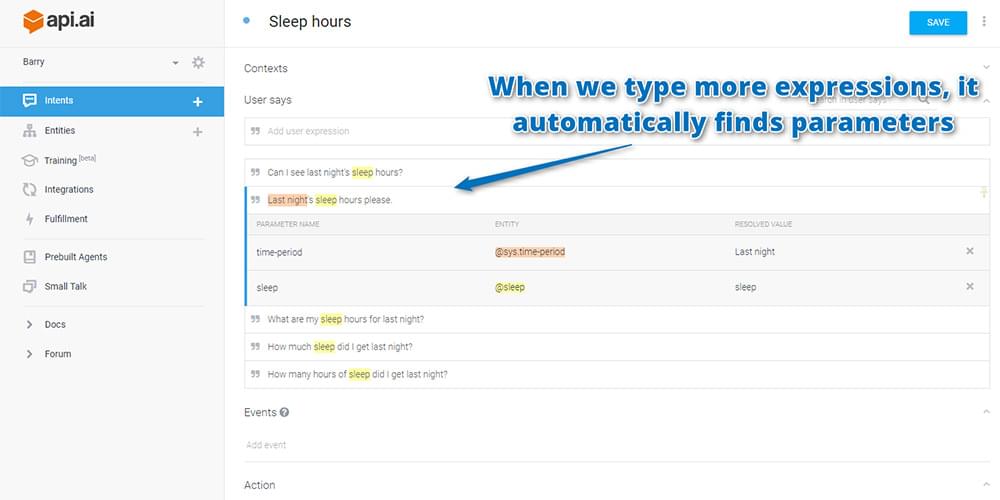
It might also find other pre-built entities that Api.ai understands, such as time period. In the screenshot above, Api.ai picked up that “Last night” was a time period and highlighted that too. This means that Api.ai should still understand the sentence “Last night’s sleep hours please” if it instead hears “Last week’s sleep hours please.”
To finish up your intent, set up some responses to your intent about sleep hours. The assistant itself in Api.ai can’t look up the stats, so you’ll need to use your own web app for that. However, it’s nice for the assistant to at least keep up the illusion that it’s doing all the work. To do this, your responses say things like “I’ll retrieve your sleep stats for you now, one moment!” and “Looking up your sleep hours now.” It also gives us a bit of time for our web app to retrieve that data.
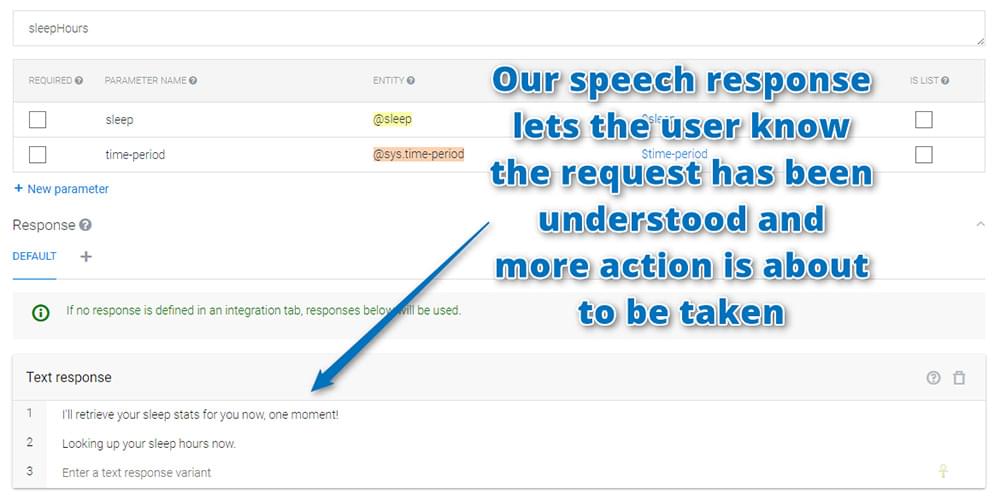
Once you have your responses defined, click Save!
If you test your new intent by saying “How many hours of rest did I get last night?”, your assistant now returns a correct speech response and the action of “sleepHours” ready for your web app to respond. This is exactly what you want!

Expanding Your Entity
You have a working entity that lets your assistant understand when you want to look up how many hours of rest you’ve had, but the entity is still quite simple. Sleep is just sleep. Rest. Shut-eye. In reality, there are specific types of sleep that a user might ask about. What if the user asks “How many hours of REM sleep did I get last night?” “REM sleep”, “Deep sleep” and “Light sleep” are all different types of “sleep” that should be understood by your sleep entity. You’ll add those in.
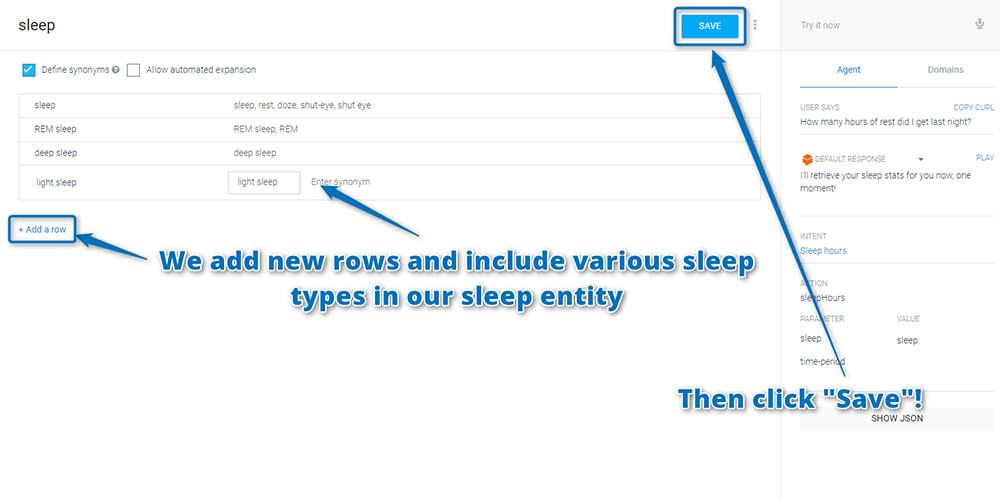
Return to the Entities page and open the @sleep entity. Underneath “sleep” and its synonyms of “sleep, rest, doze, shut-eye”, add new types of sleep such as “REM sleep” (also just called “REM”), “deep sleep” and “light sleep”. Include these as new rows, as they have distinct meanings and aren’t exactly the same as the generic term of “sleep”. To add a new row, click “Add a row”. Once you’ve added your new forms of sleep, click “Save” to save the changes:
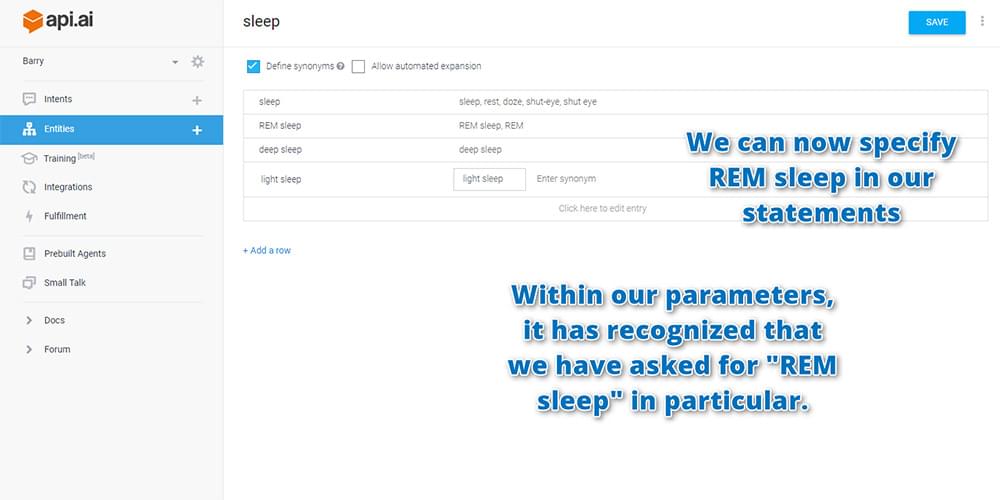
If you now try a more specific sentence, like “How many hours of REM did I get last night?”, your assistant still recognizes that the request is one of “sleepHours”, but also contains the sleep parameter of “REM sleep” to tell your web app what particular sleep the user is asking about:
If you click the “Show JSON” button underneath, you’ll see where the power of this truly comes into play. All of this information is returned to your web app in an easy-to-interpret JSON file that looks like so:
{
  "id": "7438",
  "timestamp": "2017-02-06T01:19:45.271Z",
  "result": {
    "source": "agent",
    "resolvedQuery": "How many hours of REM did I get last night?",
    "action": "sleepHours",
    "actionIncomplete": false,
    "parameters": {
      "sleep": "REM sleep"
    },
    "contexts": [],
    "metadata": {
      "intentId": "25d04df",
      "intentName": "How many hours of @sleep:sleep did I get last night?"
    },
    "fulfillment": {
      "speech": "Looking up your sleep hours now."
    }
  },
  "status": {
    "code": 200,
    "errorType": "success"
  }
}
The most important bits of this are the action name that has been requested and the parameters for that action:
"action": "sleepHours",
"parameters": {
  "sleep": "REM sleep"
},
This is what you’ll use in your next article to build up your web app’s response to these queries.
Conclusion
Incredibly, after three articles looking into Api.ai, you’ve still just scratched the surface of what’s possible with the platform! Entities can contain other entities (both system entities and your own developer entities), you can set up intents that require certain information and prompt the user if they don’t provide it, you can use your previously mentioned entities in a conversation using their $alias … and so on!
In the final article in the series, you’ll look at adding functionality to the web app that you created in the earlier article on How to Build Your Own AI Assistant Using Api.ai that pulls in Jawbone data to give you real answers to these queries!
I’ve had feedback from a few readers who have been loving building their own personal assistants. If you’ve been following along, how’s your assistant going? What have you trained them to do? Let me know in the comments below, or get in touch with me on Twitter at @thatpatrickguy. I always love to hear the ideas that emerging tech spurs into developer minds!
Give your AI the human touch with a sentiment tool. Check out our screencasts on the Microsoft Cognitive Services and the Text Analytics API.