How to Make Your Web App Smarter with Image Recognition

Clarifai is an API which provides image and video recognition that is incredibly simple to use and a whole lot of fun to implement. In this article, we will explore dragging and dropping images from around the web into a simple web app that will read them and tell us what it believes they are.
In this demo, we will be using Node.js for the server and a relatively basic front end that uses jQuery for AJAX requests. If you aren’t strong in Node.js, that should be okay as long as you are at a level where you are comfortable running npm install to pull in modules and node app.js in the command line to get your web app going. You won’t need to customize too much within it and might learn a thing or two in the end by getting the existing code running!
The Code
All of the sample code for this demo is available on GitHub.
Getting Started
To get started, we go to the Clarifai home page and click the “Sign up now” button on the top right:

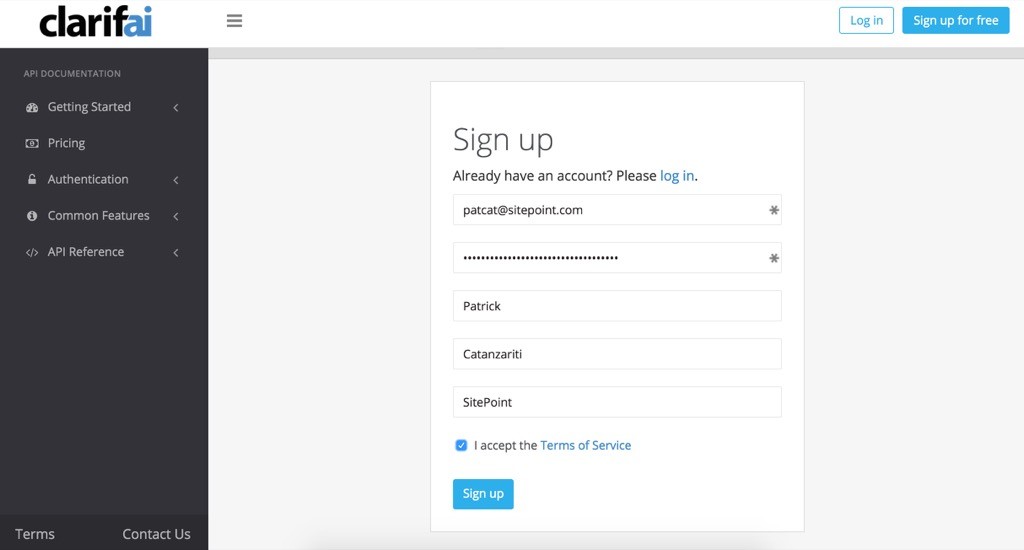
Sign up with your email and details:
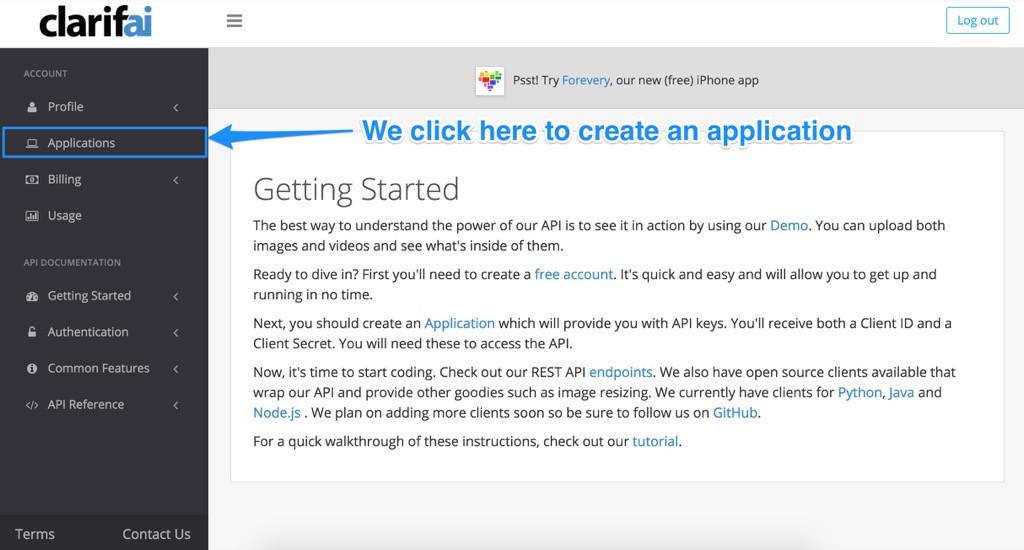
We want to create a new application, so we head to the application screen by clicking the “Applications” menu item on the left.
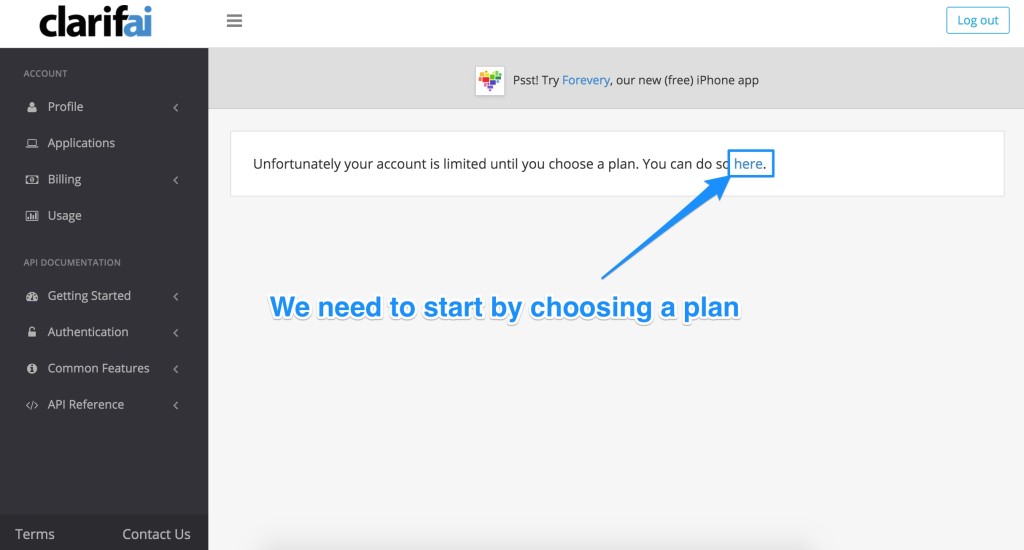
Clarifai won’t allow us to create an application just yet, as we need to choose a plan:
Lets choose a plan so we can get things going. For our demo, the free plan should be more than suitable. We can upgrade later if needed:

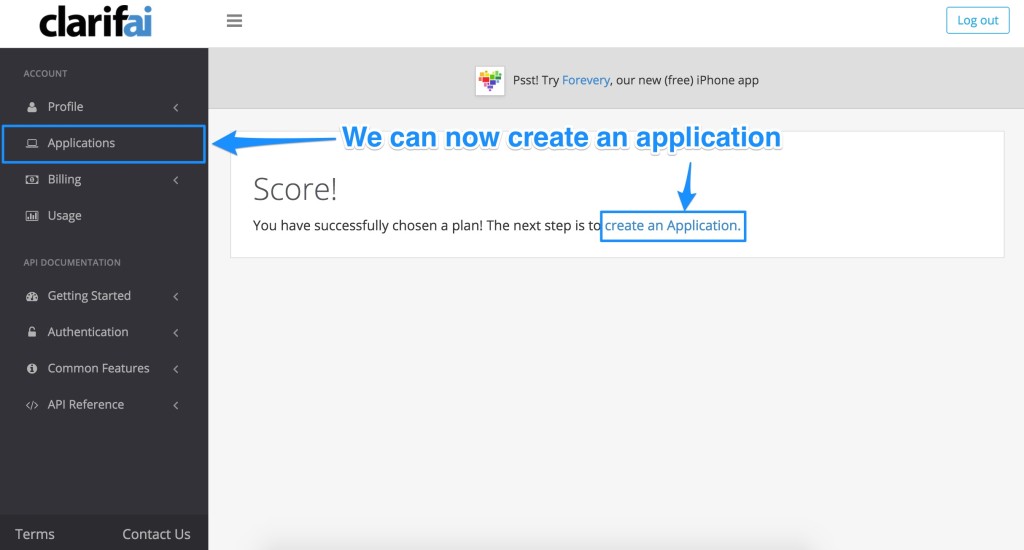
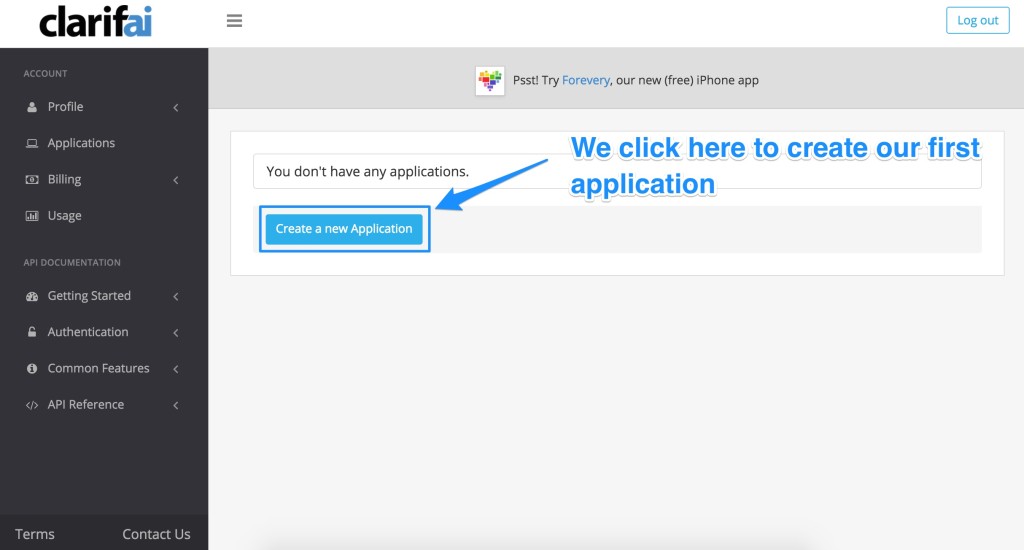
We are now allowed to create an application, to do so we can either click the “Applications” menu item on the left or the “create an Application” link:
Click the “Create a New Application” button:
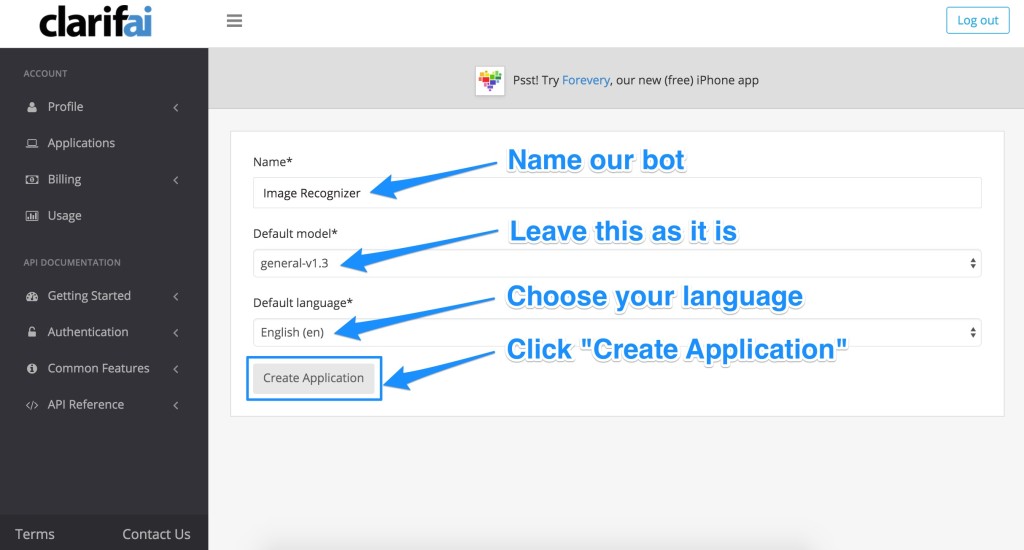
We give our new application a name (e.g. “Image Recognizer”), leave the default model as is and set our language (we have kept it on English, you may prefer a different language!). To finish, click “Create Application”:
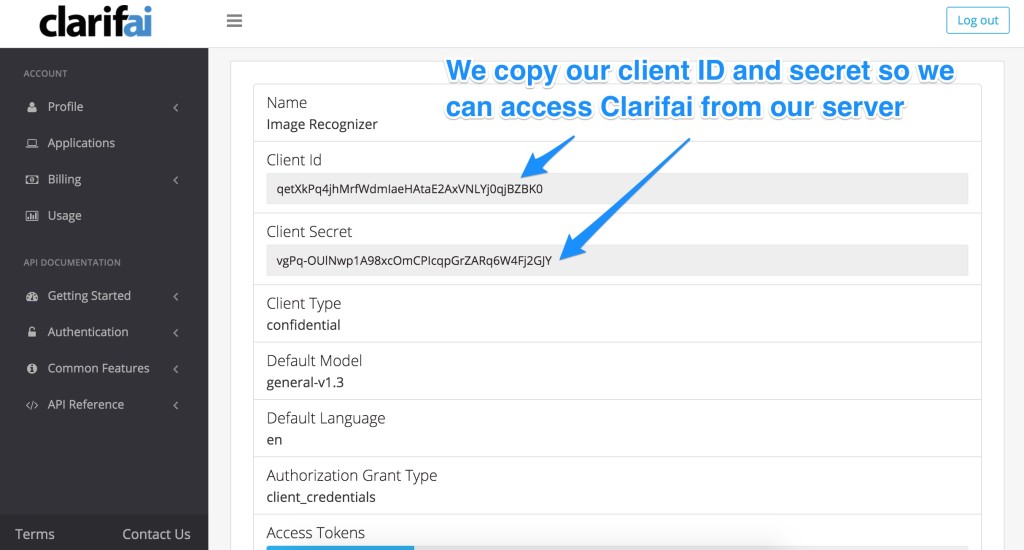
Our new application details should now appear. The two most important bits we will want to copy somewhere safe are our “Client ID” and “Client Secret” — we will need these to access Clarifai on our server that we will set up next.
Setting Up Our Node.js Server
Clarifai has a Node.js client we can use to interface with its service available on GitHub. Download the repo to your computer. In particular, we want the clarifai_node.js file.
Create a directory for your Node server and add the `clarifai_node.js` JavaScript file into the root directory.
Our Node.js server functions will be within a JavaScript file called app.js. This is where we will manage our Clarifai powered image recognition requests. app.js has the following JavaScript:
var Clarifai = require("./clarifai_node.js"),
    express = require("express"),
    app = express(),
    server = require("http").Server(app),
    bodyParser = require("body-parser"),
    port = process.env.PORT || 5000;

app.use(bodyParser.json());

Clarifai.initAPI("YOUR_CLIENT_ID", "YOUR_CLIENT_SECRET");

function identifyClarifaiError(err) {
  // Default error function from Clarifai we won't go into but you can find it in the GitHub download of this code!
}

app.post("/examineImage", function(req, resp) {
  var imageURL = req.body.imageRequested;
  console.log("Response was ", imageURL);

  Clarifai.tagURL(imageURL, "Image from browser", commonResultHandler);

  function commonResultHandler(err, res) {
    if (err != null) {
      identifyClarifaiError(err);
    }
    else {
      if (typeof res["status_code"] === "string" &&
        (res["status_code"] === "OK" || res["status_code"] === "PARTIAL_ERROR")) {

        if (res["results"][0]["status_code"] === "OK") {
          var tags = res["results"][0].result["tag"]["classes"];
          console.log("Tags found were: ", tags);
          resp.send(tags);
        }
        else {
          console.log("We had an error... Details: " +
            " docid=" + res.results[0].docid +
            " local_id=" + res.results[0].local_id +
            " status_code="+res.results[0].status_code +
            " error = " + res.results[0]["result"]["error"]);

          resp.send("Error: " + res.results[0]["result"]["error"]);
        }
      }
    }
  }
});

app.get("/", function(request, response) {
  response.sendFile(__dirname + "/public/index.html");
});

app.get(/^(.+)$/, function(req, res) {
  res.sendFile(__dirname + "/public/" + req.params[0]);
});

app.use(function(err, req, res, next) {
  console.error(err.stack);
  res.status(500).send("Something broke!");
});

server.listen(port, function() {
  console.log("Listening on " + port);
});
A large proportion of the code is basic Node express server functionality which we won’t cover in this article, if you aren’t quite sure these parts mean, you can leave them as is and just enjoy a running Node server.
The bits which relate specifically to Clarifai begin with our line of code that includes our clarifai_node.js file:
var Clarifai = require("./clarifai_node.js"),The next line which uses Clarifai starts out initialization of the API. It gives us access to the API using the client ID and client secret which we copied somewhere safe earlier. Paste them into the appropriate spots:
Clarifai.initAPI("YOUR_CLIENT_ID", "YOUR_CLIENT_SECRET");We then have a POST request which the Node server will look out for and respond to. This request expects to receive a web URL for an image within our POST body called imageRequested when accessed via /examineImage. It logs whatever URL it finds into our console:
app.post("/examineImage", function(req, resp) {
  var imageURL = req.body.imageRequested;
  console.log("Response was ", imageURL);
We then run a function from the Clarifai Node API Client called tagURL(). This function takes three parameters — the image URL we want Clarifai to examine, a name we give the image (you could potentially change this name and adapt it from the URL if you wanted but to keep it simple we’ve kept it as a generic name for all) and the callback function once it has run:
Clarifai.tagURL(imageURL, "Image from browser", commonResultHandler);Within commonResultHandler(), we react to what Clarifai returns to us. If it returns an error, we pass it to the identifyClarifaiError() function which we can leave as is (you can find that function in the GitHub download above). It contains a series of checks for status codes which come from Clarifai. For our purposes in this basic demo, we won’t cover all of what it does as you shouldn’t need to adjust it.
function commonResultHandler(err, res) {
  if (err != null) {
    identifyClarifaiError(err);
  }
  // Continues further
If we do not have a clear error returned, we double check that Clarifai’s returned data does not also contain error statuses within its res["status_code"]:
else {
  if (typeof res["status_code"] === "string" &&
    (res["status_code"] === "OK" || res["status_code"] === "PARTIAL_ERROR")) {
Clarifai returns an array of results within res["results"] — one for each image it is given. As we are only providing one single image, we only need to retrieve the first item in that array. Each item will have a JSON object of data it has for that image. The JSON returned looks like so:
{
  "docid": 6770681588539017000,
  "url": "https://encrypted-tbn2.gstatic.com/images?q=tbn:ANd9GcQSoU65AMIOpJ2rwtvdJyuSExIjcwQfuIup8sm6tesdWwtCEajzVw",
  "status_code": "OK",
  "status_msg": "OK",
  "local_id": "Image from browser",
  "result": {
    "tag": {
      "concept_ids": [
        "ai_l8TKp2h5",
        "ai_VPmHr5bm"
      ],
      "classes": [
        "people",
        "adult"
      ],
      "probs": [
        0.9833399057388306,
        0.9695020318031311
      ]
    }
  },
  "docid_str": "c009c46cf0c7b68b5df64b083c2547b4"
}
The most important bits for us to use are within the result object. This contains three arrays, one which lists the Clarifai concept IDs for the elements it has found, one lists the “classes” for them (the human readable names for each concept) and one lists the probability for each being correct. The order of these match up with each object’s tag, so in the example above, the concept ID of "ai_l8TKp2h5" is known as "people" and Clarifai is about 0.9833399057388306 percent sure that there are people in this image.
Using this data, we can list these classes to show what Clarifai has uncovered. In the code below, we check the status code in this result is "OK" and then send the array of tags as a response to the front end’s AJAX request.
if (res["results"][0]["status_code"] === "OK") {
  var tags = res["results"][0].result["tag"]["classes"];
  console.log("Tags found were: ", tags);
  resp.send(tags);
}
Otherwise, if the status code isn’t "OK", we log the details of the error and send that back to our web app instead:
else {
  console.log("We had an error... Details: " +
    " docid=" + res.results[0].docid +
    " local_id=" + res.results[0].local_id +
    " status_code="+res.results[0].status_code +
    " error = " + res.results[0]["result"]["error"]);

  resp.send("Error: " + res.results[0]["result"]["error"]);
}
Our Front End JavaScript
Much of the front end can be made however you’d like. In our example, the front end is going to be a relatively simple one which allows for an image to be dragged onto the app from elsewhere on the web. We read it the URL, send it to our Node server above and then await a list of tags to show.
Our full front end JavaScript file looks like so:
var baseUrl = window.location.origin,
    dropArea = document.getElementById("dropArea");

dropArea.addEventListener("drop", imageDropped, false);

function imageDropped(evt) {
  evt.stopPropagation();
  evt.preventDefault();

  var imageHTML = evt.dataTransfer.getData("text/html"),
      dataParent = $("<div>").append(imageHTML),
      imageRequested = $(dataParent).find("img").attr("src"),
      $imageFound = $("#imageFound");

  console.log(imageRequested);

  $imageFound.attr("src", imageRequested);

  $.ajax({
    type: "POST",
    url: baseUrl + "/examineImage",
    contentType: "application/json; charset=utf-8",
    dataType: "json",
    data: JSON.stringify({"imageRequested": imageRequested}),

    success: function(data) {
      console.log(data);
      var tags = "";
      for (var i = 0; i The initial line of code reads in the URL we've got in the browser bar, as this is also the URL for our server:

[code language="js"]
var baseUrl = window.location.origin,
We then tell JavaScript to keep an eye on the #dropArea element and add an event listener that will run imageDropped() if we drop something onto it:
dropArea = document.getElementById("dropArea");

dropArea.addEventListener("drop", imageDropped, false);
imageDropped() starts by preventing the usual behavior that will happen when a file is dragged into the browser (it usually will load that file into the browser window you dragged it into):
function imageDropped(evt) {
  evt.stopPropagation();
  evt.preventDefault();
Once we are sure that the usual functionality of dragging and dropping by the browser has been avoided, we get the HTML from the event’s dropped data. The data should typically include an <img> tag, but sometimes has other tags that come along with it like a <meta> tag and other <div> tags. To ensure we’ve always got a parent element to look inside, we append whatever data we’ve got into a <div>. Then we find the <img> within it, read its src attribute and put this value into a variable called imageRequested:
var imageHTML = evt.dataTransfer.getData("text/html"),
    dataParent = $("<div>").append(imageHTML),
    imageRequested = $(dataParent).find("img").attr("src")
There is an <img> tag with an ID of #imageFound in our HTML which we then place the dragged image into, so that we can visually see the image underneath our results. We also log the URL of the image for debugging (you can remove the console.log if you’d prefer):
$imageFound = $("#imageFound");

console.log(imageRequested);

$imageFound.attr("src", imageRequested);
With our newly acquired image URL we have retrieved and stored into imageRequested, we send it to our Node server’s /examineImage address within a JSON object in the format {"imageRequested": "http://www.somewebsite.com/yourimage.jpg"}. On successful retrieval of tags (Clarifai calls them classes), we change them into a comma separated string and place that string into our HTML’s #dropArea element. If there is an error, we log that an error has occurred.
$.ajax({
  type: "POST",
  url: baseUrl + "/examineImage",
  contentType: "application/json; charset=utf-8",
  dataType: "json",
  data: JSON.stringify({"imageRequested": imageRequested}),

  success: function(data) {
    console.log(data);
    var tags = "";
    for (var i = 0; i I won't cover the HTML in detail as it isn't too exciting and could definitely be optimized! It looks like so:

[code language="html"]
<!doctype html>
<html>
<head>
  <title>Image recognition tester</title>
  <meta http-equiv="Content-Type" content="text/html; charset=utf-8" />
  <script src="//code.jquery.com/jquery-1.12.0.min.js"></script>
  <link href="https://fonts.googleapis.com/css?family=Lora" rel="stylesheet" type="text/css"/>
  <style type="text/css">
    #dropArea {
      border: 1px solid #fff;
      bottom: 10%;
      color: #fff;
      display: flex;
      justify-content: center;
      flex-direction: column;
      font-family: "Lora", Arial, sans-serif;
      font-size: 30px;
      left: 10%;
      position: absolute;
      right: 10%;
      text-align: center;
      text-shadow: 0 0 10px rgba(0,0,0,0.5);
      top: 10%;
    }
    #imageFound {
      background-size: 100% cover;
      background: none 0 0 no-repeat #000;
      height: 100%;
      left: 0;
      position: absolute;
      top: 0;
      width: 100%;
    }
  </style>
</head>
<body>
  <img src="" id="imageFound" />
  <div id="dropArea" ondragover="return false;">Drop your image from the web into here!</div>
  <script src="./main.js"></script>
</body>
</html>
In Action
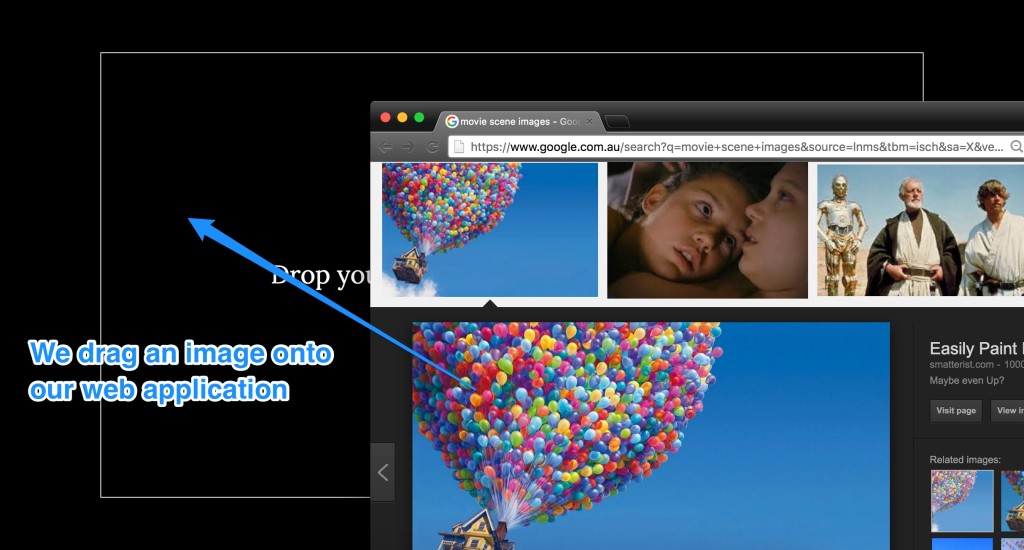
If we run our Node server locally, we can access it via localhost:5000, so run the server using node app.js and visit the page in your web browser.

Visit another website in a separate window and drag in an image from that window to this one:
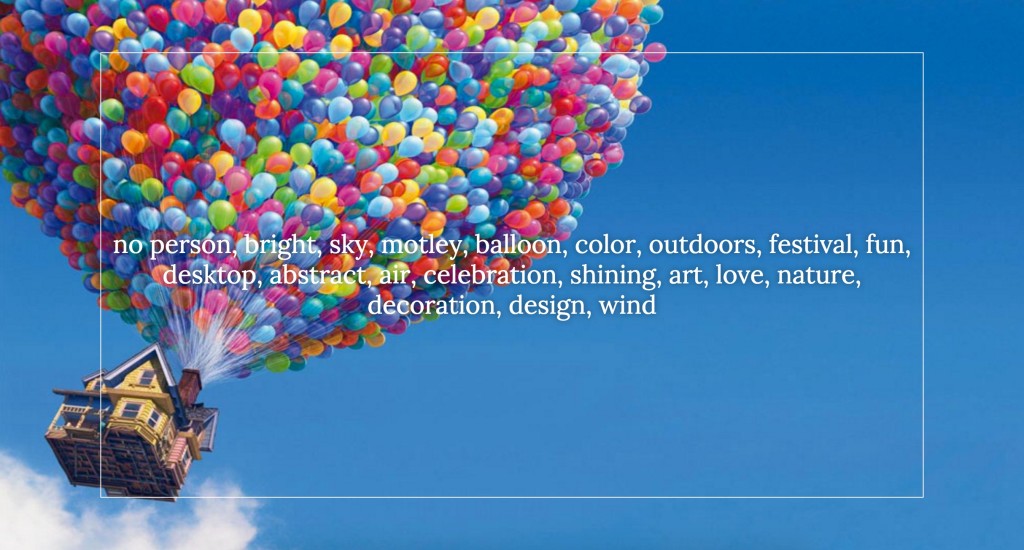
When it has recognized and identified the image, it tells us a list of tags in order from most likely to least likely which it believes the image contains:
Conclusion
Clarifai has a lot of potential with its image recognition capabilities. This service’s API could be added into a range of AI applications to give our AI a nice bit of visual understanding of the world around it. For example, we could add this functionality to a Siri-style personal assistant like the one we built in the articles on How to Build Your Own AI Assistant Using Api.ai and Customizing Your Api.ai Assistant with Intent and Context. You could add it to a Nodebot or any other web enabled application. Clarifai’s service can also do video recognition which brings a whole new level of potential!
Where do you plan on using Clarifai’s image recognition? I’d love to hear about where this API gets used! Let me know in the comments below, or get in touch with me on Twitter at @thatpatrickguy.


