How to Build a Daily Affirmations SMS Service with Stripe & Syncano

This article was sponsored by Syncano. Thank you for supporting the sponsors who make SitePoint possible.
Syncano provides a cloud-based platform for real-time applications. It stores the data, microservice code, schedules for automating code execution, user accounts, webhooks to access these functions via HTTP and more. They’ve even got an open source community of code snippets and support various runtime environments including Node, Python, Go and Ruby.
From a developer point of view, Syncano makes it simpler to get started by providing a lot of the backend infrastructure you’d otherwise need to piece together yourself. In this article, we will look at what is involved in setting up a web app using Syncano and linking it to third party services.
What You’ll Need
In order to be able to follow along with this tutorial, it will be handy for you to have a knowledge in the basics of HTML, CSS and JavaScript.
In the demo application, we use jQuery to put together some simple prototype screens and actions. I’d like to stress one point – in a proper application you really should be using a much more reliable and clean way of structuring your web app. I’d recommend a JavaScript framework such as React, Angular, Meteor… etc. For this demo, we purposely avoided using a JavaScript framework like those to keep things simple and focus on Syncano’s part in it all. Take our snippets of Syncano functionality and adapt the front-end JavaScript to your own favorite framework!
Our Demo Application
To explore what is possible with Syncano from a beginner’s perspective, we’ll be putting together a web app that will send registered users positive affirmations each day for the low price of $1 a month! We’ll explore user registrations, scheduling events, sending out SMS messages via Twilio and setting up payments.
The Code
The code for this demo can all be found on GitHub.
Getting Started With Syncano
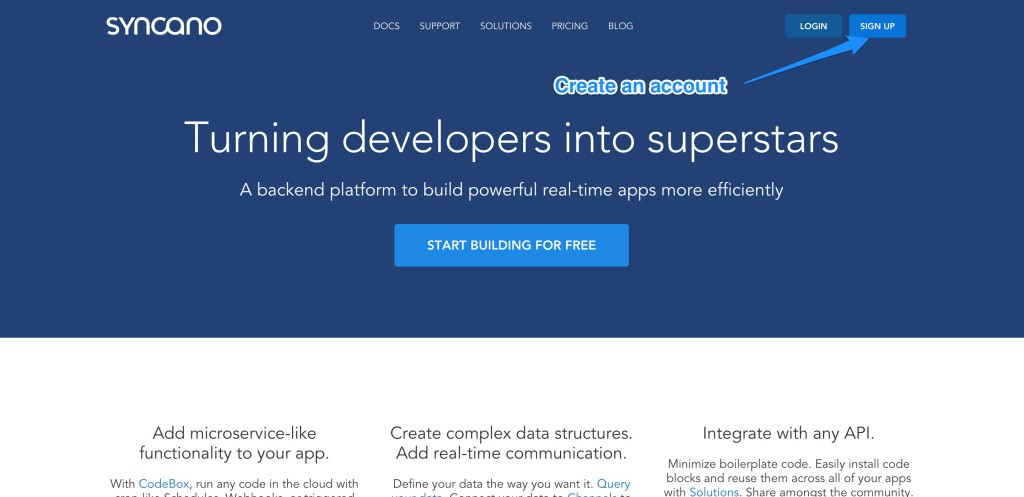
If you don’t have a Syncano account, you can sign in for free at Syncano.com. You’ll find a “Sign Up” button in the top right:
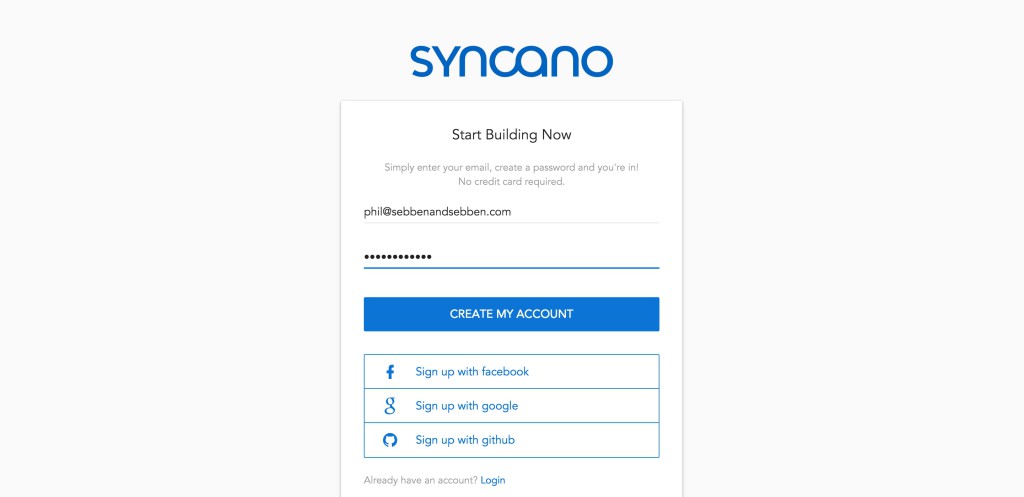
Fill in your email address and preferred password, then click “Create My Account”:
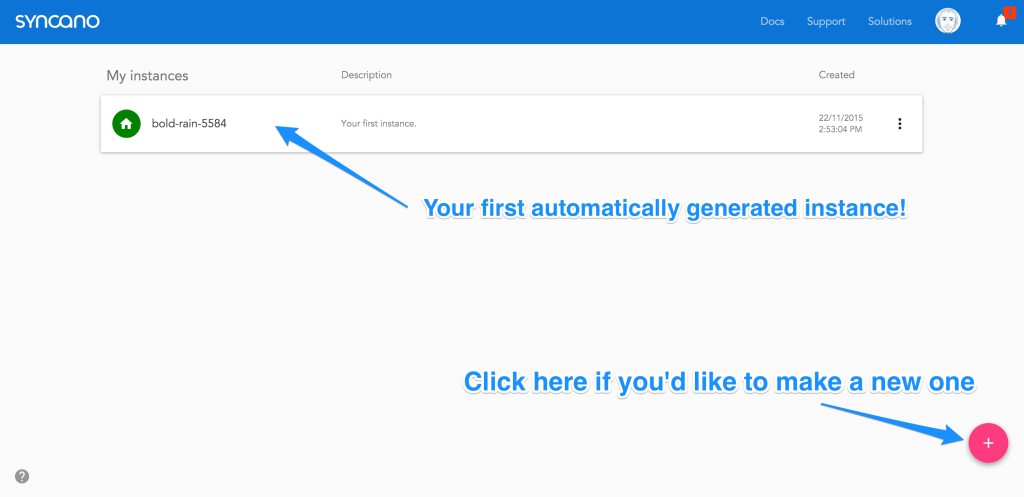
Once you sign up, you’ll have access to your Syncano dashboard. You can access this any time by going to dashboard.syncano.io. When you have logged in, you will have one “instance” which we will use for our demo app. If you’ve already been using Syncano and would like to create a new one, click the “+” icon on the bottom right (note, you cannot give the instance a custom name unless you use their API explorer, however that’s beyond the scope of this article!):
Generating a Syncano API Key
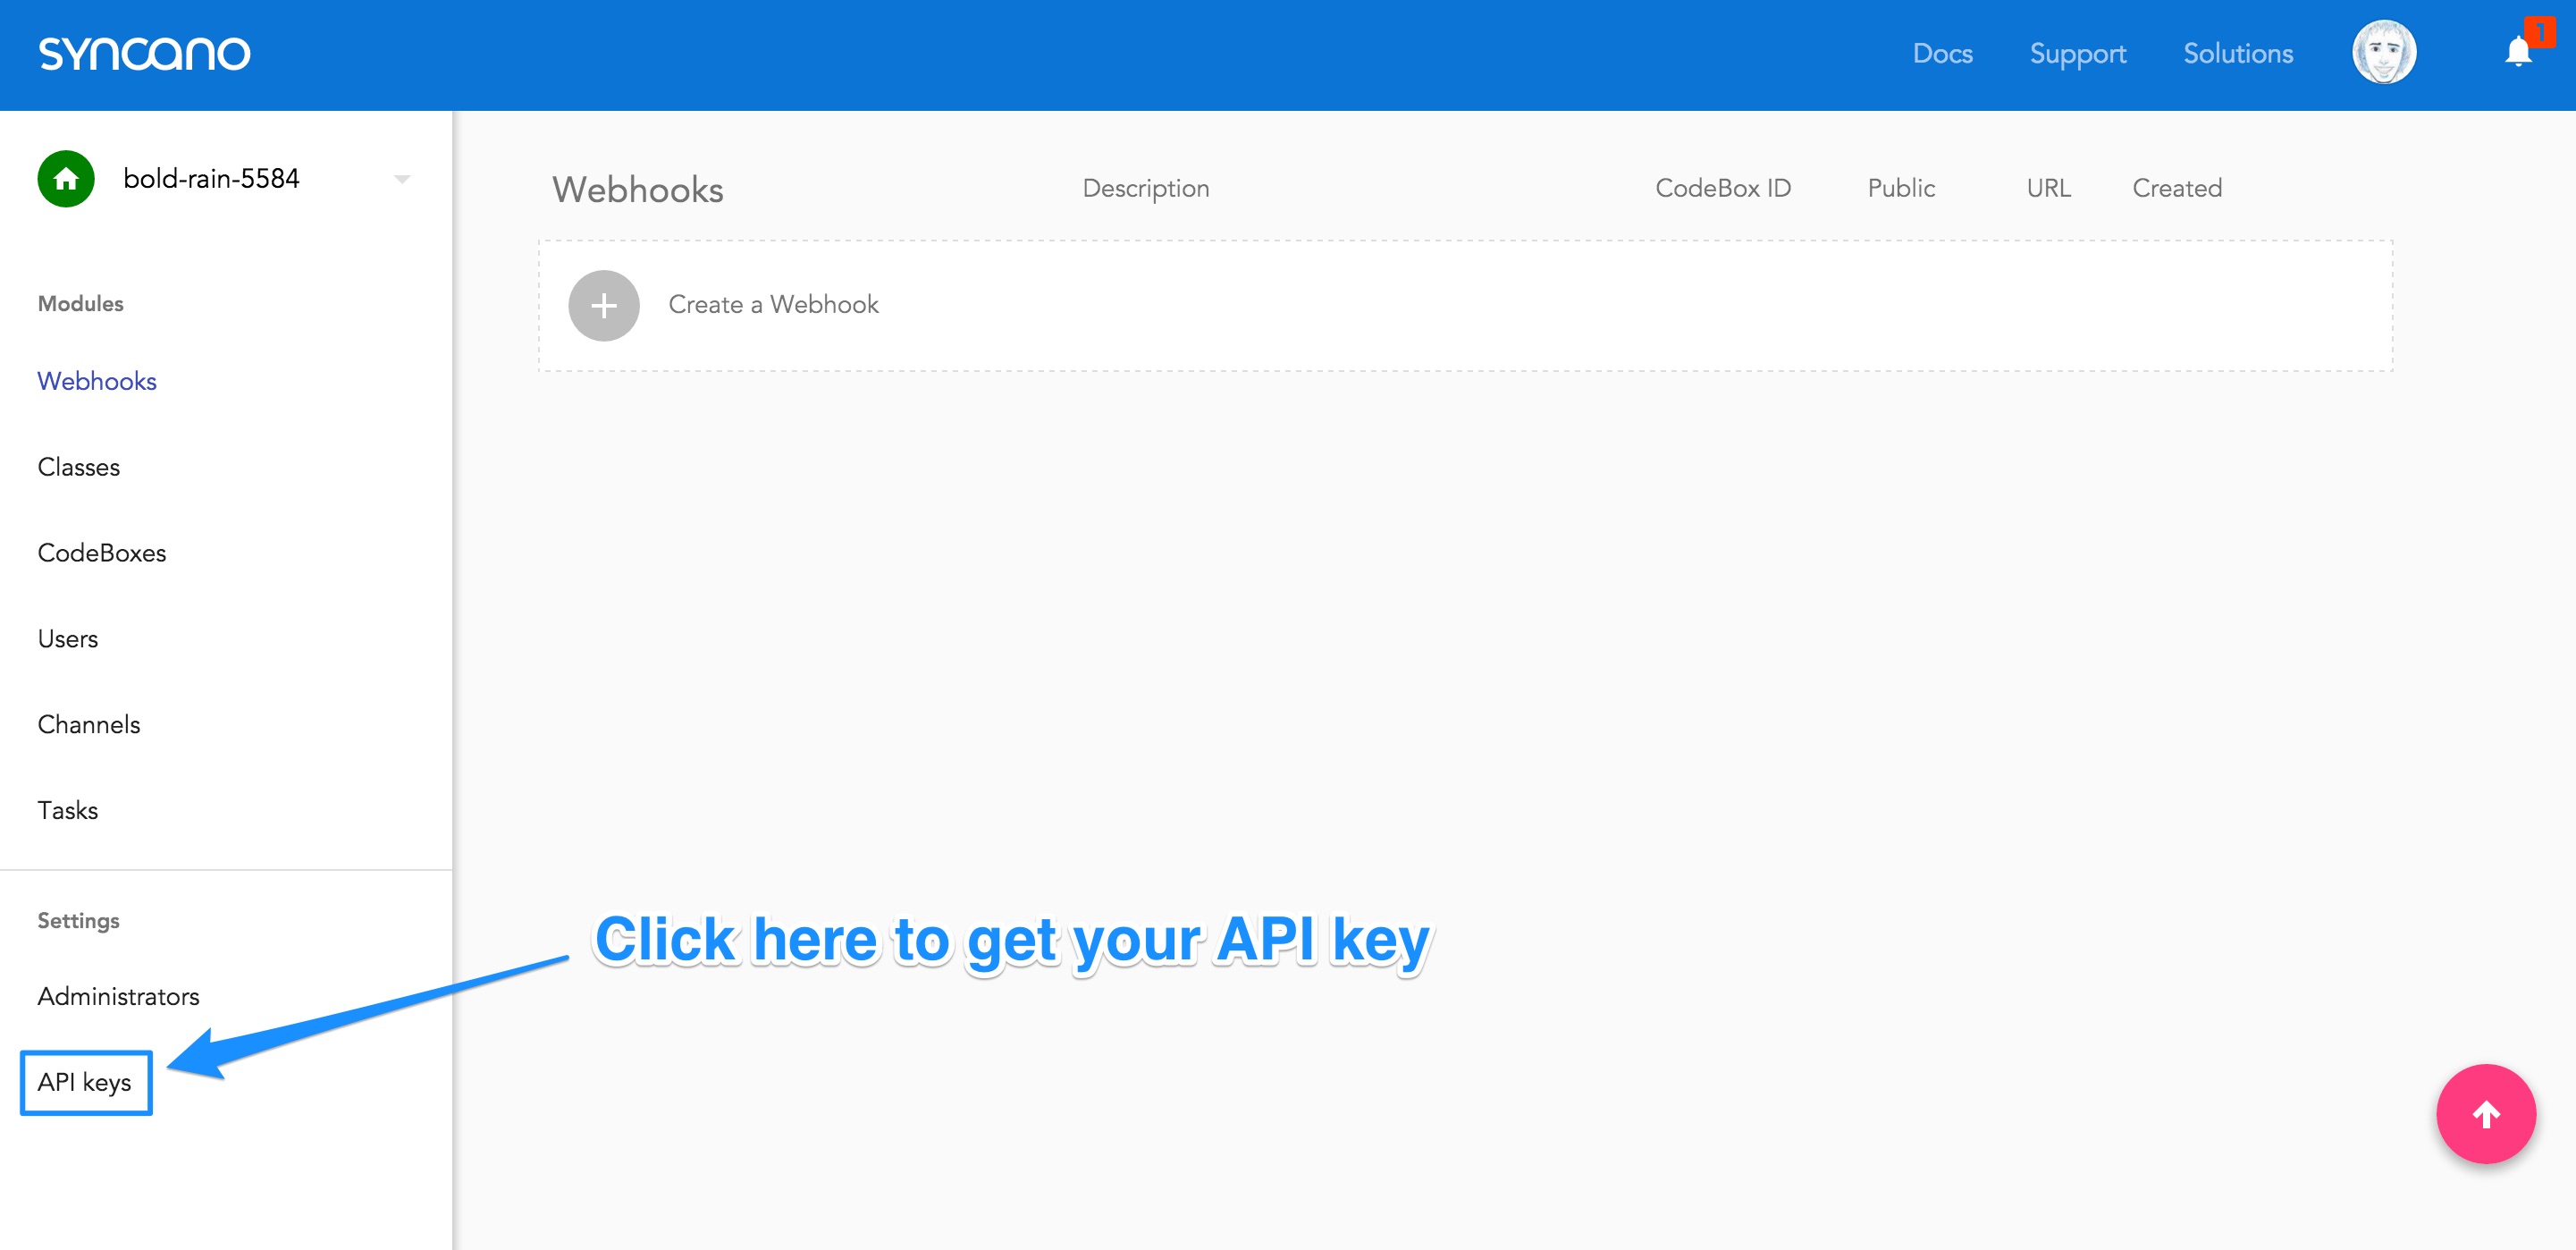
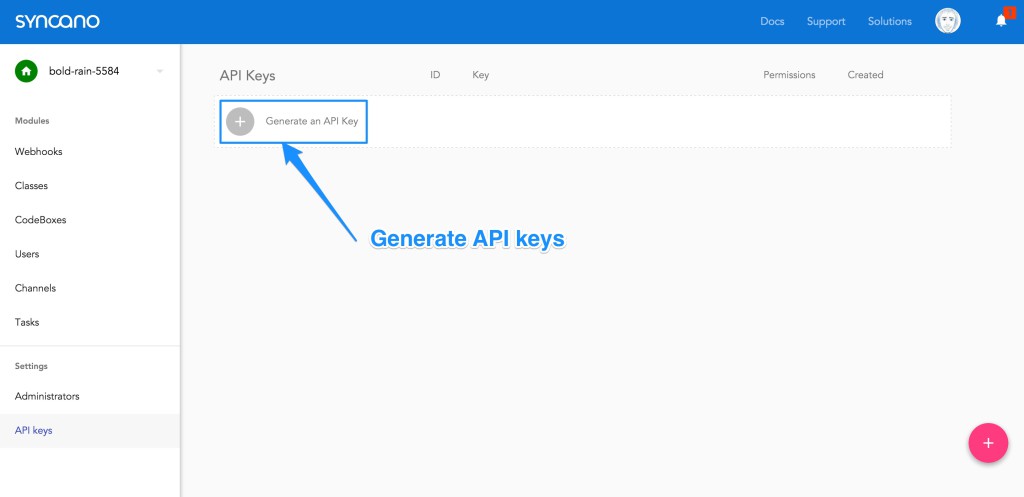
Click that instance to open it up. It’ll look rather empty to start, with plenty of options alongside the left. The first thing you’ll want to do is click the “API keys” menu option to get your API key:
Then generate an API key for this instance by clicking “Generate an API Key”:
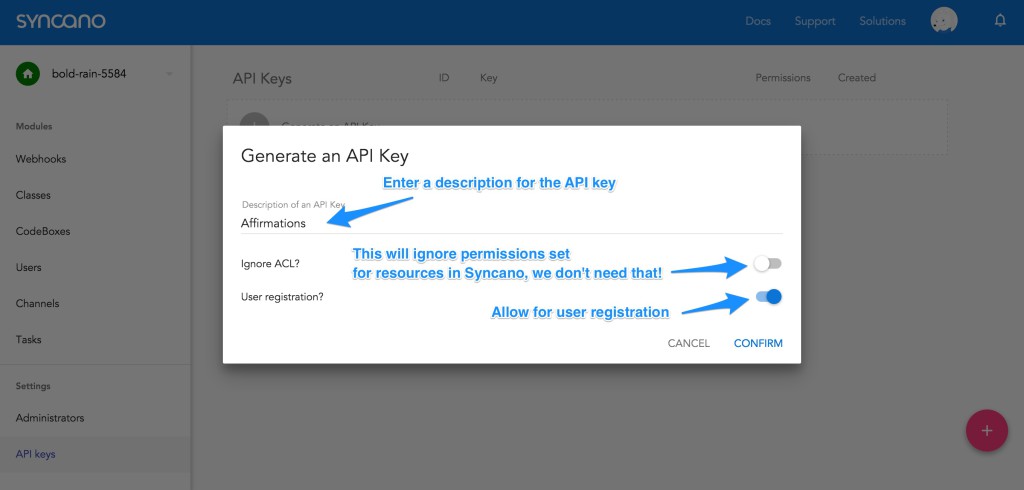
Syncano will give you a popup to provide API key settings. There are three settings you can update:
- Description – the description for your API key. We will call ours “Affirmations”.
- Ignore ACL – this ignores any permissions set for resources within our app, we won’t need that.
- User registration – this lets people sign up within this API key, we will want to have this ticked!
Once you have input in all of those settings, click “Confirm”:
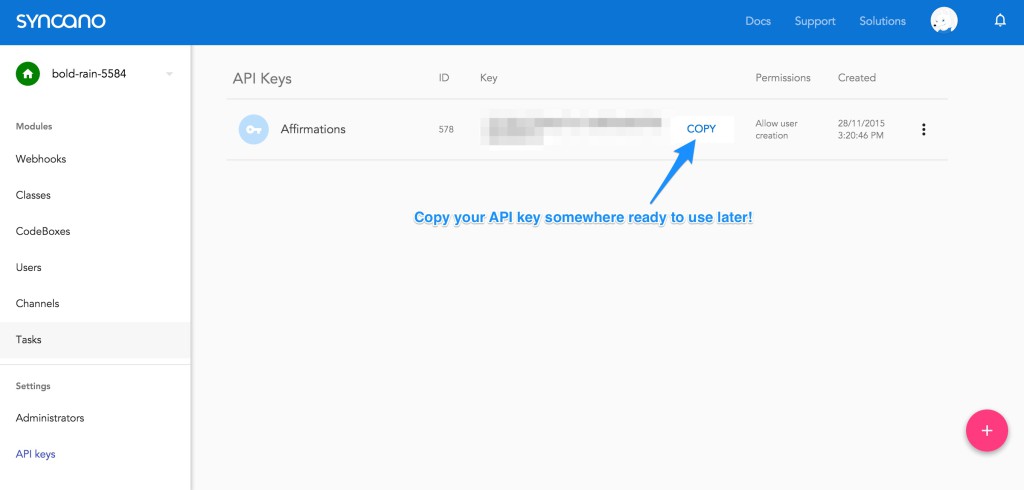
You should now see your API key listed, copy that key somewhere ready for when you’ll want to use it in your code. If you lose it, just come right back to this “API keys” page in your dashboard:
Finding Your Syncano Account Key
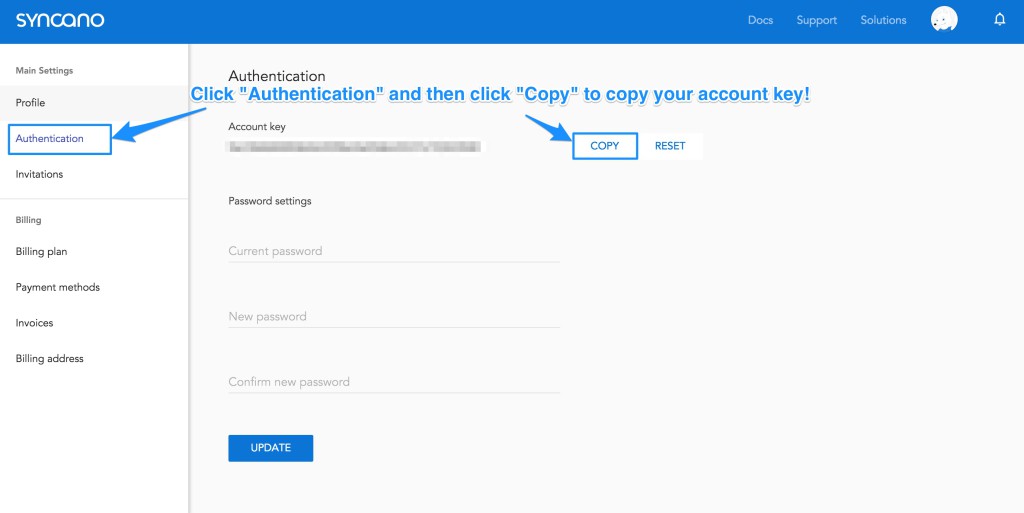
In order to make some calls in Syncano, you will need to generate an API key. We can do that via the Account screen. To get there, we will click our profile picture in the top right and then click the area with our email to go to the Account screen:

From there, we click the “Authentication” item in the menu on the left and click “Copy” to copy the Account key that is displayed. Store that somewhere safe for now!
We will want to try and stick to using the API key where possible, especially anywhere that is outside the Syncano ecosystem.
Getting Started With Syncano’s JavaScript
Syncano provides a variety of ways you can include their JavaScript library into your app:
- Directly downloading the JavaScript file from GitHub – You can find the latest JavaScript library on their GitHub (download the zip file from this link). You’ll find the JavaScript file you will need under
dist/syncano.min.js. - Including their npm module – If you prefer to use npm (via Node, Browserify… etc), you can install their module via
npm install syncano --save- You would then include this in your project via
var Syncano = require('syncano');
- You would then include this in your project via
- Including their Bower module – If you prefer Bower, you can install their module via
bower install syncano- Include this via
<script src="path/to/bower_components/syncano/dist/syncano.min.js">
</script>
- Include this via
User Accounts in Syncano
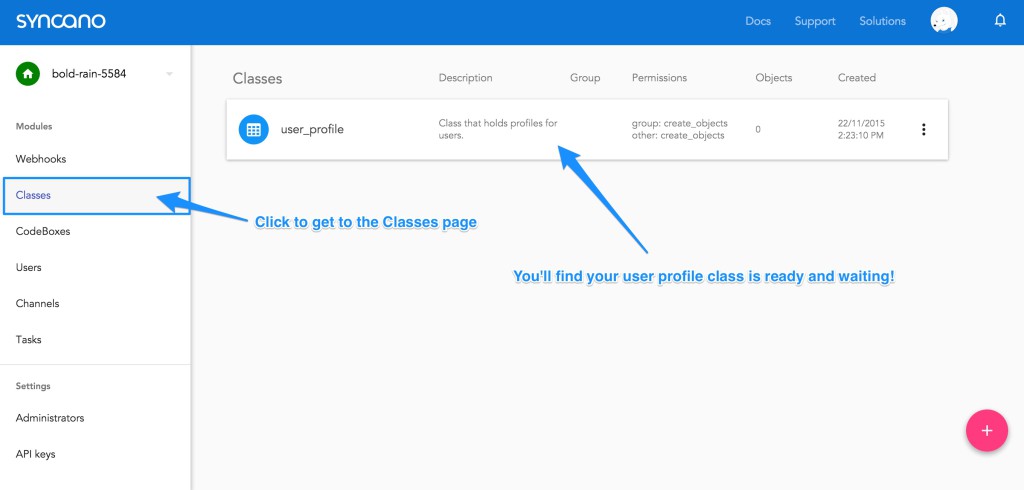
Syncano comes ready with user account functionality for you to pick up and use straight away. If we head over to the “Classes” page by clicking the menu item on the left, we can see our user_profile class is ready and waiting to store user details:
We will also be able to see our users listed on the “Users” page once we’ve got a user in the system. The “User” page will show their e-mail addresses and whether they are assigned to any groups (we won’t be assigning groups in this demo), the “Classes” page with the user_profile class will show us much more detail, including custom fields we will be adding for our app in particular.
Adding Custom Syncano Classes
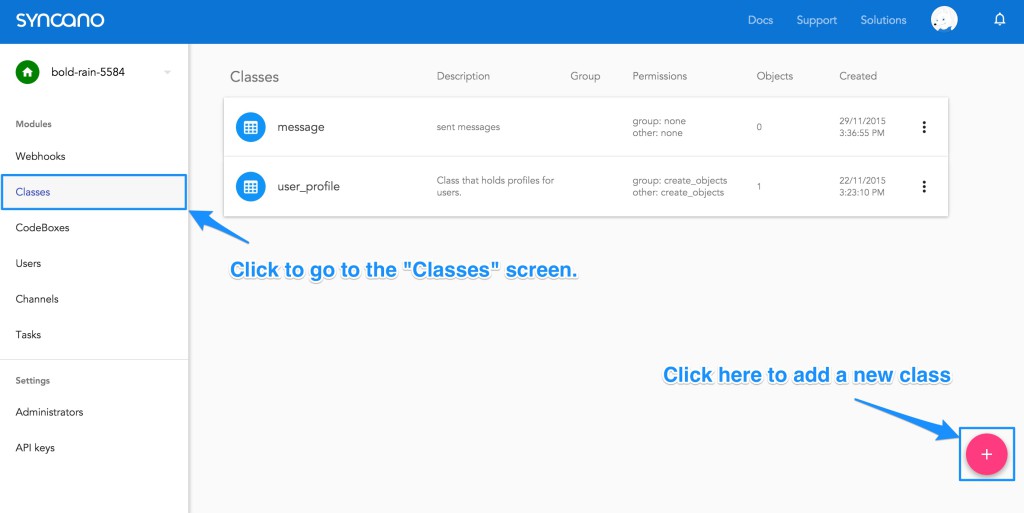
To store our affirmations, we will create a new class in Syncano to store them. To do so, go to the “Classes” page and click the plus icon to create a new class:
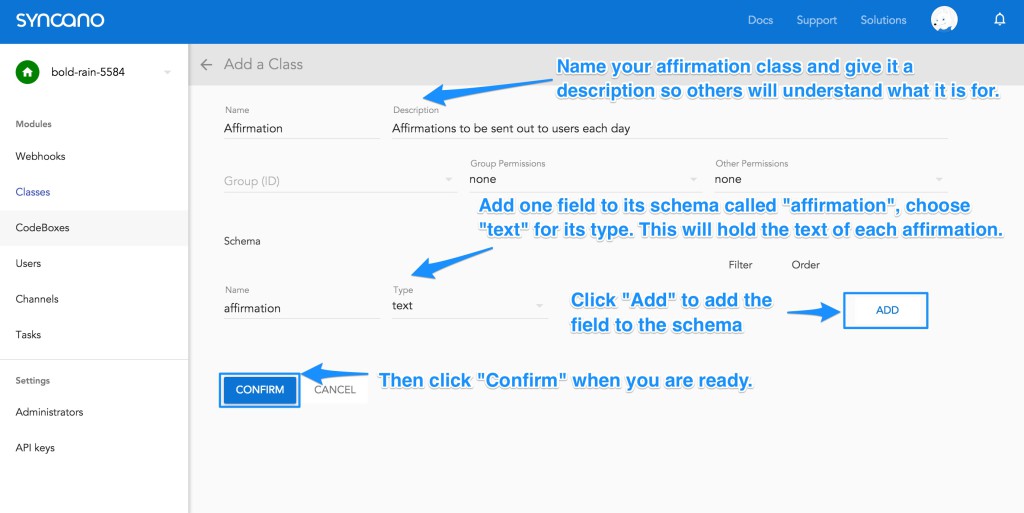
In this screen, we name the class “Affirmation” and give it a description. Underneath “Schema”, we set up our single field for the class which we’ve also called “affirmation”. We set it to be a text field and click “Add”. Then we click “Confirm” to save the new class. Make sure you click both “Add” and “Confirm” for it to save everything!
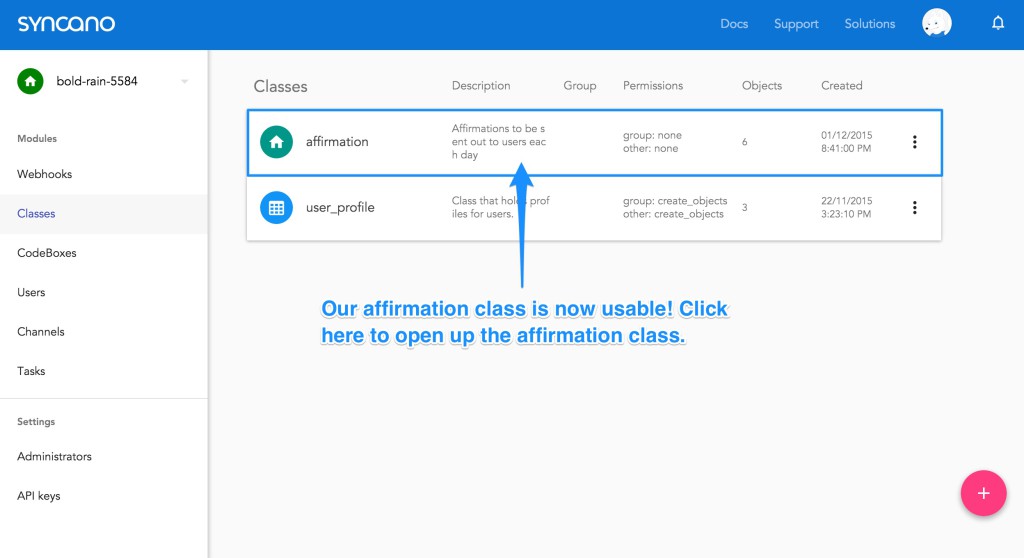
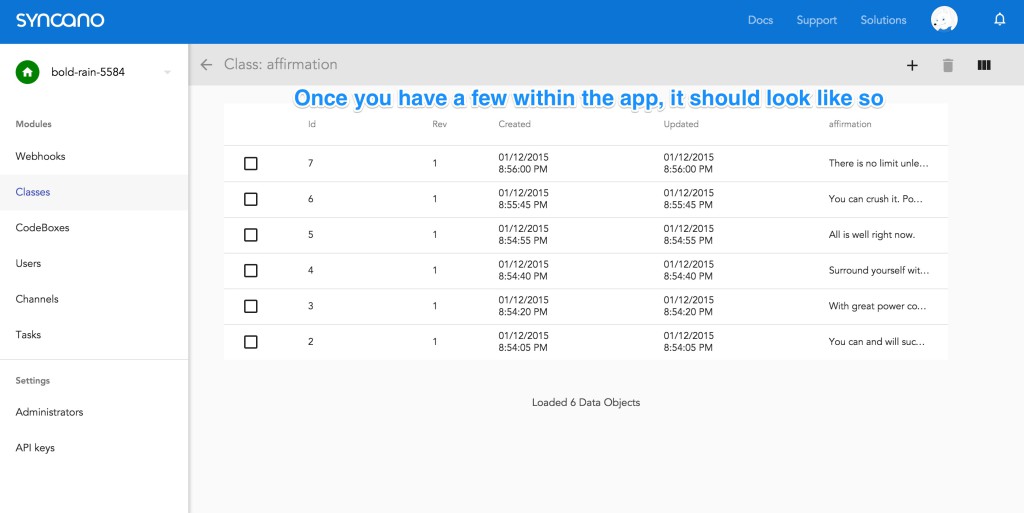
Our affirmation class will now be visible on the “Classes” page. Click it to go to a screen where you can add some affirmations:
Once you’ve added quite a few, the screen should look like so:
Integrating SMS Messages
The main feature of our app is that it will send out a daily SMS to users with a positive and happy affirmation. We will be sending these SMS messages with Twilio – a service that provides voice and SMS services.
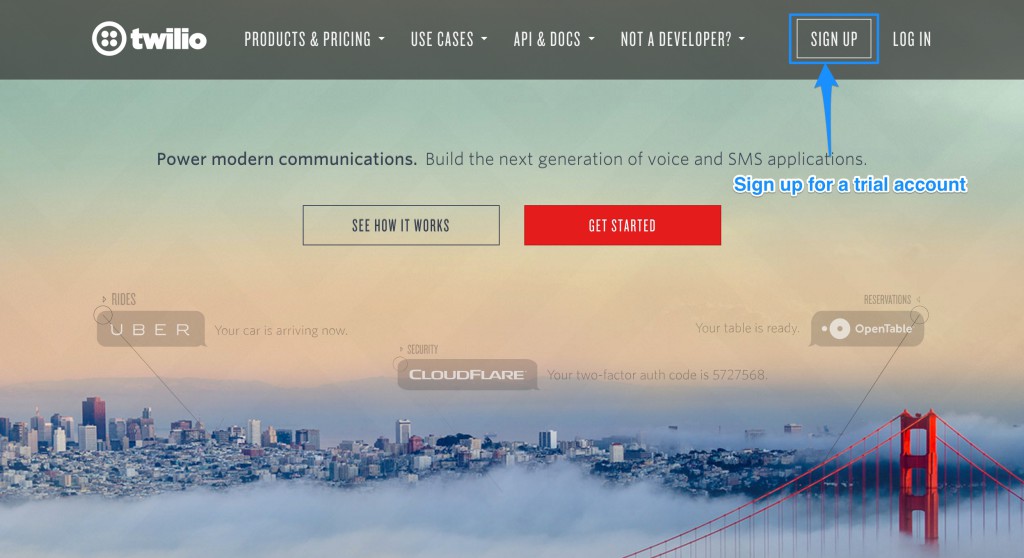
Setting Up a Twilio Number
Head over to Twilio and click the “Sign up” button in the top right to sign up for a free trial.
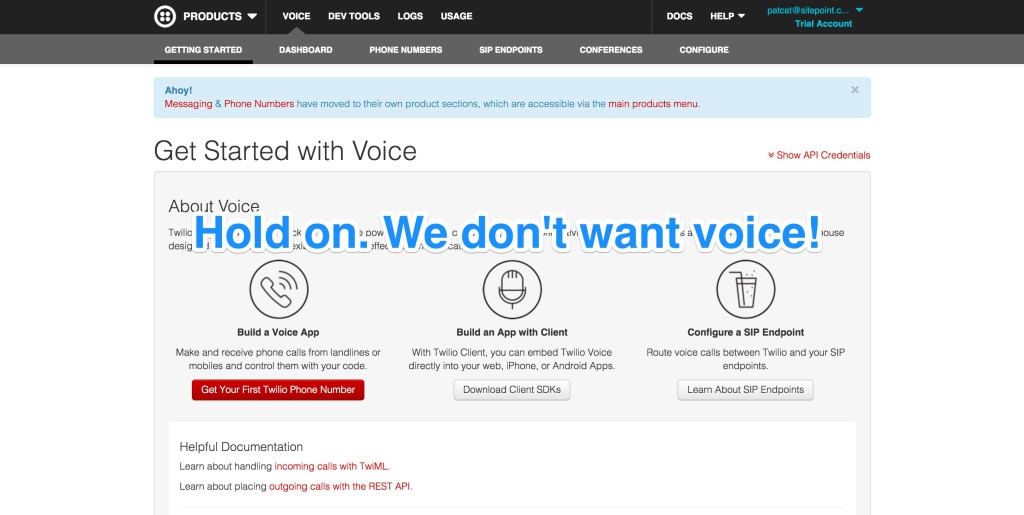
Follow the prompts to create your account. Once you’ve finished that, you may end up on a screen that talks about setting up voice – don’t set that up! We don’t need voice functionality. We’re looking for messaging. This is the screen you don’t want:
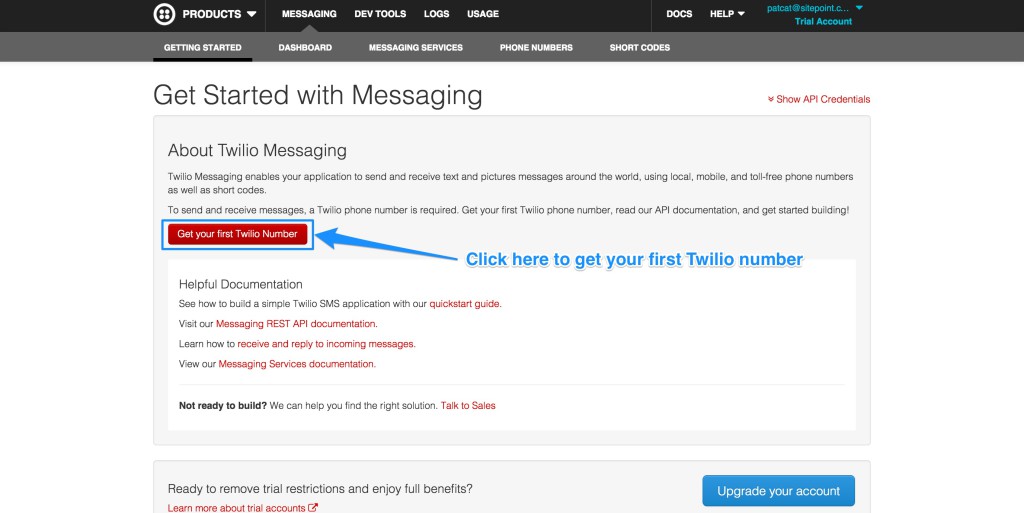
Instead, go to the Twilio “Getting Started” screen for Messaging. Click the red button on that screen that says “Get your first Twilio number”:
If the next screen shows a number with SMS as one of its capabilities, go right ahead and click “Choose this number”.
However, if you accidentally clicked to get a number on the Voice screen (or for another unknown reason), you might find Twilio suggests a number which does not mention SMS capabilities. If it only shows “Voice”, click “Don’t like this one? Search for a different number”:

On the next screen, tick “SMS” and then click “Search”:
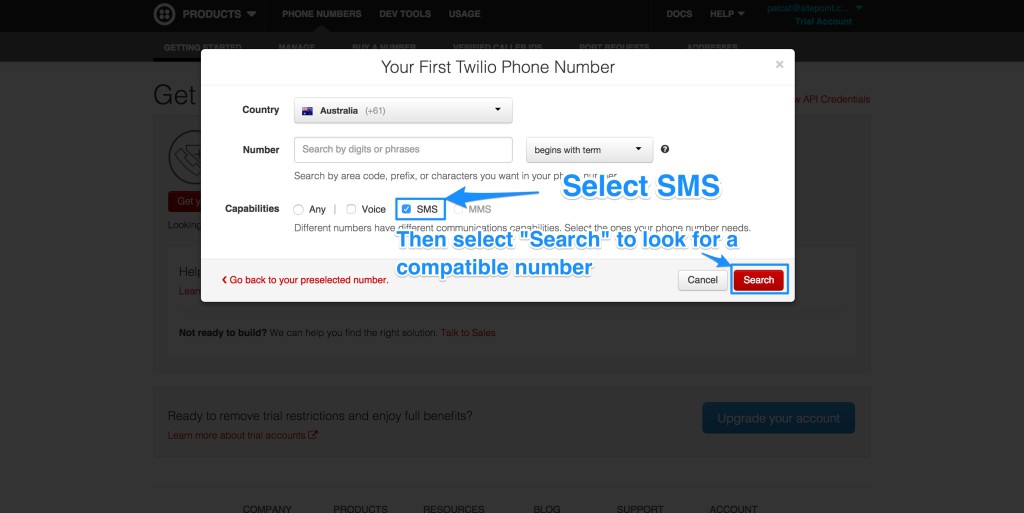
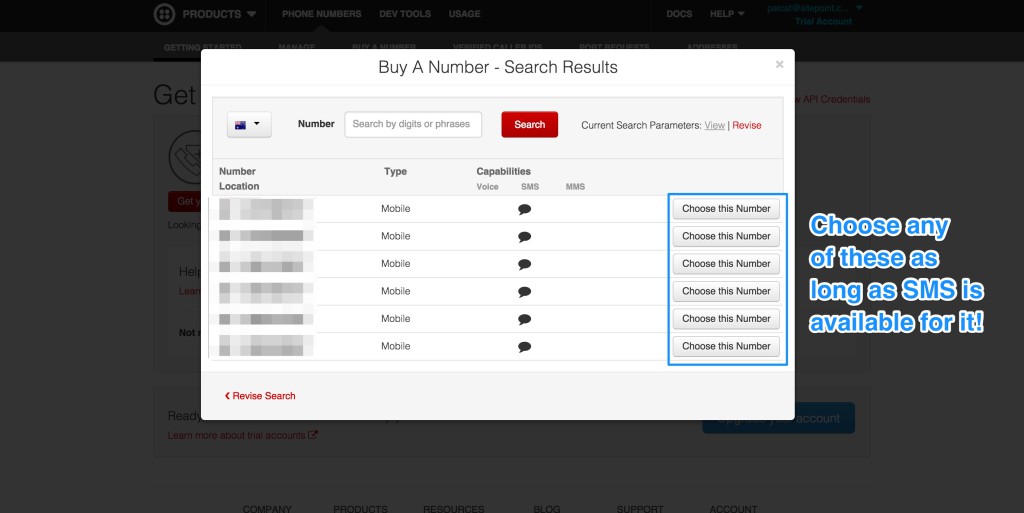
Then choose any number as long as it has SMS capabilities (which they should due to our previous selection):
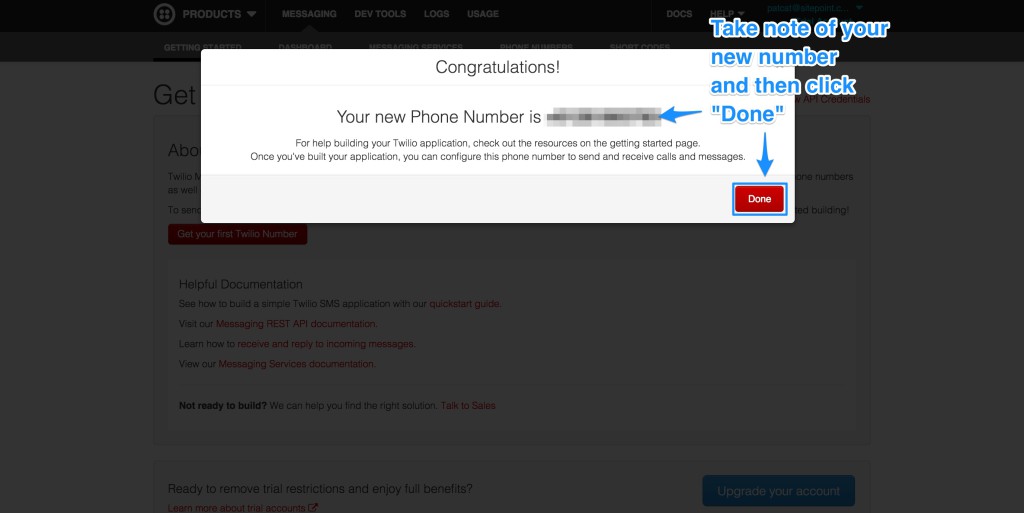
Twilio will now show you your Twilio number! Copy that number somewhere safe as we will be using that quite soon.
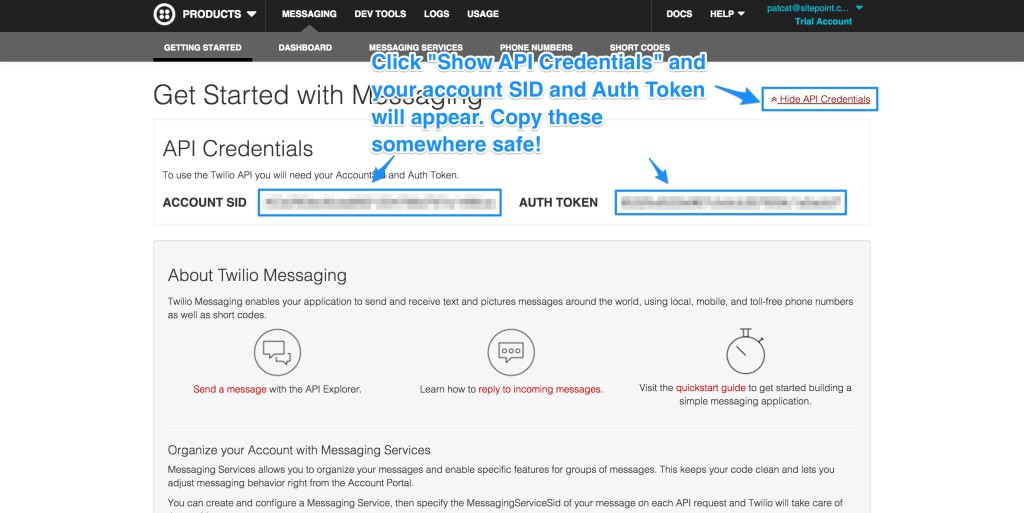
Finding Your Twilio API credentials
On the Twilio “Getting Started” screen for Messaging, there is one last piece of information that we will need for our app – our Twilio API credentials. To find these, click the “Show API Credentials” link in the top right corner. You’ll then see your “Account SID” and “Auth Token”. Copy these somewhere safe (preferably the same place as you copied the phone number). We will use them in our app soon too.
Syncano Solutions
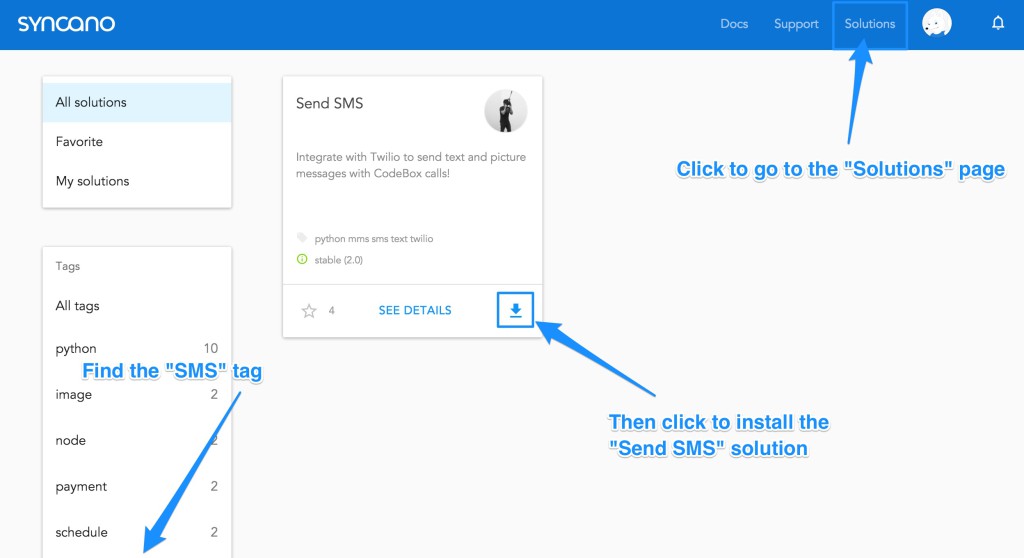
One of the really nice features of Syncano is its open source repository of Solutions that you can add into your projects with a few clicks. The Solutions don’t even need to be written in the same language as the rest of your app! They’ll add in everything you need for the functionality to work and you just need to provide specifics for your application’s needs. Sending SMS messages using Twilio is unbelievably easy because there’s already a Syncano Solution ready to go called “Send SMS”.
To install our “Send SMS” Solution, we click on the “Solutions” link in the top right, then find the “SMS” tag on the left to filter them. It is much easier to find the “Send SMS” solution this way! Once we have it, click the arrow icon on the bottom right of its box to install it.
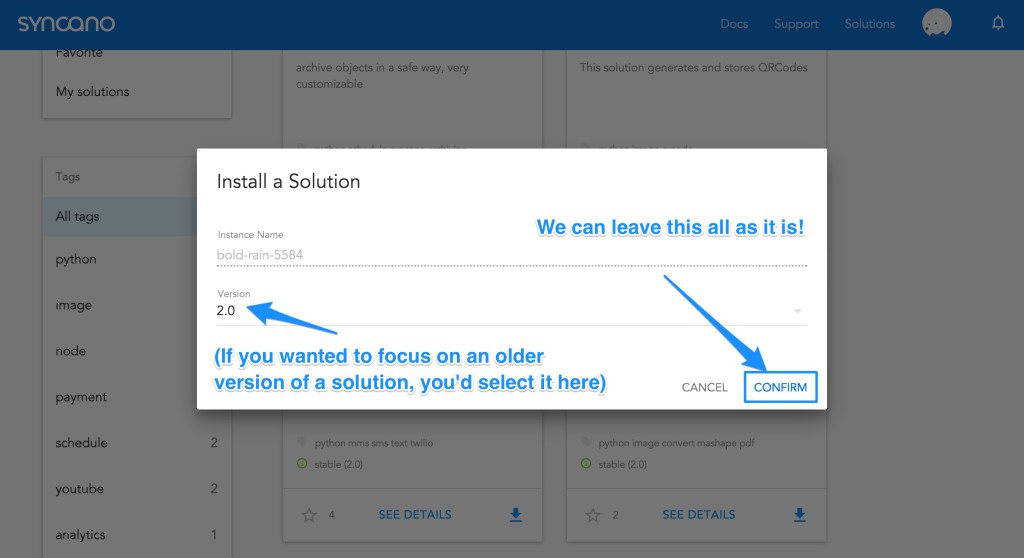
A pop up will appear asking for which instance we want to save it in (we only have one instance so far so this is simple!) and for which version of the solution we want to save. Leave them as is and click “Confirm”:
Syncano CodeBoxes
Each code snippet we can run in our Syncano hosted application is called a “CodeBox”. Ready made CodeBoxes will appear as a part of Solutions and you can also make your own. We will be doing both in this guide!
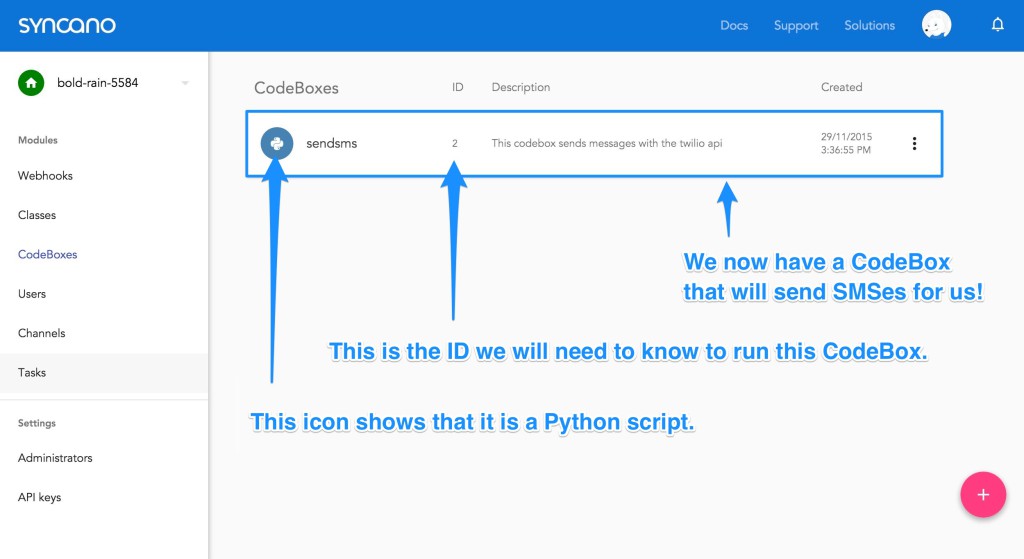
If we click the “CodeBoxes” menu link, we find the “Send SMS” solution has created us a CodeBox called “sendsms”. The icon beside it tells us the CodeBox is written in Python. Luckily, as I mentioned earlier, we can have components written in different languages working together. This is a really fascinating way to work on and share functionality!
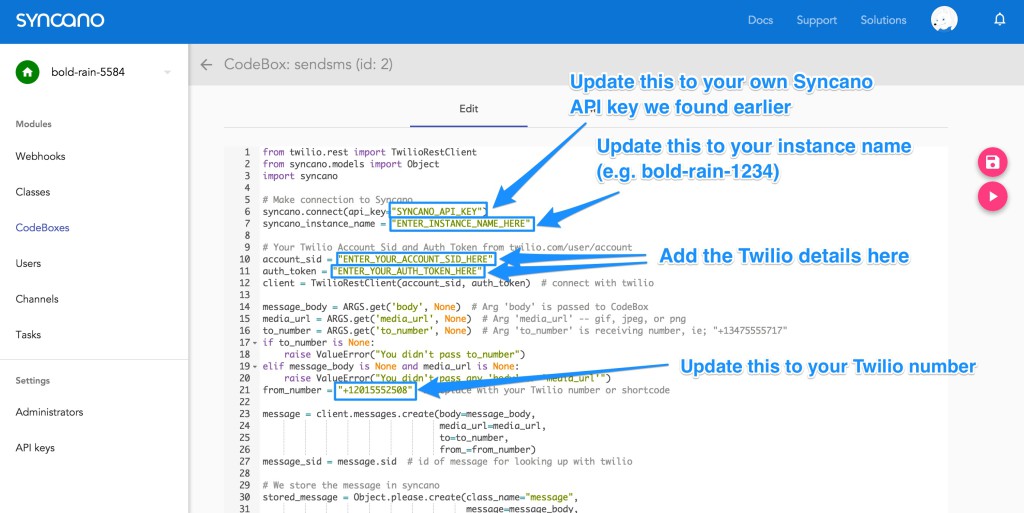
If we click that CodeBox item, Syncano will open up the code editor for it. This will allow us to edit some of the variables in there to match our Twilio credentials and settings. We need to update the following:
SYNCANO_API_KEY– Update this to your Syncano API key we copied earlier.ENTER_INSTANCE_NAME_HERE– Update this to your Syncano instance name (e.g. bold-rain–1234).ENTER_YOUR_ACCOUNT_SID_HERE– Update this to your Twilio Account SID.ENTER_YOUR_AUTH_TOKEN_HERE– Update this to your Twilio auth token.from_number– This variable needs to be equal to your Twilio phone number you chose earlier.
Looking at the CodeBox, we can see it takes three arguments in order to run. These are represented by ARGS.get('argument_name', None) (None is its initial value):
message_body = ARGS.get('body', None)  # Arg 'body' is passed to CodeBox
media_url = ARGS.get('media_url', None)  # Arg 'media_url' -- gif, jpeg, or png
to_number = ARGS.get('to_number', None)  # Arg 'to_number' is receiving number, ie; "+13475555717"
Our Scheduled Affirmations CodeBox
In order to run this for each of our users, we will create our own CodeBox that will trigger the sendsms CodeBox with our user details and an affirmation for the message body.
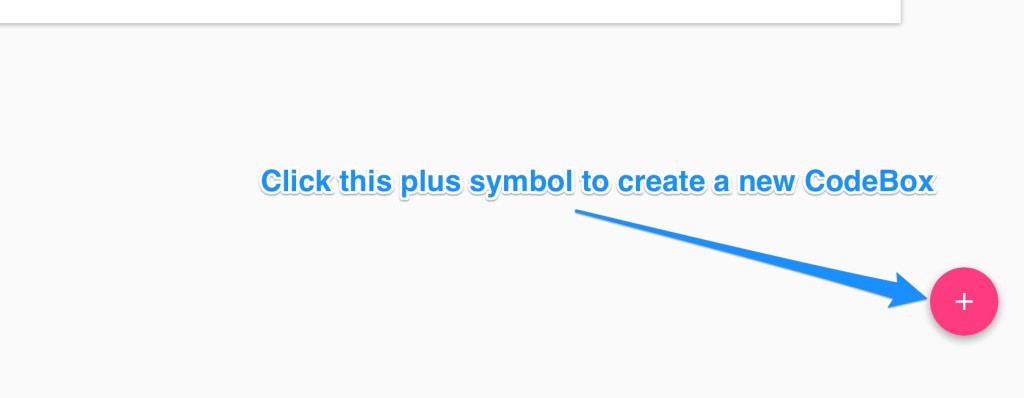
To create a new CodeBox, we click the plus icon in the bottom right of the “CodeBoxes” page:
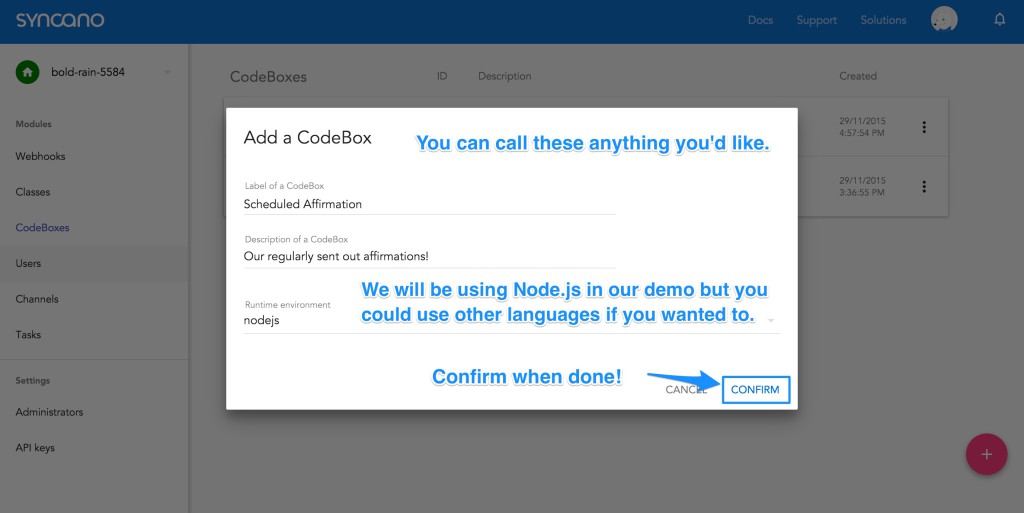
On the screen that appears, we name the new CodeBox “Scheduled Affirmation”, we can give it a description if we’d like, choose “nodejs” for the runtime environment and then click “Confirm”:
Our custom CodeBox code will look like so:
var Syncano = require('syncano');
var _ = require('lodash');
var account = new Syncano({accountKey: 'YOURKEYHERE'});

account.instance('bold-rain-5584').class('affirmation').dataobject().list()
.then(function(res){
  var randomId = _.random(0, res.objects.length - 1),
      messageToSend = res.objects[randomId].affirmation;

  console.log('Sending message of ', messageToSend);

  var filter = {
    "query": {"subscribed":{"_eq":true}}
  };

  account.instance('bold-rain-5584').class('user_profile').dataobject().list(filter, function(err, res) {
    if (err) {
      console.log('Error!');
      console.log(err); return;
    }
    _.each(res.objects, function(user) {
      var payload = {"payload":{'body': messageToSend, 'to_number': user.phone}};

      console.log({"body": messageToSend, "to_number": user.phone});

      account.instance('bold-rain-5584').codebox(2).run(payload, function(err, res) {
        console.log('Just sent that SMS out.');
      });
    });
  });
})
.catch(function(err) {
  console.log('Error!');
  console.log(err); return;
});
I’ll explain what each part of this code is doing. This works exactly like any other Node.js code snippet, only it runs in Syncano’s cloud. (Note: We haven’t set up all the rest of the parts in Syncano for this, so this code won’t work if you try to run it straight away!)
Just like any other Node application, we require() our dependencies. We will be using some utility functions from lodash so we include that (at the time of writing, Syncano doesn’t have the Underscore module available, only lodash):
var _ = require('lodash');Since Syncano CodeBox uses isolated Docker images to run, we need to include the Syncano module to use functionality like looking up classes and users. To do this, we have to initialize Syncano with our account key, which we found earlier:
var Syncano = require('syncano');
var account = new Syncano({accountKey: 'YOURKEYHERE'});
Then, we will go through all affirmations in our affirmation class using the account.instance('bold-rain-5584').class('affirmation').dataobject().list() function. Once the list of affirmations has loaded, we use promises in JavaScript to then access those affirmations via the res.objects returned variable.
account.instance('bold-rain-5584').class('affirmation').dataobject().list()
.then(function(res){
  // In here we will look at res.objects
The first thing we do is get a random number using lodash that is between zero and the number of affirmations we have (minus one because we are starting at zero). This is how we choose our random affirmation. We then choose that affirmation by assigning the affirmation object at that random ID to the variable messageToSend.
var randomId = _.random(0, res.objects.length - 1),
    messageToSend = res.objects[randomId].affirmation;

console.log('Sending message of ', messageToSend);
In order to send out the random affirmation to our users, we need to list them all first. Remember, we only want to send this to users who have subscribed to our affirmation service through Stripe. We don’t have the Stripe service set up just yet but the way we will keep track of whether users have subscribed is by toggling a custom value in our user_profile class called subscribed (we will set that up soon too).
Syncano lets us filter our query so that we only get those users who have subscribed equal to true. We list through our user_profile class just like we did with the affirmation class but use this filtering by passing a JSON object as the first parameter like so:
var filter = {
  "query": {"subscribed":{"_eq":true}}
};

account.instance('bold-rain-5584').class('user_profile').dataobject().list(filter, function(err, res) {
// We will look into our users in the res.objects variable here next!
In the user_profile class list, we first check for any errors. Feel free to add this same error checking in the affirmation class list too if you’d like to be thorough. It is good practice to always be catching errors!
if (err) {
  console.log('Error!');
  console.log(err); return;
}
If we have no errors, then we use lodash to loop through each user and put together a JSON with the messageToSend (our affirmation) and the phone number it finds for the user at this iteration of the loop via user.phone. We’ll be setting up that custom phone field soon too.
_.each(res.objects, function(user) {
  var payload = {"payload":{'body': messageToSend, 'to_number': user.phone}};
Finally, we run our sendsms codebox via the codebox(2).run() function. The 2 is our CodeBox’s ID that we took note of earlier. Once it has finished running, it logs a message to the console to let us know it ran successfully.
account.instance('bold-rain-5584').codebox(2).run(payload, function(err, res) {
        console.log('Just sent that SMS out.');
      });
    });
  });
})
Finally, at the end of our initial promise, we catch any errors:
.catch(function(err) {
  console.log('Error!');
  console.log(err); return;
});
Preparing User Accounts for SMS
We now need to add those custom fields to our user details for our app to be able to have all the information it needs to send users SMS messages.
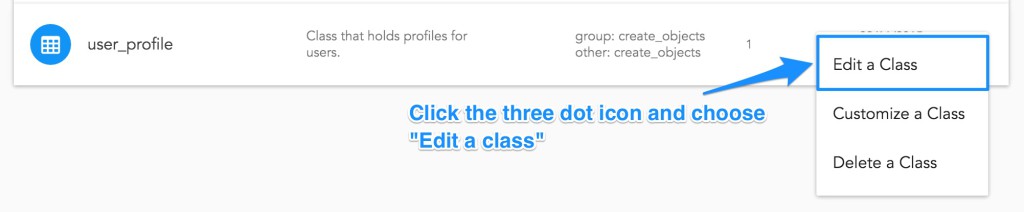
Head back to the user_profile area of our dashboard that we were viewing earlier in the “Classes” page, click the three dot icon and choose “Edit a class”:
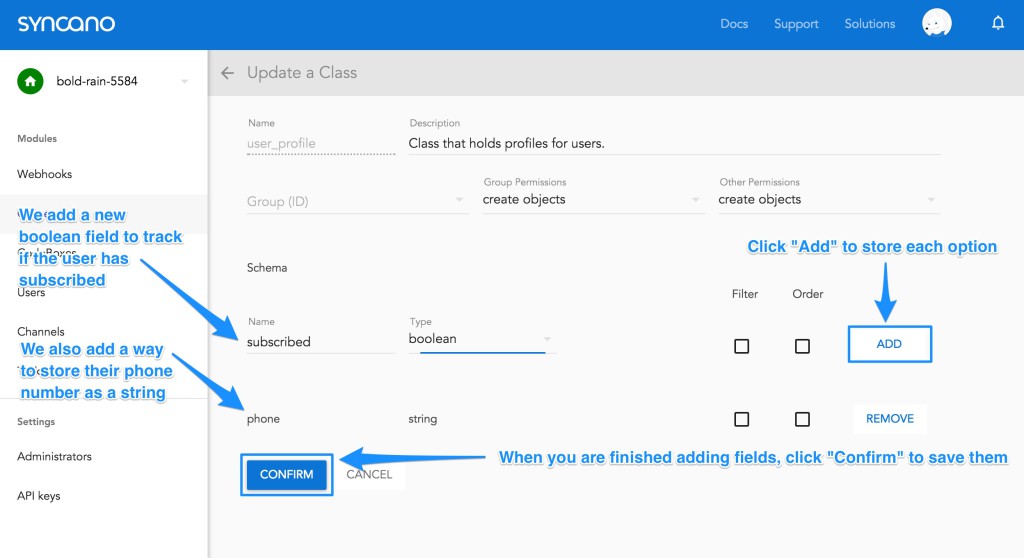
In the screen that appears, we are able to add custom fields to our user_profile class. In the area under “Schema”, we add any of our own fields we need. For our SMS functionality, we’ll want two fields:
subscribed– A boolean to track whether or not the user has a paid subscription to our service (the paid bit we’ll integrate in soon). We only want to send our paid subscribers the affirmations!phone– A string to store each user’s phone number. We’ll need that to know where to SMS their messages.
We will add each one by typing in its name, setting the appropriate type and then finishing the field by clicking “Add”. Once you have both fields added (make sure you’ve clicked “Add”!), then click “Confirm” at the bottom of the screen to save these updates.
Our HTML
To keep things simple in our HTML, we’re going to work off Foundation’s framework template. You can download that from the Foundation download page. If you aren’t a fan of Foundation or prefer a different framework – that’s totally okay. We are only using the framework as a starting point and a simple template for forms and such. You could do the same thing in your preferred template (or from scratch!) if you desire. This is just to avoid our prototype looking like it was built in the default HTML style of the ’90s. In HTML code samples, I’ll steer clear of the Foundation markup, but be aware that this is what is making things look a bit nicer than the default!
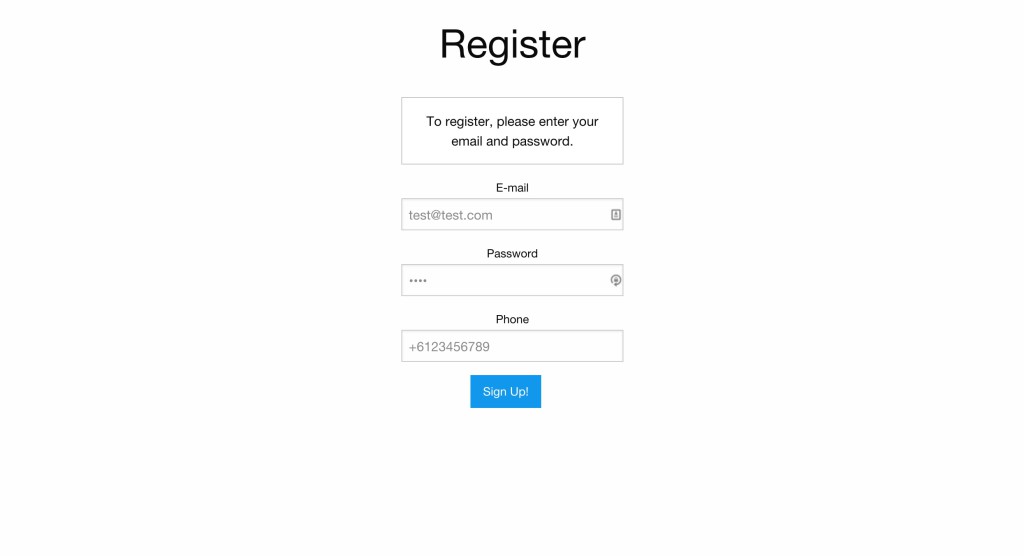
Our Login/Registration Form
We have a very simple HTML form for both the login and registration forms, along with a div with the ID of #message that displays some basic instructions. Here is a sample of the basic HTML from our registration form stripped of the Foundation framework elements to keep things simple:
<h1>Register</h1>
<div id="message">To register, please enter your email and password.</div>

<form id="register">
  <label>E-mail
    <input id="email" type="email" placeholder="Your email address">
  </label>
  <label>Password
    <input id="password" type="password" placeholder="Your password">
  </label>
  <button type="submit" class="button">Sign Up!</button>
</form>
If you’d like to see the Foundation framework version, feel free to look through the GitHub of our demo.
We authorize our app.js front-end code to have access to our Syncano instance via the Syncano API key we saved earlier:
instance = new Syncano({
  instance: 'bold-rain-5584',
  apiKey: '10133b1f19bbd71a11a8055a8357ffd3b233697d'
});
We then refer to that instance via the instance variable whenever we need to access it.
The final line of our code for registering or logging in users (both code snippets are very similar) is where the action actually begins. The registration code below looks up the user and logs them in via Syncano. If Syncano returns no errors, then it runs our callback() function that tells our front end everything is a-okay.
In the registration form, we also read in a custom field called phone to store our user’s phone number when they register. Upon successful registration of a user, our JavaScript performs a basic POST request via AJAX. This request is to a Syncano webhook that accepts the user’s ID and their phone number, saving the phone number to that account.
$('#main').on('submit', '#register', function(e) {
  var $form = $(this),
      username = $('#email').val(),
      password = $('#password').val(),
      phone = $('#phone').val(),
      data = 'username=' + username + '&password=' + password + '&phone=' + phone;

  function callback(resp) {
    $.ajax({
      type: "POST",
      url: "https://api.syncano.io/v1/instances/bold-rain-5584/webhooks/p/f5bb236b40f560a44dbc930a7bebaf87ea18e6d1/savephonenumber/",
      data: {"phone": phone, "user_id": resp.profile.id}
    })
    .done(function(msg) {
      console.log(msg);
        console.log('Phone number saved ', resp);
      userLoggedIn(resp);
    });
  }
  function error(resp) {
      console.log('Register failure... ', resp);
  }

  instance.user().add({"username": username, "password": password})
    .then(callback).catch(error);

  e.preventDefault();
});
Creating Syncano Webhooks
As an example of how to make a basic Webhook, we will create the Webhook mentioned above that saves a user’s phone number to their account. A Webhook in Syncano is a way of running CodeBoxes via a HTTP request. It can be either a public request or one that requires authentication first. Our Webhooks will be publicly accessible via POST requests.
Our CodeBox, which we’ve called “Save Phone Number”, accepts two arguments of phone and user_id. It then updates the user_profile data object for that ID:
var Syncano = require('syncano');
var account = new Syncano({accountKey: 'YOURACCOUNTKEY'});

var phone = ARGS.POST.phone;
var userId = ARGS.POST.user_id;

var details = {
  "phone": phone
};

account.instance('bold-rain-5584').class('user_profile').dataobject(userId).update(details, function(err, res) {
    console.log("Phone number " + phone + "added to " + userId + "!");
});
The reason we are using our Account Key instead of our API key is that API keys aren’t able to change user_profile data. We should not have Account keys clearly visible in our public JavaScript either, so we’ve chosen to keep them only used within our Syncano CodeBoxes.
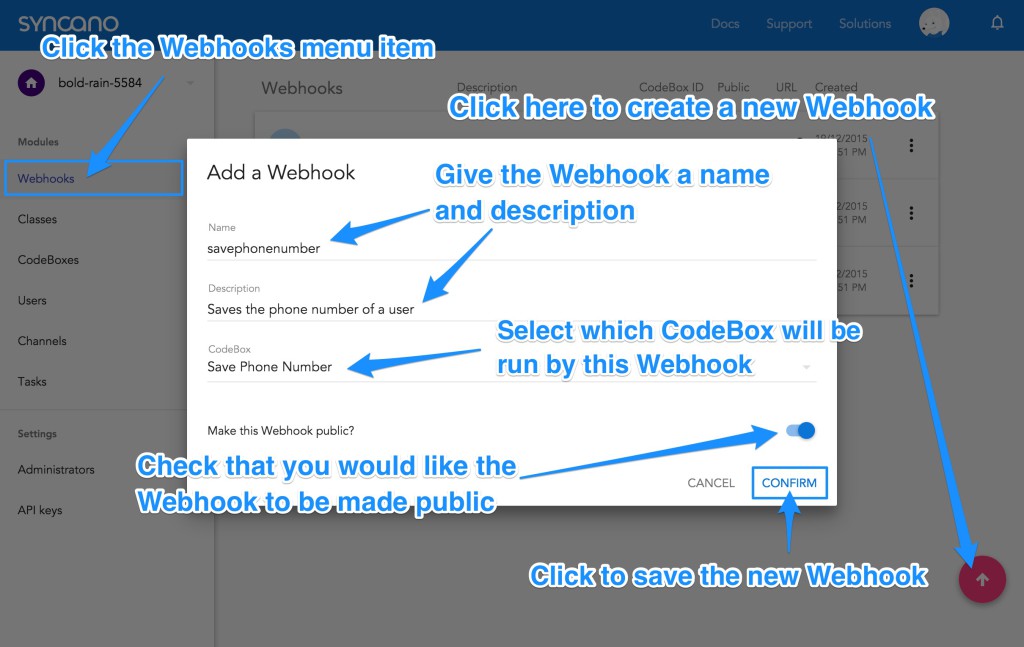
To create a webhook in the Syncano Dashboard for this CodeBox, go to the “Webhooks” menu item. On the “Webhooks” page, click the arrow icon on the bottom right hand side to open the “Add a Webhook” window. From here, name your Webhook a URL friendly name, give it a description if you’d like and choose which CodeBox you would like it to run. Make sure you check “Make this Webhook public?” so that you can access the Webhook via POST requests.
Integrating Payments
We’ve got user accounts set up, a list of affirmations and code ready to send out those affirmations via SMS. Now we just need a way for these users to subscribe and pay us to get these daily affirmations! To keep things simple, we will be using Stripe, an online payment provider.
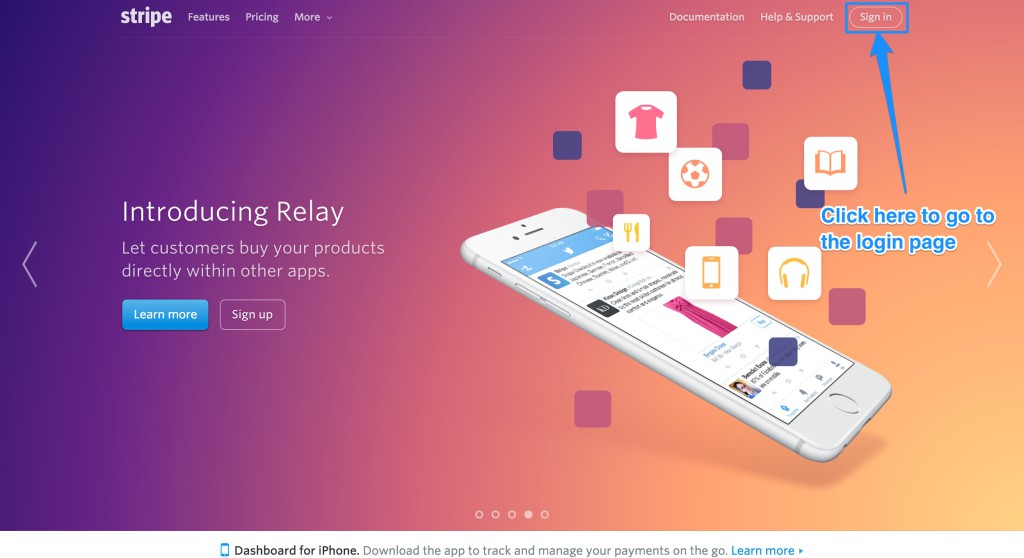
To sign up, we go to the Stripe website and click “Log in”:
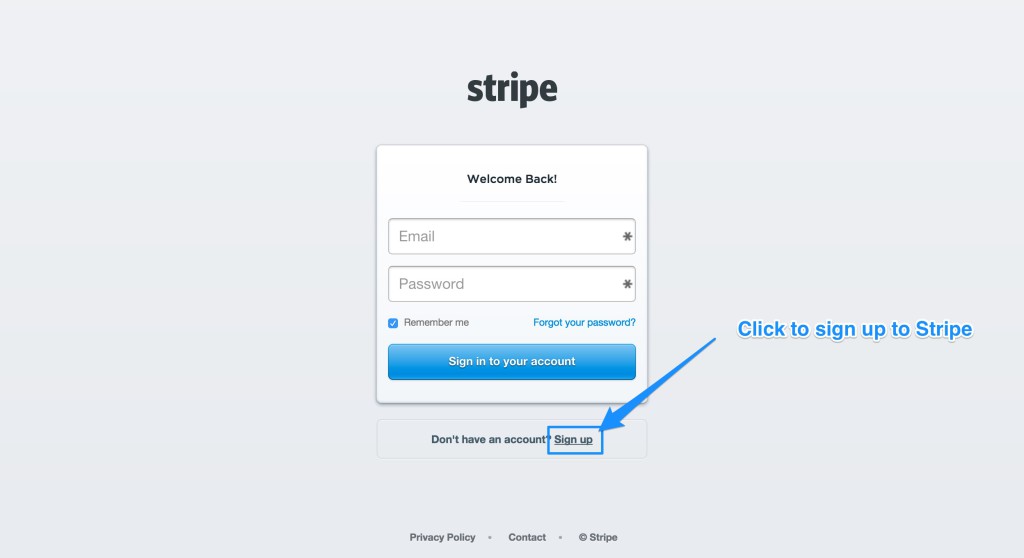
Then click on the “Sign up” link at the bottom:
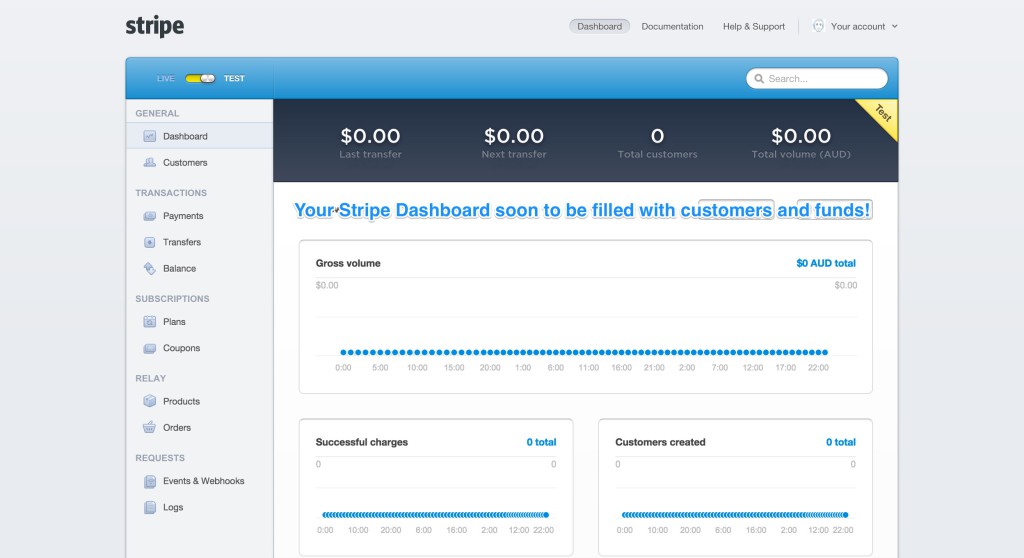
Follow their prompts until the account has been set up successfully and our very own dashboard has appeared before our eyes:
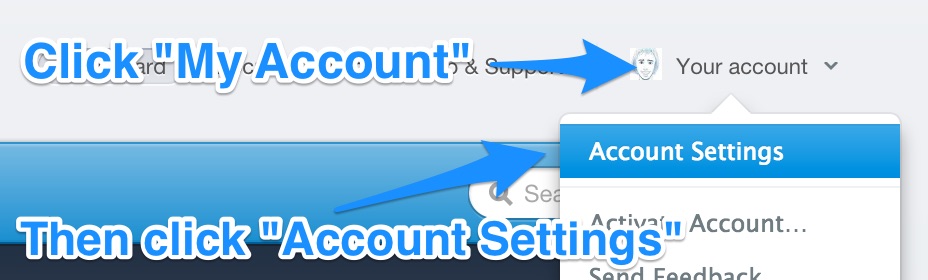
From here, we need to find and copy our API key for Stripe. This can be found in your account settings. Click on “Your account” in the top right corner and then click “Account Settings”.
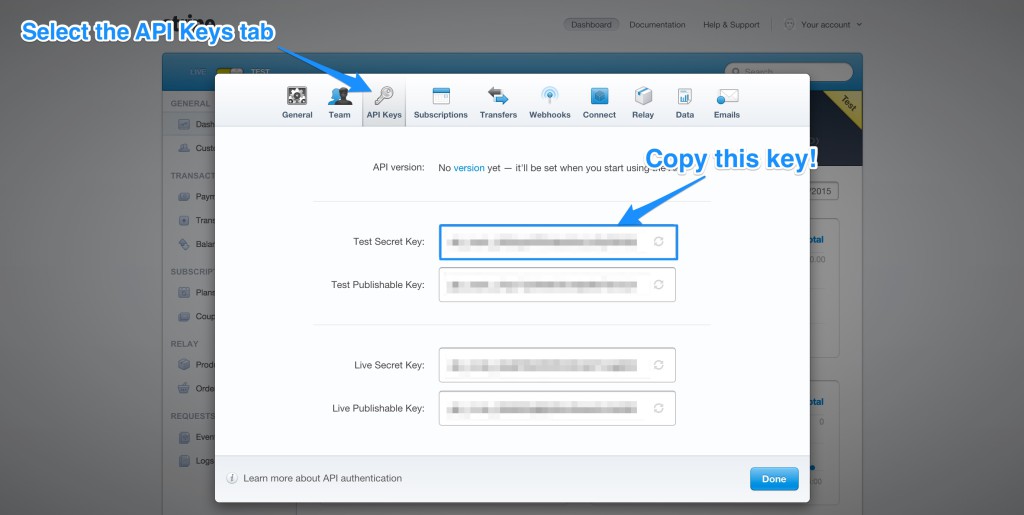
Then click on the “API keys” tab and copy the key that is beside “Test Secret Key”. This is the one we need to access our Stripe test environment. Copy it somewhere safe, ready to use in a CodeBox soon.
Subscribing New Customers
Syncano does currently have a Stripe solution in its “Solutions” collection, however it is only for single transactions. We could potentially use it with a scheduled task but this could get messy as we would need to run that task at the same time for everyone. What if someone joins just before our next scheduled run? Do we only charge them once the task comes around?
Instead, we eliminate all of this in a much nicer way. Stripe already has a subscription-based payment service. Syncano can subscribe users to that and then Stripe takes care of the monthly payments for us. All our system in Syncano needs to manage is whether they’re subscribed. Much easier!
Subscriptions in Stripe
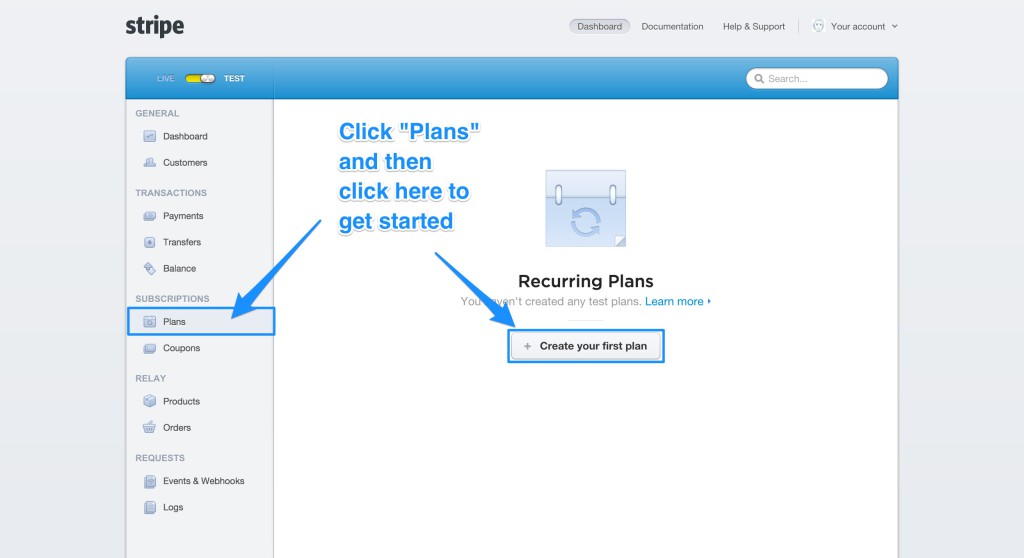
To do this, we need to first define our subscription type in Stripe. We will go back to our Stripe dashboard and click on the “Plans” menu item on the left under “Subscriptions”. From here, click “Create your first plan”:
On the screen that appears, we will be entering the following:
- ID – affirmationsubscription (the ID we will use to refer to our subscription in our code)
- Name – Affirmations (this is just used within Stripe’s dashboard)
- Currency – I left it in AUD but you might want it in your local currency!
- Amount – $1 (feel free to charge more if you feel your affirmations are more worthy)
- Interval – monthly (you could change the frequency of billing if you wanted)
- Trial period days – We aren’t providing a free trial period but you could do so here if you wanted to.
- Statement desc – “Life Is Good” (This is what appears on users’ bank statements)
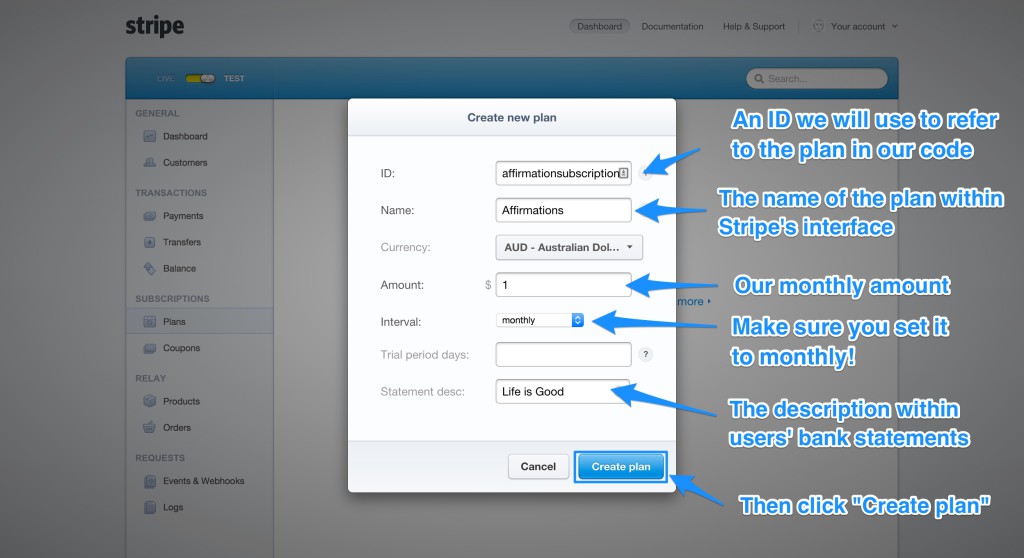
Then we click “Create plan”. With that, our set up on the Stripe side is complete.
Our Subscription CodeBox
To set up our subscription management on Syncano’s end, we will create a new CodeBox called “Stripe Subscribe New Customer”. Our CodeBox will look like so:
var Syncano = require('syncano');
var account = new Syncano({accountKey: 'YOURACCOUNTKEY'});
var _ = require('lodash');

var stripe = require("stripe")("sk_test_YOURSTRIPEKEY");
var stripeToken = ARGS.POST.stripe_token;
var email = ARGS.POST.email;

stripe.customers.create({
  source: stripeToken,
  plan: "affirmationsubscription",
  email: email
}, function(err, customer) {
  account.instance('bold-rain-5584').user().list()
    .then(function(res){
        console.log(res);

        _.each(res.objects, function(user) {
            if (user.username == email) {
                console.log("USER:");
                console.log(user);

                var details = {
                  "subscribed": true,
                  "stripe_id": customer.id,
                  "subscription_id": customer.subscriptions.data[0].id
                };

                account.instance('bold-rain-5584').class('user_profile').dataobject(user.profile.id).update(details, function(err, res) {
                    console.log(customer.id + ',' + customer.subscriptions.data[0].id);
                });
            }
        });
    })
    .catch(function(err) {
        console.log("Error! ", err);
    });
});
We’ll go over each section to explain what each portion is doing:
The beginning is very similar to our previous CodeBoxes, using an account key and requiring lodash:
var Syncano = require('syncano');
var account = new Syncano({accountKey: 'YOURACCOUNTKEY'});
var _ = require('lodash');
Then, we require Stripe’s npm module, stripe and pass it the key we copied from Stripe earlier:
var stripe = require("stripe")("sk_test_YOURTESTKEY");We set up two arguments for our CodeBox to look out for, a Stripe token and the user’s email. The Stripe token is a token which Stripe provides us once the user has put in their payment details into Stripe. This will happen on the front end in JavaScript. We are then taking those details and using them to subscribe them to our “affirmationsubscription” plan using stripe.customers.create():
var stripeToken = ARGS.POST.stripe_token;
var email = ARGS.POST.email;

stripe.customers.create({
  source: stripeToken,
  plan: "affirmationsubscription",
  email: email
}, function(err, customer) {
  // Our callback function will be here!
}
In our callback function, we list our users and update the fields of the user with the same email in our database. We save their Stripe ID (each user in Stripe will have a unique ID that we can use to manage them in the future) and their subscription ID (Stripe also gives each subscription its own ID so we can manage that too). We also set subscribed to true for them so we know they should receive affirmation SMS messages. I’ve found it useful to include a console.log in the callback. This logs the two Stripe IDs while testing, to ensure the right ones are coming through.
account.instance('bold-rain-5584').user().list()
    .then(function(res){
        console.log(res);

        _.each(res.objects, function(user) {
            if (user.username == email) {
                console.log("USER:");
                console.log(user);

                var details = {
                  "subscribed": true,
                  "stripe_id": customer.id,
                  "subscription_id": customer.subscriptions.data[0].id
                };

                account.instance('bold-rain-5584').class('user_profile').dataobject(user.profile.id).update(details, function(err, res) {
                    console.log(customer.id + ',' + customer.subscriptions.data[0].id);
                });
            }
        });
    })
Finally, we catch and log any errors that happen along the way:
.catch(function(err) {
        console.log("Error! ", err);
    });
});
To have access to that CodeBox, create a Webhook called subscribecustomer in Syncano that runs it (create it in the same way as the Webhook we created above). We will use that soon.
Triggering a Subscription
Stripe knows about our subscription service, Syncano knows how to subscribe us via Stripe. The one remaining piece of the puzzle is a button for the user to click that starts the whole process of subscription.
We start the process via Stripe’s Checkout service. We will be creating a custom Stripe Checkout button. This button doesn’t actually do the subscribing. It can be used to make payments, however we’ll be using it solely to get the user’s credit card details and email into Stripe initially. It needs these before it will let us subscribe them to our plan.
To have access to Stripe’s API for this, we include their JavaScript at the bottom of our index.html file:
<script src="https://checkout.stripe.com/checkout.js"></script>Within our app.js, we prepare for subscriptions with the StripeCheckout.configure() function:
var handler = StripeCheckout.configure({
  key: 'pk_test_YOURSTRIPEKEY',
  locale: 'auto',
  panelLabel: 'Subscribe',
  email: username,
  token: function(token) {
    stripeToken = token;

    console.log("Stripe token is " + JSON.stringify(token));

    $.ajax({
      type: "POST",
      url: "https://api.syncano.io/v1/instances/bold-rain-5584/webhooks/p/1254a339e4544e4c36ae4c5fcf67f4249413b3f2/subscribecustomer/",
      data: {"stripe_token": stripeToken.id, "email": username}
    })
    .done(function(msg) {
      paid = true;
      ids = msg.result.stdout.split(',');
      stripeId = ids[0];
      subscriptionId = ids[1];

      goToPage('myaccount');
    });
  }
});
The start of this function contains the Stripe key we used earlier, locale sets the pop up in the user’s local language (a nice touch), panelLabel changes what the payment button will say underneath their credit card detail form (we want it to say “Subscribe”) and we pass in the email address we already know from their Syncano account via email so that it is prefilled:
var handler = StripeCheckout.configure({
  key: 'pk_test_YOURSTRIPEKEY',
  locale: 'auto',
  panelLabel: 'Subscribe',
  email: username,
When Stripe has the user’s details, the token function runs and we send the token and email to our Syncano Webhook called subscribecustomer. This passes them onto our CodeBox for use in our actual subscription process.
token: function(token) {
    stripeToken = token;

    $.ajax({
      type: "POST",
      url: "https://api.syncano.io/v1/instances/bold-rain-5584/webhooks/p/1254a339e4544e4c36ae4c5fcf67f4249413b3f2/subscribecustomer/",
      data: {"stripe_token": stripeToken.id, "email": username}
    })
When that POST request is complete, we set our local JavaScript variables so that we know the current user has paid and we know their Syncano user ID, stripe ID and subscription ID. We then run a function to take the user to the “My Account” page of the app which will check the details and now tell them they are subscribed. Remember, you can (and should) do this bit much nicer using your framework of choice.
.done(function(msg) {
      paid = true;
      ids = msg.result.stdout.split(',');
      stripeId = ids[0];
      subscriptionId = ids[1];

      goToPage('myaccount');
    });
  }
});
To actually set off that Stripe Checkout handler, we have a simple handler.open() function that triggers a Stripe pop up to request payment details:
$('#main').on('click', '#paymentButton', function(e) {
  handler.open({
    name: "Life is Good Affirmations",
    description: "A monthly subscription to daily affirmations!",
    currency: "aud"
  });
  e.preventDefault();
});
If they click the part of the pop up which causes Stripe to fire a popstate event, the pop up closes:
$(window).on('popstate', function() {
  handler.close();
});
Unsubscribing Customers
To unsubscribe customers, we do a shortened version of the subscription process. We do not need Stripe to initially get the customer’s details or anything along those lines because we’ve already got their Stripe ID and Stripe subscription ID. Instead, all we need is a CodeBox that can take these details and tell Stripe to unsubscribe this user from this subscription. We will create a CodeBox called “Stripe Unsubscribe Customer”.
In our “Stripe Unsubscribe Customer” CodeBox, we have the same sorts of require statements as the “Stripe Subscribe Customer” CodeBox. We take in the current user’s Syncano ID as well as their Stripe IDs so that we can change their listing on our end too to set subscribed to false and remove their subscription ID from our database.
The only bit in this CodeBox that might look different from what we’ve already done is stripe.customers.cancelSubscription() which is our call to Stripe to cancel this user’s subscription. We pass in the Stripe ID and Stripe subscription ID, then in the success callback, we make the changes to our own database.
var Syncano = require('syncano');
var account = new Syncano({accountKey: 'YOURACCOUNTKEY'});
var _ = require('lodash');

var stripe = require("stripe")("sk_test_YOURSTRIPEKEY");

var userId = ARGS.POST.user_id;
var stripeId = ARGS.POST.stripe_id;
var subscriptionId = ARGS.POST.subscription_id;

stripe.customers.cancelSubscription(
  stripeId,
  subscriptionId,
  function(err, confirmation) {
    var details = {
      "subscribed": false,
      "subscription_id": ""
    };

    account.instance('bold-rain-5584').class('user_profile').dataobject(userId).update(details, function(err, res) {
        console.log("User set to unsubscribed");
    });
  }
);
Create a Webhook called “unsubscribecustomer”, trigger it via the same methods as our “subscribecustomer” Webhook and your subscription settings are complete!
Scheduling Tasks
The last thing we need to get running now that we can accept customers, is our scheduled affirmations. We have our CodeBox called “Scheduled Affirmation” ready to go, we just need to set it onto a timer.
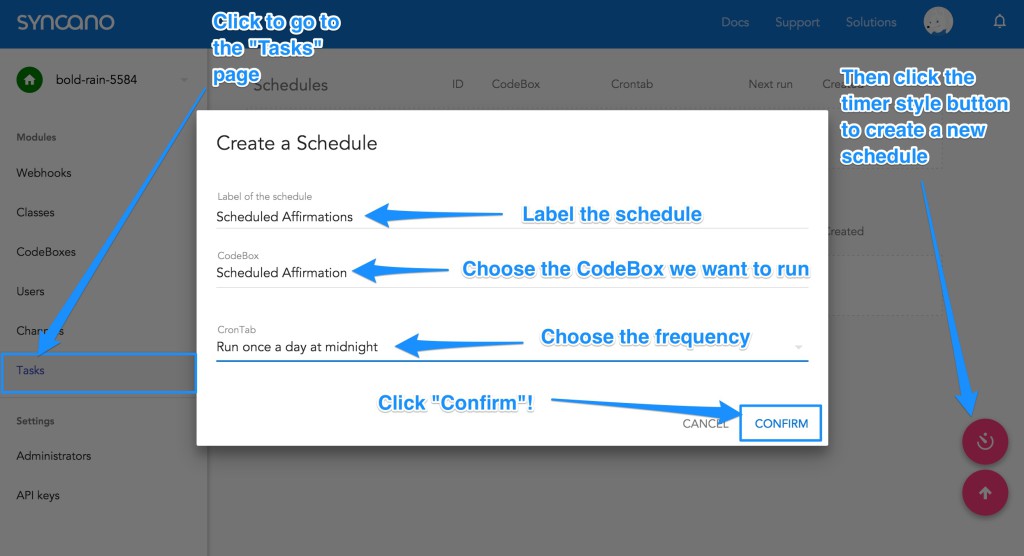
Go to the “Tasks” page, click on the round button with an icon that looks a little bit like a timer in the bottom right hand corner. In the pop up that appears, choose a name for your schedule, select the “Scheduled Affirmation” as the CodeBox we want to schedule and choose how often you want it to run (it appears at the moment, once a day at midnight is our only option – there is yet to be a way to set the timezones, so this won’t be midnight for everyone!). Click “Confirm” and your schedule is set to run on its own!
A Few Side Notes
Within our demo front-end JavaScript, we manage pages via a rather crude goToPage() function as you will have seen occasionally above. We will avoid explaining how that all works in detail as you should instead implement your favorite, proper framework in its place!
One final important note before we look at the demo in action:
On a live site, you will want to have this app running via HTTPS as you are collecting very sensitive information!
In Action
Now to try it all out! You can run the front-end HTML on any simple web server. On my personal web server, I run it via http://localhost/lab/syncano/public/. In order for our rather crude JavaScript to run, avoid including index.html in the URL.
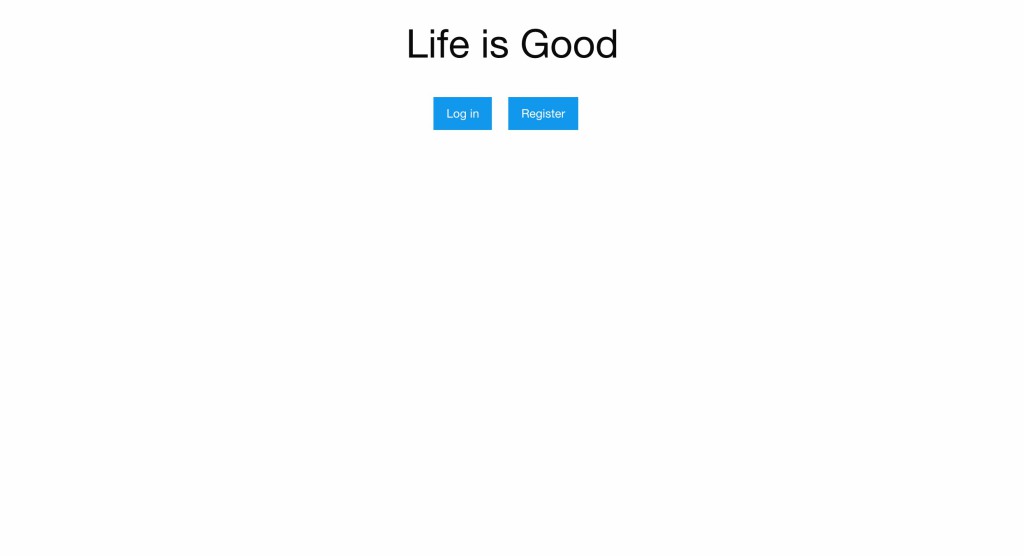
We click to register and we enter in our details (make sure you put in your own valid phone number otherwise this test isn’t going to be too exciting!):
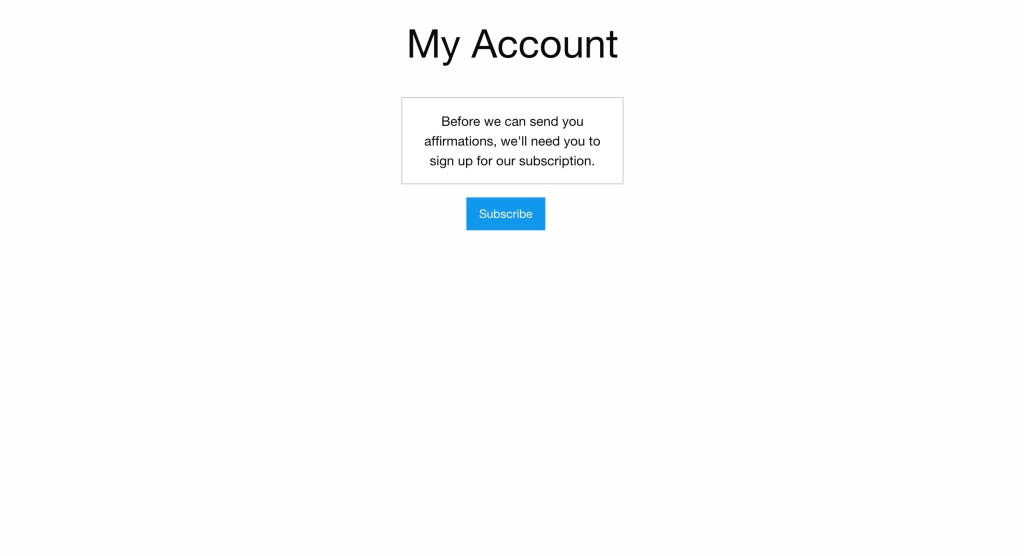
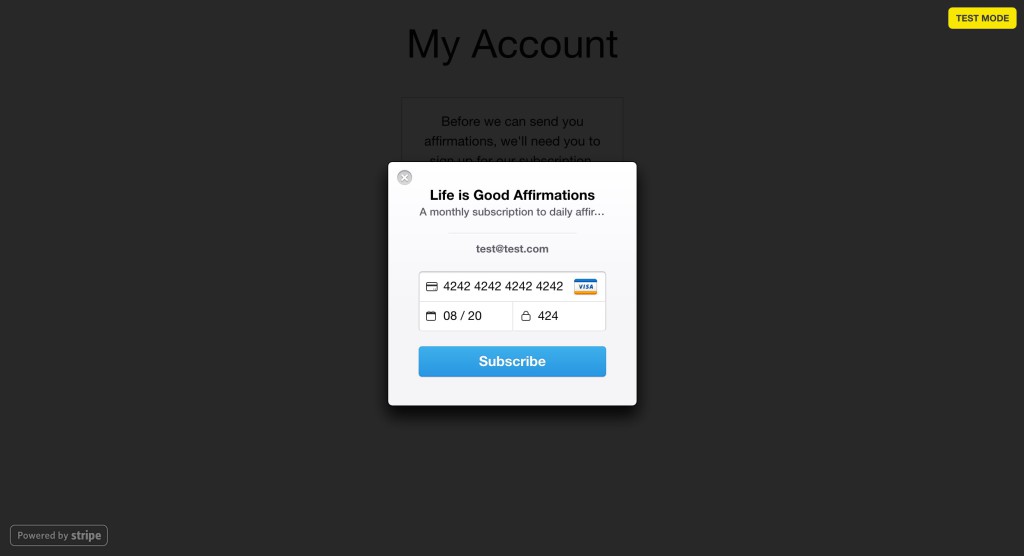
As expected, we are prompted to sign up to a subscription for the service:
When we click “Subscribe”, the Stripe Checkout pop up appears requesting payment details. One of Stripe’s testing credit card numbers is 4242 4242 4242 4242, which is what I’ve used below. You can find a list of more Stripe test numbers and such here.
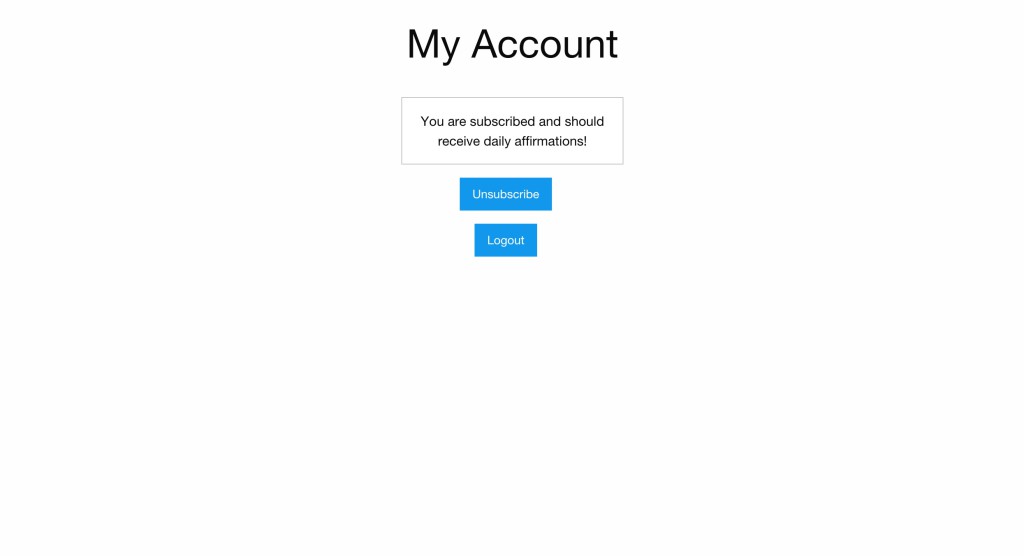
When the subscription is successful, the page will change to show this and offer an unsubscribe option (as well as a simple log out option that just clears the user ID stored in JavaScript and returns to the homepage):
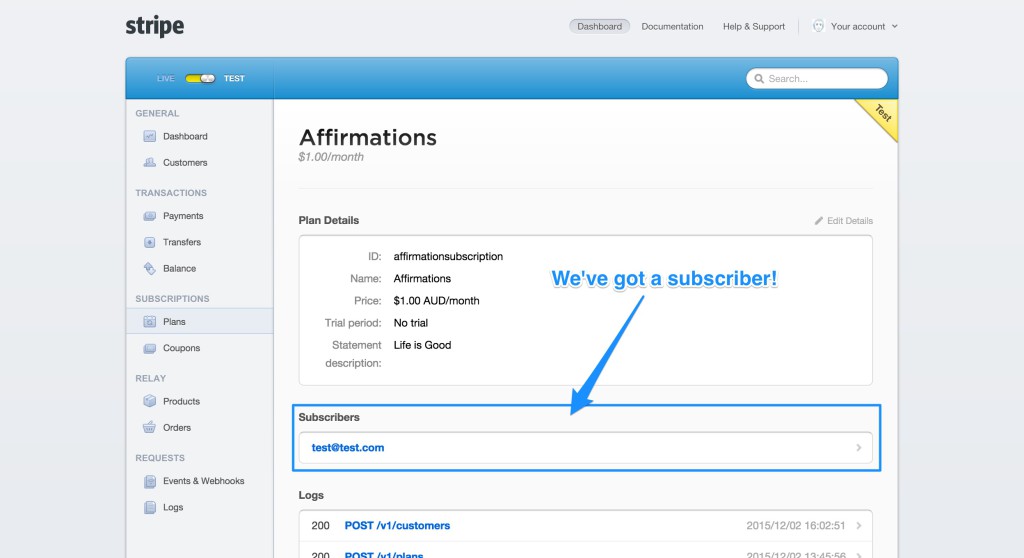
If we go to our Stripe dashboard, click Plans and then our Affirmation plan, we can see details about the plan. In particular, we can see our new subscriber!
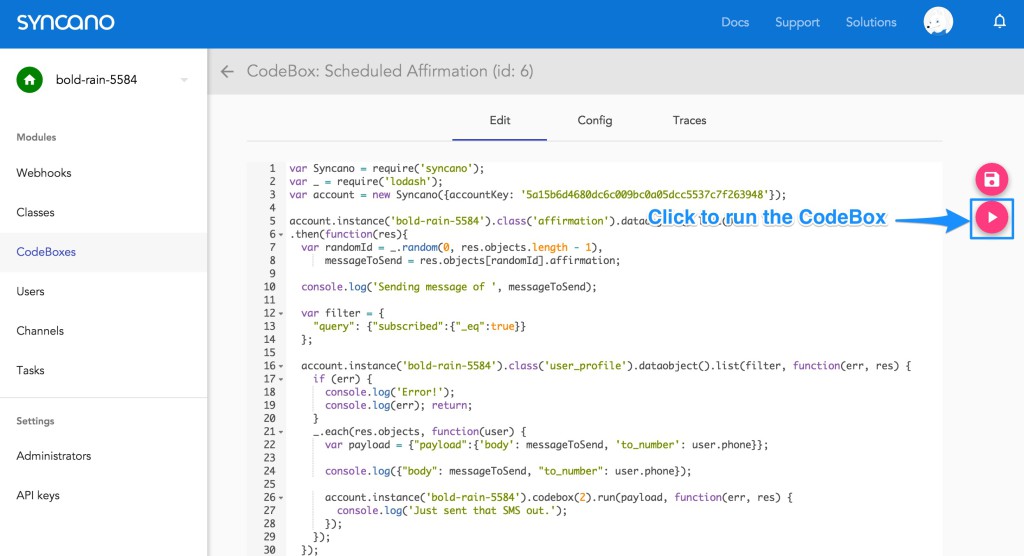
Rather than waiting for the scheduled run of the affirmations, we can open up our “Scheduled Affirmation” CodeBox and click the play button on the right to run it immediately:
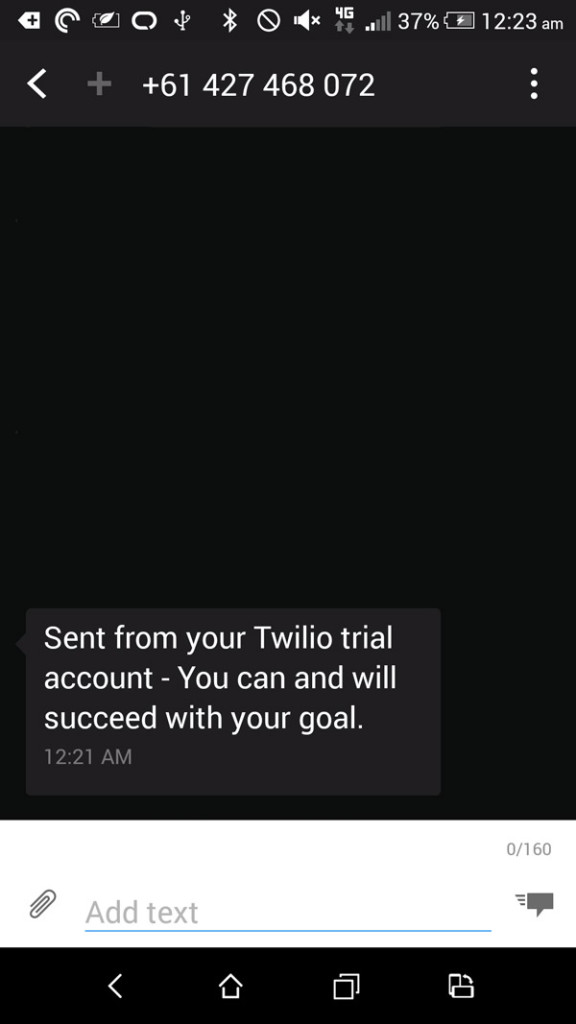
Within a very short time, you should receive a text message from your app:
If we then decide to unsubscribe, we click unsubscribe and are returned to the previous screen:
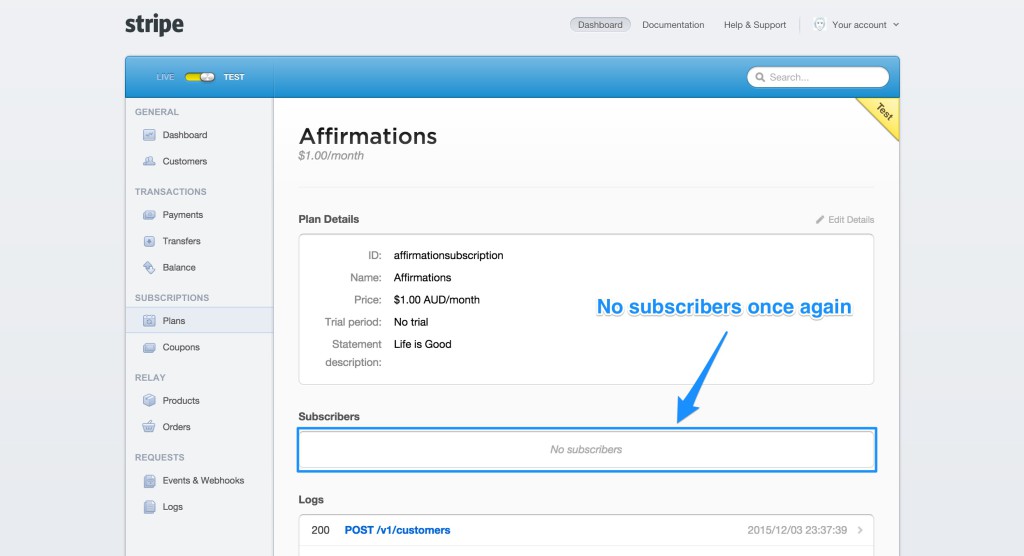
Looking back at Stripe, if we refresh the page we should find that the subscription no longer has any subscribers:
Our app works nicely!
Viewing Logs
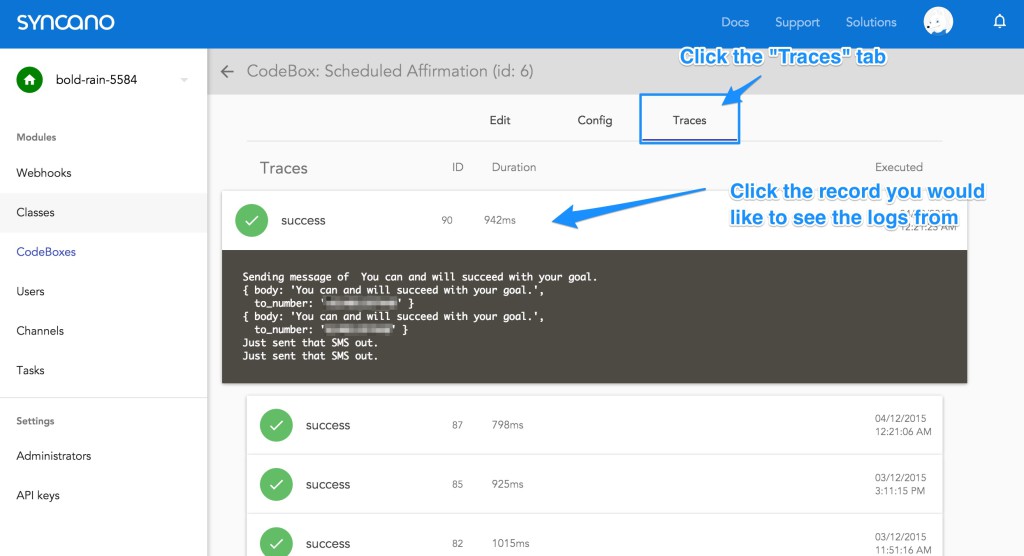
If for whatever reason your app did not work nicely and you’d like to see the logs, you can find the logs from CodeBoxes by opening the CodeBox and clicking the “Trace” tab. Then click the record you would like to view the logs from:
For CodeBoxes that were run via Webhooks, you instead can find their logs by going to the Webhooks page and clicking the Webhook you’d like to see the logs of:

Conclusion
Syncano is a platform which can make the task of putting together an app a whole lot faster and smoother to manage. Its concept of CodeBoxes and Solutions also encourages the separation of tasks into smaller chunks which can keep things neat and reusable. If you’ve got a prototype app you are considering building, why not try throwing it into Syncano and giving it a go?


