Getting Started with Git in a Team Environment

In a previous article, I discussed getting started with Git, mainly focusing on using Git when working alone. The core philosophy of Git, however, revolves around the concept of a distributed version control system.
The concept of “distributed” means there exist many independent versions of a single project, each with their own history. Thus, Git is a tool that helps you work with a team that may be geographically distributed.
We discussed how you could manage your files with Git in the previous tutorial, but the aim was to get familiarized with the concepts of git (add, commit, push). Now that you know how Git works locally, you are in a good position to start using the more advanced features.
Cloning
The first step in the process is to get the code (assuming Git is installed) from a remote resource. remote refers to a remote version of a repository or project. We begin by cloning the resource, using the command git clone.
git clone https://github.com/sdaityari/my_git_project.gitA clone URL can be obtained from a GitHub repository’s main page, in the sidebar. On successfully cloning the repository, a directory is created (by default, it’s the same name as the project). Another interesting fact is that the origin remote now points to the resource from which I cloned the repository (in this case, https://github.com/sdaityari/my_git_project.git).
Even though Git follows the distributed model, a central repository is usually maintained that contains stable, updated code.
Which protocol Should You Use When Cloning?
Notice that the repository is cloned over the https protocol in this example. The other popular choices that you have are ssh and git.
Cloning over the git protocol requires you to use the origin that looks something like git://github.com/[username]/[repository]. This does not provide any security except those of Git itself. It’s usually fast, but the big disadvantage is the inability to push changes as it gives only read-only access.
If you use the https protocol, your connection is encrypted. GitHub allows anonymous pulls over https for public repositories, but for pushing any code, your username and password would be verified. GitHub recommends using https over ssh.
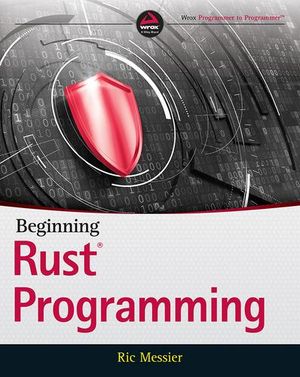
The ssh protocol uses the public key authentication. This requires you to establish a connection with the remote server over ssh. To set up authentication using ssh, you need to generate your public/private key pair. In Linux, you run the following command in the terminal to generate your key pair. But if you use the GitHub desktop client, this process is done automatically by the software, and you get an email that an SSH key was added to your GitHub account.
ssh-keygen -t rsa -C "[email_address]"Note: in these code examples, I will often include sections within square brackets. Those bracketed sections would be replaced with what’s indicated inside the brackets, but with the brackets removed.
You can optionally provide a passphrase that would be needed every time you try to connect. We leave it blank in our case. You can also specify the file where you can save the key. We leave it to the default id_rsa.
The public and private keys are stored in the id_rsa.pub and id_rsa files, respectively. In the case of GitHub, you need to paste the contents of your public key under ‘SSH’ in your profile.
To check that the process was completed successfully, you can establish a connection to the git user on github.com.
ssh git@github.com
As you can see, the connection to GitHub was successful but it was terminated because GitHub doesn’t allow shell access. This means that you can use the ssh protocol to pull or push changes.
An interesting fact is that a remote contains the protocol too. This means that connection to a resource through the https and ssh protocols need to be stored as separate remotes.
Branches
One of the best features of Git is branching. Think of branches as pathways that you take as you progress through your code. These branches can be visualized by the branches of a tree. The only place where our tree analogy fails is that Git also allows you to merge branches.
If you have used branches in other version control systems before, you need to clear your mind as the concepts are a bit different. For instance, if you compare Subversion and Git, their merging mechanisms are different.
Imagine you are making a chat application. At one point you decide that you want the snapshots of people to appear next to their name, but that idea hasn’t been approved by your boss yet. You create a branch and work on your idea while the old functionality remains intact in a separate branch. If you want to demonstrate your old work, you could switch over to your old branch. If your idea is approved, you can then merge the new branch with the old one to make the changes.
To check the list of branches and the current branch that you are working on, run the following command. It shows the list of branches in your repository, with an asterisk against the current working branch.
git branchCreating branches
Git provides a master branch, that you work on by default. When creating branches, you must name them properly, just like functions or commit messages. To create a branch, run the following command.
git branch [branch_name]This creates a new branch based on the last commit, but remains on the same branch. To switch to a different branch, run the following command
git checkout [branch_name]To create a new branch and switch to it immediately, use:
git checkout -b [branch_name]This creates a new branch based on the last commit of your current branch. If you want to create a branch based on an old commit, you should append the hash that identifies a commit with the command.
git checkout -b [branch_name] [commit_hash]Branching Models
In an earlier post, I talked about the guidelines that one must follow while contributing to open source projects. Every new feature must be built on a new branch and a pull request or patch should be submitted from that new branch. The master branch must only be used to sync with the original source of the project.
There are a number of different models that are used by organizations to manage their projects. This post on git branching discusses a generalized model that fits most organizations today.
Visualizing Progress Through Branches
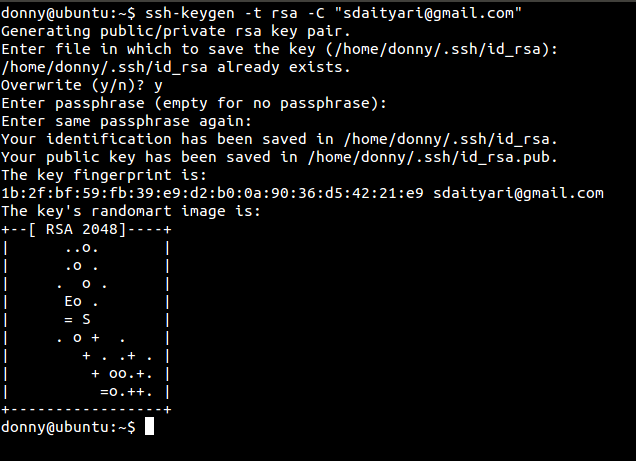
Now that you know how to create branches, you must wonder how we could grasp the idea through a single command. GUI clients for Git do this with a single click, but you can do the same in the terminal. In our case, we have added a few commits to branches — master, new_feature, and another_feature.
git log --graph --all
Using git log shows the history of the project. --graph shows the direction of commits, whereas --all shows all branches. You may want to add --oneline to display commits in single lines (without their details, of course).
Merging Branches
Let us come to perhaps the most important part of this tutorial: The ability to merge branches in Git. One of the branch models we discussed was that all of the features are developed in separate branches and the ones with desirable results are merged with the master. To do so, you need to checkout to the master branch and merge the feature branch with it.
git checkout master
git merge [branch_name]
However, in our case, we see that a conflict has been raised. Why did that happen? There were changes made in the same file in both branches and Git wasn’t able to determine which changes to keep, raising a conflict in the process. We will see how to resolve conflicts later in the tutorial.
Collaborating with Git
In the Git for Beginners post, we ended with a git push that synced our code on GitHub. Thus, you must know that to effectively send code from your local machine to another remote, you use the git push command. The different ways of doing a push are as follows.
git push
git push [remote]
git push [remote] [branch]
git push [remote] [local_branch]:[remote_branch]
The first command sends your code to the current branch of origin remote. When you specify a remote name, the code from your current active branch is pushed to the branch by the same name on the remote. Alternately, you can push from a local branch to a branch by a different name on the remote.
If you prefer the last command to push, there is a trick that deletes a branch on the remote. If you supply an empty [local_branch], it will delete the remote_branch on the server. It looks like this:
git push [remote] :[remote_branch]The push is not always accepted on the remote though. Take the following case.:
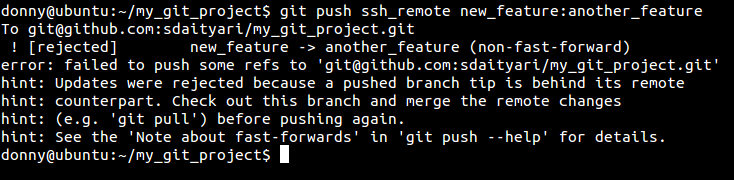
A ‘non fast forward’ branch refers to that fact that the commit at the tip of the remote branch does not match with any commits on my local system. This means that the remote branch has changed since the last time I synced it.
In such a situation, I would need to pull the changes from the remote branch, update my local branch and then push my changes. In general, it is considered good practice to always pull before a push. The syntax is exactly the same as the push counterparts.
git pull --rebase [remote] [branch]Alternately, some people do a git fetch followed by a git merge rather than a git pull. Essentially, a pull does a fetch and then a merge. A --rebase should also be used, because it first pulls the changes to your branch, and then puts your work over it. This is desirable because all possible conflicts are raised based on changes that you made and hence you are in a good position to decide what to keep and what not to keep.
As another possibility, organizations that don’t give every contributor push access to their repositories work through emails. In such a case, you would create a diff file by comparing the differences between either commits or branches. The git diff command shows the difference and the changes are stored in a file, which is then mailed to the organization. These diff files are popularly known as “patches”.
git diff [branch1] [branch2] > [file_name]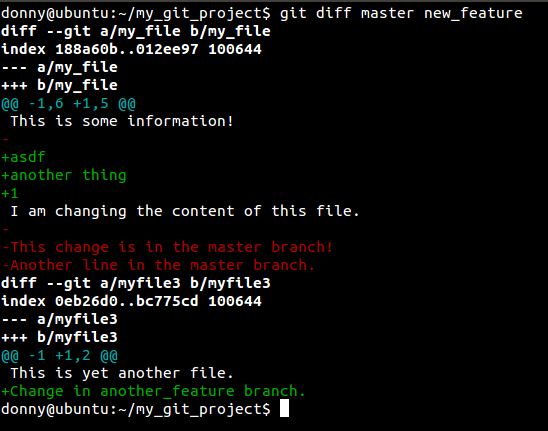
The parts of a diff file that are generated are explained in detail in this post. If you have a diff file and you want to apply the patch, you simply use the command below.
git apply [file_name]Resolving Conflicts
Resolving conflicts is important in any Git workflow. It is natural that many people work on the same file and the server has a newer version of that file since the last time you pulled for changes. Conflicts can also arise when you try to merge two branches that have changes to the same file. Sometimes Git tries to apply certain algorithms to see if it can solve the conflict itself, but it often raises a red flag to make sure there is no loss of data.
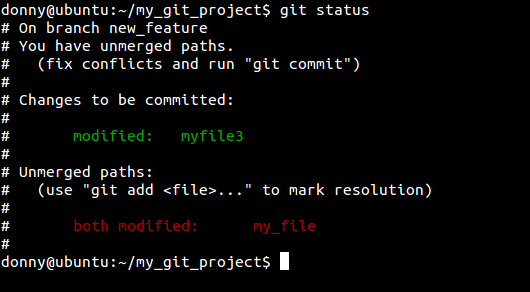
When we tried to merge our branches, we noticed that a conflict arose. Let us see how we can resolve it. A git status shows you what caused the conflict.
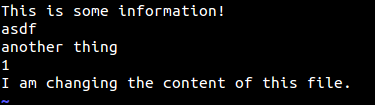
We can then open the identified file using a text editor (like VIM) to see what is wrong. The contents of the file are as shown:

Look at the file carefully. Notice the three lines that have been inserted by Git.
<<<<<<<< HEAD
...
...
========
...
...
>>>>>>>> another_feature
What this means is pretty simple. The lines of code that are between <<<<<<<< HEAD and ======== are a part of your current branch, whereas those between ======== and >>>>>>>> another_feature are present in the branch that you are trying to merge. What you need to do is remove those three marker lines and edit the content in between them to something that you desire. In our case, let’s keep all the information, so the end file will look something like this.
Although we keep all the content within both blocks, you could remove all content, keep some of the content, or write something else entirely in their place while resolving the conflict.
This conflict was pretty simple in our case. In more complex projects, you might have a lot of instances that lead to conflicts, with a number of instances of the lines shown above included in the conflicting files. The process of solving a rather complex conflict remains the same: Check the affected files through a git status, open each of them, and search for occurrences of HEAD.
Conflicts can arise while pulling from a remote too. In that case, the last line would read >>>>>>>> [commit_hash] instead of >>>>>>>> [branch_name], where [commit_hash] would be the identifying hash for the commit.
Conclusion
Git is popular in the developer community, yet critics often compare it to a Swiss Army knife. It is true that Git offers a lot of features. But once you understand the basics, they are very intuitive to use. Let’s hope this tutorial can get you started with Git in a way that allows you to contribute in a team environment.
If you have anything to add on any of the features discussed above, please add your comments.