Setting Up Your PHP Development Environment with Docker

The following article is an excerpt from PHP & MySQL: Novice to Ninja, 7th Edition, a hands-on guide to learning all the tools, principles, and techniques needed to build a professional web application. In this first tutorial of the series, we cover how to set up your PHP development environment with Docker.
- Setting Up Your PHP Development Environment with Docker
- A Beginner’s Guide to PHP
- Introducing MySQL: A Beginner’s Guide
- Displaying Data from MySQL on the Web: an Introduction
In this book, I’ll guide you as you take your first steps beyond the static world of building web pages with the purely client-side technologies of HTML, CSS, and JavaScript. Together, we’ll explore the world of building websites, and discover the dizzying array of dynamic tools, concepts, and possibilities they open up. Whatever you do, don’t look down!
Okay, maybe you should look down. After all, that’s where the rest of this book is. But remember, you were warned!
Before you build your first dynamic website, you must gather together the tools you’ll need for the job. Like baking a cake, you’ll need the ingredients before you can start following the recipe. In this chapter, I’ll show you how to download and set up the software packages required.
If you’re used to building websites with HTML, CSS, and perhaps even a smattering of JavaScript, you’re probably familiar with uploading the files that make up your site to a certain location. It might be a web hosting service you’ve paid for, a web space provided by your internet service provider, or maybe a web server set up by the IT department of the company you work for. In any case, once you copy your files to any of these destinations, a software program called a web server is able to find and serve up copies of those files whenever they’re requested by a web browser like Microsoft Edge, Internet Explorer, Google Chrome, Safari, or Firefox. Common web server software programs you may have heard of include Apache HTTP Server (Apache), NGINX, and Internet Information Services.
PHP is a server-side scripting language. It’s completely free to download and use. You can think of it as a plugin for your web server that enables it to do more than just send exact copies of the files requested by web browsers. With PHP installed, your web server will be able to run little programs — called PHP scripts — that can do tasks like retrieve up-to-the-minute information from a database and use it to generate a web page on the fly, before sending it to the browser that requested it. Much of this book will focus on writing PHP scripts to do exactly that.
For your PHP scripts to retrieve information from a database, you must first have a database. That’s where MySQL comes in. MySQL is a relational database management system, or RDBMS. We’ll discuss the exact role it plays and how it works later, but briefly, it’s a software program that’s able to organize and manage many pieces of information efficiently while keeping track of how all those pieces of information are related to each other. MySQL also makes that information really easy to access with server-side scripting languages such as PHP. And, like PHP, it’s completely free for most uses.
The goal of this first chapter is to set you up with a web server equipped with PHP and MySQL. I’ll provide step-by-step instructions that work on recent versions of Windows, macOS, and Linux, so no matter what flavor of computer you’re using, the instructions you need should be right here.
Your Own Web Server
Chances are, your current web host’s web server already has PHP and MySQL installed — which is one of the reasons PHP and MySQL are so popular. If your web host is so equipped, the good news is that you’ll be able to publish your first website without having to shop for a web host that supports the right technologies.
When developing static websites, you can simply load your HTML files directly from your hard disk into your browser to see how they look. There’s no web server software involved when you do this, which is fine, because web browsers can read and understand HTML code all by themselves.
However, when it comes to dynamic websites built using PHP and MySQL, your web browser needs some help. Web browsers are unable to understand PHP scripts. Instead, PHP scripts contain instructions for a PHP-savvy web server to execute in order to generate the HTML code that browsers can understand.
Even if you have an existing web host that supports PHP, you’re still going to want to be able to run PHP scripts yourself without needing to use someone else’s server. For this, you’ll need to set up your own web server. The word “server” might make you think of a large, air-conditioned room filled with big computers in racks. But don’t worry, you don’t need any fancy new hardware. Your laptop or desktop computer will work just fine.
To run PHP scripts on your web host, you need to write them in your editor, open your FTP or SSH client and upload them to the server. Only then can you see the result in your browser by navigating to the URI of the file you created. If you made a mistake and there’s an error, you’ll need to change the code, go back into your FTP program, upload the file again and then reload the page. This is tedious, and uses up precious time that you could be using to write code. By running a server on your own PC, you’ll be able to save a file in your editor and view the changes in your browser by simply refreshing the page — no file uploading required. This is a real time saver, and one of the biggest (although not only!) advantages of running a server on your PC — even if you have a perfectly good web host already.
So how do you get a web server running on your PC? There are four ways to achieve this, each with its own advantages and disadvantages.
Server Setup 1: Manually Installing All the Software Components
Apache is a web server, and like most software it comes with an installer that lets you easily set it up on your PC. Without much effort, you can have it serve web pages. However, there are hundreds of configuration options, and unless you know what you’re doing, it can be time consuming and confusing to get it working for developing PHP websites.
For our purposes of running PHP scripts, a web server alone is not enough. For manual installation, you’ll also need to install PHP — which doesn’t have an installer — and configure it. As with Apache, there are lots of options, and the defaults are set up as if you’re running a live website. For developing code, this is bad, as there are no errors shown. If you make a mistake, you’ll get a blank page with no indication of what went wrong. Even a single character out of place — such as a missing brace or semicolon — will give you a blank page, with no indication of what caused the problem. To solve this, you’ll need to manually configure the PHP installation and tweak the settings to show error messages and enable other tools that make development a more pleasant task.
You’ll also need to configure Apache to talk with PHP, so that when someone connects to the server and requests a file with a .php extension, the file is first sent to PHP for processing.
To follow along with this book, you’ll also want MySQL, which means manually installing and configuring that as well.
Apache, MySQL and PHP each have dozens of configuration options, and unless you know exactly what you’re doing, they can be difficult to set up. Even if you’re an expert, it will take at least an hour to get everything working!
Manual installation requires a significant amount of knowledge or research and is beyond the scope of this book. Being able to configure a server is a useful skill, to be sure, but it doesn’t help you learn how to program using PHP — which is what you’re really interested in if you’re reading this book.
This option is not for the faint hearted, and even for seasoned professionals it’s very easy to miss some important settings. If you really want to intsall and configure your setup manually, check out our guide to installing PHP on Windows. However, if you we don’t want to worry about setting up and configuring all the software individually,there are some great alternative options.
Server Setup 2: Pre-packaged Installations
The problems with manual installations have been recognized by groups of developers over the years, and to overcome them they’ve built pre-packaged installations — a single installer that installs PHP, Apache, MySQL and other relevant software, all pre-configured with appropriate settings for developers like you. The most popular example of this kind of package is XAMPP: X (any operating system), Apache, MySQL (or more specifically, MariaDB, a “fork” of MySQL with a better license), PHP, and Perl. Alternatives include WAMP (Windows, Apache, MySQL, and PHP), LAMP (Linux, Apache, MySQL, and PHP), and MAMP (macOS, Apache, MySQL, and PHP).
This is obviously a lot simpler than manually installing each piece of software, and doesn’t require you to learn how to configure your server. It’s quick and easy and a lot better than a manual installation, though there are still a couple of problems you may encounter with this method, listed below.
- Your web host is probably running Linux, but your PC probably isn’t. Although Apache, MySQL and PHP work in Windows, Linux or macOS, there are some big differences between the way the operating systems work. On Windows, file names are not case-sensitive, meaning that
FILE.PHPis the same asfile.phpandfIlE.pHp. On your web host, this will almost certainly not be the case! This causes frequent problems when a script working perfectly on your Windows development server doesn’t work once it’s uploaded, because files are being referenced in the code with the wrong case. - Apache and MySQL are servers, and they run in the background. Even when you’re not developing software, they’ll be running, using up your computer’s RAM and processing power.
- Pre-packaged software is always slightly out of date. Although security fixes aren’t a priority for a development computer (you shouldn’t be allowing people to access it across the Web!), it’s always useful for developers to stay on the most recent versions of software to check for problems that might be encountered when the software on your web host is updated. If your web host is using a newer version of PHP than your development server, this can cause problems with features that have been changed or removed. Finally, developers like to play with new features as they’re released. You won’t be able to do this if you’re not using the latest versions!
Although pre-packaged installations are much better than installations, these problems don’t make them ideal. Luckily, there’s an even better approach!
Server Setup 3: Virtual Servers
The third method of getting a server up and running is a “virtual server”. A virtual server acts like a web server on a different computer. This computer can be running any operating system, and you can connect to it from your PC as if it were somewhere else in the world.
Virtualization software such as VirtualBox and the tools offered by VMware is common. As a web developer, you may be familiar with tools such as modern.ie, a helpful service provided by Microsoft that lets you download virtual machines running various versions of Windows, Microsoft Edge and Internet Explorer. If you want to see what your website looks like in Internet Explorer 8 on Windows XP, you can download the relevant virtual machine and run it in a Window on your Windows 10/macOS/Linux desktop without having to actually install and run Windows 7 with Internet Explorer 8 inside your existing Windows 10, Linux or macOS installation.
Software like VirtualBox allows you to run an operating system inside another operating system. For testing Internet Explorer 8, you can run Windows 7 in a virtual machine. However, for our purposes of running PHP scripts, this allows us to do something a lot cooler: we can run a Linux web server with PHP, Apache and MySQL installed on our Windows or macOS PC.
This can be used to allow you to run the exact same versions of PHP, MySQL and Apache that are being used on your web host, on the exact same operating system, which prevents any issues that may exist due to version differences or differences in the operating systems being used.
One of the biggest advantages is that you can download pre-configured virtual machines, like the Windows XP and Internet Explorer 8 virtual machine provided by Microsoft, or a virtual machine that has PHP, Apache and MySQL installed and configured to work together. This is like the pre-configured package but runs on Linux as if it’s a real web server on your network.
The downside to all this is that you have to download an entire operating system in order to run your code. That means more downloading. It also means that packages are locked to whatever is provided by the virtual machine you download. Swapping out PHP 7 for PHP 8 requires downloading a whole new copy of the operating system.
Server Setup 4: Docker
Docker takes the idea of virtualization and flips it on its head. Each program (or “service”, in Docker’s terminology) runs in its isolated environment called a container.
Docker allows a software developer to provide a configuration file that describes all the programs needed to run an application — for example, PHP, MySQL, Apache, and so on.
This configuration file is then treated as its own application. When you run the application, Docker downloads and sets up all the software listed in the configuration file automatically.
The overhead of this is much lower than you might think, and there are numerous benefits:
- The server configuration is provided as part of the application. When you make your website live, you can upload all of the configuration files along with the website. In the traditional model, you’d have to manually set up the web server and configure it.
- Multiple websites can run at the same time on your development machine, with different configurations and even different server software (for example, one website using Apache, another using NGINX). Without Docker, there’s generally one PHP version installed with a single configuration applied to every website running on the machine.
- You can easily swap out a piece of software. If you want to change the website from PHP 7 to PHP 8, it’s one change in one file, and you can do it on a per-website basis rather than forcing an upgrade to all your websites at once.
Docker is currently the best option for setting up a PHP development environment. If you want to know more about setting up a development environment for yourself using Docker, check out my article “Setting Up a Modern PHP Development Environment with Docker”.
Getting Started
Before writing any PHP code and developing your website, we’ll set up the development environment using Docker. I’ve provided all the configuration for you, but before you start, you’ll need to install Docker.
Installation on Windows
Firstly, download and install the latest version of Docker for Windows from the Docker site.
Once you’ve installed Docker (and rebooted if asked), create a folder on your computer where you want to store your website. This can be anywhere: your Documents folder, the desktop, an external hard drive, and so on, but make sure you know where this is as you’ll need to go back to this folder frequently.
You’ll also need to know how to open a terminal. Windows 10 makes this easy. With the folder open in the file explorer, choose the File menu at the top left of the window, then click Open Windows PowerShell. Make sure you do this from the File menu and not the start menu, as clicking it from File will open the command prompt in your chosen folder.
With PowerShell open, verify that the path it’s showing is your chosen folder — for example, C:\Users\Tom\Documents\My Website. Then go to the “Getting Started with Docker” section below.
At the time of writing (September 2021), in the current preview build of Windows 11, PowerShell has been renamed to Windows Terminal and is accessed in a different way:
- Enable the option by manually opening the Windows Terminal application from the start menu once. You can just open and close the program. Inexplicably, Microsoft has designed Windows 11 in such a way that opening one program turns on a hidden setting in another, and if you skip this step the menu item from step three is missing.
- Use File Explorer to navigate to your folder.
- Right click in the main panel (it should say “This Folder is Empty”) and select Open in Windows Terminal.

Note: these instructions may have changed by the time Windows 11 is released and after this book has been published.
Installation on macOS
Firstly, download and install Docker for macOS from the Docker site.
Once you’ve installed Docker (and rebooted if asked), create a directory on your computer where you want to store your website. This can be anywhere: your Documents directory, the desktop, an external hard drive, and so on, but make sure you know where this is, as you’ll need to go back to this folder frequently.
If you’re familiar with navigating around your computer using the terminal you can skip this step, but for convenience I recommend enabling a feature that lets you open a terminal in the current directory. This can be turned on using the following steps:
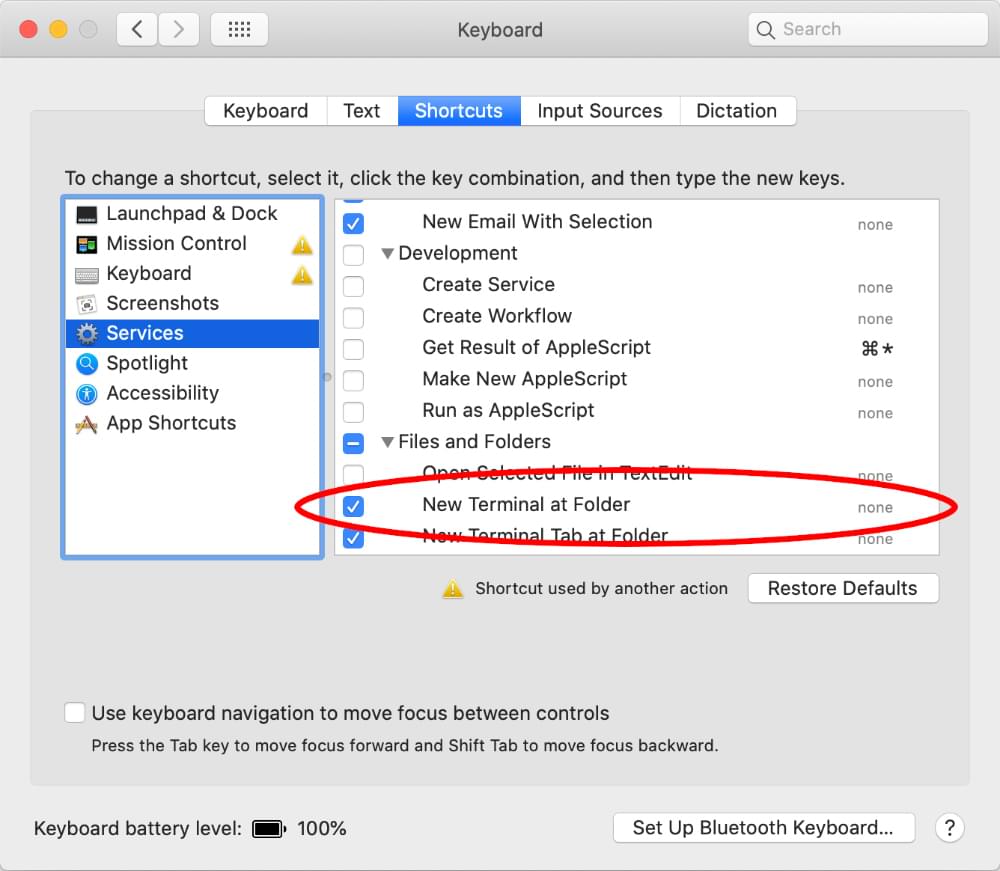
- open System Preferences
- go to Keyboard
- select the Shortcuts tab
- click the Services button
- check the box New Terminal at Folder
With this enabled:
- open the Docker app from the
Applicationsfolder and accept the terms - go back into Finder
- navigate to the directory you want to store your website in
- right click (or control click) on the directory name, choose the Services option from the content menu, and select New Terminal At Folder
With this terminal open, you’re ready to proceed to the “Getting Started with Docker” section below.
Going forward, you’ll only need to repeat the last set of steps each time you wish to start or stop your server.
Installation on Linux
Linux generally makes installing software very simple, and Docker is actually a Linux program by design. On most distributions, it can be installed via your package manager, but you may need to set up a custom package repository.
For Debian-based distributions (Debian, Ubuntu, Mint and KDE Neon) and RedHat-based distributions (RedHat, CentOS, Fedora) there’s an install script which sets up a custom repository and installs Docker:
curl -fsSL https://get.docker.com -o get-docker.sh
sudo sh get-docker.sh
For specific instructions for your distribution, take a look at the Docker manual.
Once Docker is installed, you have to enable and start the service using these commands:
sudo systemctl enable docker
sudo systemctl start docker
Finally, you can add yourself to the docker group so that you won’t need to run Docker applications through sudo:
sudo usermod -aG docker ${USER}
Changing user groups requires logging out and back in, so log out and back in (remember to save anything you have open!), and once you’re back in you’re ready to open a terminal.
After you’ve logged back in, create a directory on your computer where you want to store your website. This can be anywhere: your Home directory, the desktop, an external hard drive, and so on, but make sure you know where this is as you’ll need to go back to this folder frequently.
Open the folder in your file manager and choose the Open Terminal option. In the Dolphin file manager, you can right click and choose Open Terminal, but this option may be in a different location and possibly named differently depending on which file manager you’re using.
Getting Started with Docker
Now that you have all the software installed and your terminal is open at the correct location, it’s time to run some Docker commands.
While you could manually set up the environment and configure everything yourself, this requires a different skill set from programming and is beyond the scope of this book. I’ve provided some configuration based on the article I linked to earlier.
Firstly, copy the configuration using this command:
docker run --rm -v ${PWD}:/install vjedev/installer:latest
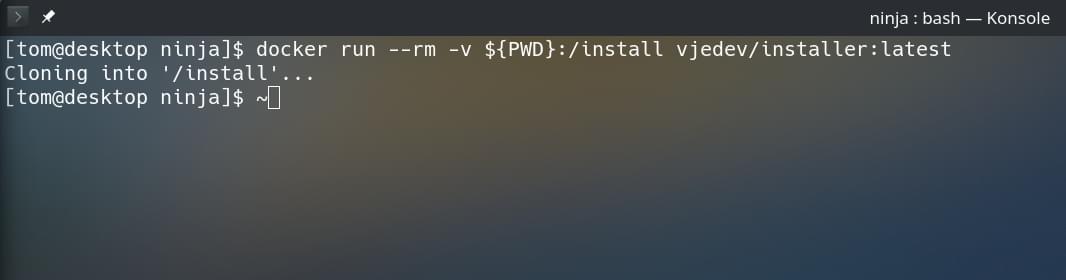
This command downloads some configuration files from a GitHub repository and copies them to the current folder. The directory has to be empty for this to work, so make sure there are no files or subdirectories in the directory you’re trying to run this command from.
Note: GitHub is a source code hosting platform used by a lot of open-source projects. A repository is the name given to an individual project. In this case, the code is being downloaded from github.com/v-je/docker.
Tip: if you have Git installed, you could just run the following command at this point: git clone https://github.com/v-je/docker . However, rather than asking every reader of this book to install Git for a single command, I created an installer script which does this for you.
You only need to do this the first time, and once the command completes you’ll see some configuration files appear in your directory. Feel free to look though the files created. There’s nginx.conf, which configures the web server; PHP.Dockerfile, which configures PHP extensions; and docker-compose.yml, which lists all the programs that will be installed and run when you start the server (NGINX, MySQL, PHP, and so on).
Don’t worry about trying to understand these files. You don’t need to do anything with them, as they’re just there to configure the server when you run the next command.
Note: before we continue, it’s worth mentioning that the environment we’ve just set up uses NGINX and not Apache. If you’ve been using XAMPP or a similar package, the web server you’re using is Apache. The web server is the part of the server that listens to requests from a web browser and sends it files.
Apache is fine, and it works, but it’s been around forever. When Apache was created, the Web was a very different place. Apache is big, and there are lots of different features that have come and gone — but which Apache still supports. The Web has changed a lot since Apache was created, and although Apache is a capable server and will work fine, most websites these days tend to use NGINX. It’s easier to configure, more lightweight, and better tuned for the kinds of tasks a lot of of modern websites make use of (such as video streaming); and as such, its market share is growing rapidly at the expense of Apache’s.
My general advice is: if you already have a website running Apache, there’s no reason to go through the hassle of changing it, but if you’re starting a new project from scratch, use NGINX.
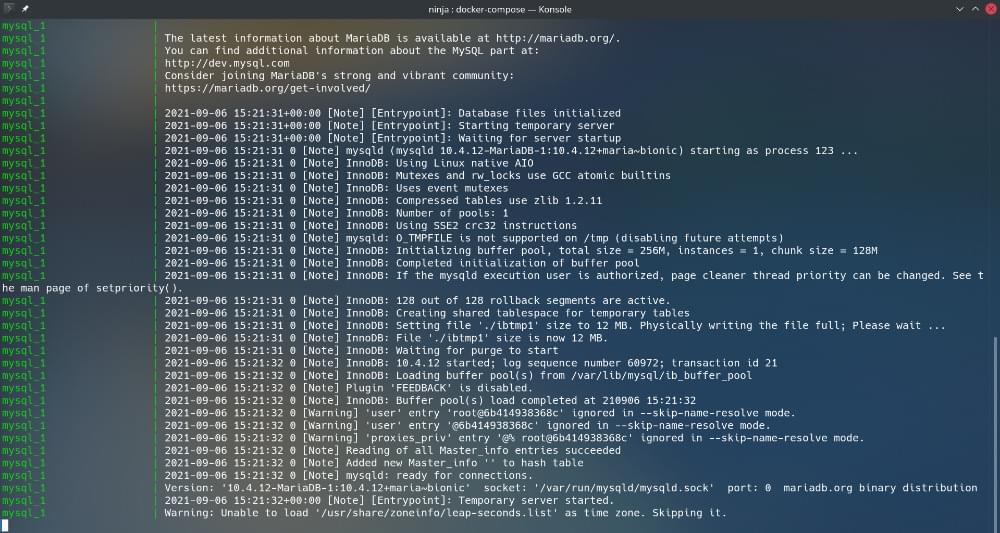
Now that you have the server configuration files downloaded, it’s time to get Docker to download and run all the programs required for the server. Run the following command:
docker compose up
Note: for boring technical reasons that aren’t worth getting into here, the docker compose command used to be a separate program called docker-compose. This functionality has now been moved into Docker itself. However, if you’re on an older Linux distribution, or running an older version of Docker Desktop, you may need to replace docker compose with docker-compose in all the docker compose commands. Only do this replacement for compose. Other commands like docker run should retain the space.
You may get the following error when running docker compose up:
docker: 'compose' is not a docker command.If so, you’ll need to replace the command with docker-compose up, and if you’re on Linux, you’ll probably also need to install the separate docker-compose package using your package manager.
The docker compose command loads docker-compose.yml, then downloads and installs all the software listed as services. The main things we’re interested in for now are PHP, NGINX, and MariaDB.
The first time you run this command it will take a couple of minutes, as it has to download all the required software. Don’t worry, as this only happens the first time. Once the software is downloaded and installed, starting the server in future will be significantly easier.
Unlike using a manual NGINX/PHP/MySQL installation directly on your PC, the server is only started when you want it to be, by running docker compose up. You can stop the server at any time by going back into the terminal and pressing Ctrl + C.
Alternatively, you can start the server in the background using this command:
docker compose up -d
You can stop the server by running docker compose down from your terminal. (You must open the terminal in the correct directory for starting and stopping the server!)
Each time you want to work on the website, you can start and stop the server using the same process:
- navigate to the folder you created
- open your terminal/Windows PowerShell as you did earlier
- run
docker compose up -d
When you’re done, you can stop the server using the same process:
- navigate to the folder you created
- open your terminal/Windows PowerShell as you did earlier
- run
docker compose down
If you’ve left the terminal open in the background, you can just open the window and run step 3.
Tip: the command docker compose down stops the running services and removes them, freeing up disk space. It also forces them to be recreated each time.
You can also use docker compose stop and docker compose start to stop and start the server. But these rely on the container, network and other things Docker creates behind the scenes being kept between executions. System restore, moving files between computers, or even running other Docker commands you’re using for other tasks (be careful with docker prune!) can remove these.
Using up and down will use a blank slate approach and be consistently reliable. However, it does require removing when it’s not in use and re-creating it when you use it. Don’t worry, though: all your PHP, JavaScript and CSS files in the directory you created won’t be removed!
Connecting to the Server and Creating Your First File
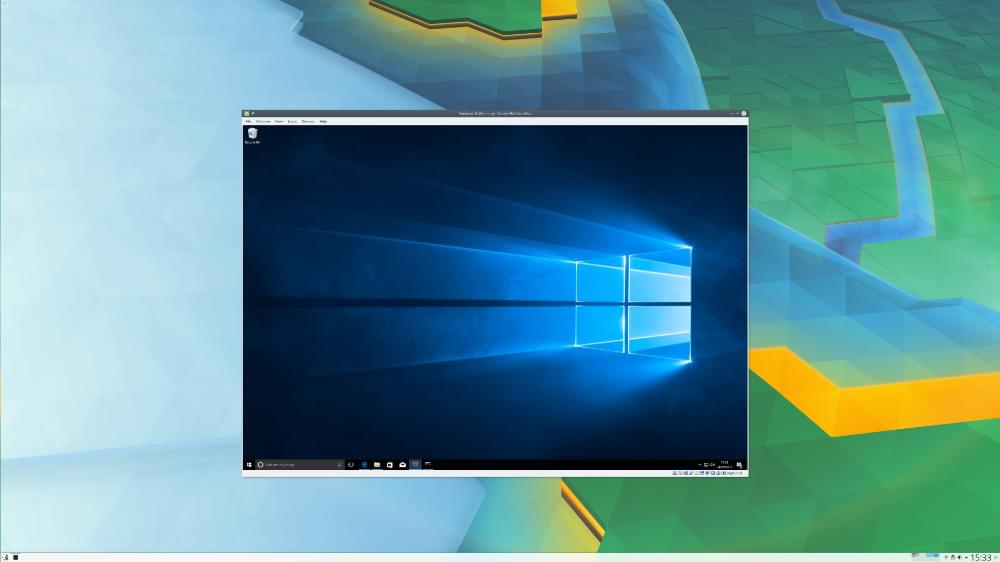
Now that you have the server running, you can connect to it using your favorite web browser. The server acts like a real web server running somewhere on the Internet. You can connect to it by opening your browser, typing v.je into the address bar and pressing enter.
You should see a test page like the one pictured below.
With the server running, it’s time to create your first file. When you ran the docker-compose up command, a folder called websites was created automatically in the directory from which the command was run. The files in the websites/default/public folder are the files used for the test page in the screenshot above.
Using your favorite text editor, create a file called test.html in the websites/default/public directory that contains the following code:
<!DOCTYPE html>
<html>
    <body>
        <h1>Hello World!</h1>
    </body>
</html>
You can now view your web page on the server. By default (we’ll see later on that this can be overridden) a URL directly maps to a file. A file called test.html placed in the public directory can be accessed on https://v.je/test.html, public/products.html can be viewed on https://v.je/products.html, and files can even be put in subdirectories. For example, public/images/logo.png can be viewed at the URL https://v.je/images/logo.png.
Tip: you might be wondering why there are three levels of folder — websites, default and public — instead of just having the public directory with the files in it.
The environment is configured to host multiple websites from different folders within the created websites directory. To create a new website that’s available at https://mysite.v.je/, take the following steps:
- Create the directory
mysiteinside thewebsitesdirectory. - Create the directory
publicinside themysitedirectory. - Place your web-accessible files inside the
websites/mysite/publicdirectory. For example, the file inwebsites/mysite/public/phpinfo.phpwill be accessible at the URLhttps://mysite.v.je/phpinfo.php.
Any directory you create inside the websites directory is treated as a subdomain of v.je. If no subdomain is specified and you just visit v.je, it will load the website from the default directory.
As we’ll see later on in the book, it’s good practice to keep certain files outside the public directory for security, which is why each website has a public directory.
Note: text editors provided by your operating system — such as Notepad or TextEdit — aren’t really suitable for editing HTML and PHP scripts. However, there are several solid text editors with rich support for editing PHP scripts that you can download for free. Here are a few that work on Windows, macOS, and Linux:
- Visual Studio Code (Getting Started guide)
- Atom (Getting Started guide)
- Sublime Text (Documentation)
These are all very similar, and for the purposes of this book, any one of them is a good choice and will make your life as a developer a lot simpler than Notepad or TextEdit.
We’re All Set Up
In this chapter, you’ve learned how to set up your PHP development environment with Docker, and how to host an HTML file on the server. I’ve only covered the basics in order to quickly get to the meat and bones of this book: actually programming in PHP. However, having a good development workflow as a PHP developer is a skill in its own right. For our purposes, however, the server is up and running, and you’re ready to write your first PHP script, which is exactly what we’ll do in the next chapter, A Beginner’s Guide to PHP.