Getting Started with Laravel Livewire

As developers, we’re always looking for tools, libraries, and frameworks that will make our lives easier. It’s no different for Laravel developers. That’s the reason why we love this framework to begin with, as everything is made easy for us — allowing us to focus on building awesome applications instead of getting bogged down with how to implement stuff.
In this tutorial, we’ll be looking at another tool which can make your life easier as a Laravel developer. Specifically, we’ll be looking into Livewire, a full-stack framework for Laravel that allows us to build dynamic interfaces without writing a whole lot of JavaScript. Everything is essentially done with tools you’re already familiar with as a Laravel developer.
What is Livewire?
Livewire is a library that allows us to build reactive and dynamic interfaces using Blade and a little bit of JavaScript. I say “a little” because we’re only going to write JavaScript to pass data around via browser events and responding to them.
You can use Livewire to implement the following functionality, without the page reload:
- pagination
- form validation
- notifications
- file uploads preview
Note that Livewire isn’t limited to the above functionality. You can use it for so much more. The features above are just the most common one you might like to implement in your apps.
Livewire vs Vue
Vue has always been the preferred front-end framework for Laravel developers to add interactivity to their apps. If you’re already using Vue to power your apps, Livewire is optional for you to learn. But if you’re fairly new to doing front end in Laravel, and you’re looking into Livewire as a Vue replacement, then yes, you can use Livewire as a replacement for Vue. The learning curve
won’t be as steep as learning Vue, since you’ll mostly be using Blade to write your template files.
For more information on how Livewire and Vue compare, check out “Laravel Livewire vs Vue”.
App overview
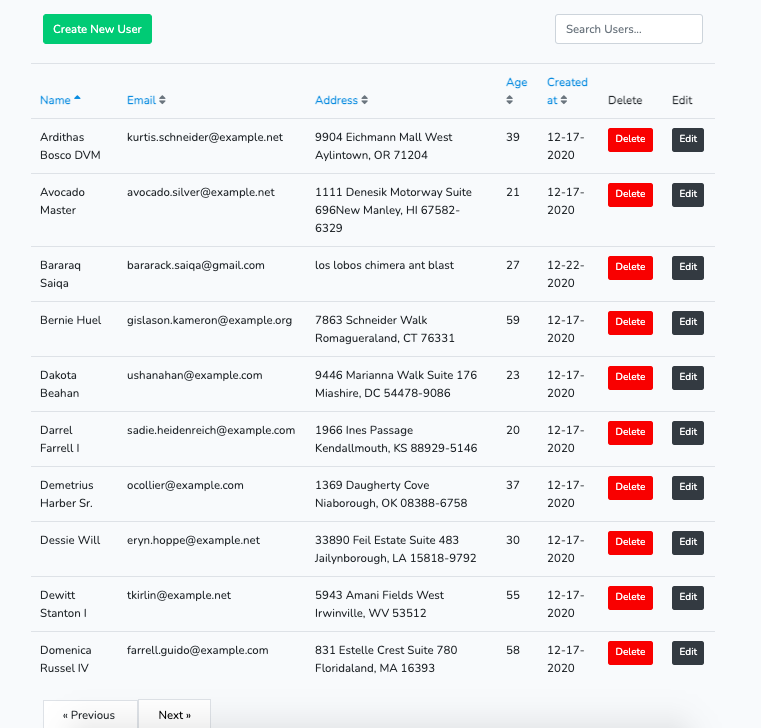
We’re going to create a live CRUD app. So it’s basically a CRUD app without the page reloads. Livewire will handle all the AJAX requests required to update the UI. This includes filtering the results via the search field, sorting via the column header, and a simple pagination (previous and next). Creating and editing users will make use of Bootstrap Modals.
You can view the source code of this project on its GitHub repo.
Prerequisites
This tutorial assumes that you have experience with PHP application development. Experience in Laravel is helpful but not required. You can still follow along if you only know plain PHP or another PHP framework.
This tutorial assumes that you have the following software installed on your machine:
If you’re on a Mac, a more convenient option instead of installing MySQL and NGINX would be to install DBngin and Laravel Valet instead.
Setting Up the Project
You can now create a new Laravel project:
composer create-project laravel/laravel livecrud
Navigate inside the livecrud folder that it will generate. This will be the root project folder where you execute all of the commands throughout this tutorial.
The next step is to create a MySQL database using your database management tool of choice. Name the database as livecrud.
Install the back-end dependencies
We only have one dependency for the back end and that’s Livewire. Install it with the following command:
composer require livewire/livewire:2.3
Note: we’re installing the specific version I’ve used in creating the demo. If you’re reading this in the future, it’s recommended that you install the most recent version. Don’t forget to check the project’s changelog on their GitHub repo to make sure you’re not missing anything.
Setting up the database
Update the default migration for creating the users table and add the custom fields that we’re going to use:
// database/migrations/<timestamp>_create_users_table.php
public function up()
{
    Schema::create('users', function (Blueprint $table) {
        $table->id();
        $table->string('name');
        $table->string('email')->unique();
        $table->enum('user_type', ['admin', 'user'])->default('user'); // add this
        $table->tinyInteger('age'); // add this
        $table->string('address')->nullable(); // add this
        $table->timestamp('email_verified_at')->nullable();
        $table->string('password');
        $table->rememberToken();
        $table->timestamps();
    });
}
Next, update the database/factories/UserFactory.php file and supply values to the custom fields that we’ve added:
// database/factories/UserFactory.php
public function definition()
{
    return [
        'name' => $this->faker->name,
        'email' => $this->faker->unique()->safeEmail,
        'email_verified_at' => now(),
        'password' => '$2y$10$92IXUNpkjO0rOQ5byMi.Ye4oKoEa3Ro9llC/.og/at2.uheWG/igi', // password
        'remember_token' => Str::random(10),

        // add these
        'user_type' => 'user',
        'age' => $this->faker->numberBetween(18, 60),
        'address' => $this->faker->address,
    ];
}
Lastly, open the database/seeders/DatabaseSeeder.php file and uncomment the call to create dummy users:
// database/seeders/DatabaseSeeder.php
public function run()
{
    \App\Models\User::factory(100)->create();
}
Don’t forget to update your .env file with the test database you’re going to use. In this case, I’ve named the database as livecrud. Once that’s done, run the migrations and the seeder to populate the database:
php artisan migrate
php artisan db:seed
Setting up front-end dependencies
To simplify things, we’re going to use Laravel scaffold for Bootstrap. To use that, you first need to install the laravel/ui package:
composer require laravel/ui
Next, install Bootstrap 4. This adds the config on your webpack.mix.js file and creates the resources/js/app.js and resources/sass/app.scss files:
php artisan ui bootstrap
Next, add Font Awsome to the resources/sass/app.scss file. By default, there should already be the fonts, variables, and bootstrap imports in there:
// Fonts
@import url("https://fonts.googleapis.com/css?family=Nunito");

// Variables
@import "variables";

// Bootstrap
@import "~bootstrap/scss/bootstrap";

// add these:
@import "~@fortawesome/fontawesome-free/scss/fontawesome";
@import "~@fortawesome/fontawesome-free/scss/brands";
@import "~@fortawesome/fontawesome-free/scss/regular";
@import "~@fortawesome/fontawesome-free/scss/solid";
Once that’s done, install all the dependencies:
npm install @fortawesome/fontawesome-free
npm install
Create the Livewire Component
You can use the make:livewire command to create a new Livewire component:
php artisan make:livewire LiveTable
This will create the following files:
app/Http/Livewire/LiveTable.php— the controller for the componentresources/views/livewire/live-table.blade.php— the view file for the component
Open the resources/views/livewire/live-table.blade.php file and add the following:
<div>
    <div class="row mb-4">
        <div class="col-md-12">
          <div class="float-right mt-5">
              <input wire:model="search" class="form-control" type="text" placeholder="Search Users...">
          </div>
        </div>
    </div>

    <div class="row">
        @if ($users->count())
        <table class="table">
            <thead>
                <tr>
                    <th>
                        <a wire:click.prevent="sortBy('name')" role="button" href="#">
                            Name
                            @include('includes.sort-icon', ['field' => 'name'])
                        </a>
                    </th>
                    <th>
                        <a wire:click.prevent="sortBy('email')" role="button" href="#">
                            Email
                            @include('includes.sort-icon', ['field' => 'email'])
                        </a>
                    </th>
                    <th>
                        <a wire:click.prevent="sortBy('address')" role="button" href="#">
                            Address
                            @include('includes.sort-icon', ['field' => 'address'])
                        </a>
                    </th>
                    <th>
                        <a wire:click.prevent="sortBy('age')" role="button" href="#">
                            Age
                            @include('includes.sort-icon', ['field' => 'age'])
                        </a>
                    </th>
                    <th>
                        <a wire:click.prevent="sortBy('created_at')" role="button" href="#">
                        Created at
                        @include('includes.sort-icon', ['field' => 'created_at'])
                        </a>
                    </th>
                    <th>
                        Delete
                    </th>
                    <th>
                        Edit
                    </th>
                </tr>
            </thead>
            <tbody>
                @foreach ($users as $user)
                    <tr>
                        <td>{{ $user->name }}</td>
                        <td>{{ $user->email }}</td>
                        <td>{{ $user->address }}</td>
                        <td>{{ $user->age }}</td>
                        <td>{{ $user->created_at->format('m-d-Y') }}</td>
                        <td>
                            <button class="btn btn-sm btn-danger">
                            Delete
                            </button>
                        </td>
                        <td>
                            <button class="btn btn-sm btn-dark">
                            Edit
                            </button>
                        </td>
                    </tr>
                @endforeach
            </tbody>
        </table>
        @else
            <div class="alert alert-warning">
                Your query returned zero results.
            </div>
        @endif
    </div>

    <div class="row">
        <div class="col">
            {{ $users->links() }}
        </div>
    </div>
</div>
That’s a lot of code, so let’s break it down from top to bottom. First, we have the search field for searching for users. We want the users to be able to see the results of their query as they type. The way we implement that is by using wire:model. This allows us to pass in the name of the variable from the component class (LiveTable). Whatever the user types in this field will then be synced to the value for that variable. In this case, we’re binding the search variable:
<input wire:model="search" class="form-control" type="text" placeholder="Search Users...">
Later on in the code for the LiveTable component class, you’ll see the bound variable like in the below code. These are called properties in Livewire. If you’re coming from Vue, then this is the equivalent of the state. Only public properties can be accessed directly from the front end:
// app/Http/Livewire/LiveTable.php
<?php
class LiveTable extends Component
{
  public $search = ''; // don't add this yet
}
Next, we have the table headers. Here we’re using wire:click.prevent to listen for click events in the link element. These are called actions in Livewire. They essentially allow you to listen for browser events but respond to it using methods in the back end. Using .prevent prevents the default browser action. The value you supply to this is the name of the method you want to execute in the component class. In this case it’s sortBy. Then we’re passing in the name of the column we want to sort:
<th>
  <a wire:click.prevent="sortBy('name')" role="button" href="#">
      Name
      @include('includes.sort-icon', ['field' => 'name'])
  </a>
</th>
Here’s what the corresponding method in the component class looks like. We’ll add the code for this later:
// app/Http/Livewire/LiveTable.php
public function sortBy($field)
{
  //
}
In the above code, we’ve included another view file called sort-icon. Create a resources/views/includes/sort-icon.blade.php file and add the following. This will render the current sorting icon based on the current sort selected by the user:
@if ($sortField !== $field)
    <i class="text-muted fas fa-sort"></i>
@elseif ($sortAsc)
    <i class="fas fa-sort-up"></i>
@else
    <i class="fas fa-sort-down"></i>
@endif
That’s pretty much it for the markup. The rest of the code is basically the same as your standard Blade template. So we still use the links() method to show the pagination and the @if directive to conditionally show something.
We now move on to the component class. Open the app/Http/Livewire/LiveTable.php file and update it so it contains the following code:
<?php

namespace App\Http\Livewire;

use Livewire\Component;
use Livewire\WithPagination;
use App\Models\User;

class LiveTable extends Component
{
    use WithPagination;

    public $sortField = 'name'; // default sorting field
    public $sortAsc = true; // default sort direction
    public $search = '';

    public function sortBy($field)
    {
        if ($this->sortField === $field) {
            $this->sortAsc = !$this->sortAsc;
        } else {
            $this->sortAsc = true;
        }

        $this->sortField = $field;
    }

    public function render()
    {
        return view('livewire.live-table', [
            'users' => User::search($this->search)
                ->orderBy($this->sortField, $this->sortAsc ? 'asc' : 'desc')
                ->simplePaginate(10),
        ]);
    }
}
As mentioned earlier, we’ve bound the value of the search variable to a specific text field in the client-side via the wire:model. So every time the user types something, the search variable is also updated. And when it’s updated, the component is also re-rendered. This is because in the render() function we’re depending on the value of the search variable to fetch user data. So for each keystroke, we’re actually fetching data from the database by supplying the user’s query and selected sort (we’ll take a look at how to improve this later in the Optimizations section):
User::search($this->search)
                ->orderBy($this->sortField, $this->sortAsc ? 'asc' : 'desc')
                ->simplePaginate(10)
The sortBy() method is what we use to update the field for sorting the users table. Each field can be sorted by either ascending or descending order. By default, clicking on a sorting field will sort it by ascending. Clicking it again will simply do the opposite:
public function sortBy($field)
{
    if ($this->sortField === $field) {
        $this->sortAsc = !$this->sortAsc; // if field is already sorted, use the opposite instead
    } else {
        $this->sortAsc = true; // sort selected field by ascending by default
    }

    $this->sortField = $field;
}
When filtering the users table, we use the search() method. But we haven’t added that yet. Update the app/Models/User.php file to include the search() method. This filters the user table to only return users of type user. Then the rest of the conditions will be the fields we want to use for filtering the search field:
protected $casts = [
    //
];

public static function search($query)
{
    return empty($query) ? static::query()->where('user_type', 'user')
        : static::where('user_type', 'user')
            ->where(function($q) use ($query) {
                $q
                    ->where('name', 'LIKE', '%'. $query . '%')
                    ->orWhere('email', 'LIKE', '%' . $query . '%')
                    ->orWhere('address', 'LIKE ', '%' . $query . '%');
            });
}
Using the Livewire Component
Once that’s done, the search and sort functionality should be good to go. Open your routes/web.php file and replace the existing route with the following:
Route::get('/', function () {
    return view('index');
});
Next, create a resources/views/index.blade.php file and add the following. This is where we use the Live Table component we created. We can render it into the page the same way you would with a standard component. The only difference is that we need to prefix the component name with livewire: and we also need to use @livewireScripts to render the Livewire JavaScript file:
<!DOCTYPE html>
<html lang="en">
<head>
    <meta charset="UTF-8">
    <meta name="viewport" content="width=device-width, initial-scale=1.0">
    <title>{{ config('app.name') }}</title>
    <link rel="stylesheet" type="text/css" href="{{ asset('css/app.css') }}">
</head>
<body>

    <div class="container">
        <div class="row justify-content-center">
            <div class="col-md-9">
                <livewire:live-table />
            </div>
        </div>
    </div>

    @livewireScripts
    <script src="{{ asset('js/app.js') }}"></script>

</body>
</html>
At this point, you can now start running the app. The easiest way is to serve the project using Artisan:
php artisan serve
Then access the app in your browser at http://127.0.0.1:8000/.
If you’ve set up a local domain, either via Laravel Valet or some other tool, then you can use that as well.
Deleting Users
Next, let’s implement the deletion of users. Just like earlier, we use wire:click to listen for click events on the delete button. Only this time, we won’t be calling a method in the component class directly. That’s because this is a delete operation. We don’t want the users to mistakenly delete someone so we need to show some sort of confirmation before we proceed with the deletion. This is the perfect use case for Livewire Events. This allows us to send and receive specific events to and from the server. You can use it by calling the $emit() method. Its first argument will be the name of the event, while the ones that follow are the arguments you want to pass to the listener for that event. In this case, we have the deleteTriggered event and we’re passing in the ID and name of the user as arguments to the listener.
Open the resources/views/livewire/live-table.blade.php file and update the code for the delete button:
<button class="btn btn-sm btn-danger" wire:click="$emit('deleteTriggered', {{ $user->id }}, '{{ $user->name }}')">
  Delete
</button>
We can then listen for that event either on the server or on the client side. Since all we want is to show a confirmation when this event is triggered, we listen for it on the client side. Create a resources/js/users.js file and add the following. As you can see, we get access to the id and name of the user via the arguments passed to the listener:
Livewire.on("deleteTriggered", (id, name) => {
    const proceed = confirm(`Are you sure you want to delete ${name}`);

    if (proceed) {
        Livewire.emit("delete", id);
    }
});
Once the user agrees, we emit the event which will actually delete the user. To listen for events in the back end, create a $listeners array which contains the name of the listeners and the class methods they map to. In this case, the name of the event and the method is the same so we simply add delete. The delete() method will then delete the user with the corresponding id:
// app/Http/Livewire/LiveTable.php
protected $listeners = ['delete'];

public function sortBy($field)
{
    //
}

public function delete($id)
{
    User::find($id)
        ->delete();
}
If you want some sort of notification when the user is deleted, you can dispatch a browser event:
User::find($id)
        ->delete();
$this->dispatchBrowserEvent('user-deleted', ['user_name' => $user->name]); // add this
Then on the client side, listen for this event via the standard browser event listener API. Here, we’re simply showing an alert which contains the name of the deleted user:
// resources/js/users.js
window.addEventListener("user-deleted", (event) => {
    alert(`${event.detail.user_name} was deleted!`);
});
Lastly, don’t forget to add the users.js file to webpack.mix.js:
// webpack.mix.js
mix.js("resources/js/app.js", "public/js")
    .sass("resources/sass/app.scss", "public/css")
    .js("resources/js/users.js", "public/js") // add this
    .sourceMaps();
At this point, deleting users should now work if you try it on your browser.
Creating New Users
Let’s proceed with creating new users. Open the resources/views/livewire/live-table.blade.php file and add the button for creating a new user. Again, we’re using wire:click to trigger an event called triggerCreate:
<div>
    <div class="row mb-4">
        <div class="col-md-12">
            <div class="float-left mt-5">
                <button class="btn btn-success" wire:click="$emit('triggerCreate')">Create New User</button>
            </div>

            <div class="float-right mt-5">
                <input wire:model="search" class="form-control" type="text" placeholder="Search Users...">
            </div>
        </div>
    </div>

    <!-- code for the users table from earlier -->
    <div class="row">
        @if ($users->count())
        @endif
    </div>
</div>
Then in your resources/js/users.js file, listen for this event and open the modal:
Livewire.on("triggerCreate", () => {
    $("#user-modal").modal("show");
});
Note: the above code isn’t really the “Livewire Purist” way of doing things. Normally, if you’re using Livewire you want all the interactivity to be handled by Livewire and that includes modals. In this case, we’re using jQuery to open the modal. This is forgivable since it’s just one line of code. But if you want to use Livewire, the correct way of doing things is to use Livewire for everything. You can’t mix and match it with jQuery. This will help in making things easier when you need to add front-end tests later on.
We haven’t actually created the Livewire component yet, so let’s go ahead and do that:
php artisan make:livewire UserForm
Just like the Live Table, this creates the component class as well as the view file:
app/Http/Livewire/UserForm.phpresources/views/livewire/user-form.blade.php
First, open the view file and add the following. This code will look familiar because most of it is just a standard Blade template for rendering a form. The only difference is that we’ve sprinkled it with some Livewire attributes, all of which you’re already familiar with:
<!-- resources/views/livewire/user-form.blade.php -->
<div>
    <form wire:submit.prevent="save">
        <div class="form-group">
            <label for="name">Name</label>
            <input type="text" class="form-control" id="name" name="name" wire:model="name">
            @error('name') <span class="text-danger">{{ $message }}</span> @enderror
        </div>

        <div class="form-group">
            <label for="exampleInputPassword1">Email</label>
            <input type="email" class="form-control" id="email" name="email" wire:model="email">
            @error('email') <span class="text-danger">{{ $message }}</span> @enderror
        </div>

        <div class="form-group">
            <label for="age">Age</label>
            <input type="number" class="form-control" id="age" name="age" wire:model="age">
            @error('age') <span class="text-danger">{{ $message }}</span> @enderror
        </div>

        <div class="form-group">
            <label for="address">Address</label>
            <input type="text" class="form-control" id="address" name="address" wire:model="address">
            @error('address') <span class="text-danger">{{ $message }}</span> @enderror
        </div>

        <button class="btn btn-primary" type="submit">Save</button>
    </form>
</div>
At this point, you already know that wire:submit.prevent="save" will be fired when the save button is clicked. .prevent prevents the default action, which is the actual submission of the form. Then we use wire:model to bind each field to a specific property in the component class.
Another thing with this code: this is the standard Blade template code for showing form errors. You might be wondering what it’s doing here when we’re in a Livewire component. Well, the answer is that Livewire can also utilize this code to show us form errors. So if a user didn’t supply a value to a specific field when they submit the form, the server is going to squawk and it will trigger these errors to show up:
@error('name') <span class="text-danger">{{ $message }}</span> @enderror
Next, open the resources/views/index.blade.php file and add the markup for the modal:
<div class="container">
<div class="row justify-content-center">
<div class="col-md-9">
<livewire:live-table />
</div>
</div>
</div>
<!-- add this -->
<div class="modal" tabindex="-1" role="dialog" id="user-modal">
<div class="modal-dialog" role="document">
<div class="modal-content">
<div class="modal-header">
<h5 class="modal-title">User</h5>
<button type="button" class="close" data-dismiss="modal" aria-label="Close">
<span aria-hidden="true">×</span>
</button>
</div>
<div class="modal-body">
<livewire:user-form>
</div>
</div>
</div>
</div>
Now that we have the code for the front-end side, let’s take a look at the back end. Open the app/Http/Livewire/UserForm.php and add the following:
<?php

namespace App\Http\Livewire;

use Livewire\Component;
use App\Models\User; // add this

class UserForm extends Component
{

    // add these
    public $name;
    public $email;
    public $age;
    public $address;

    public function render()
    {
        return view('livewire.user-form');
    }

    // add this
    public function save()
    {
        $validated = $this->validate([
            'name' => 'required|min:10',
            'email' => 'required|email|min:10',
            'age' => 'required|integer',
            'address' => 'required|min:10',
        ]);

        User::create(array_merge($validated, [
            'user_type' => 'user',
            'password' => bcrypt($this->email)
        ]));

        $this->resetForm();
        $this->dispatchBrowserEvent('user-saved', ['action' => 'created', 'user_name' => $this->name]);
        $this->emitTo('live-table', 'triggerRefresh');
    }

    public function resetForm()
    {
        $this->user_id = null;
        $this->name = null;
        $this->email = null;
        $this->age = null;
        $this->address = null;
    }

}
That’s a lot, but most of it should already make sense to you, since we’ve already used them previously. So I won’t go through them in detail. Instead, let’s just go over the reasoning why I’ve coded it in a certain way.
First is the way I validated the form. Nothing new here. This is just the standard Laravel form validation code. But why did I use this instead of a Request class? That’s because Livewire’s way of doing things is not compatible with the Request class. Basically, the Laravel Request class only works for standard HTTP request. This means that it redirects the user to the previous page if there’s a validation error. We can’t really have that in Livewire, since everything is done via AJAX:
$validated = $this->validate([
    'name' => 'required|min:10',
    'email' => 'required|email|min:10',
    'age' => 'required|integer',
    'address' => 'required|min:10',
]);
Next is this bit of code. Here we’re using emitTo() instead of emit(). This gives the ability for different components to communicate with each other via events. It accepts the name of the component as the first argument and the name of the event as the second:
$this->dispatchBrowserEvent('user-saved', ['action' => 'created', 'user_name' => $this->name]);
$this->emitTo('live-table', 'triggerRefresh');
Why do we make use of two separate events (one browser event and one Livewire event) when we can use only one? Well, it’s true that we can use just a single event. The problem is that we also need to refresh the data table once the user is created. I currently don’t know of a way of to trigger reloading of a specific component from the client side, which is why I used two separate events — one for hiding the modal and showing an alert, and another for refreshing the data table.
Now that you know the reasoning behind the code, let’s proceed with the handlers for those events. Add the following to the resources/js/users.js file:
window.addEventListener("user-saved", (event) => {
    $("#user-modal").modal("hide");
    alert(`User ${event.detail.user_name} was ${event.detail.action}!`);
});
Then in your LiveTable component class, add the listener for triggerRefresh. This is a bit different from the delete listener, since we’re pointing to a $refresh function that we don’t actually need to declare as a class method. That’s because it’s a built-in method for all Livewire component classes which allows us to reload the whole component:
// app/Http/Livewire/LiveTable.php
    protected $listeners = ['delete', 'triggerRefresh' => '$refresh'];
At this point, users can now be created when you try it on your browser.
Updating Existing Users
The final bit of functionality that we’ll be implementing is the updating of users. Update the edit button in the resources/views/livewire/live-table.blade.php file with the following. Since we’re in the LiveTable component, and the edit functionality should be in the UserForm component, we have to use $emitTo() to emit the triggerEdit event to the UserForm component. Unlike before, where we only supplied individual values, here we’re supplying the whole user object:
<td>
    <button class="btn btn-sm btn-dark" wire:click="$emitTo('user-form', 'triggerEdit', {{ $user }})">Edit</button>
</td>
To listen for the triggerEdit event, open the app/Http/Livewire/UserForm.php file and add the following. The individual user object is passed to this function and we use it to populate the form fields with values. Note that instead of an object, you access individual fields just like you would in an array. Once that’s done, emit the dataFetched event:
protected $listeners = ['triggerEdit'];

public function resetForm()
{
    //
}

public function triggerEdit($user)
{
    $this->user_id = $user['id'];
    $this->name = $user['name'];
    $this->email = $user['email'];
    $this->age = $user['age'];
    $this->address = $user['address'];

    $this->emit('dataFetched', $user);
}
Listen for the dataFetched event in the client side. Since we’ve already populated the individual fields with values at that point, we can simply open the modal:
// resources/js/users.js
Livewire.on("dataFetched", (user) => {
  $("#user-modal").modal("show");
});
Lastly, update the save() method in the UserForm component class to handle updates as well. To do that, check for the value of the user_id field. If it has a value then it means that a user is currently being updated. Otherwise, we create it:
// app/Http/Livewire/UserForm.php
public function save()
{
    $validated = $this->validate([
        'name' => 'required|min:10',
        'email' => 'required|email|min:10',
        'age' => 'required|integer',
        'address' => 'required|min:10',
    ]);

    if ($this->user_id) {
        User::find($this->user_id)
            ->update([
                'name' => $this->name,
                'email' => $this->email,
                'age' => $this->age,
                'address' => $this->address,
            ]);

        $this->dispatchBrowserEvent('user-saved', ['action' => 'updated', 'user_name' => $this->name]);
    } else {
        User::create(array_merge($validated, [
            'user_type' => 'user',
            'password' => bcrypt($this->email)
        ]));

        $this->dispatchBrowserEvent('user-saved', ['action' => 'created', 'user_name' => $this->name]);
    }

    $this->resetForm();
    $this->emitTo('live-table', 'triggerRefresh');
}
At this point, user details can now be edited when you try it on your browser.
Optimizations
In this section, we’ll go through some of the optimizations you can do to make sure your app doesn’t make use of more server resources than it needs.
Search field
As you might have already noticed, typing on the search field will almost immediately trigger an AJAX request which pulls the updated data from the server. This sends a query to the database every time, so it’s not really ideal. By default, Livewire applies a 150ms debounce to inputs. We want to increase that delay so Livewire doesn’t send a request to the server while the user is still typing. The below code adds an 800ms debounce so there’s a noticeable delay. Play around with this value to make sure there’s a perfect balance:
<!-- resources/views/livewire/live-table.blade.php -->
<input wire:model.debounce.800ms="search">
Form fields
Another quick optimization we could do is the updating of the form fields in the user form. Just like the search field, a request is sent to the server almost instantly as you type in something. This time, instead of adding a debounce, we use lazy updating. This will send a request to the server only when the user focuses out of the text field:
<!-- resources/views/livewire/user-form.blade.php -->
<input wire:model.lazy="name">
Conclusion
That’s it! In this tutorial, you learned the basics of using Livewire to make your Laravel apps more dynamic without writing a whole bunch of JavaScript to fetch and submit data to the server.
Specifically, we’ve built a simple CRUD application that uses Livewire to remove the need for front-end packages like Datatables to implement table search and sorting. We’ve also removed the need for a full page refresh for form submissions. Lastly, we’ve utilized both Livewire events and browser events to get the front end and the back end to communicate with each other without the need to write AJAX code.
You can view the project source code on this GitHub repo.


