Form Validation with PHP


In this article, we’ll build and validate a small web form using HTML and PHP. The form is created using HTML, and validation and processing of the form’s contents is done with PHP. The goal of this article is to teach you some basic HTML form elements and how their data is accessible to you in your PHP scripts.
The form we’ll create contains a number of inputs: text fields, a radio button, a multiple-option select list, a checkbox, and a submit button. These inputs will be validated to ensure that the user has supplied a value for each one.
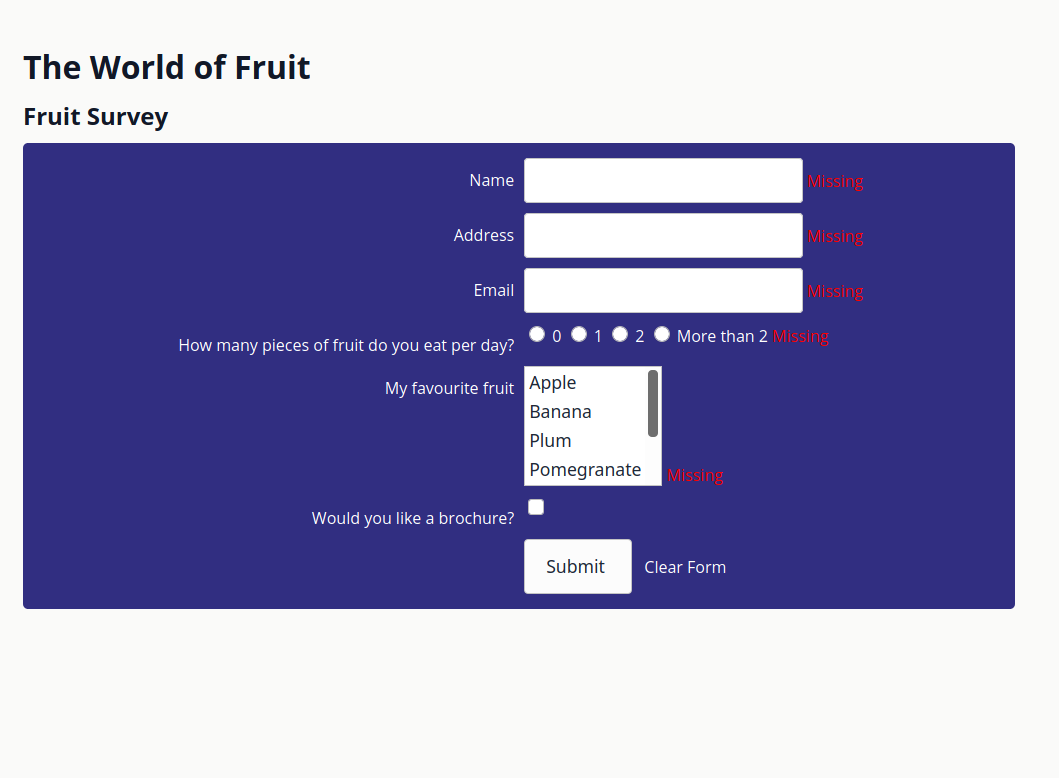
If one or more fields are empty, the form will be displayed again. This time, however, the empty fields will be have the error string “Missing” next to them. If none of the fields are empty, the supplied values will be displayed, in a simplistic fashion.
You can find the code for this article on GitHub.

The HTML Form
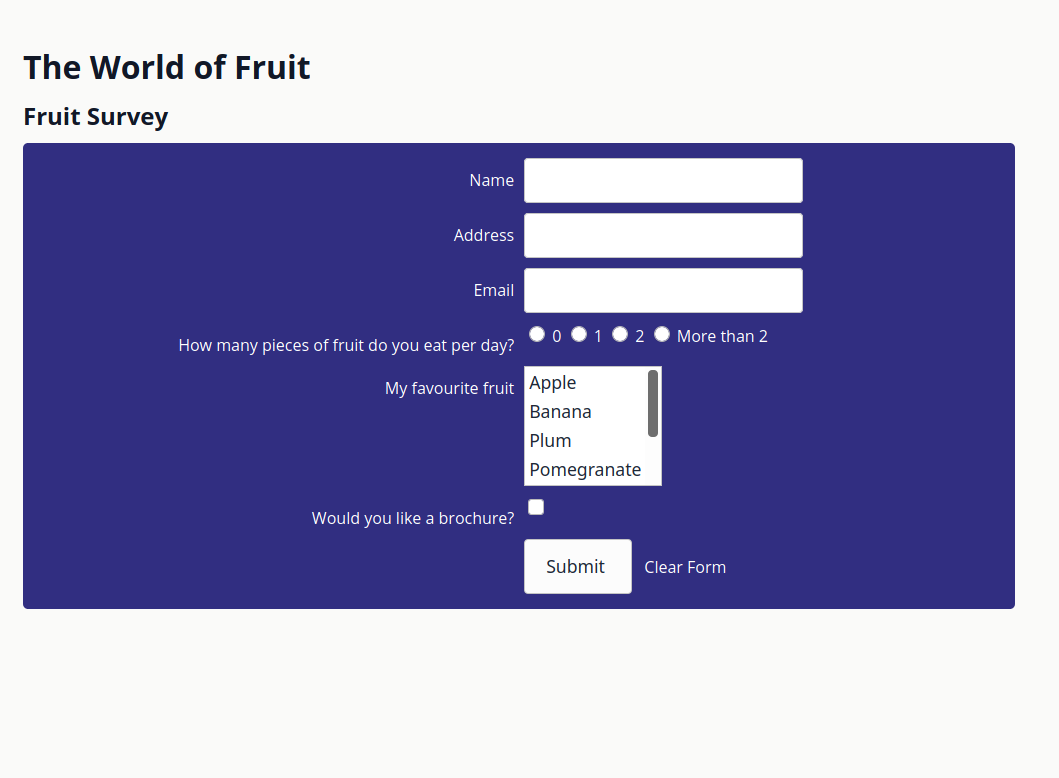
Let’s create the HTML form. The purpose of the form is for the fictitious company “The World of Fruit” to conduct a fruit survey of their customers. The form captures three things:
- The user’s details (name, address, and email address)
- The user’s fruit consumption preferences (amount of fruit they eat per day, and their favorite fruit)
- If the user would like a free brochure
Text Fields
The name, address, and email fields will be coded with label and input elements like this:
<label for="name">Name</label>
  <div>
    <input type="text" name="name" id="name" value="">
  </div>

<label for="address">Address</label>
  <div>
    <input type="text" name="address" id="address" value="">
  </div>

<label for="email">Email</label>
  <div>
    <input type="text" name="email" id="email" value="">
  </div>
HTML input elements have several attributes. Setting type to text defines them as single-line input fields that accept text. The name attribute is used to specify the field’s name, and is used to access the element during PHP processing. The ID attribute associates the input with its associated label (via the label’s for attribute), which makes the form more accessible.
Radio Buttons
The radio button stores how much fruit the user eats per day.
<label>
  <input type="radio" name="howMany" value="zero"> 0
</label>
<label>
  <input type="radio" name="howMany" value="one"> 1
</label>
<label>
  <input type="radio" name="howMany" value="two"> 2
</label>
<label>
  <input type="radio" name="howMany" value="twoplus"> More than 2
</label>
Setting type to radio renders the input as a radio button. Notice how each button is assigned the same name. This treats the radio buttons as a group, allowing the user to select 0, 1, or 2. The value attribute differs for each button to provide the different values that the user can choose from. Because the inputs are wrapped within the labels here, the for and id attributes aren’t needed.
Select List
The select element stores the user’s choice of favorite fruit:
<label for="favoriteFruit">My favorite fruit</label>
<div>
  <select name="favoriteFruit[]" id="favoriteFruit" size="4" multiple="">
    <option value="apple">Apple</option>
    <option value="banana">Banana</option>
    <option value="plum">Plum</option>
    <option value="pomegranate">Pomegranate</option>
    <option value="strawberry">Strawberry</option>
    <option value="watermelon">Watermelon</option>
  </select>
</div>
The name attribute is an array (defined by the square brackets after the name) because multiple choices are allowed (due to the presence of the multiple attribute). Without the multiple attribute, only one option would be selectable.
The value attribute for each option element is the value that will be submitted to the server, and the text between the opening and closing option tag is the value the user will see in the select menu. Each option element must have a distinct value.
Checkbox
<label for="brochure">Would you like a brochure?</label>
<div>
  <input type="checkbox" name="brochure" id="brochure" value="Yes">
</div>
A checkbox element is used to let the user choose if they want a brochure or not. Its value will be set to “Yes” if the box is checked. Otherwise, it will effectively be set to “No”.
Submit Button
<div>
  <input type="submit" name="submit" value="Submit">
</div>
Last but not least is the Submit button. The value of its value element is displayed as the button’s text. Clicking on it submits the form.
The Form Element
<form method="POST"
  action="<?php echo htmlspecialchars($_SERVER["PHP_SELF"]);?>">
Next comes the form element. While HTML forms support a number of attributes, only two attributes need to be set: action and method. method determines how the form’s content is submitted. action defines where the form contents are sent when the form is submitted.
Setting action to POST means that the form’s content is sent as part of the HTTP request’s body. The values are retrievable in PHP via the $_POST superglobal. The alternative to POST is GET, which passes the form’s values as part of the URL. Values sent using GET are retrievable in PHP via the $_GET superglobal.
The main difference between the methods POST and GET is visibility. There are numerous articles on the Web about choosing between them, but my advice is to stick to POST when using forms, unless you have a good reason to pass user data in a viewable URL.
In the example above, action is set to the result of passing the value of $_SERVER["PHP_SELF"], which is the name of the current script being executed, to PHP’s htmlspecialchars() method. This method is used to convert specific HTML characters to their HTML entity names. for example, > will be converted to >.
This does two things:
- It prevents the form from breaking, if the user submits HTML markup.
- It is a means of protecting against XSS (Cross-Site Scripting) attacks, which attackers will use to try to exploit vulnerabilities in web applications. To find out about other common vulnerabilities, check out the OWASP Top 10.
Note: in a real application, you’d likely use more than htmlspecialchars to sanitize form input, such as a third-party library like laminas-filter.
Using $_SERVER["PHP_SELF"] is preferable to simply hard-coding a location if you want your form to post back to the same script that generated it, since you won’t have to update the code if you change the script’s name.
Just before we finish up discussing forms, here are three things to remember when working with HTML forms:
- All the form controls must be enclosed within the
formtags. - The alignment of text and form controls can be achieved in many ways. CSS is the preferred option for this, especially with all the new layout tools available these days, including Flexbox and Grid. (Please don’t use tables for layout, as form elements are not tabular data!)
- For extra accessibility, it’s worth looking into the
fieldsetelement for grouping form elements.
Form Processing
Now that you’ve defined the form in HTML, let’s work through the code that processes the form. Before we do that, be aware that the form can be in one of two states:
- A blank form is loaded when the page is first loaded.
- The form is loaded if the form failed validation. In this state, the fields that the user filled out will contain the value supplied. The other fields will be empty with an error message next to them.
Validating the Form Contents
When the form is submitted, the following entries will be stored in the $_POST array (or $_GET array depending on the form’s method attribute). The values in the left-hand column are taken from the control’s name attribute, and I’ve also marked whether the field is a required field for validation purposes.
| Field | Type | Mandatory or Optional |
|---|---|---|
| name | single-value variable | mandatory |
| address | single-value variable | mandatory |
| single-value variable | mandatory | |
| howMany | single-value variable | mandatory – must select one |
| favoriteFruit | array | mandatory – must select one |
| brochure | single-value variable | optional |
If the user doesn’t comply with these rules, an error message will be displayed. Any fields already completed will be left unchanged, allowing the user to simply adjust their input and re-submit the form, without having to re-enter data.
Before we continue, the validation that we’re performing in the code in this article is extremely simplistic. Normally, you’d perform much more sophisticated validation, such as:
- whether certain fields are not longer than a certain length
- Whether an email address meets the email address specification
- if a start date was of the correct format and before or after a certain date
To do that, you’d likely use a third-party library, such as laminas-validator or the Symfony validation component
However, that’s outside the scope of this article.
Let’s look at the PHP required for validating the form, which is placed at the top of the page, before the HTML for the form:
<?php
$errors = [];
$fields = ['name', 'address', 'email', 'howMany', 'favoriteFruit', 'brochure'];
$optionalFields = ['brochure'];
$values = [];
if ($_SERVER["REQUEST_METHOD"] == "POST") {
    foreach ($fields as $field) {
        if (empty($_POST[$field]) && !in_array($field, $optionalFields)) {
            $errors[] = $field;
        } else {
            $values[$field] = $_POST[$field];
        }
    }
The code initializes three arrays:
$errors: initially empty, this stores the form fields that failed validation$fields: this stores all the field names to be processed$optionalFields: this stores the field names that are optional$values: initially empty, this is an associative array that will contain the supplied fields and their values
After that, it checks if the method used to submit the form was set to POST. If so, it iterates over the values in the array and checks if the $_POST superglobal contains the relevant field name. If so, and the field has a value, the field and its value is stored in the $values array. However, if the field is empty, and it’s not in the $optionalFields array, it’s added to the $errors array.
In the example here, we’re checking the $_POST array because the form’s method is set to POST. If method was set to GET, the code would be updated to check the $_GET superglobal instead.
After checking the submission for errors, in a rather rudimentary way, the code prints out the values that the user submitted, if no errors were recorded:
    if (empty($errors)) {
        foreach ($fields as $field) {
            if ($field === "favoriteFruit") {
                printf("%s: %s<br />", $field, var_export($_POST[$field], TRUE));
            } else {
                printf("%s: %s<br />", $field, $_POST[$field]);
            }
        };
        exit;
    }
}
After running this code, the HTML for the page is rendered. Given that we’re going to render the form again with the values the user supplied, we need to update the form a little. Specifically, some PHP code needs to be incorporated into the HTML for each element.
For the input fields, we’ll update them to set their values as in the following example, which populates the value of the name field:
<input type="text"
       name="name"
       value="<?php echo htmlspecialchars($values['name']);?>">
htmlspecialchars() is used here for the same reason it was used earlier with PHP_SELF – to protect against XSS attacks. Then the following HTML will be added after the input field to display an error message if a value wasn’t supplied:
<?php if (in_array('name', $errors)): ?>
  <span class="error">Missing</span>
<?php endif; ?>
The use of the class error provides a hook for styling the error message using CSS:
.error {
  color: #FF0000;
}
Extending the Form’s Usability
With a little more effort, you can also remember the choices the user made from the radio buttons and select:
<input type="radio" name="howMany"
 <?php if (isset($howMany) && $howMany == "zero") echo "checked"; ?>
 value="zero"> 0
<input type="radio" name="howMany"
 <?php if (isset($howMany) && $howMany == "one") echo "checked"; ?>
 value="one"> 1
<input type="radio" name="howMany"
 <?php if (isset($howMany) && $howMany == "two") echo "checked"; ?>
 value="two"> 2
<input type="radio" name="howMany"
 <?php if (isset($howMany) && $howMany == "twoplus") echo "checked"; ?>
 value="twoplus"> More than 2
Code has been added to check whether the variable associated with the radio button has been defined within the validation section. If so, checked is outputted as part of the element’s HTML.
Now to address the select menu. It’s actually a better idea to restructure the code as a loop than to blindly add code to check each option manually. The loop can generate the HTML for the options on the fly, and the check for whether the option has been selected or not can be incorporated into it:
<select name="favoriteFruit[]" size="4" multiple="">
<?php
$options = ["apple", "banana", "plum", "pomegranate", "strawberry", "watermelon"];
foreach ($options as $option) {
    printf(
        '<option value="%s" %s>%s</option>',
        $option,
        (in_array($option, $values['favoriteFruit'])) ? "selected" : '', ucfirst($option)
    );
}
?>
</select>
If you’re not yet familiar with PHP loops, you may want to read the “Learning Loops” article.
Note that the difference here is the use of the attribute selected: radio buttons use checked, while select options use selected. It’s just one of those minor inconsistencies we have to live with.
One topic that I haven’t addressed and is outside the scope of this article is what you would do with the data after validation is successful. There are a number of possibilities, including saving it in a database or emailing the data to yourself. Whichever you choose, you need to be sure that:
- the form has been submitted by the user
- the data entered by the user is error-free
Summary
Validation is essential, particularly if you’re going to save the submitted data in a database, or some other form of persistent storage. When validating, it pays to remember the old saying GIGO (Garbage In, Garbage Out), and you won’t go far wrong.
In this article, you’ve learned four things:
- how to create a basic HTML form
- how to validate the form with PHP
- how to re-display user input
- how to display error messages
For further information on $_SERVER, $_POST, and $_GET, read the article “Introducing Superglobals” and, of course, the PHP documentation.