Build a React Native Application & Authenticate with OAuth 2.0
This article was originally published on the Okta Developer Blog. Thank you for supporting the partners who make SitePoint possible.
With Okta and OpenID Connect (OIDC), you can easily integrate authentication into a React Native application and never have to build it yourself again. OIDC allows you to authenticate directly against the Okta API, and this article shows you how to do just that in a React Native application. Today you’ll see how to log a user into your React Native application using an OIDC redirect via the AppAuth library.
React Native is a pretty slick framework. Unlike Ionic and other hybrid mobile frameworks, it allows you to use web technologies (React and JavaScript) to build native mobile apps. There is no browser or WebView involved, so developing a mobile app with React Native is similar to using the native SDK in that you’ll do all your testing on an emulator or device. There is no way to test it in your browser like there is with Ionic. This can be a benefit in that you don’t have to write code that works in-browser and on-device separately.
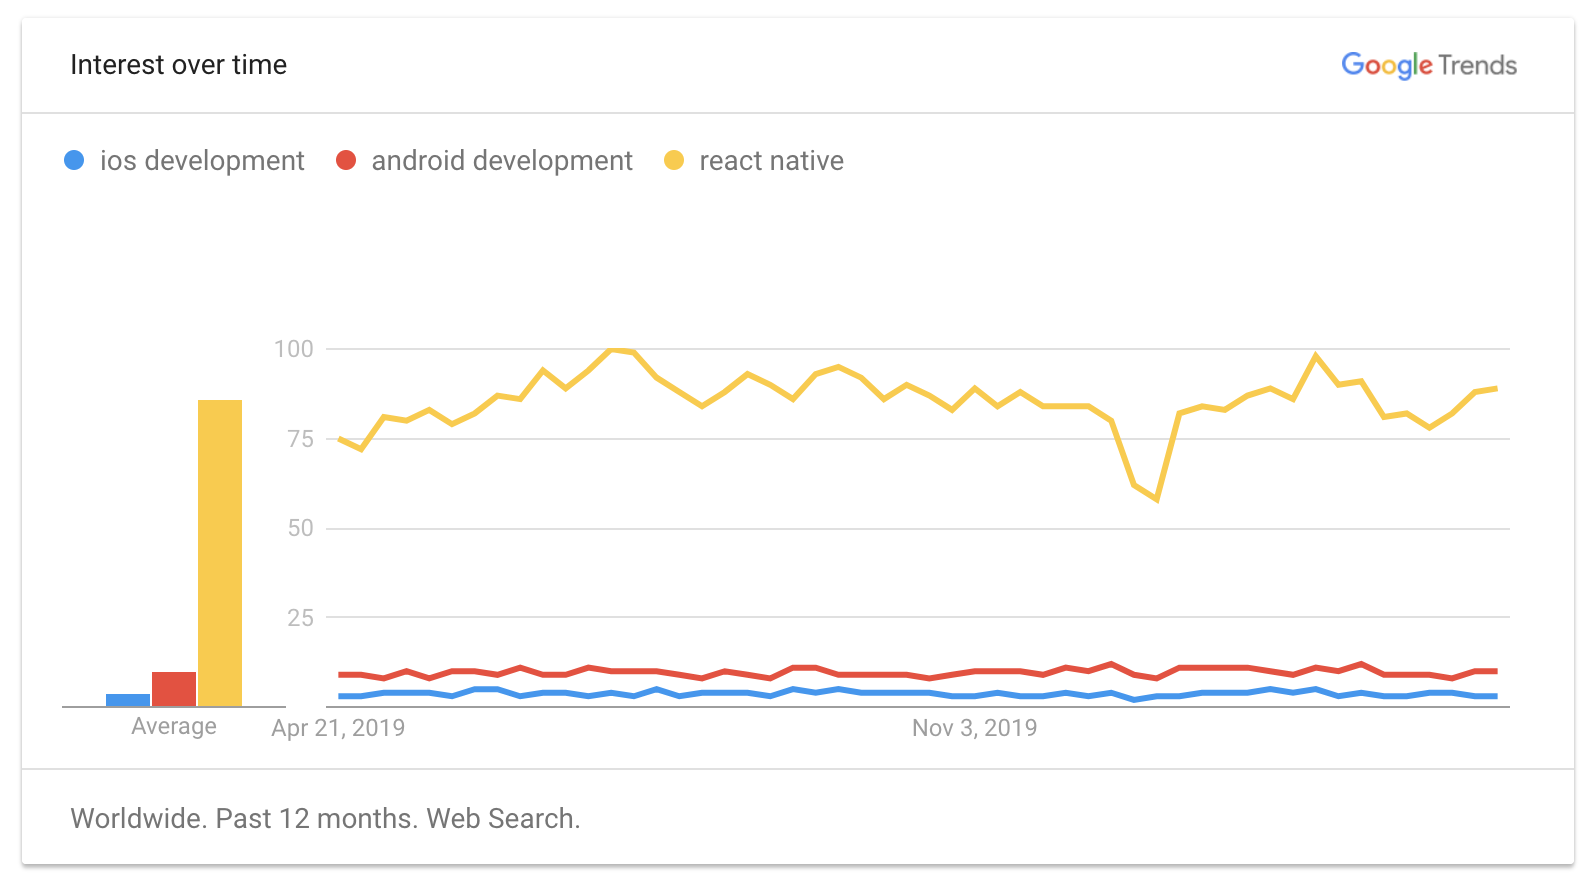
If you look at Google Trends, you can see that React Native is even more popular than Android and iOS for native development!
Today I’m going to show you how to develop a React Native app with the latest and greatest releases. At the time of this writing, that’s React 16.2.0 and React Native 0.54.0. You’ll create a new app, add AppAuth for authentication, authenticate with Okta, and see it running on both iOS and Android.
AppAuth is a client SDK for native apps to authenticate and authorize end-users using OAuth 2.0 and OpenID Connect. Available for iOS, macOS, Android and Native JS environments, it implements modern security and usability best practices for native app authentication and authorization.
Create Your React Native Application
React has a create-react-app command-line tool (CLI) that you can use to create new React apps. React Native has a similar tool called Create React Native App. Before you install it, make sure you have Node v6 or later installed.
Install create-react-native-app and create a new project called okta-rn:
npm install -g create-react-native-app
create-react-native-app okta-rn
cd okta-rn
npm start
Running these commands will result in your terminal prompting you with some options:
To view your app with live reloading, point the Expo app to this QR code.
You'll find the QR scanner on the Projects tab of the app.

[QR Code]

Or enter this address in the Expo app's search bar:

  exp://172.31.98.12:19000

Your phone will need to be on the same local network as this computer.
For links to install the Expo app, please visit https://expo.io.

Logs from serving your app will appear here. Press Ctrl+C at any time to stop.

 › Press a to open Android device or emulator, or i to open iOS emulator.
 › Press q to display QR code.
 › Press r to restart packager, or R to restart packager and clear cache.
 › Press d to toggle development mode. (current mode: development)
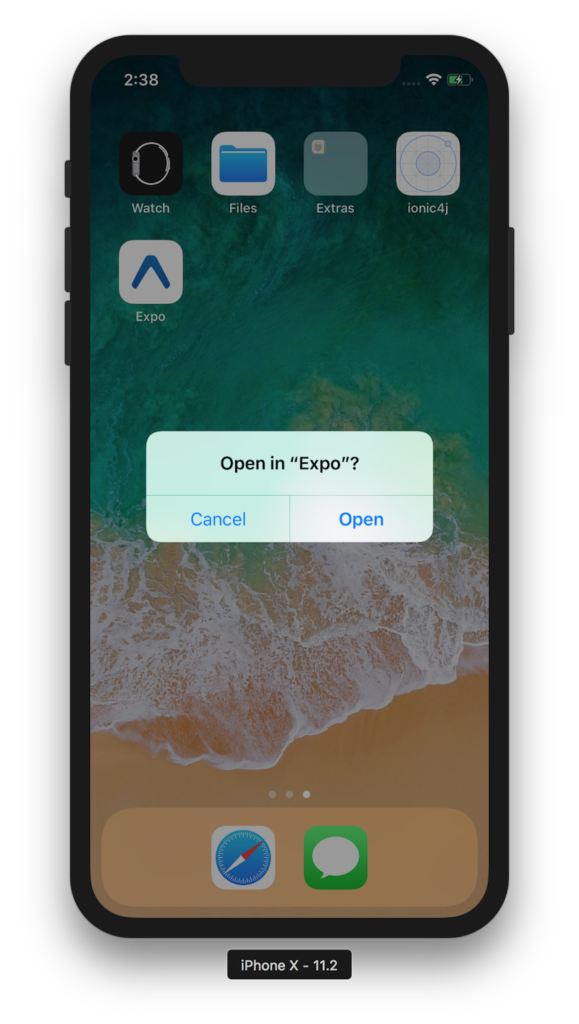
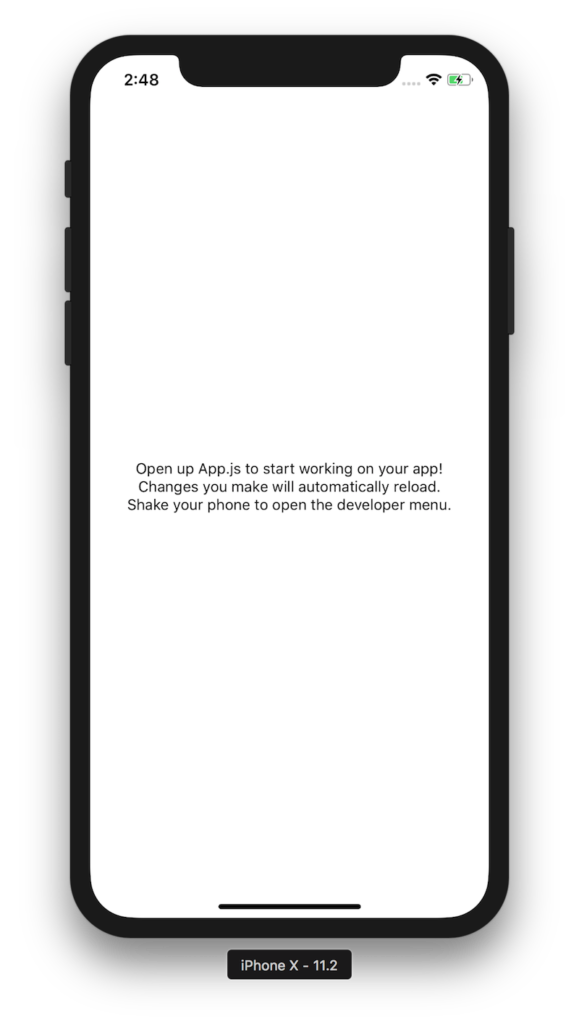
If you’re on a Mac, press i to open iOS emulator. You will be prompted to install/open with Expo, then presented with the rendered App.js.
If you’re on Windows or Linux, I’d suggest trying the Android emulator or your Android device (if you have one). If it doesn’t work, don’t worry, I’ll show you how to make that work later on.
TIP: You can use TypeScript instead of JavaScript in your React Native app using Microsoft’s TypeScript React Native Starter. If you decide to go this route, I’d recommend following the steps to convert your app after you’ve completed this tutorial.
React Native and OAuth 2.0
In this example, I’ll use React Native App Auth, a library created by Formidable. The reason I’m using this library is three-fold: 1) they provide an excellent example that I was able to make work in just a few minutes, 2) it uses AppAuth (a mature OAuth client implementation), and 3) I was unable to get anything else working.
- I tried react-native-oauth but discovered it required using an existing provider before adding a new one. I only wanted to have Okta as a provider. Also, it’s high number of issues and pull requests served as a warning sign.
- I tried react-native-simple-auth but had problems getting the deprecated Navigator component to work with the latest React Native release.
- I tried doing this OAuth 2 with React Native tutorial, but also had problems redirecting back to my app.
Create Native Application in Okta
Before you add AppAuth to your React Native application, you’ll need an app to authorize against. If you don’t have a free-forever Okta Developer account, get one today!
Log in to your Okta Developer account and navigate to Applications > Add Application. Click Native and click Next. Give the app a name you’ll remember (e.g., React Native), select Refresh Token as a grant type, in addition to the default Authorization Code. Copy the Login redirect URI (e.g., com.oktapreview.dev-158606:/callback) and save it somewhere. You’ll need this value when configuring your app.
Click Done and you should see a client ID on the next screen. Copy and save this value as well.
Add React Native AppAuth for Authentication
You’ll need to “eject” the native configuration for your app, which is normally hidden by create-react-native-app.
npm run eject
When prompted to answer questions, use the following answers:
| Question | Answer |
|---|---|
| How would you like to eject from create-react-native-app? | React Native |
| What should your app appear as on a user’s home screen? | Okta RN |
| What should your Android Studio and Xcode projects be called? | OktaRN |
To install App Auth for React Native, run the following commands:
npm i react-native-app-auth@2.2.0
npm i
react-native link
After running these commands, you have to configure the native iOS projects. I’ve copied the steps below for your convenience.
iOS Setup
React Native App Auth depends on AppAuth-ios, so you have to configure it as a dependency. The easiest way to do that is to use CocoaPods. To install CocoaPods, run the following command:
sudo gem install cocoapods
Create a Podfile in the ios directory of your project that specifies AppAuth-ios as a dependency. Make sure that OktaRN matches the app name you specified when running npm run eject.
platform :ios, '11.0'

target 'OktaRN' do
  pod 'AppAuth', '>= 0.91'
end
Then run pod install from the ios directory. This can take a while the first time, even on a fast connection. Now is a good time to grab a coffee or a scotch! 🥃
Open your project in Xcode by running open OktaRN.xcworkspace from the ios directory.
If you intend to support iOS 10 and older, you need to define the supported redirect URL schemes in ios/OktaRN/Info.plist as follows:
<key>CFBundleURLTypes</key>
<array>
  <dict>
    <key>CFBundleURLName</key>
    <string>$(PRODUCT_BUNDLE_IDENTIFIER)</string>
    <key>CFBundleURLSchemes</key>
    <array>
      <string>{yourReversedOktaDomain}</string>
    </array>
  </dict>
</array>
Below is what mine looks like after I changed my app identifier and added this key.
<key>CFBundleIdentifier</key>
<string>com.okta.developer.reactnative.$(PRODUCT_NAME:rfc1034identifier)</string>
<key>CFBundleURLTypes</key>
<array>
  <dict>
    <key>CFBundleURLName</key>
    <string>$(PRODUCT_BUNDLE_IDENTIFIER)</string>
    <key>CFBundleURLSchemes</key>
    <array>
      <string>com.oktapreview.dev-158606</string>
    </array>
  </dict>
</array>
Open AppDelegate.h in your Xcode project (OktaRN > OktaRN > AppDelegate.h) and add the lines with the + next to them below.
+ @protocol OIDAuthorizationFlowSession;

  @interface AppDelegate : UIResponder <UIApplicationDelegate>
+ @property(nonatomic, strong, nullable) id<OIDAuthorizationFlowSession> currentAuthorizationFlow;
  @property (nonatomic, strong) UIWindow *window;
  @end
This property holds the authorization flow information that started before you redirect to Okta. After Okta authorizes you, it redirects to the redirect_uri that’s passed in.
The authorization flow starts from an openURL() app delegate method. To add it, open AppDelegate.m and import AppAuth.h.
#import "AppAuth.h"
Then at the bottom of the class (before @end), add the openURL() method.
- (BOOL)application:(UIApplication *)app
            openURL:(NSURL *)url
            options:(NSDictionary<NSString *, id> *)options {
  if ([_currentAuthorizationFlow resumeAuthorizationFlowWithURL:url]) {
    _currentAuthorizationFlow = nil;
    return YES;
  }
  return NO;
}
Build Your React Native App
Replace the code in App.js with the following JavaScript. This code allows you to authorize, refresh your access token, and revoke it.
import React, { Component } from 'react';
import { UIManager, LayoutAnimation } from 'react-native';
import { authorize, refresh, revoke } from 'react-native-app-auth';
import { Page, Button, ButtonContainer, Form, Heading } from './components';

UIManager.setLayoutAnimationEnabledExperimental &&
  UIManager.setLayoutAnimationEnabledExperimental(true);

const scopes = ['openid', 'profile', 'email', 'offline_access'];

type State = {
  hasLoggedInOnce: boolean,
  accessToken: ?string,
  accessTokenExpirationDate: ?string,
  refreshToken: ?string
};

const config = {
  issuer: 'https://{yourOktaDomain}/oauth2/default',
  clientId: '{clientId}',
  redirectUrl: 'com.{yourReversedOktaDomain}:/callback',
  additionalParameters: {},
  scopes: ['openid', 'profile', 'email', 'offline_access']
};

export default class App extends Component<{}, State> {
  state = {
    hasLoggedInOnce: false,
    accessToken: '',
    accessTokenExpirationDate: '',
    refreshToken: ''
  };

  animateState(nextState: $Shape<State>, delay: number = 0) {
    setTimeout(() => {
      this.setState(() => {
        LayoutAnimation.easeInEaseOut();
        return nextState;
      });
    }, delay);
  }

  authorize = async () => {
    try {
      const authState = await authorize(config);
      this.animateState(
        {
          hasLoggedInOnce: true,
          accessToken: authState.accessToken,
          accessTokenExpirationDate: authState.accessTokenExpirationDate,
          refreshToken: authState.refreshToken
        },
        500
      );
    } catch (error) {
      Alert.alert('Failed to log in', error.message);
    }
  };

  refresh = async () => {
    try {
      const authState = await refresh(config, {
        refreshToken: this.state.refreshToken
      });

      this.animateState({
        accessToken: authState.accessToken || this.state.accessToken,
        accessTokenExpirationDate:
          authState.accessTokenExpirationDate || this.state.accessTokenExpirationDate,
        refreshToken: authState.refreshToken || this.state.refreshToken
      });
    } catch (error) {
      Alert.alert('Failed to refresh token', error.message);
    }
  };

  revoke = async () => {
    try {
      await revoke(config, {
        tokenToRevoke: this.state.accessToken,
        sendClientId: true
      });
      this.animateState({
        accessToken: '',
        accessTokenExpirationDate: '',
        refreshToken: ''
      });
    } catch (error) {
      Alert.alert('Failed to revoke token', error.message);
    }
  };

  render() {
    const {state} = this;
    return (
      <Page>
        {!!state.accessToken ? (
          <Form>
            <Form.Label>accessToken</Form.Label>
            <Form.Value>{state.accessToken}</Form.Value>
            <Form.Label>accessTokenExpirationDate</Form.Label>
            <Form.Value>{state.accessTokenExpirationDate}</Form.Value>
            <Form.Label>refreshToken</Form.Label>
            <Form.Value>{state.refreshToken}</Form.Value>
          </Form>
        ) : (
          <Heading>{state.hasLoggedInOnce ? 'Goodbye.' : 'Hello, stranger.'}</Heading>
        )}

        <ButtonContainer>
          {!state.accessToken && (
            <Button onPress={this.authorize} text="Authorize" color="#017CC0"/>
          )}
          {!!state.refreshToken && <Button onPress={this.refresh} text="Refresh" color="#24C2CB"/>}
          {!!state.accessToken && <Button onPress={this.revoke} text="Revoke" color="#EF525B"/>}
        </ButtonContainer>
      </Page>
    );
  }
}
Make sure to adjust config with your settings.
const config = {
  issuer: 'https://{yourOktaDomain}/oauth2/default',
  clientId: '{clientId}',
  redirectUrl: 'com.{yourReversedOktaDomain}:/callback',
  ...
};
Change index.js to use OktaRN as the name of your app.
AppRegistry.registerComponent('OktaRN', () => App);
This code uses styled-components, so you’ll need to install that as a dependency.
NOTE: Make sure to navigate into the root directory of your project before running the commands below.
npm i styled-components
Then copy the components directory into your project’s root directory from Formidable’s example.
svn export https://github.com/FormidableLabs/react-native-app-auth/trunk/Example/components
Grab the background image that’s referenced in the Page.js component too.
svn export https://github.com/FormidableLabs/react-native-app-auth/trunk/Example/assets
Run on iOS Simulator
Run your app with npm run ios.
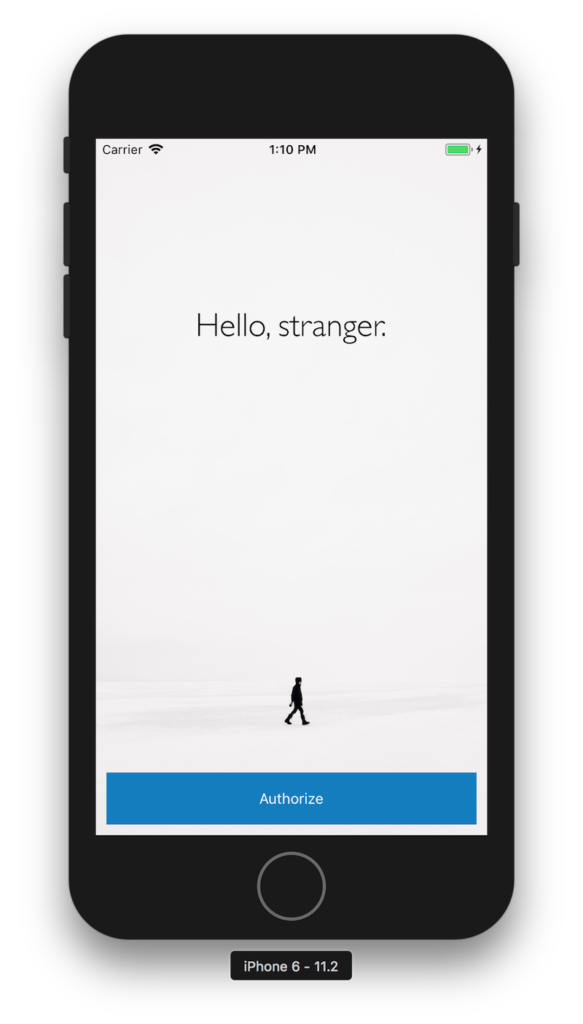
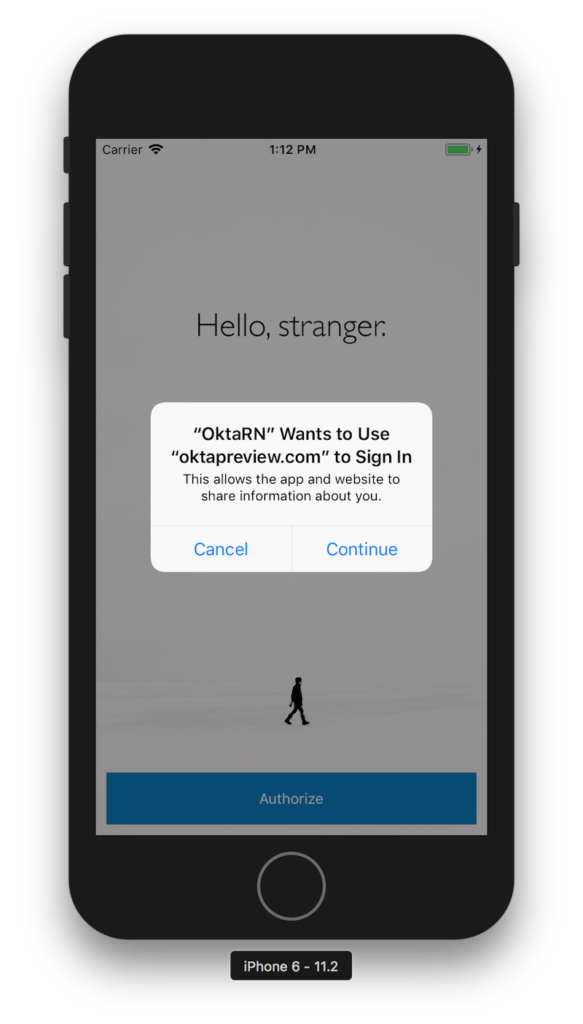
You should see a screen that says “Hello, stranger.” Click on Authorize, and you’ll be prompted to continue or cancel.
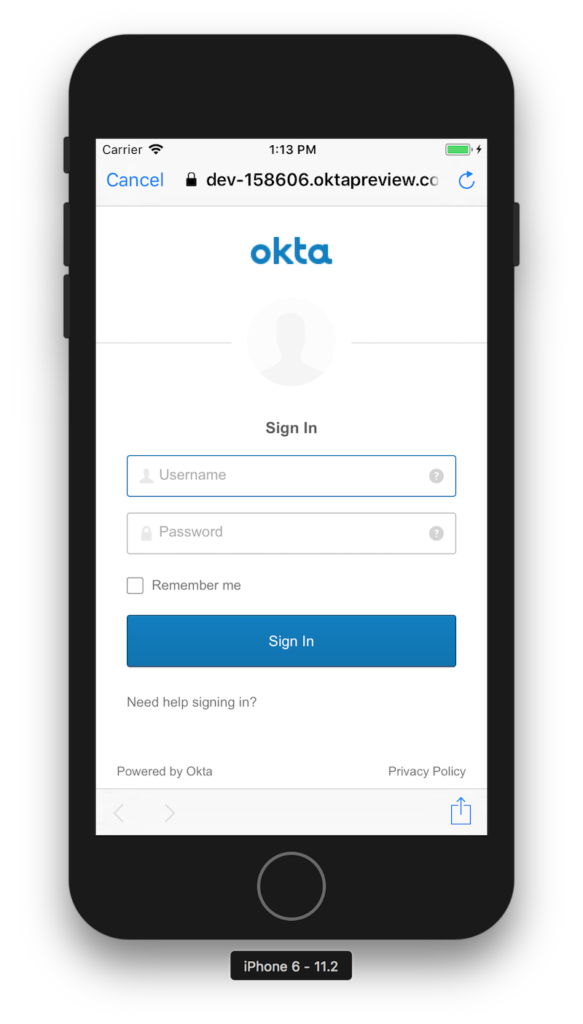
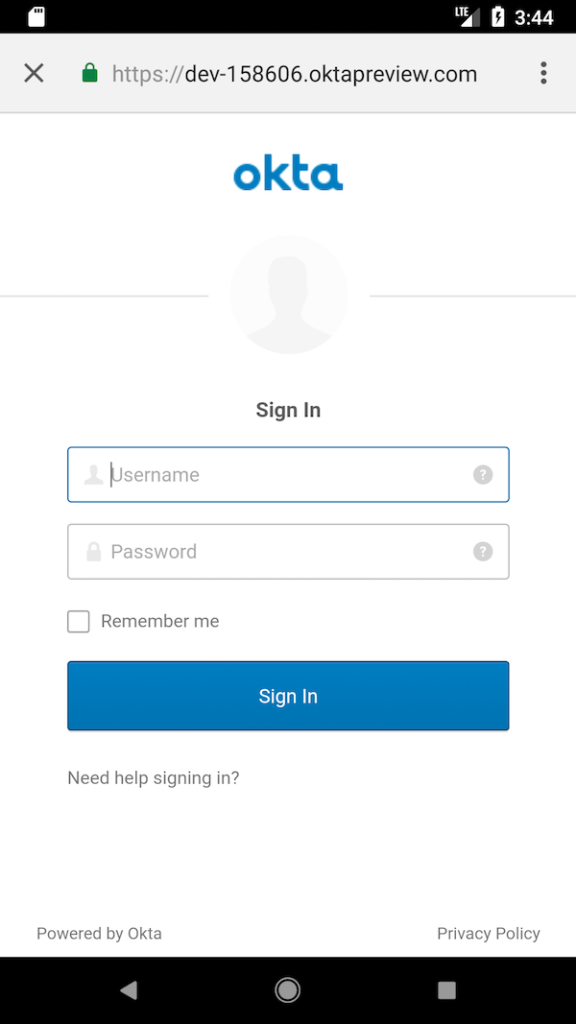
Click Continue and you should see an Okta sign-in form. Enter your credentials, and you’ll be redirected back to the application.
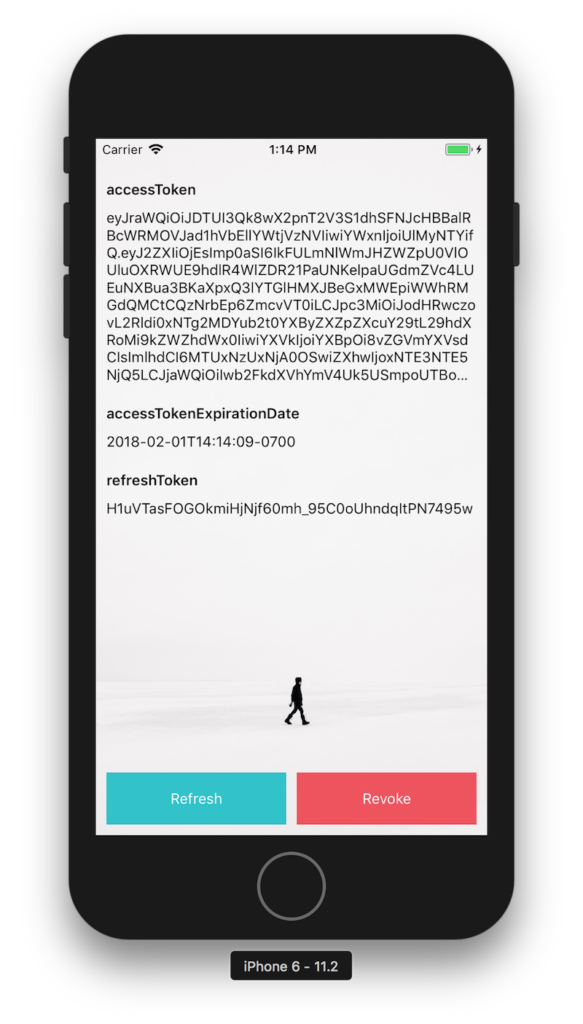
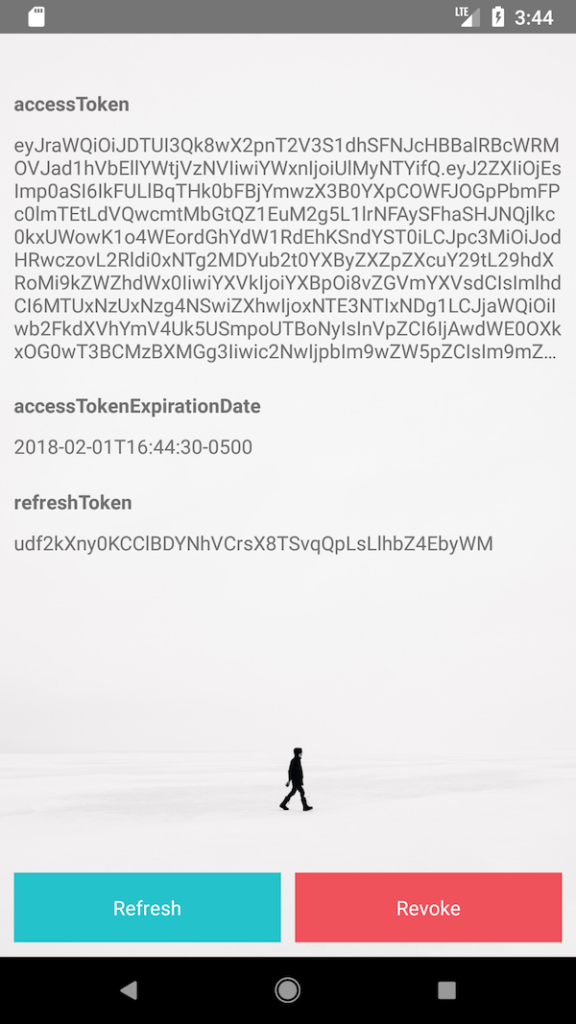
You can click Refresh to watch the values for the access token and expire date change.
TIP: If animations happen slowly in iOS Simulator, toggle Debug > Slow Animations.
Android Setup
To configure the native Android project, start by upgrading the version of Gradle it uses.
cd android
./gradlew wrapper --gradle-version 4.6
React Native App Auth for Android depends on AppAuth-android, but you need to add the correct Android Support library version to your project.
Add the Google Maven repository to your android/build.gradle and upgrade the Android Tools dependency:
buildscript {
    repositories {
        jcenter()
        google()
    }
    dependencies {
        classpath 'com.android.tools.build:gradle:3.0.1'
    }
}
Upgrade the appcompat dependency in android/app/build.gradle to 25.3.1 to match the one expected by AppAuth.
dependencies {
  compile "com.android.support:appcompat-v7:25.3.1"
}
Remove buildToolsVersion "23.0.1" as its no longer necessary.
Update the compileSdkVersion:
android {
  compileSdkVersion 25
}
Add the appAuthRedirectScheme property the defaultConfig in android/app/build.gradle:
android {
  defaultConfig {
    ...
    manifestPlaceholders = [
      appAuthRedirectScheme: '{yourReversedOktaDomain}'
    ]
  }
}
After making this change, my defaultConfig looks as follows.
defaultConfig {
    applicationId "com.oktarn"
    minSdkVersion 16
    targetSdkVersion 22
    versionCode 1
    versionName "1.0"
    ndk {
        abiFilters "armeabi-v7a", "x86"
    }
    manifestPlaceholders = [
        appAuthRedirectScheme: 'com.oktapreview.dev-158606'
    ]
}
Run on Android
To try it on an Android emulator, run npm run android. If you don’t have a phone plugged in or an Android Virtual Device (AVD) running, you’ll see an error:
* What went wrong:
Execution failed for task ':app:installDebug'.
> com.android.builder.testing.api.DeviceException: No connected devices!
To fix this, open Android Studio, choose open existing project, and select the android directory in your project. If you’re prompted to update anything, approve it.
To create a new AVD, navigate to Tools > Android > AVD Manager. Create a new Virtual Device and click Play. I chose a Pixel 2 as you can see from my settings below.
![]()
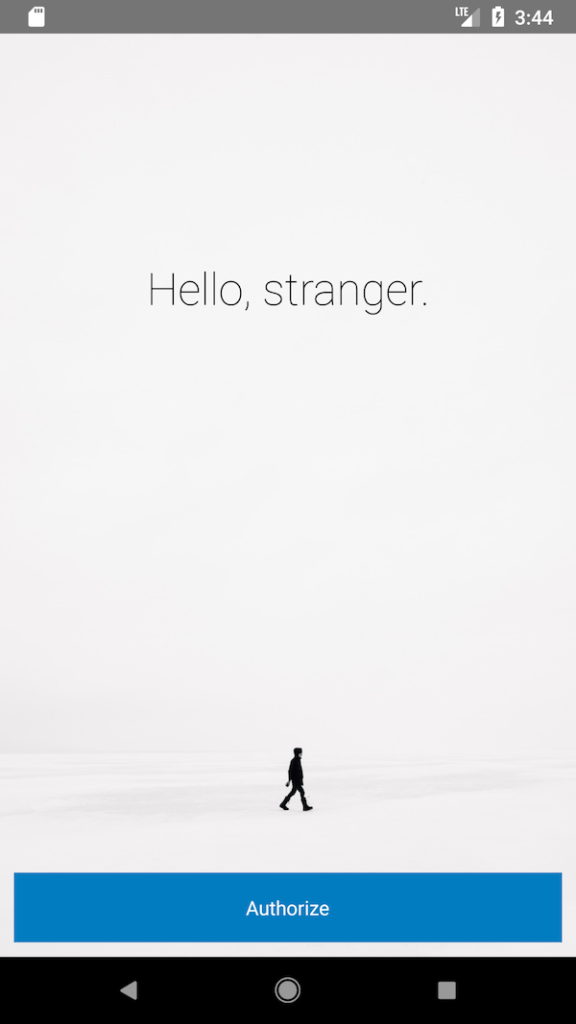
Run npm run android again. You should see a welcome screen and be able to authorize successfully.
TIP: To fix Configuration 'compile' in project ':app' is deprecated. Use 'implementation' instead., change compile under dependencies to implementation. More information can be found in Migrate to Android Plugin for Gradle 3.0.0.
Upgrade to the Latest Release of React Native
The react-native-git-upgrade tool is a handy way to upgrade your project to use the latest versions. Install it and run it.
npm i -g react-native-git-upgrade
react-native-git-upgrade
npm i
Or, you can just change your package.json to have "react-native": "0.54.2" and then run npm i.
Get and View an ID Token
If you’d like to get an ID token in addition to an access token, add idToken as a property of type State and the state variable in App.js.
type State = {
  ...
  idToken: ?string
};

export default class App extends Component<{}, State> {
  ...
  state = {
    ...
    idToken: ''
  };
Then update the authorize() method to set the property from authState. You’ll want to add similar logic in the refresh() and revoke() methods.
authorize = async () => {
  try {
    const authState = await authorize(config);
    this.animateState(
      {
        hasLoggedInOnce: true,
        accessToken: authState.accessToken,
        accessTokenExpirationDate: authState.accessTokenExpirationDate,
        refreshToken: authState.refreshToken,
        idToken: authState.idToken
      },
      500
    );
  } catch (error) {
    Alert.alert('Failed to log in', error.message);
  }
};
To see what’s in your ID token, install buffer.
npm i buffer
Import it at the top of App.js.
import { Buffer } from 'buffer';
Then change the render() method to decode it.
render() {
  const {state} = this;
  if (state.idToken) {
    const jwtBody = state.idToken.split('.')[1];
    const base64 = jwtBody.replace('-', '+').replace('_', '/');
    const decodedJwt = Buffer.from(base64, 'base64');
    state.idTokenJSON = JSON.parse(decodedJwt);
  }
  ...
Finally, add a <Form.Label> and <Form.Value> row after the one that displays the access token.
<Form.Label>ID Token</Form.Label>
<Form.Value>{JSON.stringify(state.idTokenJSON)}</Form.Value>
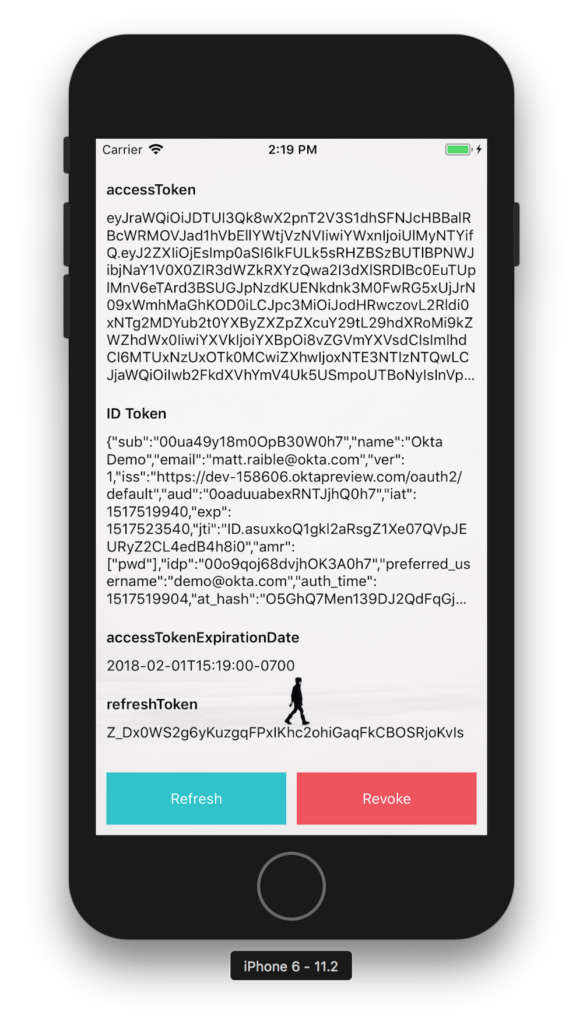
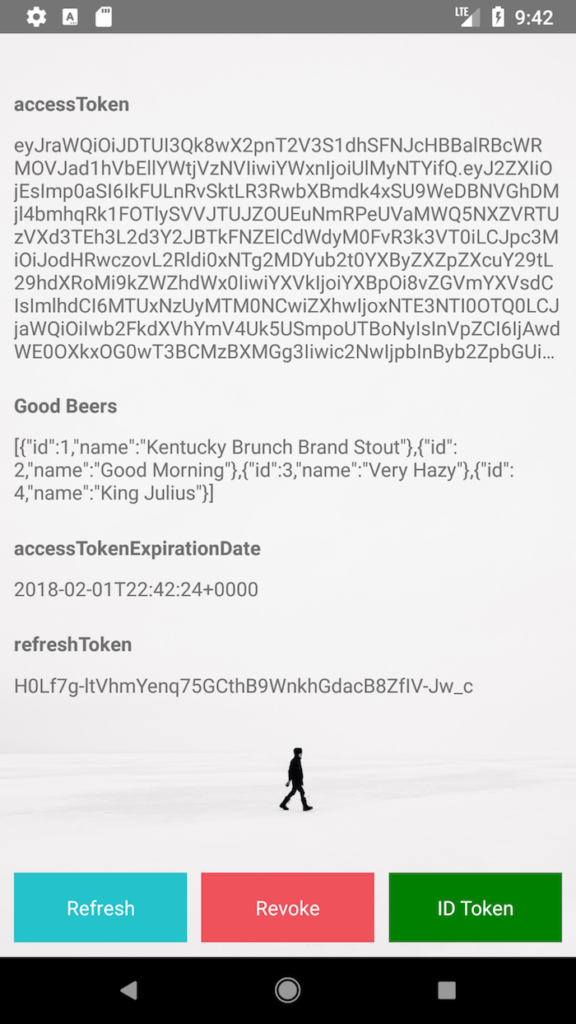
Run npm run ios (or npm run android) and you should see the claims in the ID token after authorizing with Okta. Below is a screenshot proving it works in iOS Simulator.
Call an API with Your Access Token
Now that you have an access token, what can you do with it? You can call an Okta-protected API with it in an Authorization header!
I wrote about how to create a “Good Beers” API in Bootiful Development with Spring Boot and React. You can use the backend of that application to prove it works.
Clone the project from GitHub and check out the okta branch.
git clone https://github.com/oktadeveloper/spring-boot-react-example.git
git checkout okta
Modify spring-boot-react-example/server/src/main/resources/application.properties to set the issuer and clientId.
okta.oauth2.issuer=https://{yourOktaDomain}/oauth2/default
okta.oauth2.clientId={clientId}
NOTE: You’ll need to have Java 8 installed to run this Spring Boot application.
Start the app by running ./mvnw from the server directory.
Back to the React Native client. In App.js, add beers as a property of state.
state = {
  ...
  beers: []
};
Set it to this same value in the revoke() method. Add a fetchGoodBeers() method that uses the access token to call the backend.
fetchGoodBeers = async () => {
  if (this.state.beers.length) {
    // reset to id token if beers is already populated
    this.animateState({beers: []})
  } else {
    fetch('http://localhost:8080/good-beers', {
      headers: {
        'Authorization': `Bearer ${this.state.accessToken}`
      }
    }).then(response => response.json())
      .then(data => {
        this.animateState({beers: data})
      })
      .catch(error => console.error(error));
  }
};
TIP: For this to work in the Android emulator (and on a real phone), you’ll need to change localhost to your IP address.
In the <ButtonContainer> at the bottom, add a “Good Beers” button that allows you to call the API, as well as press it again to view the ID Token.
{!!state.accessToken && <Button onPress={this.fetchGoodBeers} text={!this.state.beers.length ? 'Good Beers' : 'ID Token'} color="#008000" />}
Modify the row where you display the ID token to show the JSON from the API.
<Form.Label>{state.beers.length ? 'Good Beers' : 'ID Token'}</Form.Label>
<Form.Value>{JSON.stringify(state.beers.length ? state.beers : state.idTokenJSON)}</Form.Value>
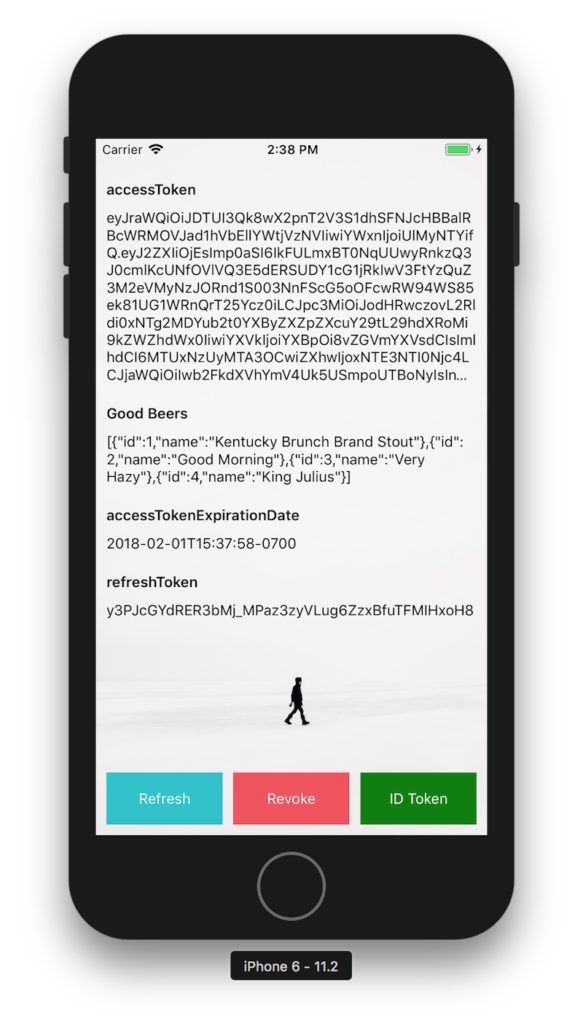
In iOS Simulator, press Command + R to reload everything and you should see the JSON when you click on the Good Beers button. You can reload in Android using Command + M (on Mac, CTRL + M on other operating systems).
NOTE: There is an open issue in react-native-app-auth about revoke not working with Okta because an Authorization header is not sent.
Learn More about React Native and React
I hope you’ve enjoyed this whirlwind tour of how to do authentication with Okta and React Native. You can learn more about React Native on its official site. You can also add to its ~60K stars on GitHub.
You can find the source code for this application at https://github.com/oktadeveloper/okta-react-native-app-auth-example.
If you’re interested in seeing how to do regular React development with Okta, I encourage you to check out the following resources:
- Build a React Application with User Authentication in 15 Minutes
- Build a Preact App with Authentication
- Bootiful Development with Spring Boot and React
If you have any questions about this article, please hit me up on Twitter @mraible.


