Authentication and Sharing in Android with the Google+ API

This tutorial was updated in April 2017 for version 10.2 of Google Play Services
In this tutorial I will show how to connect your Android application to the Google Plus API and use it for login, getting and sharing data.
Find the completed project on GitHub.
Create Android Project
Open Android Studio and create a New Project, naming it as you wish. Click Next, choose Minimum API level 18 and click Next again. Choose Blank Activity as the first activity, name it LoginActivity and click Finish.
Setting up gradle
Open build.gradle (Module) and add apply plugin: 'com.google.gms.google-services' to the end of the file. Add these lines inside dependencies:
    compile 'com.google.android.gms:play-services-auth:10.2.0'
    compile 'com.google.android.gms:play-services-identity:10.2.0'
    compile 'com.google.android.gms:play-services:10.2.0'
Now open build.gradle (Project) and add this line inside dependencies :
classpath 'com.google.gms:google-services:3.0.0'
The next step is adding the file google-services.json to your project. This file contains developer credentials and configuration settings to connect to the Google API Client. You can download this file here, move it inside the app folder of your project and Sync gradle.
Layouts
In the layout folder of your project, delete the content_login.xml file.
Inside activity_login.xml, delete the <include layout="@layout/content_login"/> and replace the Floating Action Button code with these lines. The only thing we need in this layout is the Login Button:
<RelativeLayout
    android:layout_width="fill_parent"
    android:layout_height="match_parent"
    android:layout_weight="1">

    <com.google.android.gms.common.SignInButton
        android:id="@+id/sign_in_button"
        android:layout_width="wrap_content"
        android:layout_height="wrap_content"
        android:layout_centerInParent="true"
        android:visibility="visible"
        tools:visibility="gone" />

    <LinearLayout
        android:id="@+id/sign_out_and_disconnect"
        android:layout_width="fill_parent"
        android:layout_height="wrap_content"
        android:layout_centerInParent="true"
        android:orientation="horizontal"
        android:paddingLeft="16dp"
        android:paddingRight="16dp"
        android:visibility="gone"
        tools:visibility="visible">

        <Button
            android:id="@+id/sign_out_button"
            android:layout_width="0dp"
            android:layout_height="wrap_content"
            android:layout_weight="1"
            android:text="Sign Out"  />

    </LinearLayout>

</RelativeLayout>
Open the LoginActivity class and delete the Floating Action Button code inside the onCreate() method.
Make sure your public class LoginActivity extends AppCompatActivity and implements GoogleApiClient.OnConnectionFailedListener, View.OnClickListener{
Before the onCreate() method add this code:
private static final String TAG = "LoginActivity";
private static final int SIGN_IN_CODE = 9001;
private GoogleApiClient mGoogleApiClient;
private GoogleSignInAccount account;
Inside the onCreate method, before the closing bracket, add these lines which set-up connections to the Google API and bind them to a sign-in button:
findViewById(R.id.sign_in_button).setOnClickListener(this);
        findViewById(R.id.sign_out_button).setOnClickListener(this);

GoogleSignInOptions gso = new GoogleSignInOptions.Builder(GoogleSignInOptions.DEFAULT_SIGN_IN)
                .requestEmail()
                .build();

        mGoogleApiClient = new GoogleApiClient.Builder(this)
                .enableAutoManage(this, this)
                .addApi(Auth.GOOGLE_SIGN_IN_API, gso)
                .build();


        SignInButton signInButton = (SignInButton) findViewById(R.id.sign_in_button);
        signInButton.setSize(SignInButton.SIZE_STANDARD);
After the onCreate() method we are going to implement overridden methods. The first is onStart() and a placeholder for the onConnectionFailed method. Add them inside the LoginActivity class:
@Override
    public void onStart() {
        super.onStart();
        OptionalPendingResult<GoogleSignInResult> optPenRes = Auth.GoogleSignInApi.silentSignIn(mGoogleApiClient);
        if (optPenRes.isDone()) {
            Log.e(TAG, "Yayy!");
            GoogleSignInResult result = optPenRes.get();
            handleSignInResult(result);
        } else {
            optPenRes.setResultCallback(new ResultCallback<GoogleSignInResult>() {
                @Override
                public void onResult(GoogleSignInResult googleSignInResult) {
                    handleSignInResult(googleSignInResult);
                }
            });
        }
    }

@Override
public void onConnectionFailed(ConnectionResult connectionResult) {
}
Do not worry about the errors you will likely see, as we are going to implement these methods later.
The second overridden method is onActivityResult(). Add it after the last method added. The code is as follows:
@Override
    public void onActivityResult(int requestCode, int resultCode, Intent data) {
        super.onActivityResult(requestCode, resultCode, data);
        if (requestCode == SIGN_IN_CODE) {
            GoogleSignInResult result = Auth.GoogleSignInApi.getSignInResultFromIntent(data);
            handleSignInResult(result);
        }
    }}
Next add the handeSignInResult() method after the onActivityResult() method:
private void handleSignInResult(GoogleSignInResult result) {
        Log.e(TAG, "handleSignInResult:" + result.isSuccess());
        if (result.isSuccess()) {
            account = result.getSignInAccount();
            Log.e(TAG,account.getDisplayName());
            Log.e(TAG,account.getEmail());
            Log.e(TAG,account.getId());
            updateUI(true);
        } else {
            updateUI(false);
        }
    }
Now we will add the signIn() and signOut() methods:
private void signIn() {
        Intent signInIntent = Auth.GoogleSignInApi.getSignInIntent(mGoogleApiClient);
        startActivityForResult(signInIntent, SIGN_IN_CODE);
    }

 private void signOut() {
        Auth.GoogleSignInApi.signOut(mGoogleApiClient).setResultCallback(
                new ResultCallback<Status>() {
                    @Override
                    public void onResult(Status status) {
                        updateUI(false);
                    }
                });
    }
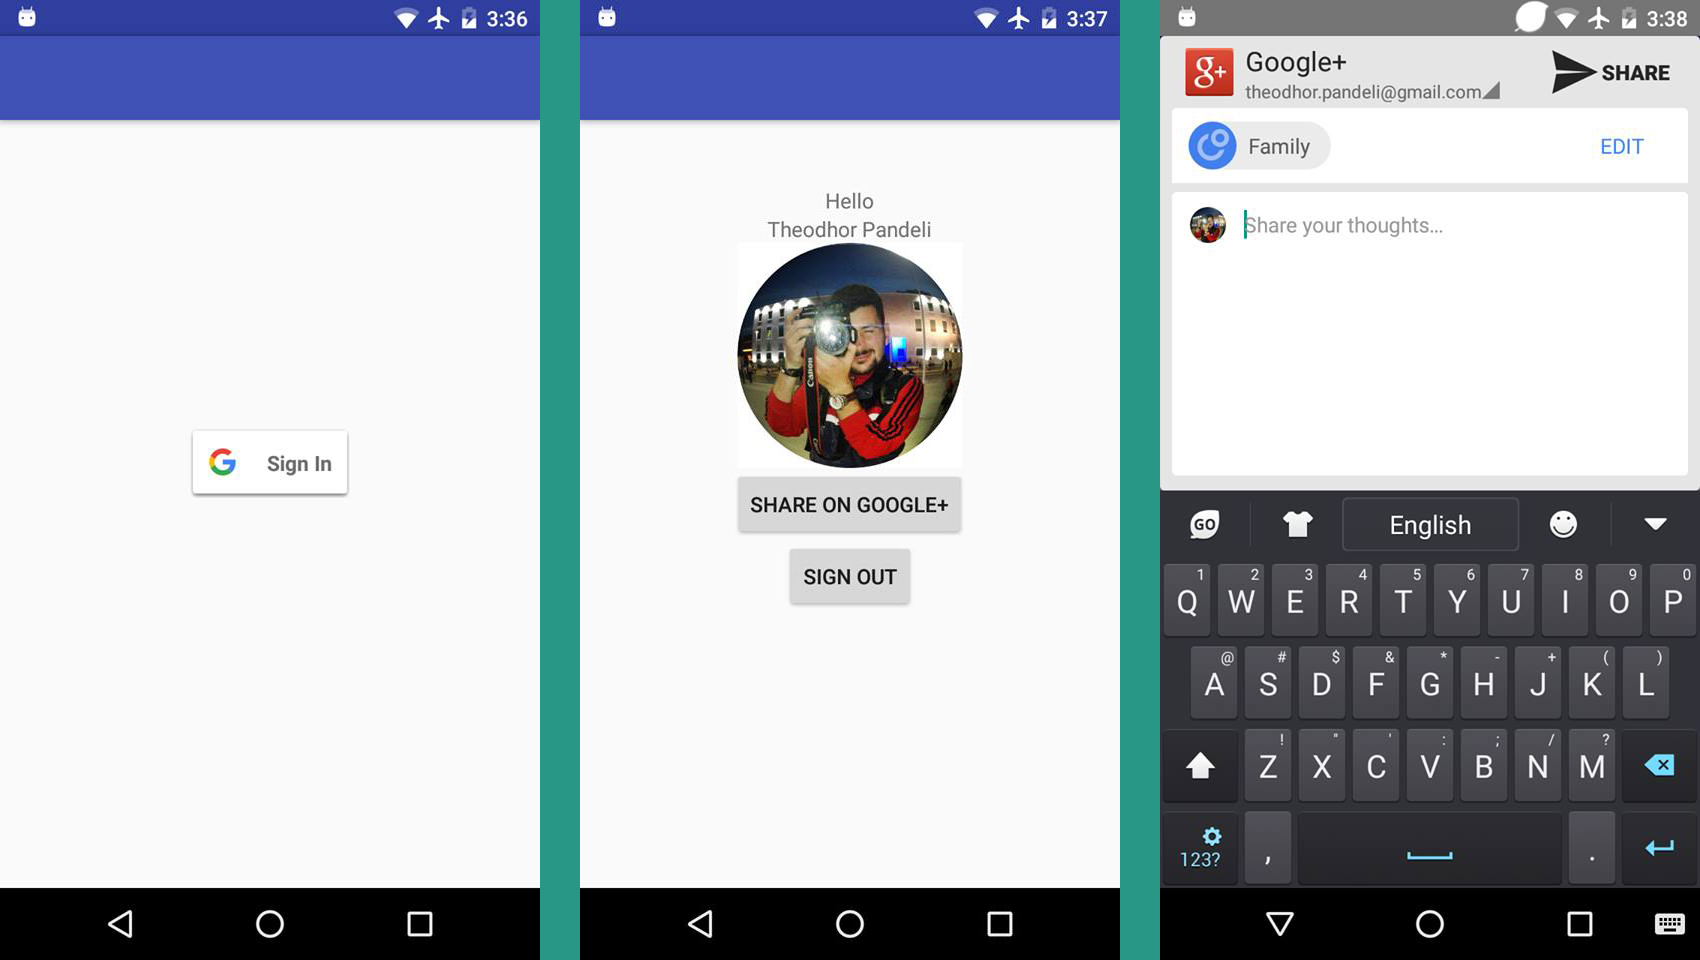
The next method is updateUI(). If the user is signed in, then it changes the visibility of the sign in and sign out buttons, and creates a new Intent called main which represents the next activity opened after we have a successful sign in process. The next activity is MainActivity. Before we switch activities, we should pass some extra data received as account information. We are passing the displayname and imageurl strings to the new intent as extras.
private void updateUI(boolean signedIn) {
        if (signedIn) {
            findViewById(R.id.sign_in_button).setVisibility(View.GONE);
            findViewById(R.id.sign_out_and_disconnect).setVisibility(View.VISIBLE);
            Intent main = new Intent(this, MainActivity.class);
            main.putExtra("displayname", account.getDisplayName());
            main.putExtra("imageurl", account.getPhotoUrl().toString());
            startActivity(main);
            finish();
        } else {
            findViewById(R.id.sign_in_button).setVisibility(View.VISIBLE);
            findViewById(R.id.sign_out_and_disconnect).setVisibility(View.GONE);
        }
    }
The last method we need to implement in our LoginActivity class is onClick(View v):
@Override
    public void onClick(View v) {
        switch (v.getId()) {
            case R.id.sign_in_button:
                signIn();
                break;
            case R.id.sign_out_button:
                signOut();
                break;
        }
    }
The LoginActivity class is now complete.
Main Activity Class
We need another class to display user information and profile picture and to place a Google Plus Share button. Start with creating a new class by right-clicking on your package (e.g: com.example.theodhor.googleplusintegration) and selecting to New -> Activity -> Blank Activity. Leave the default name of MainActivity and click Finish.
Delete the content_main.xml file because we don’t need it.
Open activity_main.xml and replace <include layout="@layout/content_main"/> with:
<LinearLayout
  android:layout_width="match_parent"
  android:layout_height="match_parent"
  android:orientation="vertical"
  android:paddingTop="100dp">

  <TextView
      android:layout_width="wrap_content"
      android:layout_height="wrap_content"
      android:text="Hello"
      android:id="@+id/textView"
      android:layout_gravity="center_horizontal"/>

  <TextView
      android:layout_width="wrap_content"
      android:layout_height="wrap_content"
      android:text="New Text"
      android:id="@+id/nameSurnameText"
      android:layout_gravity="center_horizontal"/>

  <ImageView
      android:layout_width="150dp"
      android:layout_height="150dp"
      android:id="@+id/imageView"
      android:layout_gravity="center_horizontal"/>

  <Button
      android:id="@+id/share_button"
      android:layout_width="wrap_content"
      android:layout_height="wrap_content"
      android:text="Share on Google+"
      android:layout_gravity="center_horizontal"/>

  <Button
      android:id="@+id/sign_out_button"
      android:layout_width="wrap_content"
      android:layout_height="wrap_content"
      android:text="Sign Out"
      android:visibility="visible"
      android:layout_gravity="center"/>

</LinearLayout>
Delete the Floating Action Button code as we won’t use it.
Now open the MainActivity class and we’ll add the code to make it work.
Firstly make sure the class extends and implements classes we will use:
public class MainActivity extends AppCompatActivity implements GoogleApiClient.OnConnectionFailedListener, View.OnClickListener {
Before the onCreate() method add these two lines of code:
GoogleApiClient mGoogleApiClient;
private static final int SIGN_IN_CODE = 9001;
Inside the onCreate() method, replace the Floating Action Button code with these lines:
findViewById(R.id.sign_out_button).setOnClickListener(this);

GoogleSignInOptions gso = new GoogleSignInOptions.Builder(GoogleSignInOptions.DEFAULT_SIGN_IN)
  .requestEmail()
  .build();

mGoogleApiClient = new GoogleApiClient.Builder(this)
  .enableAutoManage(this , this)
  .addApi(Auth.GOOGLE_SIGN_IN_API, gso)
  .build();
Here we created the sign out button and built a new GoogleApiClient that will set which API we’re going to use for our application. In this case we will use Google Authentication since we are performing a Google Plus Login.
Inside the same method, add these lines:
Intent intent = getIntent();
  String nameSurname = intent.getStringExtra("displayname");
  String imageUrl = intent.getStringExtra("imageurl");
  TextView displayName = (TextView)findViewById(R.id.nameSurnameText);
  displayName.setText("" + nameSurname);
Here we create an intent and use it to get the extras sent form the last activity, the of displayname and imageurl strings.
Next we should add the code that creates the share button:
Button shareButton = (Button) findViewById(R.id.share_button);
shareButton.setOnClickListener(this);
Since View.OnClickListener is implemented in this class, we need the overridden method for it. Add it after the onCreate() method:
@Override
public void onClick(View v) {
  switch (v.getId()) {
      case R.id.sign_in_button:
          signIn();
          break;
      case R.id.sign_out_button:
          signOut();
          break;
      case R.id.share_button:
          Intent shareIntent = new PlusShare.Builder(this)
                  .setType("text/plain")
                  .getIntent();
          startActivityForResult(shareIntent, 0);
          break;
  }
}
The remaining methods for this class are signIn() , signOut() and an overridden method called onConnectionFailed() :
@Override
public void onConnectionFailed(ConnectionResult connectionResult) {
}

private void signOut() {
  Auth.GoogleSignInApi.signOut(mGoogleApiClient).setResultCallback(
          new ResultCallback<Status>() {
              @Override
              public void onResult(Status status) {
                  Intent login = new Intent(MainActivity.this, LoginActivity.class);
                  startActivity(login);
                  finish();
              }
          });
}

private void signIn() {
  Intent signInIntent = Auth.GoogleSignInApi.getSignInIntent(mGoogleApiClient);
  startActivityForResult(signInIntent, SIGN_IN_CODE);
}
From LoginActivity we receive the displayname and imageurl as strings. The first will be displayed as text using a TextView but the seconds needs to be displayed as an image. Let’s create another class that uses our imageurl string to download and show a bitmap image.
Create a new class by right-clicking your package and selecting New -> Java Class. I called it DownloadImageTask and it’s code is below:
public class DownloadImageTask extends AsyncTask<String, Void, Bitmap> {
  ImageView bmImage;

  public DownloadImageTask(ImageView mImage) {
      this.bmImage = mImage;
  }

  protected Bitmap doInBackground(String... urls) {
      String url = urls[0];
      Bitmap mBitmap = null;
      try {
          InputStream in = new java.net.URL(url).openStream();
          mBitmap = BitmapFactory.decodeStream(in);
      } catch (Exception e) {
          Log.e("Error", e.getMessage());
          e.printStackTrace();
      }
      return mBitmap;
  }

  protected void onPostExecute(Bitmap result) {
      bmImage.setImageBitmap(result);
  }
}
To call it in our MainActivity class add this line of code inside the onCreate() method:
new DownloadImageTask((ImageView) findViewById(R.id.imageView)).execute(imageUrl);
Enabling Google Play Services
The last task is connecting our application to Google APIs. Click here to browse the Google Services Page.
Add your application name and package name and click Continue.
On the next view add your SHA-1 fingerprint key. If you don’t know how to do this, Google’s help pages are the best source of information.
Click Continue to generate the configuration files we need, download the google-services.json file and move it inside your YourProjectName/app/ or mobile/ directory.
Now you can run the application.
Conclusion
In this tutorial I showed some basic steps to integrate Google Plus into an Android application for authentication and sharing content. There is much more that can be accomplished with this integration such as social graph information, deep linking and over air installs.
I’d love to hear any questions, issues and ideas you may have.


