How to Use Deno’s Built-in Tools
One surprising difference between Deno and Node.js is the number of tools built into the runtime. Other than a Read-Eval-Print Loop (REPL) console, Node.js requires third-party modules to handle most indirect coding activities such as testing and linting. The Deno built-in tools provide almost everything you need out of the box.
Before we begin, a note. Deno is new! Use these tools with caution. Some may be unstable. Few have configuration options. Others may have undesirable side effects such as recursively processing every file in every subdirectory. It’s best to test tools from a dedicated project directory.
Install Deno
Install Deno on macOS or Linux using the following terminal command:
curl -fsSL https://deno.land/x/install/install.sh | sh
Or from Windows Powershell:
iwr https://deno.land/x/install/install.ps1 -useb | iex
Further installation options are provided in the Deno manual.
Enter deno --version to check installation has been successful. The version numbers for the V8 JavaScript engine, TypeScript compiler, and Deno itself are displayed.
Upgrade Deno
Upgrade Deno to the latest version with:
deno upgrade
Or upgrade to specific release such as v1.3.0:
deno upgrade --version 1.30.0
Most of the tools below are available in all versions, but later editions may have more features and bug fixes.
Deno Help
A list of tools and options can be viewed by entering:
deno help
Read-Eval-Print Loop (REPL)
Like Node.js, a REPL expression evaluation console can be accessed by entering deno in your terminal. Each expression you enter returns a result or undefined:
$ deno

Deno 1.3.0
exit using ctrl+d or close()
> const w = 'World';
undefined
> w
World
> console.log(`Hello ${w}!`);
Hello World!
undefined
> close()

$
Previously entered expressions can be re-entered by using the cursor keys to navigate through the expression history.
Dependency Inspector
A tree of all module dependencies can be viewed by entering deno info <module> where <module> is the path/URL to an entry script.
Consider the following lib.js library code with exported hello and sum functions:
// general library: lib.js

/**
 * return "Hello <name>!" string
 * @module lib
 * @param {string} name
 * @returns {string} Hello <name>!
 */
export function hello(name = 'Anonymous') {

  return `Hello ${ name.trim() }!`;

};

/**
 * Returns total of all arguments
 * @module lib
 * @param {...*} args
 * @returns {*} total
 */
export function sum(...args) {

  return [...args].reduce((a, b) => a + b);

}
These can be used from a main entry script, index.js, in the same directory:
// main entry script: index.js

// import lib.js modules
import { hello, sum } from './lib.js';

const
  spr = sum('Site', 'Point', '.com', ' ', 'reader'),
  add = sum(1, 2, 3);

// output
console.log( hello(spr) );
console.log( 'total:', add );
The result of running deno run ./index.js:
$ deno run ./index.js

Hello SitePoint.com reader!
total: 6
The dependencies used by index.js can be examined with deno info ./index.js:
$ deno info ./index.js

local: /home/deno/testing/index.js
type: JavaScript
deps:
file:///home/deno/testing/index.js
  └── file:///home/deno/testing/lib.js
Similarly, the dependencies required by any module URL can be examined, although be aware the module will be downloaded and cached locally on first use. For example:
$ deno info https://deno.land/std/hash/mod.ts

Download https://deno.land/std/hash/mod.ts
Download https://deno.land/std@0.65.0/hash/mod.ts
Download https://deno.land/std@0.65.0/hash/_wasm/hash.ts
Download https://deno.land/std@0.65.0/hash/hasher.ts
Download https://deno.land/std@0.65.0/hash/_wasm/wasm.js
Download https://deno.land/std@0.65.0/encoding/hex.ts
Download https://deno.land/std@0.65.0/encoding/base64.ts
deps:
https://deno.land/std/hash/mod.ts
  └─┬ https://deno.land/std@0.65.0/hash/_wasm/hash.ts
    ├─┬ https://deno.land/std@0.65.0/hash/_wasm/wasm.js
    │ └── https://deno.land/std@0.65.0/encoding/base64.ts
    ├── https://deno.land/std@0.65.0/encoding/hex.ts
    └── https://deno.land/std@0.65.0/encoding/base64.ts
For further information, see the Deno Manual: Dependency Inspector.
Linter (Syntax Checker)
Deno provides a linter to validate JavaScript and TypeScript code. This is an unstable feature which requires the --unstable flag, but no files will be altered when it’s used.
Linting is useful to spot less obvious syntax errors and ensure code adheres with your team’s standards. You may already be using a linter such as ESLint in your editor or from the command line, but Deno provides another option in any environment where it’s installed.
To recursively lint all .js and .ts files in the current and child directories, enter deno lint --unstable:
$ deno lint --unstable

(no-extra-semi) Unnecessary semicolon.
};
 ^
    at /home/deno/testing/lib.js:13:1

Found 1 problem
Alternatively, you can specify one or more files to limit linting. For example:
$ deno lint --unstable ./index.js
$
For further information, see the Deno Manual: Linter. It includes a list of rules you can add to code comments to ignore or enforce specific syntaxes.
Test Runner
Deno has a built-in test runner for unit-testing JavaScript or TypeScript functions.
Tests are defined in any file named <something>test with a .js, .mjs, .ts, .jsx, or .tsx extension. It must make one or more calls to Deno.test and pass a test name string and a testing function. The function can be synchronous or asynchronous and use a variety of assertion utilities to evaluate results.
Create a new test subdirectory with a file named lib.test.js:
// test lib.js library

// assertions
import { assertEquals } from 'https://deno.land/std/testing/asserts.ts';

// lib.js modules
import { hello, sum } from '../lib.js';

// hello function
Deno.test('lib/hello tests', () => {

  assertEquals( hello('Someone'), 'Hello Someone!');
  assertEquals( hello(), 'Hello Anonymous!' );

});

// sum integers
Deno.test('lib/sum integer tests', () => {

  assertEquals( sum(1, 2, 3), 6 );
  assertEquals( sum(1, 2, 3, 4, 5, 6), 21 );

});

// sum strings
Deno.test('lib/sum string tests', () => {

  assertEquals( sum('a', 'b', 'c'), 'abc' );
  assertEquals( sum('A', 'b', 'C'), 'AbC' );

});

// sum mixed values
Deno.test('lib/sum mixed tests', () => {

  assertEquals( sum('a', 1, 2), 'a12' );
  assertEquals( sum(1, 2, 'a'), '3a' );
  assertEquals( sum('an', null, [], 'ed'), 'annulled' );

});
To run all tests from all directories, enter deno test. Or run tests stored in a specific directory with deno test <dir>. For example:
$ deno test ./test

running 4 tests
test lib/hello tests ... ok (4ms)
test lib/sum integer tests ... ok (2ms)
test lib/sum string tests ... ok (2ms)
test lib/sum mixed tests ... ok (2ms)

test result: ok. 4 passed; 0 failed; 0 ignored; 0 measured; 0 filtered out (11ms)

$
A --filter string or regular expression can also be specified to limit tests by name. For example:
$ deno test --filter "hello" ./test

running 1 tests
test lib/hello tests ... ok (4ms)

test result: ok. 1 passed; 0 failed; 0 ignored; 0 measured; 3 filtered out (5ms)
Longer-running tests can be stopped on the first failure by passing a --failfast option.
For further information, see the Deno Manual: Testing. A few third-party test modules are also available, including Merlin and Ruhm, but these still use Deno.test beneath the surface.
V8 Debugger
Deno provides the same V8 engine and debugger as Node.js. It’s possible to attach to the debugger using the Chrome browser or VS Code, then step through code to view variable and object changes.
To launch the debugger, run a script with --inspect or --inspect-brk to stop on the first line. If you need to attach to the debugger from another device on your network, add its IP address and a port or allow a connection from anywhere using --inspect=0.0.0.0:9229. For example:
$ deno run --inspect-brk=0.0.0.0:9229 ./index.js

Debugger listening on ws://0.0.0.0:9229/ws/ceb123...
Debugger session started.
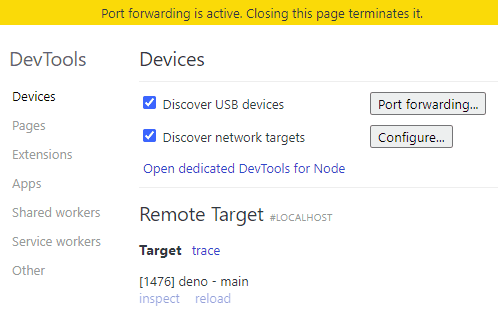
Open deno script will appear as a new Remote Target:

Note: the “dedicated DevTools for Node” will not connect to Deno’s debugger, even though they are similar.
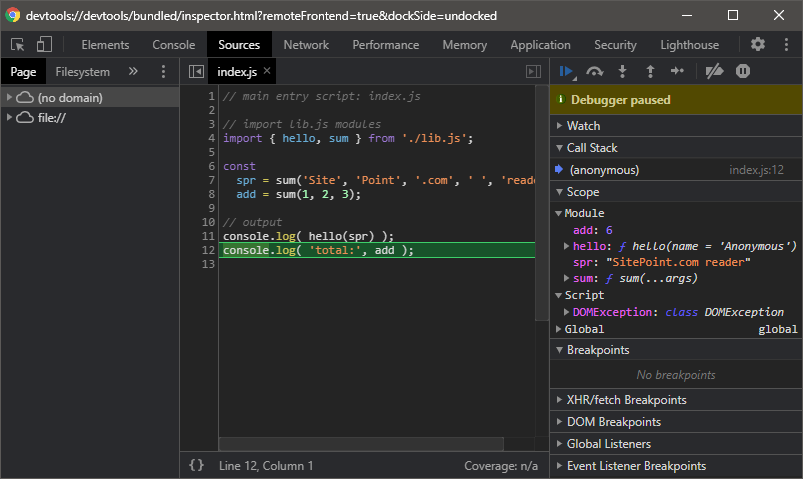
Click the target’s inspect link to launch DevTools. This will be familiar if you’ve used client-side debugging. The Sources tab is the most useful and allows you to step through code execution:

For further information, see the Deno Manual: Debugger.
Code Formatter
The built-in code formatter auto-formats JavaScript and TypeScript code in a similar way to Prettier. Deno’s formatter is also opinionated and it’s not currently possible to configure options.
To use it, enter deno fmt to recursively format every file in every subdirectory. For example:
$ deno fmt

/home/deno/testing/index.js
/home/deno/testing/test/lib.test.js
/home/deno/testing/lib.js
Alternatively, you can format one or more individual files — for example, deno fmt ./index.js.
If you examine the lib.test.js file, you’ll see the formatter has removed some spacing and converted strings to use double-quotes ("):
// hello function
Deno.test("lib/hello tests", () => {
  assertEquals(hello("Someone"), "Hello Someone!");
  assertEquals(hello(), "Hello Anonymous!");
});
Individual blocks of code can be ignored by adding a // deno-fmt-ignore comment. For example:
// deno-fmt-ignore
const bin = [
              1, 0, 0,
              0, 1, 0,
              0, 0, 1,
            ];
Whole files can be ignored by adding a // deno-fmt-ignore-file comment at the top of the code.
For further information, see the Deno Manual: Code Formatter.
Warning! Automated formatting can adversely affect JSDoc comments.
Documentation Generator
Deno can generate documentation from JSDoc comments in the source code, which explain a function’s purpose, parameters, and return value. Currently, Deno will only generate documentation for modules which export functions. For example:
$ deno doc ./lib.js

Defined in file:///home/deno/testing/lib.js:9:0

function hello(name)
  return "Hello <name>!" string
  @module lib
  @param {string} name
  @returns {string} Hello <name>!

Defined in file:///home/deno/testing/lib.js:21:0

function sum(...args)
  Returns total of all arguments
  @module lib
  @param {...*} args
  @returns {*} total

$
Adding a --json flag outputs the documentation in JSON format.
For further information, see the Deno Manual: Documentation Generator.
Script Bundling
Your main script and all its dependencies can be bundled into a single file using:
deno bundle <main-script> <output-script>
For example:
$ deno bundle ./index.js ./index.bundle.js

Bundle file:///home/deno/testing/index.js
Emit "./index.bundle.js" (3.13 KB)
The resulting script can then be executed:
$ deno run ./index.bundle.js

Hello SitePoint.com reader!
total: 6
This could be useful when distributing scripts to end users or deploying a final codebase to a live server.
Note: top-level await calls can fail when bundling, so an async wrapper function must be added. This is a known issue which will be fixed in future Deno releases.
For further information, see the Deno Manual: Bundling.
Script Installer
A Deno script can be globally installed so it can be run from any location in the file system. It’s similar to installing global Node.js modules, but somewhat simpler and easier to use.
The deno install command must be passed:
- Any required runtime permission flags such as
--allow-read,--allow-write, or--allow-net. - An optional installed-script name with
--name <scriptname>. - An optional installation root folder with
--root <path>. If this isn’t set, Deno installs the script to the path set in theDENO_INSTALL_ROOTenvironment variable or$HOME/.deno/bin/. - The module path or URL.
The example script above can be installed with:
$ deno install --name myscript ./index.js

✅ Successfully installed myscript
/home/deno/.deno/bin/myscript
A myscript file is created in the .deno/bin/ directory with the following content:
#!/bin/sh
# generated by deno install
deno "run" "file:///home/deno/testing/index.js" "$@"
myscript can now be run from anywhere on the system. For example:
cd ~
$ myscript

Hello SitePoint.com reader!
total: 6
This process makes it easy to tell users how install your application from a published URL. For example:
deno install --name myapp https://myserver.com/myapp.js
myapp
Deno doesn’t currently provide an uninstall or remove command. The only way to remove the script is to manually delete the generated file from the .deno/bin/ directory or wherever it was installed.
For further information, see the Deno Manual: Script Installer.
A Complete Deno Toolkit?
Deno’s tools are new and some are rudimentary, but a documented “standard” approach has benefits. Node.js offers numerous third-party options, but this can lead to choice paralysis or continual solution switching. Have you stuck with the same Node.js testing suite?
However, be wary: these built-in tools may evolve rapidly as Deno usage grows.
Deno Foundations
Get up to speed with Deno. Our Deno Foundations collection helps you take your first steps into the Deno world and beyond, and we’re adding to it constantly. We’ll bring you the tutorials you need to become a pro. You can always refer to our index as it’s updated at the end of our Introduction to Deno:


